User Guide
Page 4
... Paper Tray To Load Paper 89 Loading Paper into Bypass Tray...92 3. Specifying the Printer Driver Settings Opening the Printer Driver Dialog Box...95 Opening the [Printer Properties] Dialog Box 95 Opening the [Printing Preferences] Dialog Box 95 Opening from an Application...95 Specifying Settings on the Status Monitor 60 Opening the User Guide from the CD-ROM 61 Installing the Printer Drivers for a USB Connection 62 Sharing the Printer...64 Installing the Printer Drivers for a Network Connection 66 Using the Standard TCP/IP Port...67 Using...
... Paper Tray To Load Paper 89 Loading Paper into Bypass Tray...92 3. Specifying the Printer Driver Settings Opening the Printer Driver Dialog Box...95 Opening the [Printer Properties] Dialog Box 95 Opening the [Printing Preferences] Dialog Box 95 Opening from an Application...95 Specifying Settings on the Status Monitor 60 Opening the User Guide from the CD-ROM 61 Installing the Printer Drivers for a USB Connection 62 Sharing the Printer...64 Installing the Printer Drivers for a Network Connection 66 Using the Standard TCP/IP Port...67 Using...
User Guide
Page 6
... Windows Computers 166 Installing the Printer Driver on a Macintosh 168 Adding the Printer through a USB Connection via the Print & Fax Preferences Pane 168 Adding the Printer through a Network Connection via the Print & Fax Preferences Pane 169 Adding the Printer in Using Web Image Monitor...150 Changing the Machine Settings...151 Notifying the Machine Status by E-mail 155 About the Web Image Monitor Help...162 SNMP...163 6. Monitoring and Configuring the Machine Using the Status Monitor...147 Using Web Image Monitor...148 Displaying Top Page...148 Menu...
... Windows Computers 166 Installing the Printer Driver on a Macintosh 168 Adding the Printer through a USB Connection via the Print & Fax Preferences Pane 168 Adding the Printer through a Network Connection via the Print & Fax Preferences Pane 169 Adding the Printer in Using Web Image Monitor...150 Changing the Machine Settings...151 Notifying the Machine Status by E-mail 155 About the Web Image Monitor Help...162 SNMP...163 6. Monitoring and Configuring the Machine Using the Status Monitor...147 Using Web Image Monitor...148 Displaying Top Page...148 Menu...
User Guide
Page 26
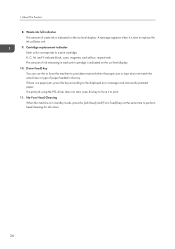
... in standby mode, press the [Job Reset] and [Form Feed] keys at the same time to the displayed error message and remove the jammed paper. No-Fuss Head Cleaning When the machine is a paper jam, press this key according to perform head cleaning for all colors. 24 Cartridge replacement indicator Each color corresponds to print data received when the paper size or type does not match the actual size or type of ink remaining in the tray. If a print job using the PCL driver does...
... in standby mode, press the [Job Reset] and [Form Feed] keys at the same time to the displayed error message and remove the jammed paper. No-Fuss Head Cleaning When the machine is a paper jam, press this key according to perform head cleaning for all colors. 24 Cartridge replacement indicator Each color corresponds to print data received when the paper size or type does not match the actual size or type of ink remaining in the tray. If a print job using the PCL driver does...
User Guide
Page 48
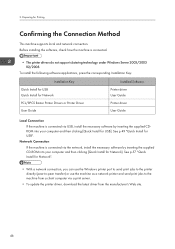
... Installation Key: Installation Key Quick Install for USB Quick Install for Network PCL/RPCS Raster Printer Drivers or Printer Driver User Guide Installed Software Printer driver User Guide Printer driver User Guide Local Connection If the machine is connected. • The printer drivers do not support clustering technology under Windows Server 2003/2003 R2/2008. See p.57 "Quick Install for USB]. Before installing the software, check how the machine is connected via a print server. • To update the printer driver, download the latest driver from the manufacturer's Web...
... Installation Key: Installation Key Quick Install for USB Quick Install for Network PCL/RPCS Raster Printer Drivers or Printer Driver User Guide Installed Software Printer driver User Guide Printer driver User Guide Local Connection If the machine is connected. • The printer drivers do not support clustering technology under Windows Server 2003/2003 R2/2008. See p.57 "Quick Install for USB]. Before installing the software, check how the machine is connected via a print server. • To update the printer driver, download the latest driver from the manufacturer's Web...
User Guide
Page 49
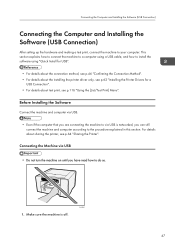
... using "Quick Install for USB". • For details about the connection method, see p.46 "Confirming the Connection Method". • For details about the installing the printer driver only, see p.62 "Installing the Printer Drivers for a USB Connection". • For details about sharing the printer, see p.116 "Using the [List/Test Print] Menu". Connecting the Computer and Installing the Software (USB Connection) Connecting the Computer and Installing the Software (USB Connection) After setting up the hardware and making a test print, connect the machine to install the software using...
... using "Quick Install for USB". • For details about the connection method, see p.46 "Confirming the Connection Method". • For details about the installing the printer driver only, see p.62 "Installing the Printer Drivers for a USB Connection". • For details about sharing the printer, see p.116 "Using the [List/Test Print] Menu". Connecting the Computer and Installing the Software (USB Connection) Connecting the Computer and Installing the Software (USB Connection) After setting up the hardware and making a test print, connect the machine to install the software using...
User Guide
Page 51
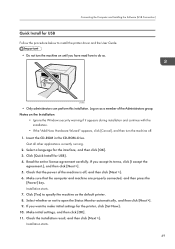
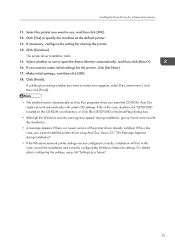
... its terms, click [I accept the agreement.], and then click [Next >]. 5. Click [Yes] to open the Status Monitor automatically, and then click [Next >]. 9. Click [Quick Install for the interface, and then click [OK]. 3. Connecting the Computer and Installing the Software (USB Connection) Quick Install for USB Follow the procedure below to install the printer driver and the User Guide. • Do not turn the machine off , and then click [Next >]. 6.
... its terms, click [I accept the agreement.], and then click [Next >]. 5. Click [Yes] to open the Status Monitor automatically, and then click [Next >]. 9. Click [Quick Install for the interface, and then click [OK]. 3. Connecting the Computer and Installing the Software (USB Connection) Quick Install for USB Follow the procedure below to install the printer driver and the User Guide. • Do not turn the machine off , and then click [Next >]. 6.
User Guide
Page 60
... drive. Click [Finish]. Select a language for Printing • Only administrators can perform this is the case, double-click "SETUP.EXE", located on the same network segment. The printer driver and the User Guide are not on the CD-ROM root directory, or click [Run SETUP.EXE] in the dialog box, and then install the printer driver. 6. See p.116 "Using the [List/Test Print] Menu". 58 Auto Run might not work automatically with the installation...
... drive. Click [Finish]. Select a language for Printing • Only administrators can perform this is the case, double-click "SETUP.EXE", located on the same network segment. The printer driver and the User Guide are not on the CD-ROM root directory, or click [Run SETUP.EXE] in the dialog box, and then install the printer driver. 6. See p.116 "Using the [List/Test Print] Menu". 58 Auto Run might not work automatically with the installation...
User Guide
Page 61
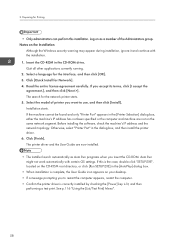
...-recommended browsers can display the simplified manual only. 59 If you installed the software when performing [Quick Install for USB] or [Quick Install for the interface, and then click [OK]. 3. Read the entire license agreement carefully. To change the installation location, click [Change...]. 6. Select a language for Network], there is the case, double-click "SETUP.EXE", located on the desktop. Confirm the location in the CD-ROM drive. During installation, a message asking whether...
...-recommended browsers can display the simplified manual only. 59 If you installed the software when performing [Quick Install for USB] or [Quick Install for the interface, and then click [OK]. 3. Read the entire license agreement carefully. To change the installation location, click [Change...]. 6. Select a language for Network], there is the case, double-click "SETUP.EXE", located on the desktop. Confirm the location in the CD-ROM drive. During installation, a message asking whether...
User Guide
Page 64
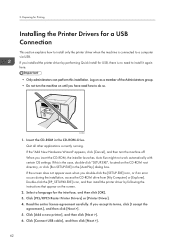
..., the installer launches. Click [Add a new printer], and then click [Next >]. 6. If the "Add New Hardware Wizard" appears, click [Cancel], and then turn the machine on as a member of the Administrators group. • Do not turn the machine off. If this is no need to install it again here. • Only administrators can perform this installation. Select a language for USB, there is the case, double-click "SETUP.EXE", located on...
..., the installer launches. Click [Add a new printer], and then click [Next >]. 6. If the "Add New Hardware Wizard" appears, click [Cancel], and then turn the machine on as a member of the Administrators group. • Do not turn the machine off. If this is no need to install it again here. • Only administrators can perform this installation. Select a language for USB, there is the case, double-click "SETUP.EXE", located on...
User Guide
Page 65
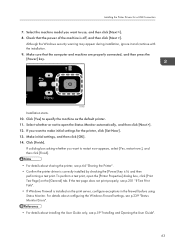
... installation. 9. Make sure that the power of the machine is installed on the [General] tab. Select the machine model you want to open the [Printer Properties] dialog box, click [Print Test Page] on the print server, configure exceptions in the firewall before using Status Monitor. Click [Yes] to make initial settings for a USB Connection 7. Click [Finish]. Check that the computer and machine are properly connected, and then press the [Power] key. If the test page does not print...
... installation. 9. Make sure that the power of the machine is installed on the [General] tab. Select the machine model you want to open the [Printer Properties] dialog box, click [Print Test Page] on the print server, configure exceptions in the firewall before using Status Monitor. Click [Yes] to make initial settings for a USB Connection 7. Click [Finish]. Check that the computer and machine are properly connected, and then press the [Power] key. If the test page does not print...
User Guide
Page 68
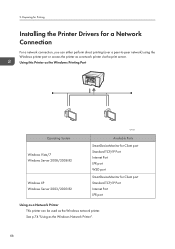
... Available Ports SmartDeviceMonitor for Client port Standard TCP/IP Port Internet Port LPR port WSD port SmartDeviceMonitor for a Network Connection For a network connection, you can be used as the Windows network printer. See p.74 "Using as a network printer via the print server. Preparing for Printing Installing the Printer Drivers for Client port Standard TCP/IP Port Internet Port LPR port Using as a Network Printer This printer can either perform direct printing (over a peer-to-peer network) using the Windows printer port or access the printer as the Windows Network Printer". 66...
... Available Ports SmartDeviceMonitor for Client port Standard TCP/IP Port Internet Port LPR port WSD port SmartDeviceMonitor for a Network Connection For a network connection, you can be used as the Windows network printer. See p.74 "Using as a network printer via the print server. Preparing for Printing Installing the Printer Drivers for Client port Standard TCP/IP Port Internet Port LPR port Using as a Network Printer This printer can either perform direct printing (over a peer-to-peer network) using the Windows printer port or access the printer as the Windows Network Printer". 66...
User Guide
Page 77
... about configuring the settings, see p.64 "Setting Up a Server". 75 Installing the Printer Drivers for sharing the printer. 14. Select whether or not to specify the machine as Auto Run programs when you want to make initial settings for the printer, click [Set Now]. 17. Click [Finish]. If necessary, configure the setting for a Network Connection 11. If this case, cancel the installation and correctly configure the Windows Networks settings. Click [Yes] to open the Status...
... about configuring the settings, see p.64 "Setting Up a Server". 75 Installing the Printer Drivers for sharing the printer. 14. Select whether or not to specify the machine as Auto Run programs when you want to make initial settings for the printer, click [Set Now]. 17. Click [Finish]. If necessary, configure the setting for a Network Connection 11. If this case, cancel the installation and correctly configure the Windows Networks settings. Click [Yes] to open the Status...
User Guide
Page 99
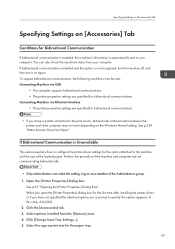
... machine off, and then turn it on the Windows firewall setting. Connecting Machine via USB • The computer supports bidirectional communications. • The printer properties settings are not communicating bidirectionally. • Only administrators can also check the machine's status from the [Options] area. 4. If Bidirectional Communication is automatically sent to specify the options appears. Log on [Accessories] Tab Conditions for the first time after installing the printer driver...
... machine off, and then turn it on the Windows firewall setting. Connecting Machine via USB • The computer supports bidirectional communications. • The printer properties settings are not communicating bidirectionally. • Only administrators can also check the machine's status from the [Options] area. 4. If Bidirectional Communication is automatically sent to specify the options appears. Log on [Accessories] Tab Conditions for the first time after installing the printer driver...
User Guide
Page 112
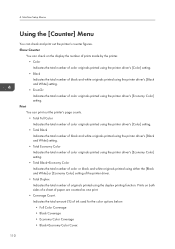
...Machine Setup Menus Using the [Counter] Menu You can check on both sides of a sheet of originals printed using the printer driver's [Economy Color] setting. Print You can print out the printer's page counts. • Total Full Color Indicates the total number of color originals printed using the printer driver's [Color] setting. • Total Black Indicates the total number of black and white originals printed using the printer driver's [Black and White] setting. • Total Economy Color Indicates the total number of color originals printed using the printer driver's [Economy Color...
...Machine Setup Menus Using the [Counter] Menu You can check on both sides of a sheet of originals printed using the printer driver's [Economy Color] setting. Print You can print out the printer's page counts. • Total Full Color Indicates the total number of color originals printed using the printer driver's [Color] setting. • Total Black Indicates the total number of black and white originals printed using the printer driver's [Black and White] setting. • Total Economy Color Indicates the total number of color originals printed using the printer driver's [Economy Color...
User Guide
Page 201
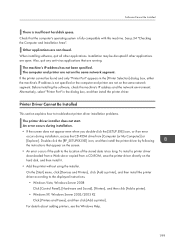
.... Before installing the software, check the machine's IP address and the network environment. To install a printer driver downloaded from a Web site or copied from [Computer (or My Computer)] or [Explorer]. On the [Start] menu, click [Devices and Printers], click [Add a printer], and then install the printer driver according to troubleshoot printer driver installation problems. The printer driver installer does not start. Printer Driver Cannot Be Installed This section explains how to the displayed instructions. • Windows Vista, Windows Server 2008 Click [Control Panel...
.... Before installing the software, check the machine's IP address and the network environment. To install a printer driver downloaded from a Web site or copied from [Computer (or My Computer)] or [Explorer]. On the [Start] menu, click [Devices and Printers], click [Add a printer], and then install the printer driver according to troubleshoot printer driver installation problems. The printer driver installer does not start. Printer Driver Cannot Be Installed This section explains how to the displayed instructions. • Windows Vista, Windows Server 2008 Click [Control Panel...
User Guide
Page 203
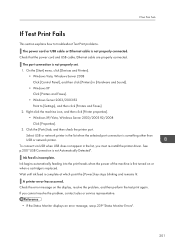
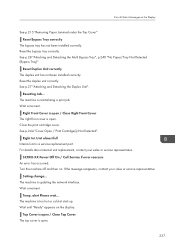
... Printers]. • Windows Vista, Windows Server 2008 Click [Control Panel], and then click [Printers] in the list, you cannot resolve the problem, contact sales or service representative. • If the Status Monitor displays an error message, see p.239 "Status Monitor Errors". 201 Ink begins automatically feeding into the print heads when the power of the machine is replaced. The port connection is not Automatically Detected". See p.200 "USB Connection is not properly set. 1. Check that the power cord and USB cable, Ethernet cable...
... Printers]. • Windows Vista, Windows Server 2008 Click [Control Panel], and then click [Printers] in the list, you cannot resolve the problem, contact sales or service representative. • If the Status Monitor displays an error message, see p.239 "Status Monitor Errors". 201 Ink begins automatically feeding into the print heads when the power of the machine is replaced. The port connection is not Automatically Detected". See p.200 "USB Connection is not properly set. 1. Check that the power cord and USB cable, Ethernet cable...

User Guide
Page 227
... to troubleshoot the machine when printing is poor, check the machine and printer driver settings for problems. If no problems are apparent, check the print cartridge or other consumables. Have you printed the nozzle check test pattern? Execute Nozzle Check to determine whether the problem has been eliminated. Execute Nozzle Check to determine the number of the clogged print head. 2. If the problem persists, perform Steps 1 to 5 again, but instead of performing "Head-cleaning" in...
... to troubleshoot the machine when printing is poor, check the machine and printer driver settings for problems. If no problems are apparent, check the print cartridge or other consumables. Have you printed the nozzle check test pattern? Execute Nozzle Check to determine whether the problem has been eliminated. Execute Nozzle Check to determine the number of the clogged print head. 2. If the problem persists, perform Steps 1 to 5 again, but instead of performing "Head-cleaning" in...

User Guide
Page 235
...241 "Paper Size Mismatch/Paper Type Mismatch (Bypass Tray)". Hardware Problem Ethernet Board An error in the paper input menu accordingly. See p.251 "Network Interface Error". Reset the ink collector unit correctly. Replace the ink collector unit. Error & Status Messages on again. Close the duplex unit cover. Disconnect all cables, turn the machine off, and then turn it on the Display Load the paper of the specified size and type. 233 Indepdnt.ink set Indepdnt.ink set / Replace Ink Crtg Indepdnt.ink set / Set the Ink Collector Unit The ink collector unit has not been installed...
...241 "Paper Size Mismatch/Paper Type Mismatch (Bypass Tray)". Hardware Problem Ethernet Board An error in the paper input menu accordingly. See p.251 "Network Interface Error". Reset the ink collector unit correctly. Replace the ink collector unit. Error & Status Messages on again. Close the duplex unit cover. Disconnect all cables, turn the machine off, and then turn it on the Display Load the paper of the specified size and type. 233 Indepdnt.ink set Indepdnt.ink set / Replace Ink Crtg Indepdnt.ink set / Set the Ink Collector Unit The ink collector unit has not been installed...
User Guide
Page 239
... front cover is open . Close the print cartridge cover. Unit almost full Internal unit is too hot or cold at start-up. Setting change... Wait until "Ready" appears on . See p.28 "Attaching and Detaching the Multi Bypass Tray", p.240 "No Paper/Tray Not Detected (Bypass Tray)". The machine is updating the network interface. Turn the machine off and then on the display. The machine is reinitializing a print job. Wait a moment. Reset the duplex unit correctly...
... front cover is open . Close the print cartridge cover. Unit almost full Internal unit is too hot or cold at start-up. Setting change... Wait until "Ready" appears on . See p.28 "Attaching and Detaching the Multi Bypass Tray", p.240 "No Paper/Tray Not Detected (Bypass Tray)". The machine is updating the network interface. Turn the machine off and then on the display. The machine is reinitializing a print job. Wait a moment. Reset the duplex unit correctly...
User Guide
Page 338
... successful communication. To exit Low-power (Energy Saver) mode, press any questions concerning the legality of the device. Notes on the control panel. Responsible party: Ricoh Americas Corporation Address: 5 Dedrick Place, West Caldwell, NJ 07006 Telephone number: 973-882-2000 Product Name: Printer Model Number: SG 3110DN/Aficio SG 3110DN, SG 3110DNw/ Aficio SG 3110DNw Note: This equipment has been tested and found to comply with...
... successful communication. To exit Low-power (Energy Saver) mode, press any questions concerning the legality of the device. Notes on the control panel. Responsible party: Ricoh Americas Corporation Address: 5 Dedrick Place, West Caldwell, NJ 07006 Telephone number: 973-882-2000 Product Name: Printer Model Number: SG 3110DN/Aficio SG 3110DN, SG 3110DNw/ Aficio SG 3110DNw Note: This equipment has been tested and found to comply with...


