Manuals
Page 1
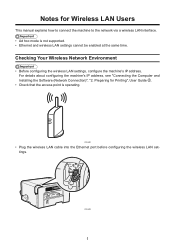
... LAN cable into the Ethernet port before configuring the wireless LAN settings. For details about configuring the machine's IP address, see "Connecting the Computer and Installing the Software (Network Connection)", "2. CHV602 1 Notes for Printing", User Guide . • Check that the access point is not supported. • Ethernet and wireless LAN settings...
... LAN cable into the Ethernet port before configuring the wireless LAN settings. For details about configuring the machine's IP address, see "Connecting the Computer and Installing the Software (Network Connection)", "2. CHV602 1 Notes for Printing", User Guide . • Check that the access point is not supported. • Ethernet and wireless LAN settings...

User Guide
Page 3
... Read This Manual...14 Symbols...14 Notes...14 Model-Specific Information...15 Available Units and Options for Printing Setup Procedure...33 Checking the Computer and Installation Area 34 The area where the machine is to be placed 34 Checking the power source...37 Checking the Computer to Components...17 Front View... Tray 28 Turning On/Off the Power...31 2. About This Product Guide to be Connected 38 Checking the Supplied Items and Unpacking the Machine 39 Installing the Print Cartridges...41 Plugging in the Power Cord and Turning the Power On 43 1 Preparing for Each Model 15 1.
... Read This Manual...14 Symbols...14 Notes...14 Model-Specific Information...15 Available Units and Options for Printing Setup Procedure...33 Checking the Computer and Installation Area 34 The area where the machine is to be placed 34 Checking the power source...37 Checking the Computer to Components...17 Front View... Tray 28 Turning On/Off the Power...31 2. About This Product Guide to be Connected 38 Checking the Supplied Items and Unpacking the Machine 39 Installing the Print Cartridges...41 Plugging in the Power Cord and Turning the Power On 43 1 Preparing for Each Model 15 1.
User Guide
Page 4
...the SmartDeviceMonitor for Client Port 72 Using as the Windows Network Printer...74 Downloading Utility Software...76 SmartDeviceMonitor for Network...57 Installing and Opening the User Guide...59 Opening the User Guide When an Error Message Appears on [Accessories] Tab...97 ... Method...46 Connecting the Computer and Installing the Software (USB Connection 47 Before Installing the Software...47 Quick Install for USB...49 Connecting the Computer and Installing the Software (Network Connection 51 Before Installing the Software...51 Quick Install for Client...76 Paper...77 Loadable Paper...
...the SmartDeviceMonitor for Client Port 72 Using as the Windows Network Printer...74 Downloading Utility Software...76 SmartDeviceMonitor for Network...57 Installing and Opening the User Guide...59 Opening the User Guide When an Error Message Appears on [Accessories] Tab...97 ... Method...46 Connecting the Computer and Installing the Software (USB Connection 47 Before Installing the Software...47 Quick Install for USB...49 Connecting the Computer and Installing the Software (Network Connection 51 Before Installing the Software...51 Quick Install for Client...76 Paper...77 Loadable Paper...

User Guide
Page 6
...]...143 Using the [Language] Menu...145 5. Using the Machine with a Macintosh System Requirements for Macintosh...165 Instructions Applicable to Both Macintosh and Windows Computers 166 Installing the Printer Driver on a Macintosh 168 Adding the Printer through a USB Connection via the Print & Fax Preferences Pane 168 Adding the Printer through a Network Connection...
...]...143 Using the [Language] Menu...145 5. Using the Machine with a Macintosh System Requirements for Macintosh...165 Instructions Applicable to Both Macintosh and Windows Computers 166 Installing the Printer Driver on a Macintosh 168 Adding the Printer through a USB Connection via the Print & Fax Preferences Pane 168 Adding the Printer through a Network Connection...
User Guide
Page 7
......178 RPCS Raster Printer Drivers for Macintosh 178 Manuals for a Long Period of Time 196 8. Troubleshooting Software Cannot Be Installed...197 Confirming Installation...197 Checking Your Computer Environment...197 Printer Driver Cannot Be Installed...199 USB Connection is not Automatically Detected 200 If Test Print Fails...201 Uninstalling...202 Uninstalling the Printer Driver...
......178 RPCS Raster Printer Drivers for Macintosh 178 Manuals for a Long Period of Time 196 8. Troubleshooting Software Cannot Be Installed...197 Confirming Installation...197 Checking Your Computer Environment...197 Printer Driver Cannot Be Installed...199 USB Connection is not Automatically Detected 200 If Test Print Fails...201 Uninstalling...202 Uninstalling the Printer Driver...

User Guide
Page 8
... Not Match the Displayed Image 227 Positions Do Not Match the Displayed Image 228 Other Problems...228 Checking the Consumables...230 If a Message Appears during Installation...231 Error & Status Messages on the Display...232 Error Messages...232 Status Monitor Errors...239 Status Monitor Does Not Open...239 No Response from Machine...
... Not Match the Displayed Image 227 Positions Do Not Match the Displayed Image 228 Other Problems...228 Checking the Consumables...230 If a Message Appears during Installation...231 Error & Status Messages on the Display...232 Error Messages...232 Status Monitor Errors...239 Status Monitor Does Not Open...239 No Response from Machine...
User Guide
Page 11
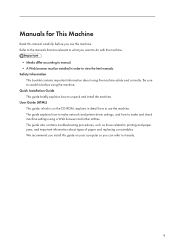
... machine settings using a Web browser and other utilities. Safety Information This booklet contains important information about types of paper and replacing consumables. Quick Installation Guide This guide briefly explains how to it easily. 9 We recommend you use the machine. Be sure to view the html manuals. Refer...you want to do with the machine. • Media differ according to manual. • A Web browser must be installed in order to read this before you install this guide on the CD-ROM, explains in detail how to make network and printer driver settings, and how to use...
... machine settings using a Web browser and other utilities. Safety Information This booklet contains important information about types of paper and replacing consumables. Quick Installation Guide This guide briefly explains how to it easily. 9 We recommend you use the machine. Be sure to view the html manuals. Refer...you want to do with the machine. • Media differ according to manual. • A Web browser must be installed in order to read this before you install this guide on the CD-ROM, explains in detail how to make network and printer driver settings, and how to use...

User Guide
Page 12
Manuals List Manual Name Quick Installation Guide User Guide Safety Information Printed Manuals Provided Yes No Yes HTML Manuals Provided No Yes No 10
Manuals List Manual Name Quick Installation Guide User Guide Safety Information Printed Manuals Provided Yes No Yes HTML Manuals Provided No Yes No 10

User Guide
Page 14
... 1. Toothed rubber belt 2. Feed belt • Take care not to estimate the number of pages printed. If they fall inside the machine. • After you install the print cartridge and turn off the power. • You can place up sooner than 2.5 kg (5.6 lb.) on the machine. • Do not place unsteady...
... 1. Toothed rubber belt 2. Feed belt • Take care not to estimate the number of pages printed. If they fall inside the machine. • After you install the print cartridge and turn off the power. • You can place up sooner than 2.5 kg (5.6 lb.) on the machine. • Do not place unsteady...

User Guide
Page 20
Open this cover only when you need to clear paper jams inside the machine. 18 Rear cover Open this cover closed. Print Cartridge (yellow) 9. Right Front Cover Normally, keep this to install or replace the print cartridge or the ink collector unit. Ink Collector Unit 10. Rear View 1 CHU061 2 CHU065 1. About This Product 8. Duplex Unit Turns the paper over when performing duplex printing. 2. 1.
Open this cover only when you need to clear paper jams inside the machine. 18 Rear cover Open this cover closed. Print Cartridge (yellow) 9. Right Front Cover Normally, keep this to install or replace the print cartridge or the ink collector unit. Ink Collector Unit 10. Rear View 1 CHU061 2 CHU065 1. About This Product 8. Duplex Unit Turns the paper over when performing duplex printing. 2. 1.

User Guide
Page 23
... has jammed inside the duplex unit. 3. Duplex unit cover Open to feed in sheets manually. 21 Catches for the duplex unit attachment and detachment are installed correctly, they click when attached. Make sure they will click. Duplex Unit This unit allows the machine to automatically perform duplex printing. 1 2 Guide to unlock...
... has jammed inside the duplex unit. 3. Duplex unit cover Open to feed in sheets manually. 21 Catches for the duplex unit attachment and detachment are installed correctly, they click when attached. Make sure they will click. Duplex Unit This unit allows the machine to automatically perform duplex printing. 1 2 Guide to unlock...

User Guide
Page 27
... Attaching and Detaching Units and Options • The following explains the warning messages on the plastic bag used in breakage and/or injury. • Before installing or removing options, always disconnect the power cord plugs from babies and small children at the base of the box, and remove the tape. 4.
... Attaching and Detaching Units and Options • The following explains the warning messages on the plastic bag used in breakage and/or injury. • Before installing or removing options, always disconnect the power cord plugs from babies and small children at the base of the box, and remove the tape. 4.
User Guide
Page 28
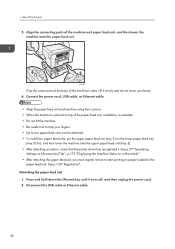
... cable. • Align the paper feed unit and machine using their corners. • When the machine is placed on top of the paper feed unit, installation is complete. • Do not tilt the machine. • Be careful not to two paper feed units can be attached. • To... install two paper feed units, put the upper paper feed unit (tray 2) on paper loaded in the paper feed unit. See p.128 "Registration". Detaching the paper ...
... cable. • Align the paper feed unit and machine using their corners. • When the machine is placed on top of the paper feed unit, installation is complete. • Do not tilt the machine. • Be careful not to two paper feed units can be attached. • To... install two paper feed units, put the upper paper feed unit (tray 2) on paper loaded in the paper feed unit. See p.128 "Registration". Detaching the paper ...

User Guide
Page 29
... Detaching the Duplex Unit This section explains how to attach and detach the duplex unit. • Before installing or removing options, always disconnect the power cord plugs from the place where the machine was installed. Make sure they will click. Lift it on a nearby flat and stable surface, and then detach the... to the machine, turn the machine off and detach the multi bypass tray. • If the catches for the duplex unit attachment and detachment are installed correctly, they click when attached.
... Detaching the Duplex Unit This section explains how to attach and detach the duplex unit. • Before installing or removing options, always disconnect the power cord plugs from the place where the machine was installed. Make sure they will click. Lift it on a nearby flat and stable surface, and then detach the... to the machine, turn the machine off and detach the multi bypass tray. • If the catches for the duplex unit attachment and detachment are installed correctly, they click when attached.
User Guide
Page 31
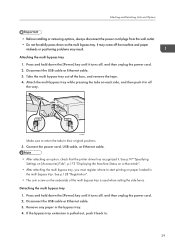
..., and then push it in . 29 Remove any paper in the multi bypass tray. It may result. Attaching and Detaching Units and Options • Before installing or removing options, always disconnect the power cord plugs from the wall outlet. • Do not forcefully press down the [Power] key until it turns...
..., and then push it in . 29 Remove any paper in the multi bypass tray. It may result. Attaching and Detaching Units and Options • Before installing or removing options, always disconnect the power cord plugs from the wall outlet. • Do not forcefully press down the [Power] key until it turns...
User Guide
Page 35
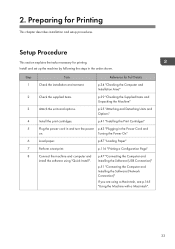
...turn the power p.43 "Plugging in the order shown. Installing the Software (USB Connection)" p.51 "Connecting the Computer and Installing the Software (Network Connection)" If you are using "Quick Install". Step Task Reference for Printing This chapter describes installation and setup procedures. p.116 "Printing a Configuration Page" 8...Check the supplied items. p.39 "Checking the Supplied Items and Unpacking the Machine" 3 Attach the units and options. Install and set up the machine by following the steps in the Power Cord and on. 2. Setup Procedure This section ...
...turn the power p.43 "Plugging in the order shown. Installing the Software (USB Connection)" p.51 "Connecting the Computer and Installing the Software (Network Connection)" If you are using "Quick Install". Step Task Reference for Printing This chapter describes installation and setup procedures. p.116 "Printing a Configuration Page" 8...Check the supplied items. p.39 "Checking the Supplied Items and Unpacking the Machine" 3 Attach the units and options. Install and set up the machine by following the steps in the Power Cord and on. 2. Setup Procedure This section ...

User Guide
Page 36
Preparing for Printing Checking the Computer and Installation Area The machine's location should be placed • Do not use flammable sprays or solvents in injury. • Do not obstruct the machine's vents. If ...
Preparing for Printing Checking the Computer and Installation Area The machine's location should be placed • Do not use flammable sprays or solvents in injury. • Do not obstruct the machine's vents. If ...

User Guide
Page 37
... temperature and high/low moisture • humidifying appliances • oil stoves and ammonia-emitting appliances (such as diazo copiers) Choose a flat, stable area to install the machine. • The surface should be level within two degrees, left to right and front to back. • To prevent condensation..., install the machine in an area where temperature and humidity conditions do not exceed those indicated in the diagram below. • The machine may cease ...
... temperature and high/low moisture • humidifying appliances • oil stoves and ammonia-emitting appliances (such as diazo copiers) Choose a flat, stable area to install the machine. • The surface should be level within two degrees, left to right and front to back. • To prevent condensation..., install the machine in an area where temperature and humidity conditions do not exceed those indicated in the diagram below. • The machine may cease ...

User Guide
Page 39
... shock. • Touching the prongs of damaged power cords could result in fire or electric shock. 37 Checking the power source Checking the Computer and Installation Area • Do not use any frequencies other appliances. Doing so could result in fire or electric shock. • If the power cord is damaged...
... shock. • Touching the prongs of damaged power cords could result in fire or electric shock. 37 Checking the power source Checking the Computer and Installation Area • Do not use any frequencies other appliances. Doing so could result in fire or electric shock. • If the power cord is damaged...

User Guide
Page 41
... you have read how to do not strain your body. • When moving the machine, remove the option. Magenta • Starter cartridge - Black • Quick Installation Guide • Safety information 39 Cyan • Starter cartridge - Lift it slowly and do so. Suffocation can result in this machine away from babies and...
... you have read how to do not strain your body. • When moving the machine, remove the option. Magenta • Starter cartridge - Black • Quick Installation Guide • Safety information 39 Cyan • Starter cartridge - Lift it slowly and do so. Suffocation can result in this machine away from babies and...


