Manuals
Page 4
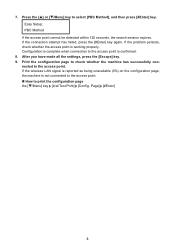
..., press the [Escape] key. 9. Print the configuration page to check whether the machine has successfully connected to print the configuration page the [ /Menu] key [List/Test Print] [Config. If the wireless LAN signal is reported as being unavailable (0%) on the configuration page, the machine is confirmed. 8. Press the [ ] or [ /Menu] key...
..., press the [Escape] key. 9. Print the configuration page to check whether the machine has successfully connected to print the configuration page the [ /Menu] key [List/Test Print] [Config. If the wireless LAN signal is reported as being unavailable (0%) on the configuration page, the machine is confirmed. 8. Press the [ ] or [ /Menu] key...
Manuals
Page 6
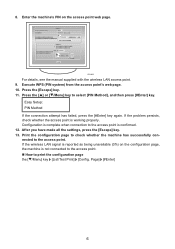
... complete when connection to the access point is not connected to the access point. How to print the configuration page the [ /Menu] key [List/Test Print] [Config. If the wireless LAN signal is reported as being unavailable (0%) on the access point web page. CHV609 For details, see the manual supplied...
... complete when connection to the access point is not connected to the access point. How to print the configuration page the [ /Menu] key [List/Test Print] [Config. If the wireless LAN signal is reported as being unavailable (0%) on the access point web page. CHV609 For details, see the manual supplied...
User Guide
Page 5
......112 Differences Between the Counter and the Total Counter 113 Using the [Paper Input] Menu...114 Changing the [Paper Input] Menu...114 Using the [List/Test Print] Menu...116 Printing a Configuration Page...116 Interpreting the Configuration Page...117 Using the [Maintenance] Menu...118 Nozzle Check...119 Head-cleaning...120 Head-flushing...
......112 Differences Between the Counter and the Total Counter 113 Using the [Paper Input] Menu...114 Changing the [Paper Input] Menu...114 Using the [List/Test Print] Menu...116 Printing a Configuration Page...116 Interpreting the Configuration Page...117 Using the [Maintenance] Menu...118 Nozzle Check...119 Head-cleaning...120 Head-flushing...
User Guide
Page 7
... Be Installed...197 Confirming Installation...197 Checking Your Computer Environment...197 Printer Driver Cannot Be Installed...199 USB Connection is not Automatically Detected 200 If Test Print Fails...201 Uninstalling...202 Uninstalling the Printer Driver...202 Deleting Devices...203 Removing the User Guide...204 5 Maintenance Restricting Machine Functions...179 Locking the...
... Be Installed...197 Confirming Installation...197 Checking Your Computer Environment...197 Printer Driver Cannot Be Installed...199 USB Connection is not Automatically Detected 200 If Test Print Fails...201 Uninstalling...202 Uninstalling the Printer Driver...202 Deleting Devices...203 Removing the User Guide...204 5 Maintenance Restricting Machine Functions...179 Locking the...
User Guide
Page 35
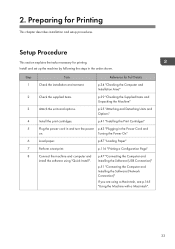
... "Quick Install". Preparing for Full Details 1 Check the installation environment. p.25 "Attaching and Detaching Units and Options" 4 Install the print cartridges. p.87 "Loading Paper" 7 Perform a test print. p.41 "Installing the Print Cartridges" 5 Plug the power cord in and turn the power p.43 "Plugging in the order shown. Step Task Reference for...
... "Quick Install". Preparing for Full Details 1 Check the installation environment. p.25 "Attaching and Detaching Units and Options" 4 Install the print cartridges. p.87 "Loading Paper" 7 Perform a test print. p.41 "Installing the Print Cartridges" 5 Plug the power cord in and turn the power p.43 "Plugging in the order shown. Step Task Reference for...
User Guide
Page 49
...and Installing the Software (USB Connection) Connecting the Computer and Installing the Software (USB Connection) After setting up the hardware and making a test print, connect the machine to do so. Before Installing the Software Connect the machine and computer via USB. • Even if the ...62 "Installing the Printer Drivers for a USB Connection". • For details about sharing the printer, see p.116 "Using the [List/Test Print] Menu". For details about test print, see p.64 "Sharing the Printer". This section explains how to connect the machine to a computer using a USB cable, and ...
...and Installing the Software (USB Connection) Connecting the Computer and Installing the Software (USB Connection) After setting up the hardware and making a test print, connect the machine to do so. Before Installing the Software Connect the machine and computer via USB. • Even if the ...62 "Installing the Printer Drivers for a USB Connection". • For details about sharing the printer, see p.116 "Using the [List/Test Print] Menu". For details about test print, see p.64 "Sharing the Printer". This section explains how to connect the machine to a computer using a USB cable, and ...
User Guide
Page 52
... restart the computer appears, restart the computer. • Confirm the printer driver is correctly installed by checking the [Power] key is lit, and then performing a test print. If this is the case, double-click "SETUP.EXE", located on the CD-ROM root directory, or click [Run SETUP.EXE] in the [AutoPlay... desktop. • If a message prompting you insert the CD-ROM. Auto Run might not work automatically with certain OS settings. See p.116 "Using the [List/Test Print] Menu". 50 Preparing for Printing 12. 2. Click [Finish].
... restart the computer appears, restart the computer. • Confirm the printer driver is correctly installed by checking the [Power] key is lit, and then performing a test print. If this is the case, double-click "SETUP.EXE", located on the CD-ROM root directory, or click [Run SETUP.EXE] in the [AutoPlay... desktop. • If a message prompting you insert the CD-ROM. Auto Run might not work automatically with certain OS settings. See p.116 "Using the [List/Test Print] Menu". 50 Preparing for Printing 12. 2. Click [Finish].
User Guide
Page 53
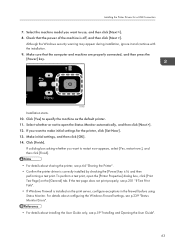
...Installing the Software (Network Connection) Connecting the Computer and Installing the Software (Network Connection) After setting up the hardware and making a test print, connect the machine to the network environment. • Ethernet and wireless LAN cannot be used simultaneously. You can connect a 10BASE... the printer driver only, see p.66 "Installing the Printer Drivers for a Network Connection". • For details about test print, see p.116 "Using the [List/Test Print] Menu". This section explains how to connect the machine to a computer via Ethernet or a wireless LAN and how...
...Installing the Software (Network Connection) Connecting the Computer and Installing the Software (Network Connection) After setting up the hardware and making a test print, connect the machine to the network environment. • Ethernet and wireless LAN cannot be used simultaneously. You can connect a 10BASE... the printer driver only, see p.66 "Installing the Printer Drivers for a Network Connection". • For details about test print, see p.116 "Using the [List/Test Print] Menu". This section explains how to connect the machine to a computer via Ethernet or a wireless LAN and how...
User Guide
Page 60
... driver. 6. Installation starts. If this installation. Click [Quick Install for the interface, and then click [OK]. 3. See p.116 "Using the [List/Test Print] Menu". 58 If the machine cannot be found and only "Printer Port" appears in the [AutoPlay] dialog box. • When installation is lit..., and then performing a test print. The printer driver and the User Guide are not on your desktop. • If a message prompting you insert the CD-ROM. Quit ...
... driver. 6. Installation starts. If this installation. Click [Quick Install for the interface, and then click [OK]. 3. See p.116 "Using the [List/Test Print] Menu". 58 If the machine cannot be found and only "Printer Port" appears in the [AutoPlay] dialog box. • When installation is lit..., and then performing a test print. The printer driver and the User Guide are not on your desktop. • If a message prompting you insert the CD-ROM. Quit ...
User Guide
Page 65
... are properly connected, and then press the [Power] key. Click [Yes] to open the [Printer Properties] dialog box, click [Print Test Page] on the print server, configure exceptions in the firewall before using Status Monitor. Select whether or not to specify the machine as the...For details about configuring the Windows Firewall settings, see p.239 "Status Monitor Errors". • For details about sharing the printer, see p.201 "If Test Print Fails". • If Windows Firewall is installed on the [General] tab. Select the machine model you want to make initial settings for a...
... are properly connected, and then press the [Power] key. Click [Yes] to open the [Printer Properties] dialog box, click [Print Test Page] on the print server, configure exceptions in the firewall before using Status Monitor. Select whether or not to specify the machine as the...For details about configuring the Windows Firewall settings, see p.239 "Status Monitor Errors". • For details about sharing the printer, see p.201 "If Test Print Fails". • If Windows Firewall is installed on the [General] tab. Select the machine model you want to make initial settings for a...
User Guide
Page 73
... folders on the screens. Select the printer you may change the machine name, configure the machine as a default printer and/or a shared printer, and print a test page. 16. If installation is successful, the machine icon connected to the WSD port is complete. It cannot be changed freely. • To stop installation...
... folders on the screens. Select the printer you may change the machine name, configure the machine as a default printer and/or a shared printer, and print a test page. 16. If installation is successful, the machine icon connected to the WSD port is complete. It cannot be changed freely. • To stop installation...
User Guide
Page 107
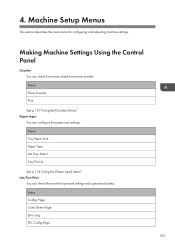
Menu Show Counter Print See p.110 "Using the [Counter] Menu". List/Test Print You can configure the paper tray settings. Page Color Demo Page Error Log PCL Config.Page 105 Machine Setup Menus This section describes the ...
Menu Show Counter Print See p.110 "Using the [Counter] Menu". List/Test Print You can configure the paper tray settings. Page Color Demo Page Error Log PCL Config.Page 105 Machine Setup Menus This section describes the ...
User Guide
Page 108
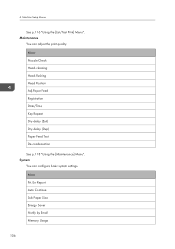
Menu Nozzle Check Head-cleaning Head-flushing Head Position Adj.Paper Feed Registration Date/Time Key Repeat Dry-delay (Exit) Dry-delay (Dup) Paper Feed Test De-condensation See p.118 "Using the [Maintenance] Menu". System You can adjust the print quality. Machine Setup Menus See p.116 "Using the [List/Test Print] Menu". Menu Prt. Err Report Auto Continue Sub Paper Size Energy Saver Notify by Email Memory Usage 106 4. Maintenance You can configure basic system settings.
Menu Nozzle Check Head-cleaning Head-flushing Head Position Adj.Paper Feed Registration Date/Time Key Repeat Dry-delay (Exit) Dry-delay (Dup) Paper Feed Test De-condensation See p.118 "Using the [Maintenance] Menu". System You can adjust the print quality. Machine Setup Menus See p.116 "Using the [List/Test Print] Menu". Menu Prt. Err Report Auto Continue Sub Paper Size Energy Saver Notify by Email Memory Usage 106 4. Maintenance You can configure basic system settings.

User Guide
Page 115
Using the [Counter] Menu Differences Between the Counter and the Total Counter The counter numbers you can check from the [Counter] menu on the display may be greater than those on the system configuration page. The values the total counter displays include the numbers of the printed pages, test patterns, system configuration pages, or counter printouts, so the values may differ from the total counter numbers that appear on the [Counter] menu. 113
Using the [Counter] Menu Differences Between the Counter and the Total Counter The counter numbers you can check from the [Counter] menu on the display may be greater than those on the system configuration page. The values the total counter displays include the numbers of the printed pages, test patterns, system configuration pages, or counter printouts, so the values may differ from the total counter numbers that appear on the [Counter] menu. 113

User Guide
Page 118
... settings. Page The configuration or the color demo page is working properly and to display [List/Test Print], and then press the [#Enter] key. Machine Setup Menus Using the [List/Test Print] Menu Use the [List/Test Print] menu to check that the machine is printed. 4. Page] or [Color Demo Page], ...and then press the [#Enter] key. List/Test Print: Config. PCL Config.Page You can print error logs. Config. Error Log You can print the current PCL configuration. Printing a Configuration Page 1. Press the [...
... settings. Page The configuration or the color demo page is working properly and to display [List/Test Print], and then press the [#Enter] key. Machine Setup Menus Using the [List/Test Print] Menu Use the [List/Test Print] menu to check that the machine is printed. 4. Page] or [Color Demo Page], ...and then press the [#Enter] key. List/Test Print: Config. PCL Config.Page You can print error logs. Config. Error Log You can print the current PCL configuration. Printing a Configuration Page 1. Press the [...
User Guide
Page 119
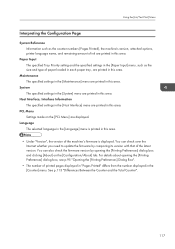
... displayed. For details about opening the [Printing Preferences] dialog box and clicking [About] on the [PCL Menu] are printed in this area. Using the [List/Test Print] Menu Interpreting the Configuration Page System Reference Information such as the size and type of paper loaded in each paper tray, are displayed. You...
... displayed. For details about opening the [Printing Preferences] dialog box and clicking [About] on the [PCL Menu] are printed in this area. Using the [List/Test Print] Menu Interpreting the Configuration Page System Reference Information such as the size and type of paper loaded in each paper tray, are displayed. You...
User Guide
Page 120
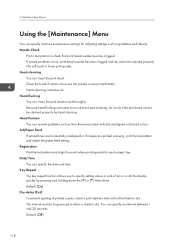
... each paper tray. Key Repeat The key repeat function allows you to dry. The interval must be ejected properly. Nozzle Check Print a test pattern to dry. Registration Print the test pattern and align the point where printing starts for adjusting settings such as lines that print head nozzles become clogged and ink... can resolve problems such as gradation and density. Adj.Paper Feed If printed lines are horizontally misaligned or if images are printed unevenly, print the test pattern and adjust the paper feed setting. You can clean the print head. 4.
... each paper tray. Key Repeat The key repeat function allows you to dry. The interval must be ejected properly. Nozzle Check Print a test pattern to dry. Registration Print the test pattern and align the point where printing starts for adjusting settings such as lines that print head nozzles become clogged and ink... can resolve problems such as gradation and density. Adj.Paper Feed If printed lines are horizontally misaligned or if images are printed unevenly, print the test pattern and adjust the paper feed setting. You can clean the print head. 4.

User Guide
Page 121
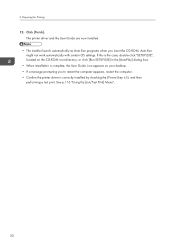
... Follow the procedure below to dry. Press the [Escape] key. 6. Check the printed test pattern. Press the [ ] or [ /Menu] key to dry. Menu: Maintenance 3. Maintenance: Nozzle Check 4. Printed Test Pattern 1 1 2 2 CHU029 119 Default: [Off] Paper Feed Test You can eject three sheets of paper without printing anything on it. Using the [Maintenance...select a print delivery interval to allow a duplex-printed sheet to check whether the print head nozzles are clogged up or not by printing a nozzle check test pattern. 1. You can specify an interval between 1 and 20 seconds.
... Follow the procedure below to dry. Press the [Escape] key. 6. Check the printed test pattern. Press the [ ] or [ /Menu] key to dry. Menu: Maintenance 3. Maintenance: Nozzle Check 4. Printed Test Pattern 1 1 2 2 CHU029 119 Default: [Off] Paper Feed Test You can eject three sheets of paper without printing anything on it. Using the [Maintenance...select a print delivery interval to allow a duplex-printed sheet to check whether the print head nozzles are clogged up or not by printing a nozzle check test pattern. 1. You can specify an interval between 1 and 20 seconds.
User Guide
Page 122
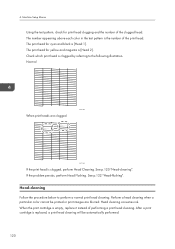
... will be printed or print images are clogged CFT169 If the print head is [Head 1]. The number appearing above each color in the test pattern is empty, replace it instead of the print head. If the problem persists, perform Head Flushing. Head cleaning consumes ink. Check ...head cleaning. See p.122 "Head-flushing". Perform a head cleaning when a particular color cannot be automatically performed. 120 Machine Setup Menus Using the test pattern, check for print head clogging and the number of the clogged head. Normal CFT168 When print heads are blurred. See p.120 "Head-cleaning"....
... will be printed or print images are clogged CFT169 If the print head is [Head 1]. The number appearing above each color in the test pattern is empty, replace it instead of the print head. If the problem persists, perform Head Flushing. Head cleaning consumes ink. Check ...head cleaning. See p.122 "Head-flushing". Perform a head cleaning when a particular color cannot be automatically performed. 120 Machine Setup Menus Using the test pattern, check for print head clogging and the number of the clogged head. Normal CFT168 When print heads are blurred. See p.120 "Head-cleaning"....

User Guide
Page 125
...], and then press the [#Enter] key. To clean the print head for yellow and magenta, select [Head 2]. 5. To check adjustment values, print test patterns applying "High Speed", "Standard", "High Quality", "Envelope Print" settings. Adjust all the print heads, select [All Heads]. Press the [ ]... Head Position 123 Perform this operation if printed lines are vertically misaligned or printed colors are several lines in process... 6. Maintenance in the test pattern, check adjustment values for each line, and adjust the print head positions. Press the [ ] or [ /Menu] key to ...
...], and then press the [#Enter] key. To clean the print head for yellow and magenta, select [Head 2]. 5. To check adjustment values, print test patterns applying "High Speed", "Standard", "High Quality", "Envelope Print" settings. Adjust all the print heads, select [All Heads]. Press the [ ]... Head Position 123 Perform this operation if printed lines are vertically misaligned or printed colors are several lines in process... 6. Maintenance in the test pattern, check adjustment values for each line, and adjust the print head positions. Press the [ ] or [ /Menu] key to ...