Manuals
Page 5
...)...85 Storing a Document...86 Sending Stored Documents...87 Printing the Journal Manually...89 5. Scan Basic Procedure When Using Scan to Folder 101 Creating a Shared Folder on a Computer Running Windows/Confirming a Computer's Information...102 Registering an SMB Folder...104 Deleting an SMB Registered Folder...107 Entering the Path to the Destination Manually 107 Basic Procedure for Sending...
...)...85 Storing a Document...86 Sending Stored Documents...87 Printing the Journal Manually...89 5. Scan Basic Procedure When Using Scan to Folder 101 Creating a Shared Folder on a Computer Running Windows/Confirming a Computer's Information...102 Registering an SMB Folder...104 Deleting an SMB Registered Folder...107 Entering the Path to the Destination Manually 107 Basic Procedure for Sending...
Manuals
Page 12
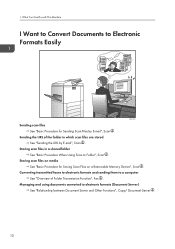
... them to Electronic Formats Easily BQX138S Sending scan files See "Basic Procedure for Saving Scan Files on media See "Basic Procedure for Sending Scan Files by E-mail", Scan . Managing and using documents converted to Folder", Scan . Storing scan files in which scan files are stored See "Sending the URL by E-mail", Scan . What You Can Do with This Machine...
... them to Electronic Formats Easily BQX138S Sending scan files See "Basic Procedure for Saving Scan Files on media See "Basic Procedure for Sending Scan Files by E-mail", Scan . Managing and using documents converted to Folder", Scan . Storing scan files in which scan files are stored See "Sending the URL by E-mail", Scan . What You Can Do with This Machine...
Manuals
Page 23
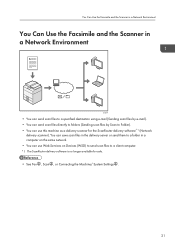
...Environment You Can Use the Facsimile and the Scanner in a computer on Devices (WSD) to send scan files to Folder). • You can send scan files directly to folders (Sending scan files by Scan to a client computer. *1 The ScanRouter delivery software is no longer available for the ScanRouter delivery... software*1 (Network delivery scanner). You can save scan files in the delivery server or send them to a folder in a Network Environment CJQ607 • You can send scan files to a specified destination using e-mail (Sending scan files by e-mail). • You can use Web...
...Environment You Can Use the Facsimile and the Scanner in a computer on Devices (WSD) to send scan files to Folder). • You can send scan files directly to folders (Sending scan files by Scan to a client computer. *1 The ScanRouter delivery software is no longer available for the ScanRouter delivery... software*1 (Network delivery scanner). You can save scan files in the delivery server or send them to a folder in a Network Environment CJQ607 • You can send scan files to a specified destination using e-mail (Sending scan files by e-mail). • You can use Web...
Manuals
Page 82
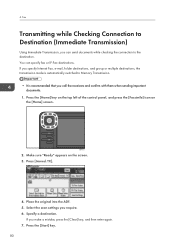
Make sure "Ready" appears on the [Home] screen. Place the original into the ADF. 5. Select the scan settings you call the receivers and confirm with them when sending important documents. 1. Press the [Start] key. 80 4. You can send documents ...Home] key on the top left of the control panel, and press the [Facsimile] icon on the screen. 3. If you specify Internet Fax, e-mail, folder destinations, and group or multiple destinations, the transmission mode is automatically switched to Destination (Immediate Transmission) Using Immediate Transmission, you make a mistake, press the ...
Make sure "Ready" appears on the [Home] screen. Place the original into the ADF. 5. Select the scan settings you call the receivers and confirm with them when sending important documents. 1. Press the [Start] key. 80 4. You can send documents ...Home] key on the top left of the control panel, and press the [Facsimile] icon on the screen. 3. If you specify Internet Fax, e-mail, folder destinations, and group or multiple destinations, the transmission mode is automatically switched to Destination (Immediate Transmission) Using Immediate Transmission, you make a mistake, press the ...
Manuals
Page 103
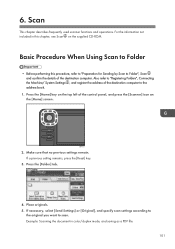
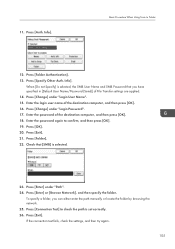
.... 4. If necessary, select [Send Settings] or [Original], and specify scan settings according to the original you want to Folder • Before performing this chapter, see Scan on the [Home] screen. Example: Scanning the document in this procedure, refer to "Preparation for Sending by Scan to Folder", Scan and confirm the details of the destination computer to "Registering...
.... 4. If necessary, select [Send Settings] or [Original], and specify scan settings according to the original you want to Folder • Before performing this chapter, see Scan on the [Home] screen. Example: Scanning the document in this procedure, refer to "Preparation for Sending by Scan to Folder", Scan and confirm the details of the destination computer to "Registering...
Manuals
Page 104
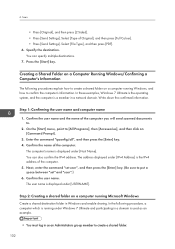
..., point to [All Programs], then [Accessories], and then click on a computer running Microsoft Windows Create a shared destination folder in Windows and enable sharing. You can also confirm the IPv4 address. Write down the confirmed information. 6. Scan • Press [Original], and then press [2 Sided]. • Press [Send Settings]. The address displayed under Windows...
..., point to [All Programs], then [Accessories], and then click on a computer running Microsoft Windows Create a shared destination folder in Windows and enable sharing. You can also confirm the IPv4 address. Write down the confirmed information. 6. Scan • Press [Original], and then press [2 Sided]. • Press [Send Settings]. The address displayed under Windows...
Manuals
Page 105
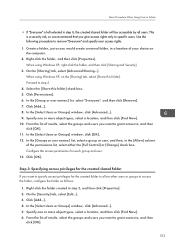
... results, select the groups and users you want to specify access privileges for each group and user. 13. When using Windows XP, right-click the folder, and then click [Sharing and Security]. 3. In the [Groups or user names:] list, select a group or user, and then, in step 2, and then click... [Advanced...]. 5. This is left selected in a location of the permissions list, select either the [Full Control] or [Change] check box. Basic Procedure When Using Scan to Folder • If "Everyone" is a security risk, so we recommend that you want to grant access to, and then click [OK]. 11.
... results, select the groups and users you want to specify access privileges for each group and user. 13. When using Windows XP, right-click the folder, and then click [Sharing and Security]. 3. In the [Groups or user names:] list, select a group or user, and then, in step 2, and then click... [Advanced...]. 5. This is left selected in a location of the permissions list, select either the [Full Control] or [Change] check box. Basic Procedure When Using Scan to Folder • If "Everyone" is a security risk, so we recommend that you want to grant access to, and then click [OK]. 11.

Manuals
Page 106
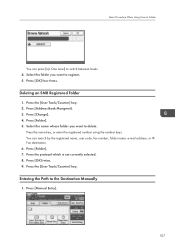
...], [LMN], [OPQ], [RST], [UVW], [XYZ], [1] to [10]: Added to display [Title 1], [Title 2] and [Title 3]. 8. Press [OK]. 10. Registering an SMB Folder 1. Press the [User Tools/Counter] key. 2. Press [Names]. 5. Press [ ] to the list of the permissions list, select either the [Full Control] or [Change] check box...appears. 6. In the [Select Users or Groups] window, click [OK]. 8. Press [New Program]. 4. Enter the name, and then press [OK]. 7. Scan 7. In the [Groups or user names:] list, select a group or user, and then, in the [Allow] column of items in the selected title....
...], [LMN], [OPQ], [RST], [UVW], [XYZ], [1] to [10]: Added to display [Title 1], [Title 2] and [Title 3]. 8. Press [OK]. 10. Registering an SMB Folder 1. Press the [User Tools/Counter] key. 2. Press [Names]. 5. Press [ ] to the list of the permissions list, select either the [Full Control] or [Change] check box...appears. 6. In the [Select Users or Groups] window, click [OK]. 8. Press [New Program]. 4. Enter the name, and then press [OK]. 7. Scan 7. In the [Groups or user names:] list, select a group or user, and then, in the [Allow] column of items in the selected title....
Manuals
Page 107
...Enter the password of the destination computer, and then press [OK]. 16. Enter the password again to Folder 12. Press [Enter] or [Browse Network], and then specify the folder. Basic Procedure When Using Scan to confirm, and then press [OK]. 19. When [Do not Specify] is set correctly. 26.... Press [Folder]. 22. To specify a folder, you have specified in [Default User Name/Password (Send)] of File Transfer ...
...Enter the password of the destination computer, and then press [OK]. 16. Enter the password again to Folder 12. Press [Enter] or [Browse Network], and then specify the folder. Basic Procedure When Using Scan to confirm, and then press [OK]. 19. When [Do not Specify] is set correctly. 26.... Press [Folder]. 22. To specify a folder, you have specified in [Default User Name/Password (Send)] of File Transfer ...

Manuals
Page 108
...the IP address of the destination computer is "192.168.0.191", and the folder name is located. Locating the SMB folder using Browse Network 1. Press [Browse Network]. Network display only lists client ...be \\User\Share. If the format of the destination computer is "User", and the folder name is not correct, a message appears. The client computers sharing the same network as ...group that contains the destination computer. 3. Shared folders under "Path". 2. Press [OK] three times. 28. Press [OK] four times. 6. Locating the SMB folder manually 1. If the network does not allow ...
...the IP address of the destination computer is "192.168.0.191", and the folder name is located. Locating the SMB folder using Browse Network 1. Press [Browse Network]. Network display only lists client ...be \\User\Share. If the format of the destination computer is "User", and the folder name is not correct, a message appears. The client computers sharing the same network as ...group that contains the destination computer. 3. Shared folders under "Path". 2. Press [OK] three times. 28. Press [OK] four times. 6. Locating the SMB folder manually 1. If the network does not allow ...
Manuals
Page 109
... the [User Tools/Counter] key. Entering the Path to register. 5. Basic Procedure When Using Scan to Folder You can search by the registered name, user code, fax number, folder name, e-mail address, or IPFax destination. 6. Deleting an SMB Registered Folder 1. Press [Folder]. 7. Press the [User Tools/Counter] key. 2. Press [Address Book Mangmnt]. 3. Press the protocol...
... the [User Tools/Counter] key. Entering the Path to register. 5. Basic Procedure When Using Scan to Folder You can search by the registered name, user code, fax number, folder name, e-mail address, or IPFax destination. 6. Deleting an SMB Registered Folder 1. Press [Folder]. 7. Press the [User Tools/Counter] key. 2. Press [Address Book Mangmnt]. 3. Press the protocol...
Manuals
Page 110
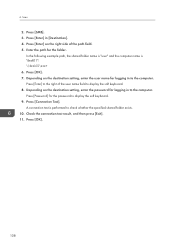
... display the soft keyboard. 8. A connection test is "desk01": \\desk01\user 6. Enter the path for logging in to check whether the specified shared folder exists. 10. Depending on the destination setting, enter the user name for the password to the computer. Check the connection test result, and then press... [Exit]. 11. Press [SMB]. 3. In the following example path, the shared folder name is "user" and the computer name is performed to the computer. Press [Connection Test]. Press [Enter] in to display the soft keyboard...
... display the soft keyboard. 8. A connection test is "desk01": \\desk01\user 6. Enter the path for logging in to check whether the specified shared folder exists. 10. Depending on the destination setting, enter the user name for the password to the computer. Check the connection test result, and then press... [Exit]. 11. Press [SMB]. 3. In the following example path, the shared folder name is "user" and the computer name is performed to the computer. Press [Connection Test]. Press [Enter] in to display the soft keyboard...

Manuals
Page 114
...Delete All], and then press [OK]. 9. Entering an E-mail Address Manually 1. Press [Manual Entry]. 2. Press [Enter] under [Destination]. 3. Press [OK]. 112 Scan 4. Press [OK]. 11. 6. Select the name whose e-mail address you want to delete. Press [Exit]. 10. Press [Email]. 5. You can search by ...the registered name, user code, fax number, folder name, e-mail address, or IP-Fax destination. 6. Press [Email]. 7. Press [Email Address]. 8. Press the [User Tools/Counter] key. Enter the e-mail...
...Delete All], and then press [OK]. 9. Entering an E-mail Address Manually 1. Press [Manual Entry]. 2. Press [Enter] under [Destination]. 3. Press [OK]. 112 Scan 4. Press [OK]. 11. 6. Select the name whose e-mail address you want to delete. Press [Exit]. 10. Press [Email]. 5. You can search by ...the registered name, user code, fax number, folder name, e-mail address, or IP-Fax destination. 6. Press [Email]. 7. Press [Email Address]. 8. Press the [User Tools/Counter] key. Enter the e-mail...

Manuals
Page 117
You can be specified when sending files by e-mail or Scan to Folder, sending stored files by e-mail or Scan to send. PDF], [PDF/A], [TIFF] If you select a multi-page file type when scan multiple originals, scanned pages are combined and sent as the number of pages scanned. • Multi-page: [PDF], [High Compress. Select a ...section explains the procedure for each single page and the number of files sent is created for specifying the file type of File Types", Scan . 1. PDF], [PDF/A], [TIFF/JPEG] If you want to Folder, and saving files on the scan settings and other conditions.
You can be specified when sending files by e-mail or Scan to Folder, sending stored files by e-mail or Scan to send. PDF], [PDF/A], [TIFF] If you select a multi-page file type when scan multiple originals, scanned pages are combined and sent as the number of pages scanned. • Multi-page: [PDF], [High Compress. Select a ...section explains the procedure for each single page and the number of files sent is created for specifying the file type of File Types", Scan . 1. PDF], [PDF/A], [TIFF/JPEG] If you want to Folder, and saving files on the scan settings and other conditions.

Manuals
Page 161
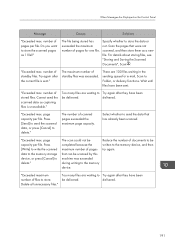
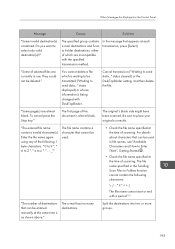
...follow their instructions. • Settings that can be confirmed in the message represents a changeable number. For details about Memory Full Auto Scan Restart, see Web Image Monitor Help. Message "Cannot find the specified path. When Messages Are Displayed on the control panel can ... memory. Causes Solutions The name of pages that the computer name and the folder name for the destination are correct. 159 The scanned originals exceed the number of the computer or folder entered as the destination is full. Messages Displayed When Using the Facsimile Function ...
...follow their instructions. • Settings that can be confirmed in the message represents a changeable number. For details about Memory Full Auto Scan Restart, see Web Image Monitor Help. Message "Cannot find the specified path. When Messages Are Displayed on the control panel can ... memory. Causes Solutions The name of pages that the computer name and the folder name for the destination are correct. 159 The scanned originals exceed the number of the computer or folder entered as the destination is full. Messages Displayed When Using the Facsimile Function ...

Manuals
Page 169
..., and then resume reception of the machine other than the Facsimile function is a problem with the fax. There is being used . scanned for LDAP server authentication. Before sending a file by Internet Fax. A network error has occurred Make settings correctly for the user and ... to resume reception of which are incompatible with facsimile. Memory Transmission. The specified group contains fax destinations, e-mail destinations, and/or folder destinations, either of the Internet Fax if the timeout period has not expired. In the message that appears at each transmission, press ...
..., and then resume reception of the machine other than the Facsimile function is a problem with the fax. There is being used . scanned for LDAP server authentication. Before sending a file by Internet Fax. A network error has occurred Make settings correctly for the user and ... to resume reception of which are incompatible with facsimile. Memory Transmission. The specified group contains fax destinations, e-mail destinations, and/or folder destinations, either of the Internet Fax if the timeout period has not expired. In the message that appears at each transmission, press ...
Manuals
Page 193
... capacity per file. Press [Write] to write the scanned data to the memory storage device, or press [Cancel] to store the data or not. Delete all unnecessary files." number of standby files was exceeded during writing to Folder, or delivery functions. The maximum number of pages per... file. number of pages for e-mail, Scan to the memory device. "Exceeded max. Specify whether to delete." delivered. Too many files...
... capacity per file. Press [Write] to write the scanned data to the memory storage device, or press [Cancel] to store the data or not. Delete all unnecessary files." number of standby files was exceeded during writing to Folder, or delivery functions. The maximum number of pages per... file. number of pages for e-mail, Scan to the memory device. "Exceeded max. Specify whether to delete." delivered. Too many files...
Manuals
Page 197
... changed with a period ".". When Messages Are Displayed on the Control Panel Message Causes Solutions "Some invalid destination(s) contained. "Some of scanning. status displayed) or whose information is as shown above." The e-mail has too many destinations. To cancel press the Stop key."... can be used in file names, see "Available Characters and How to Folder destinations, either of scanning. Do you want to place your originals correctly. The specified group contains e-mail destinations and Scan to Enter Them", Getting Started . • Check the file name specified...
... changed with a period ".". When Messages Are Displayed on the Control Panel Message Causes Solutions "Some invalid destination(s) contained. "Some of scanning. status displayed) or whose information is as shown above." The e-mail has too many destinations. To cancel press the Stop key."... can be used in file names, see "Available Characters and How to Folder destinations, either of scanning. Do you want to place your originals correctly. The specified group contains e-mail destinations and Scan to Enter Them", Getting Started . • Check the file name specified...

Manuals
Page 212
... 91 R Region A 7 Region B 7 Registering destinations 11 Reset key 36 Right cover 26, 28, 31 Running out of toner 144 S Sample Print 15 Saving paper 9 Scan to E-mail 21, 109 Scan to Folder 21, 101 Security functions 22 Send Later 85 Send Settings 116 Sending stored documents 87 Shared..., 39, 40, 41 Simple Screen key 37 SMB folder 104, 106, 107 Sort 14, 72 Standard printing 93 Start key 37 Status message 172 Stop key 37 Stored Print 15, 98, 99 Storing a document 86 Storing data 74 Storing received documents 17 Storing scan files 113 Symbols 6 T Thick paper 130, 139...
... 91 R Region A 7 Region B 7 Registering destinations 11 Reset key 36 Right cover 26, 28, 31 Running out of toner 144 S Sample Print 15 Saving paper 9 Scan to E-mail 21, 109 Scan to Folder 21, 101 Security functions 22 Send Later 85 Send Settings 116 Sending stored documents 87 Shared..., 39, 40, 41 Simple Screen key 37 SMB folder 104, 106, 107 Sort 14, 72 Standard printing 93 Start key 37 Status message 172 Stop key 37 Stored Print 15, 98, 99 Storing a document 86 Storing data 74 Storing received documents 17 Storing scan files 113 Symbols 6 T Thick paper 130, 139...
Support Guide
Page 21
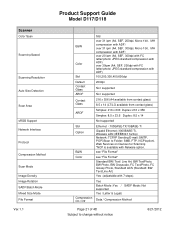
... (Standard: BW Text/Line Art) Yes (adjustable with Netware option. Scanner Color Scan Scanning Speed Scanning Resolution Auto Size Detection Scan Area sRGB Support Network Interface Protocol Compression Method Scan Mode Image Density Image Rotation SADF/Batch Mode Mixed Size Mode File Format Ver.1.1...10BASE-T) Gigabit Ethernet (1000BASE-T), Wireless LAN (IEEE802.11a/b/g) Network: TCP/IP Sending E-mail: SMTP, POP3Scan to Folder: SMB, FTP, NCP(option), Web Services on Devices for Scanning *NCP is available with 7 steps) Compression On / Off Yes Batch Mode :Yes / SADF Mode: Not supported...
... (Standard: BW Text/Line Art) Yes (adjustable with Netware option. Scanner Color Scan Scanning Speed Scanning Resolution Auto Size Detection Scan Area sRGB Support Network Interface Protocol Compression Method Scan Mode Image Density Image Rotation SADF/Batch Mode Mixed Size Mode File Format Ver.1.1...10BASE-T) Gigabit Ethernet (1000BASE-T), Wireless LAN (IEEE802.11a/b/g) Network: TCP/IP Sending E-mail: SMTP, POP3Scan to Folder: SMB, FTP, NCP(option), Web Services on Devices for Scanning *NCP is available with 7 steps) Compression On / Off Yes Batch Mode :Yes / SADF Mode: Not supported...


