Manuals
Page 24
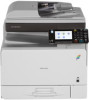
... without permission. • You can control the use of the machine, as well as prevent machine settings from being changed without authorization. • By setting passwords, you can prevent unauthorized access via the network. • You can erase or encrypt the data on the hard disk to prevent the information from...
... without permission. • You can control the use of the machine, as well as prevent machine settings from being changed without authorization. • By setting passwords, you can prevent unauthorized access via the network. • You can erase or encrypt the data on the hard disk to prevent the information from...
Manuals
Page 47
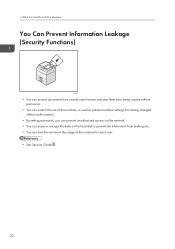
... (except for Subject and Sender Name) Scanner: Original, Send Settings (except for File Name, Security Settings in File Type, Sender Name, and User Name and Password in Store File) This section explains how to register functions in a program using copier function as an example. 1.
... (except for Subject and Sender Name) Scanner: Original, Send Settings (except for File Name, Security Settings in File Type, Sender Name, and User Name and Password in Store File) This section explains how to register functions in a program using copier function as an example. 1.

Manuals
Page 53
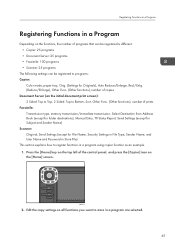
... explains the procedure for logging in the machine, be sure to prevent unauthorized usage. • Ask the user administrator for the Login User Name, Login Password, and User Code. When you go out of it to log out of the operable state, you can say that you enter the User Code... using the control panel while User Code Authentication is set. 51 The machine only becomes operable after entering your own Login User Name and Login Password. For details about user authentication, see Security Guide . • User Code to eight digits), and then press [OK].
... explains the procedure for logging in the machine, be sure to prevent unauthorized usage. • Ask the user administrator for the Login User Name, Login Password, and User Code. When you go out of it to log out of the operable state, you can say that you enter the User Code... using the control panel while User Code Authentication is set. 51 The machine only becomes operable after entering your own Login User Name and Login Password. For details about user authentication, see Security Guide . • User Code to eight digits), and then press [OK].
Manuals
Page 54
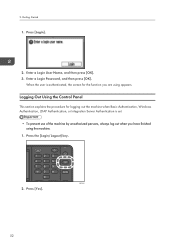
... Authentication, Windows Authentication, LDAP Authentication, or Integration Server Authentication is authenticated, the screen for the function you have finished using appears. Press [Login]. 2. Enter a Login Password, and then press [OK]. Getting Started 1. Press [Yes]. 52 2. CMR636 2.
... Authentication, Windows Authentication, LDAP Authentication, or Integration Server Authentication is authenticated, the screen for the function you have finished using appears. Press [Login]. 2. Enter a Login Password, and then press [OK]. Getting Started 1. Press [Yes]. 52 2. CMR636 2.

Manuals
Page 76
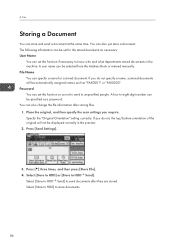
..., do so after copying is complete. 74 If you can check the stored documents from the Document Server screen. Enter a file name, user name, or password if necessary. 5. For details, see p.117 "Storing Data". Press [Store File]. 4. Place the originals. 8. Press the [Start] key. Thus you want to store documents being...
..., do so after copying is complete. 74 If you can check the stored documents from the Document Server screen. Enter a file name, user name, or password if necessary. 5. For details, see p.117 "Storing Data". Press [Store File]. 4. Place the originals. 8. Press the [Start] key. Thus you want to store documents being...
Manuals
Page 88
... documents. 86 Select [Store to HDD] to HDD Send]. File Name You can set this function so as "FAX0001" or "FAX0002". Password You can specify a name for the stored documents as a password. Specify the "Original Orientation" setting correctly. Press [ ] three times, and then press [Store File]. 4. Press [Send Settings]. 3. Place the original...
... documents. 86 Select [Store to HDD] to HDD Send]. File Name You can set this function so as "FAX0001" or "FAX0002". Password You can specify a name for the stored documents as a password. Specify the "Original Orientation" setting correctly. Press [ ] three times, and then press [Store File]. 4. Press [Send Settings]. 3. Place the original...
Manuals
Page 89
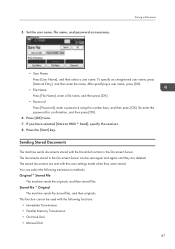
...the name. The stored documents are sent with the scan settings made when they are deleted. Set the user name, file name, and password as necessary. Press [OK] twice. 7. Press the [Start] key. The documents stored in the Document Server can select the following ... user name, press [OK]. • File Name Press [File Name], enter a file name, and then press [OK]. • Password Press [Password], enter a password using the number keys, and then press [OK]. Sending Stored Documents The machine sends documents stored with the following transmission methods: Original Stored ...
...the name. The stored documents are sent with the scan settings made when they are deleted. Set the user name, file name, and password as necessary. Press [OK] twice. 7. Press the [Start] key. The documents stored in the Document Server can select the following ... user name, press [OK]. • File Name Press [File Name], enter a file name, and then press [OK]. • Password Press [Password], enter a password using the number keys, and then press [OK]. Sending Stored Documents The machine sends documents stored with the following transmission methods: Original Stored ...

Manuals
Page 90
... an original to be sent. Select the documents to stored documents, place the original, and then select any scan settings you select a document with a password, enter the password using the number keys, and then press [OK]. 5. Press the Thumbnails key to switch the screen to be sent. Specify "TX Method" as necessary...
... an original to be sent. Select the documents to stored documents, place the original, and then select any scan settings you select a document with a password, enter the password using the number keys, and then press [OK]. 5. Press the Thumbnails key to switch the screen to be sent. Specify "TX Method" as necessary...

Manuals
Page 96
Click the WordPad menu button in the "Password:" box. 7. In the "Job Type:" list, click [Locked Print]. 5. Print Locked Print Sending a Locked Print File 1. Change any other print settings if necessary. 9. Press the [... file will be deleted. 1. 5. Click [Preferences]. 4. Start printing from the application's [Print] dialog box. Enter a User ID in the "User ID:" box, and then enter a password in the upper left of the window, and then click [Print]. 2. In the "Select Printer" list, select the printer you want to use. 3.
Click the WordPad menu button in the "Password:" box. 7. In the "Job Type:" list, click [Locked Print]. 5. Print Locked Print Sending a Locked Print File 1. Change any other print settings if necessary. 9. Press the [... file will be deleted. 1. 5. Click [Preferences]. 4. Start printing from the application's [Print] dialog box. Enter a User ID in the "User ID:" box, and then enter a password in the upper left of the window, and then click [Print]. 2. In the "Select Printer" list, select the printer you want to use. 3.

Manuals
Page 97
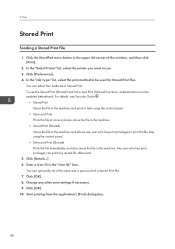
Select the files you want to print. You can select all the Locked Print files at once by pressing [All Jobs] after selecting a file. 5. Enter the password using the number keys if necessary, and then press [Resume Prt.]. 95 Enter the number of the document, press [Det.Settings]. 8. Press [Print]. 6. To change the print settings of copies using the number keys, and then press [OK]. 7. Locked Print 3. Press [Locked Jobs]. 4. Press the [Print Jobs] tab. 2.
Select the files you want to print. You can select all the Locked Print files at once by pressing [All Jobs] after selecting a file. 5. Enter the password using the number keys if necessary, and then press [Resume Prt.]. 95 Enter the number of the document, press [Det.Settings]. 8. Press [Print]. 6. To change the print settings of copies using the number keys, and then press [OK]. 7. Locked Print 3. Press [Locked Jobs]. 4. Press the [Print Jobs] tab. 2.
Manuals
Page 100
... has print privileges to be enabled beforehand. Start printing from the application's [Print] dialog box. 98 Click [Details...]. 6. You can optionally set a file name and a password of the window, and then click [Print]. 2. In the "Select Printer" list, select the printer you want to use the Stored Print (Shared) and Store...
... has print privileges to be enabled beforehand. Start printing from the application's [Print] dialog box. 98 Click [Details...]. 6. You can optionally set a file name and a password of the window, and then click [Print]. 2. In the "Select Printer" list, select the printer you want to use the Stored Print (Shared) and Store...

Manuals
Page 101
... a Stored Print File Using the Control Panel • The stored documents are selected, and some of these require a password, the machine prints files that correspond to the entered password and files that do not require a password. Press the [Print Jobs] tab. 3. The number of the control panel, and press the [Printer] icon on...
... a Stored Print File Using the Control Panel • The stored documents are selected, and some of these require a password, the machine prints files that correspond to the entered password and files that do not require a password. Press the [Print Jobs] tab. 3. The number of the control panel, and press the [Printer] icon on...
Manuals
Page 107
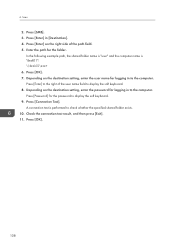
...". 15. Basic Procedure When Using Scan to confirm, and then press [OK]. 19. When [Do not Specify] is selected, the SMB User Name and SMB Password that [SMB] is set correctly. 26. Press [Auth. Enter the login user name of the destination computer, and then press [OK]. 18. Enter the... password of the destination computer, and then press [OK]. 16. 11. Check that you can either enter the path manually or locate the folder by browsing ...
...". 15. Basic Procedure When Using Scan to confirm, and then press [OK]. 19. When [Do not Specify] is selected, the SMB User Name and SMB Password that [SMB] is set correctly. 26. Press [Auth. Enter the login user name of the destination computer, and then press [OK]. 18. Enter the... password of the destination computer, and then press [OK]. 16. 11. Check that you can either enter the path manually or locate the folder by browsing ...
Manuals
Page 110
... logging in to display the soft keyboard. 9. Press [OK]. 7. Press [OK]. 108 Press [Enter] to the computer. Scan 2. Press [Password] for the folder. Press [Enter] in to the right of the path field. 5. In the following example path, the shared folder name is "user" and ...
... logging in to display the soft keyboard. 9. Press [OK]. 7. Press [OK]. 108 Press [Enter] to the computer. Scan 2. Press [Password] for the folder. Press [Enter] in to the right of the path field. 5. In the following example path, the shared folder name is "user" and ...

Manuals
Page 115
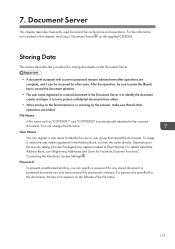
... supplier shall not be lost if some kind of failure occurs. If necessary, specify file information, such as [User Name], [File Name], and [Password]. • User Name 113 We advise against using DeskTopBinder. If a previous setting remains, press the [Reset] key. 3. Basic Procedure for Storing ...Scan Files Basic Procedure for Storing Scan Files • You can be accessed by specifying passwords. • Scan file stored in the machine may be responsible for any damage that no previous settings remain. For details, contact your ...
... supplier shall not be lost if some kind of failure occurs. If necessary, specify file information, such as [User Name], [File Name], and [Password]. • User Name 113 We advise against using DeskTopBinder. If a previous setting remains, press the [Reset] key. 3. Basic Procedure for Storing ...Scan Files Basic Procedure for Storing Scan Files • You can be accessed by specifying passwords. • Scan file stored in the machine may be responsible for any damage that no previous settings remain. For details, contact your ...

Manuals
Page 116
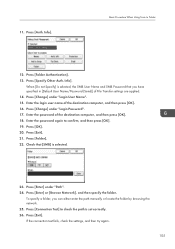
Re-enter the password for resolution and scan size. 10. Press the [Start] key. Press [ ] four times, and then press [Select/Manage Stored File]. 3. You can select more than ... list of stored files. 1. After specifying a user name, press [OK]. • File Name Press [File Name], enter a file name, and then press [OK]. • Password Press [Password], enter a password, and then press [OK]. 6. Press [OK] twice. 9. Press [Preview]. 114 If necessary, press [Send Settings] or [Original] to check. Checking a Stored File Selected from...
Re-enter the password for resolution and scan size. 10. Press the [Start] key. Press [ ] four times, and then press [Select/Manage Stored File]. 3. You can select more than ... list of stored files. 1. After specifying a user name, press [OK]. • File Name Press [File Name], enter a file name, and then press [OK]. • Password Press [Password], enter a password, and then press [OK]. 6. Press [OK] twice. 9. Press [Preview]. 114 If necessary, press [Send Settings] or [Original] to check. Checking a Stored File Selected from...
Manuals
Page 119
... section describes the procedure for the documents, the key icon appears on the supplied CD-ROM. To assign it can specify a password for Facsimile/Scanner Functions", Connecting the Machine/ System Settings . For the information not included in this chapter, see "Registering Addresses and...Book, see Copy/ Document Server on the left side of [User Name]. If a password is to the scanned document. Depending on the Document Server. • A document accessed with a correct password remains selected even after operations are ended. A protected document can change the file name....
... section describes the procedure for the documents, the key icon appears on the supplied CD-ROM. To assign it can specify a password for Facsimile/Scanner Functions", Connecting the Machine/ System Settings . For the information not included in this chapter, see "Registering Addresses and...Book, see Copy/ Document Server on the left side of [User Name]. If a password is to the scanned document. Depending on the Document Server. • A document accessed with a correct password remains selected even after operations are ended. A protected document can change the file name....

Manuals
Page 120
... a name not shown in the Document Server. CMR612 2. Press the [Start] key. If the list does not appear, press [Finish Scanning]. 118 Enter a password with the number keys, and then press [OK]. Press the [Home] key on the [Home] screen. Press [To Scanning Scrn.]. 3. Place the original. ...12. The document is scanned. Press [User Name]. 4. 7. For double-check, enter the password again, and then press [OK]. 10. The user names shown are names that were registered in the Address Book. The original is saved in the...
... a name not shown in the Document Server. CMR612 2. Press the [Start] key. If the list does not appear, press [Finish Scanning]. 118 Enter a password with the number keys, and then press [OK]. Press the [Home] key on the [Home] screen. Press [To Scanning Scrn.]. 3. Place the original. ...12. The document is scanned. Press [User Name]. 4. 7. For double-check, enter the password again, and then press [OK]. 10. The user names shown are names that were registered in the Address Book. The original is saved in the...

Manuals
Page 152
... Causes Panel/screen input accepted. Soft alert An auto reset was pressed. For details about left on the control panel or screen, or the entered password was incorrect. Beep pattern Single short beep Short, then long beep Single long beep Two long beeps Five long beeps Five long beeps repeated four...
... Causes Panel/screen input accepted. Soft alert An auto reset was pressed. For details about left on the control panel or screen, or the entered password was incorrect. Beep pattern Single short beep Short, then long beep Single long beep Two long beeps Five long beeps Five long beeps repeated four...
Manuals
Page 155
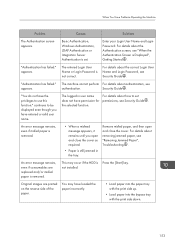
.... When You Have Problems Operating the Machine Problem Causes Solutions The Authentication screen appears. The entered Login User Name or Login Password is Displayed", Getting Started . For details about authentication, see Security Guide . not installed. "Authentication has failed." You may.... Basic Authentication, Windows Authentication, LDAP Authentication or Integration Server Authentication is removed. Enter your Login User Name and Login Password. An error message remains, even if misfed paper is Press the [Start] key. An error message remains, even ...
.... When You Have Problems Operating the Machine Problem Causes Solutions The Authentication screen appears. The entered Login User Name or Login Password is Displayed", Getting Started . For details about authentication, see Security Guide . not installed. "Authentication has failed." You may.... Basic Authentication, Windows Authentication, LDAP Authentication or Integration Server Authentication is removed. Enter your Login User Name and Login Password. An error message remains, even if misfed paper is Press the [Start] key. An error message remains, even ...


