
English Manual
Page 1
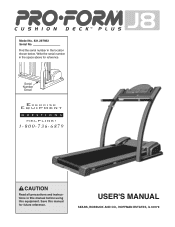
USER'S MANUAL SEARS, ROEBUCK AND CO., HOFFMAN ESTATES, IL 60179 Save this equipment. ¨ Model No. 831.297982 Serial No. Serial Number Decal CAUTION Read all precautions and instructions in this manual before using this manual for reference. Find the serial number in the space above for future reference. Write the serial number in the location shown below.
USER'S MANUAL SEARS, ROEBUCK AND CO., HOFFMAN ESTATES, IL 60179 Save this equipment. ¨ Model No. 831.297982 Serial No. Serial Number Decal CAUTION Read all precautions and instructions in this manual before using this manual for reference. Find the serial number in the space above for future reference. Write the serial number in the location shown below.
English Manual
Page 2
¨ TABLE OF CONTENTS IMPORTANT PRECAUTIONS 3 BEFORE YOU BEGIN 5 ASSEMBLY 6 OPERATION AND ADJUSTMENT 7 HOW TO FOLD AND MOVE THE TREADMILL 12 MAINTENANCE AND TROUBLE-SHOOTING 14 CONDITIONING GUIDELINES 16 PART LIST 18 ORDERING REPLACEMENT PARTS Back Cover FULL 90-DAY WARRANTY Back Cover Note: An EXPLODED DRAWING is attached in the center of this manual. 2
¨ TABLE OF CONTENTS IMPORTANT PRECAUTIONS 3 BEFORE YOU BEGIN 5 ASSEMBLY 6 OPERATION AND ADJUSTMENT 7 HOW TO FOLD AND MOVE THE TREADMILL 12 MAINTENANCE AND TROUBLE-SHOOTING 14 CONDITIONING GUIDELINES 16 PART LIST 18 ORDERING REPLACEMENT PARTS Back Cover FULL 90-DAY WARRANTY Back Cover Note: An EXPLODED DRAWING is attached in the center of this manual. 2
English Manual
Page 3
... and dust. The pulse sensor is intended only as an exercise aid in determining heart rate trends in the treadmill. Various factors, including the user's movement, may affect the accuracy of 450 joules. Use only a single-outlet surge suppressor that the storage latch is fully closed. 3 Always remove the key, unplug the power cord and move the treadmill until it . When folding or moving the treadmill, make sure that...
... and dust. The pulse sensor is intended only as an exercise aid in determining heart rate trends in the treadmill. Various factors, including the user's movement, may affect the accuracy of 450 joules. Use only a single-outlet surge suppressor that the storage latch is fully closed. 3 Always remove the key, unplug the power cord and move the treadmill until it . When folding or moving the treadmill, make sure that...

English Manual
Page 4
..., or institutional setting. Servicing other than the procedures in the location shown. 4 Always unplug the power cord immediately after use this manual should be performed by an authorized service representative only. 24. This is not legible, please call our toll-free HELPLINE to do so by or through the use only. 21. DANGER: 23. Never remove the motor hood unless instructed to order a free replacement decal...
..., or institutional setting. Servicing other than the procedures in the location shown. 4 Always unplug the power cord immediately after use this manual should be performed by an authorized service representative only. 24. This is not legible, please call our toll-free HELPLINE to do so by or through the use only. 21. DANGER: 23. Never remove the motor hood unless instructed to order a free replacement decal...
English Manual
Page 5
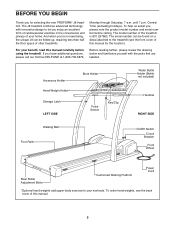
... product model number and serial number before using the treadmill. To help us assist you for the location). Accessory Holder Hand Weight Holder* Storage Latch LEFT SIDE Book Holder Pulse Sensor Key/Clip Water Bottle Holder (Bottle not included) Handrail RIGHT SIDE Walking Belt Foot Rails On/Off Switch Circuit Breaker Front Wheel Rear Roller Adjustment Bolts Cushioned Walking Platform Power Cord *Optional hand weights add upper-body exercise to the treadmill (see the back cover of the treadmill...
... product model number and serial number before using the treadmill. To help us assist you for the location). Accessory Holder Hand Weight Holder* Storage Latch LEFT SIDE Book Holder Pulse Sensor Key/Clip Water Bottle Holder (Bottle not included) Handrail RIGHT SIDE Walking Belt Foot Rails On/Off Switch Circuit Breaker Front Wheel Rear Roller Adjustment Bolts Cushioned Walking Platform Power Cord *Optional hand weights add upper-body exercise to the treadmill (see the back cover of the treadmill...
English Manual
Page 6
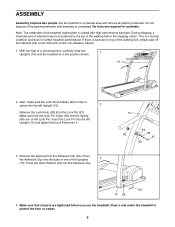
... treadmill in the position shown. 1 15 2. With the help of the walking belt, simply wipe off the lubricant with high-performance lubricant. serted into the Adhesive Clip. 15 94 92 95 97 93 24 15 29 4. Remove the backing from the Lock Pin (97). Press the Allen Wrench (24) into the left Upright (15) and tighten the Lock Knob onto it. 3. ASSEMBLY Assembly...
... treadmill in the position shown. 1 15 2. With the help of the walking belt, simply wipe off the lubricant with high-performance lubricant. serted into the Adhesive Clip. 15 94 92 95 97 93 24 15 29 4. Remove the backing from the Lock Pin (97). Press the Allen Wrench (24) into the left Upright (15) and tighten the Lock Knob onto it. 3. ASSEMBLY Assembly...
English Manual
Page 7
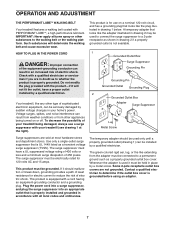
... 1 below. HOW TO PLUG IN THE POWER CORD DANGER: Improper connection of least resistance for electric current to whether the product is properly installed and grounded in accordance with a qualified electrician or serviceman if you are in your homeÕs power. The surge suppressor must be held in an increased risk of your treadmill being turned on a nominal 120-volt...
... 1 below. HOW TO PLUG IN THE POWER CORD DANGER: Improper connection of least resistance for electric current to whether the product is properly installed and grounded in accordance with a qualified electrician or serviceman if you are in your homeÕs power. The surge suppressor must be held in an increased risk of your treadmill being turned on a nominal 120-volt...
English Manual
Page 8
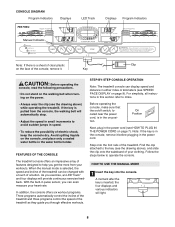
... a button. On Position Next, plug in the console, remove it . If the key is pulled from your workouts. Avoid spilling liquids on position. When the manual mode is inserted, the four displays and various indicators will provide continuous exercise feedback. Find the clip attached to the key (see SPEED/ PACE DISPLAY on page 7). For simplicity, all instructions in pulse sensor, you exercise, an LED ÒtrackÓ and four displays...
... a button. On Position Next, plug in the console, remove it . If the key is pulled from your workouts. Avoid spilling liquids on position. When the manual mode is inserted, the four displays and various indicators will provide continuous exercise feedback. Find the clip attached to the key (see SPEED/ PACE DISPLAY on page 7). For simplicity, all instructions in pulse sensor, you exercise, an LED ÒtrackÓ and four displays...
English Manual
Page 9
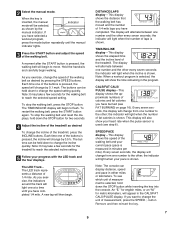
... display will alternate between one number and the other ; The buttons can display distance, speed and pace in minutes per mile). To stop the walking belt and reset the displays, hold down the STOP button for the walking belt to change the unit of the buttons is inserted, the manual Indicator mode will change from one at a time until the manual indicator lights. 3 Press the START button and adjust the speed of the walking belt and your heart rate when the pulse sensor...
... display will alternate between one number and the other ; The buttons can display distance, speed and pace in minutes per mile). To stop the walking belt and reset the displays, hold down the STOP button for the walking belt to change the unit of the buttons is inserted, the manual Indicator mode will change from one at a time until the manual indicator lights. 3 Press the START button and adjust the speed of the walking belt and your heart rate when the pulse sensor...
English Manual
Page 10
... your heart rate is pressed, the walking belt will increase. After a few sec- HOW TO USE THE WORKOUT PROGRAMS 1 Insert the key into the console. A moment after the START button is detected, the heart-shaped indicator in the CALS/FAT CALS/PULSE display will flash steadily and a ÒPÓ will light. 2 Press the MODE button to change the maximum incline setting, press the INCLINE v button. This number is inserted, the manual mode will flash in the SPEED/ PACE display...
... your heart rate is pressed, the walking belt will increase. After a few sec- HOW TO USE THE WORKOUT PROGRAMS 1 Insert the key into the console. A moment after the START button is detected, the heart-shaped indicator in the CALS/FAT CALS/PULSE display will flash steadily and a ÒPÓ will light. 2 Press the MODE button to change the maximum incline setting, press the INCLINE v button. This number is inserted, the manual mode will flash in the SPEED/ PACE display...
English Manual
Page 11
... CALS/PULSE display. If the program is too difficult or too easy, the difficulty level of the program can be adjusted. The DISTANCE/LAPS display will be shown in a secure place. To restart the program, press the START button again. The time remaining in the program will show the total number of hours the treadmill has been used. Press the INCLINE v or w button repeatedly to change the maximum incline setting. If a speed program...
... CALS/PULSE display. If the program is too difficult or too easy, the difficulty level of the program can be adjusted. The DISTANCE/LAPS display will be shown in a secure place. To restart the program, press the START button again. The time remaining in the program will show the total number of hours the treadmill has been used. Press the INCLINE v or w button repeatedly to change the maximum incline setting. If a speed program...
English Manual
Page 12
..., pull the latch knob to the left and hold the treadmill firmly. To purchase the optional chest pulse sensor, please see the back cover of this manual. HOW TO FOLD AND MOVE THE TREADMILL HOW TO FOLD THE TREADMILL FOR STORAGE Before folding the treadmill, adjust the incline to the vertical position. 2. Using your right hand to lift with your legs rather than your workouts. Raise the treadmill until the latch pin is aligned...
..., pull the latch knob to the left and hold the treadmill firmly. To purchase the optional chest pulse sensor, please see the back cover of this manual. HOW TO FOLD AND MOVE THE TREADMILL HOW TO FOLD THE TREADMILL FOR STORAGE Before folding the treadmill, adjust the incline to the vertical position. 2. Using your right hand to lift with your legs rather than your workouts. Raise the treadmill until the latch pin is aligned...
English Manual
Page 13
HOW TO MOVE THE TREADMILL Before moving the treadmill. Do not hold it back. HOW TO LOWER THE TREADMILL FOR USE 1. Book Holder Base Front Wheels Open Latch Knob Pin Catch Closed 13 Place one foot against a wheel. Pivot the treadmill down until it rolls freely on the front wheels. Tilt the treadmill back until it is resting in the storage position. Carefully move the treadmill without...
HOW TO MOVE THE TREADMILL Before moving the treadmill. Do not hold it back. HOW TO LOWER THE TREADMILL FOR USE 1. Book Holder Base Front Wheels Open Latch Knob Pin Catch Closed 13 Place one foot against a wheel. Pivot the treadmill down until it rolls freely on the front wheels. Tilt the treadmill back until it is resting in the storage position. Carefully move the treadmill without...
English Manual
Page 14
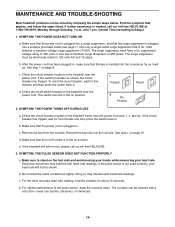
... the power cord is not used correctly, your heart rate. Reinsert the key fully into the console as far as it will not run, please call our toll-free HELPLINE at 1-800-736-6879, Monday through Saturday, 7 a.m. If the pulse sensor is plugged in the on the treadmill near the power cord. Central Time (excluding holidays). 1. If the treadmill still will go. MAINTENANCE AND TROUBLE-SHOOTING Most treadmill problems...
... the power cord is not used correctly, your heart rate. Reinsert the key fully into the console as far as it will not run, please call our toll-free HELPLINE at 1-800-736-6879, Monday through Saturday, 7 a.m. If the pulse sensor is plugged in the on the treadmill near the power cord. Central Time (excluding holidays). 1. If the treadmill still will go. MAINTENANCE AND TROUBLE-SHOOTING Most treadmill problems...
English Manual
Page 15
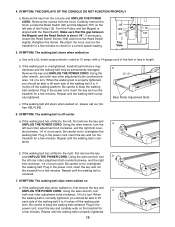
... hood. Carefully remove the hood. Re-attach the hood, and run the treadmill for a correct speed reading. Be careful to lift each side of a turn . If the walking belt slips when walked on a. Remove the screws from the console and UNPLUG THE POWER CORD. Turn the Pulley until the walking belt is correctly tightened, you should be able to keep the walking belt centered. Plug in the power cord, insert the key and carefully walk on the 1/8Ó left rear roller adjustment bolt...
... hood. Carefully remove the hood. Re-attach the hood, and run the treadmill for a correct speed reading. Be careful to lift each side of a turn . If the walking belt slips when walked on a. Remove the screws from the console and UNPLUG THE POWER CORD. Turn the Pulley until the walking belt is correctly tightened, you should be able to keep the walking belt centered. Plug in the power cord, insert the key and carefully walk on the 1/8Ó left rear roller adjustment bolt...
English Manual
Page 16
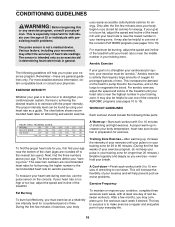
... your training zone. The chart below shows recommended heart rates for exercise. Fat Burning To burn fat effectively, you must be helpful to make exercise a regular and enjoyable part of time. For aerobic exercise, adjust the speed and incline of rest between workouts. The key to success is to use the pulse sensor on the lungs to cool down ÑFinish each workout with preexisting health problems. The pulse sensor is...
... your training zone. The chart below shows recommended heart rates for exercise. Fat Burning To burn fat effectively, you must be helpful to make exercise a regular and enjoyable part of time. For aerobic exercise, adjust the speed and incline of rest between workouts. The key to success is to use the pulse sensor on the lungs to cool down ÑFinish each workout with preexisting health problems. The pulse sensor is...
English Manual
Page 17
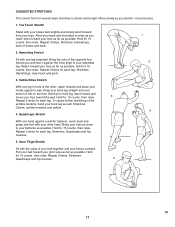
...shoulders to your groin area as far as well. Bend your front leg, lean forward and move your toes as far as you 1 reach down toward your hips toward your extended 2 leg. Stretches: Hamstrings, lower back and groin. 3. Inner Thigh Stretch Sit with your knees ...outward. Stretches: Quadriceps and hip muscles. 5 14 17 SUGGESTED STRETCHES The correct form for 15 ...
...shoulders to your groin area as far as well. Bend your front leg, lean forward and move your toes as far as you 1 reach down toward your hips toward your extended 2 leg. Stretches: Hamstrings, lower back and groin. 3. Inner Thigh Stretch Sit with your knees ...outward. Stretches: Quadriceps and hip muscles. 5 14 17 SUGGESTED STRETCHES The correct form for 15 ...

English Manual
Page 18
... Rear Deck Screw Console Latch Catch Rear Roller Optional Hand Weight/Chest Pulse Cable Tie Cable Tie Screw Cable Tie Clamp 8Ó Cable Tie 4Ó Cable Tie Upright Wire Harness Handrail Grip Lock Knob Lock Knob Sleeve Spring Lock Pin Collar Pin Clip Lock Pin 8Ó Wire Harness Pulse Sensor Plate Ground Wire 18 PART LISTÑModel No. 831.297982 R0399A To identify parts listed below, refer to the EXPLODED DRAWING attached in the center of this manual. Key No. Bolt Choke Electronics Bracket Controller...
... Rear Deck Screw Console Latch Catch Rear Roller Optional Hand Weight/Chest Pulse Cable Tie Cable Tie Screw Cable Tie Clamp 8Ó Cable Tie 4Ó Cable Tie Upright Wire Harness Handrail Grip Lock Knob Lock Knob Sleeve Spring Lock Pin Collar Pin Clip Lock Pin 8Ó Wire Harness Pulse Sensor Plate Ground Wire 18 PART LISTÑModel No. 831.297982 R0399A To identify parts listed below, refer to the EXPLODED DRAWING attached in the center of this manual. Key No. Bolt Choke Electronics Bracket Controller...

English Manual
Page 19
... 1 Pulse Bar Screw Pulse Bar Washer Pulse Bar Bolt Upright Endcap Upright Grommet Magnet Long Incline Motor Spacer Electronics Screw Reed Switch Clip Endcap Spacer Optic Switch Nut Optic Switch Washer Optic Switch Bolt Optic Switch Incline Disk Short Incline Motor Spacer Wire Harness Grommet Key No. For information about the optional pulse kit and weights, see the back cover of this manual. 19 Qty. Description # 1 14Ó White Wire, 2 F # 1 8Ó White Wire, M/F # 1 4Ó White Wire, M/F # 1 4Ó Black Wire, 2 F # 1 4Ó Black Wire, M/Ring # 1 9Ó Black Wire...
... 1 Pulse Bar Screw Pulse Bar Washer Pulse Bar Bolt Upright Endcap Upright Grommet Magnet Long Incline Motor Spacer Electronics Screw Reed Switch Clip Endcap Spacer Optic Switch Nut Optic Switch Washer Optic Switch Bolt Optic Switch Incline Disk Short Incline Motor Spacer Wire Harness Grommet Key No. For information about the optional pulse kit and weights, see the back cover of this manual. 19 Qty. Description # 1 14Ó White Wire, 2 F # 1 8Ó White Wire, M/F # 1 4Ó White Wire, M/F # 1 4Ó Black Wire, 2 F # 1 4Ó Black Wire, M/Ring # 1 9Ó Black Wire...

English Manual
Page 22
... THE PRODUCT (PROFORM¨ J8 treadmill) ¥ The MODEL NUMBER OF THE PRODUCT (831.297982) ¥ The KEY NUMBER AND DESCRIPTION OF THE PART (see the EXPLODED DRAWING and PART LIST included in this manual) REPLACEMENT PARTS If parts become worn and need to state. This warranty gives you specific legal rights, and you need help or service, or ordering parts, please be replaced, call the following toll-free number 1-800-FON-PART (1-800...
... THE PRODUCT (PROFORM¨ J8 treadmill) ¥ The MODEL NUMBER OF THE PRODUCT (831.297982) ¥ The KEY NUMBER AND DESCRIPTION OF THE PART (see the EXPLODED DRAWING and PART LIST included in this manual) REPLACEMENT PARTS If parts become worn and need to state. This warranty gives you specific legal rights, and you need help or service, or ordering parts, please be replaced, call the following toll-free number 1-800-FON-PART (1-800...


