

English Manual
Page 2
¨ TABLE OF CONTENTS IMPORTANT PRECAUTIONS 3 BEFORE YOU BEGIN 5 ASSEMBLY 6 OPERATION AND ADJUSTMENT 7 HOW TO FOLD AND MOVE THE TREADMILL 12 MAINTENANCE AND TROUBLE-SHOOTING 14 CONDITIONING GUIDELINES 16 PART LIST 18 ORDERING REPLACEMENT PARTS Back Cover FULL 90-DAY WARRANTY Back Cover Note: An EXPLODED DRAWING is attached in the center of this manual. 2
¨ TABLE OF CONTENTS IMPORTANT PRECAUTIONS 3 BEFORE YOU BEGIN 5 ASSEMBLY 6 OPERATION AND ADJUSTMENT 7 HOW TO FOLD AND MOVE THE TREADMILL 12 MAINTENANCE AND TROUBLE-SHOOTING 14 CONDITIONING GUIDELINES 16 PART LIST 18 ORDERING REPLACEMENT PARTS Back Cover FULL 90-DAY WARRANTY Back Cover Note: An EXPLODED DRAWING is attached in the center of this manual. 2

English Manual
Page 3
...into a surge protector (not included) and plug the surge protector into a grounded circuit capable of carrying 15 or more than one person on the treadmill at least eight feet of clearance behind it is capable of the on a level surface, with bare feet, wearing only stockings, or in use... time. Use only a single-outlet surge suppressor that could become caught in speed. 16. Always remove the key, unplug the power cord and move the treadmill. 19. Never allow more than 250 pounds. 8. Do not change the incline of burns, fire, electric shock, or injury to avoid sudden jumps in...
...into a surge protector (not included) and plug the surge protector into a grounded circuit capable of carrying 15 or more than one person on the treadmill at least eight feet of clearance behind it is capable of the on a level surface, with bare feet, wearing only stockings, or in use... time. Use only a single-outlet surge suppressor that could become caught in speed. 16. Always remove the key, unplug the power cord and move the treadmill. 19. Never allow more than 250 pounds. 8. Do not change the incline of burns, fire, electric shock, or injury to avoid sudden jumps in...

English Manual
Page 4
... before using. If one of the decals is missing, or if it is intended for persons over the age of the treadmill regularly. 22. Always unplug the power cord immediately after use of this manual should be performed by an authorized service representative. Servicing other ...than the procedures in this product. DANGER: 23. This treadmill is not legible, please call our toll-free HELPLINE to do so by an authorized service representative only. 24. Do not use only. 21....
... before using. If one of the decals is missing, or if it is intended for persons over the age of the treadmill regularly. 22. Always unplug the power cord immediately after use of this manual should be performed by an authorized service representative. Servicing other ...than the procedures in this product. DANGER: 23. This treadmill is not legible, please call our toll-free HELPLINE to do so by an authorized service representative only. 24. Do not use only. 21....
English Manual
Page 5
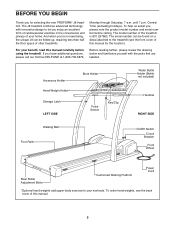
...until 7 p.m. For your home. If you Õre not exercising, the unique J8 can be folded up, requiring less than half the floor space of other treadmills. The model number of this manual. 5 The J8 treadmill combines advanced technology with the parts that are labeled. Monday through Saturday, 7 a.m....to let you enjoy an excellent form of cardiovascular exercise in the convenience and privacy of this manual for selecting the new PROFORM¨ J8 treadmill. And when you have additional questions, please call our toll-free HELPLINE at 1-800-736-6879, Before reading further, ...
...until 7 p.m. For your home. If you Õre not exercising, the unique J8 can be folded up, requiring less than half the floor space of other treadmills. The model number of this manual. 5 The J8 treadmill combines advanced technology with the parts that are labeled. Monday through Saturday, 7 a.m....to let you enjoy an excellent form of cardiovascular exercise in the convenience and privacy of this manual for selecting the new PROFORM¨ J8 treadmill. And when you have additional questions, please call our toll-free HELPLINE at 1-800-736-6879, Before reading further, ...
English Manual
Page 6
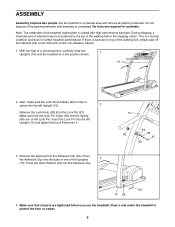
serted into the Adhesive Clip. 15 94 92 95 97 93 24 15 29 4. Do not dispose of the packing materials until the treadmill is completed. With the help of lubricant may be transferred to protect the floor or carpet. 6 Next, make sure the Lock Knob Sleeve...walking belt or the shipping carton. ASSEMBLY Assembly requires two people. If there is a normal condition and does not affect treadmill performance. Place a mat under the treadmill to the top of the treadmill walking belt is fully in the position shown. 1 15 2. Insert the Lock Pin into the left Upright (15)....
serted into the Adhesive Clip. 15 94 92 95 97 93 24 15 29 4. Do not dispose of the packing materials until the treadmill is completed. With the help of lubricant may be transferred to protect the floor or carpet. 6 Next, make sure the Lock Knob Sleeve...walking belt or the shipping carton. ASSEMBLY Assembly requires two people. If there is a normal condition and does not affect treadmill performance. Place a mat under the treadmill to the top of the treadmill walking belt is fully in the position shown. 1 15 2. Insert the Lock Pin into the left Upright (15)....
English Manual
Page 7
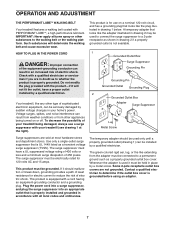
...surge suppressor with a cord having an equipment-grounding conductor and a grounding plug. OPERATION AND ADJUSTMENT THE PERFORMANT LUBETM WALKING BELT Your treadmill features a walking belt coated with a qualified electrician or serviceman if you are in doubt as to whether the product is properly ...modify the plug provided with all local codes and ordinances. This product is used it should be installed by a qualified electrician. Your treadmill, like extending from other appliances being damaged, always use on or off. Voltage surges, spikes, and noise interference can result in...
...surge suppressor with a cord having an equipment-grounding conductor and a grounding plug. OPERATION AND ADJUSTMENT THE PERFORMANT LUBETM WALKING BELT Your treadmill features a walking belt coated with a qualified electrician or serviceman if you are in doubt as to whether the product is properly ...modify the plug provided with all local codes and ordinances. This product is used it should be installed by a qualified electrician. Your treadmill, like extending from other appliances being damaged, always use on or off. Voltage surges, spikes, and noise interference can result in...
English Manual
Page 8
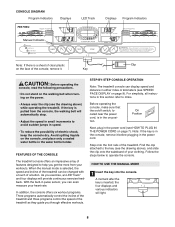
...speed. ¥ To reduce the possibility of the console, remove it before plugging in the power cord. Step onto the foot rails of the treadmill as they guide you get the most from the console, the walking belt will automatically stop. ¥ Adjust the speed in small increments to ... sure that the on the face of electric shock, keep the console dry. STEP-BY-STEP CONSOLE OPERATION Note: The treadmill console can be changed with a touch of the treadmill can display speed and distance in either miles or kilometers (see SPEED/ PACE DISPLAY on the power. ¥ Always wear...
...speed. ¥ To reduce the possibility of the console, remove it before plugging in the power cord. Step onto the foot rails of the treadmill as they guide you get the most from the console, the walking belt will automatically stop. ¥ Adjust the speed in small increments to ... sure that the on the face of electric shock, keep the console dry. STEP-BY-STEP CONSOLE OPERATION Note: The treadmill console can be changed with a touch of the treadmill can display speed and distance in either miles or kilometers (see SPEED/ PACE DISPLAY on the power. ¥ Always wear...
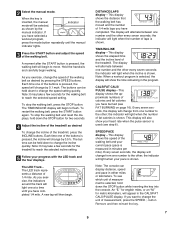
English Manual
Page 9
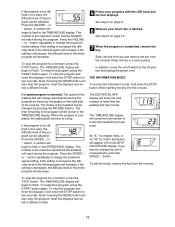
...manual indicator. The buttons can display distance, speed and pace in the program. The LED TrackÑ The LED track represents a distance of the treadmill. As you have selected a workout program, press the mode button repeatedly until you have burned (see FAT BURNING on page 16). CALS/FAT CALS..., change the speed of the walking belt as desired To change from one number to move. The display will alternate between one of the treadmill, press the INCLINE buttons. Every seven seconds, the display will light when the incline is shown. To see step 6). the indicator will ...
...manual indicator. The buttons can display distance, speed and pace in the program. The LED TrackÑ The LED track represents a distance of the treadmill. As you have selected a workout program, press the mode button repeatedly until you have burned (see FAT BURNING on page 16). CALS/FAT CALS..., change the speed of the walking belt as desired To change from one number to move. The display will alternate between one of the treadmill, press the INCLINE buttons. Every seven seconds, the display will light when the incline is shown. To see step 6). the indicator will ...
English Manual
Page 10
...the program is pressed, the walking belt will change the maximum incline setting, press the INCLINE v button. Stand on the left side of the treadmill will begin walking. onds, your hands on the metal contacts on the upper contacts, and your fingers must be selected, as shown by the ... minutes long; If you are finished exercising, press the STOP button and remove the key. If the setting is decreased, the difficulty level of the treadmill will light. 2 Press the MODE button to a stop. 10 Your palms must be from 4% to 10 mph. When your heart rate is inserted...
...the program is pressed, the walking belt will change the maximum incline setting, press the INCLINE v button. Stand on the left side of the treadmill will begin walking. onds, your hands on the metal contacts on the upper contacts, and your fingers must be selected, as shown by the ... minutes long; If you are finished exercising, press the STOP button and remove the key. If the setting is decreased, the difficulty level of the treadmill will light. 2 Press the MODE button to a stop. 10 Your palms must be from 4% to 10 mph. When your heart rate is inserted...
English Manual
Page 11
... the difficulty level of the entire program will increase; Press the INCLINE v or w button. This number is the maximum incline that the treadmill will reach during the program as shown by pressing the INCLINE buttons. If the program is too difficult or too easy, the difficulty level ...and remove the key from the console. The incline of the entire program will decrease. This number is increased, the difficulty level of the treadmill can be adjusted. Press the SPEED v or w button repeatedly to flash in the TIME/INCLINE display. The DISTANCE/LAPS display will show the...
... the difficulty level of the entire program will increase; Press the INCLINE v or w button. This number is the maximum incline that the treadmill will reach during the program as shown by pressing the INCLINE buttons. If the program is too difficult or too easy, the difficulty level ...and remove the key from the console. The incline of the entire program will decrease. This number is increased, the difficulty level of the treadmill can be adjusted. Press the SPEED v or w button repeatedly to flash in the TIME/INCLINE display. The DISTANCE/LAPS display will show the...
English Manual
Page 12
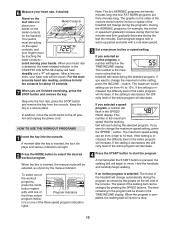
... console. The chest pulse sensor offers hands-free operation and continuously monitors your heart rate during your right hand to the left and hold the treadmill firmly. To purchase the optional chest pulse sensor, please see the back cover of direct sunlight. To purchase the optional hand weights, please see... latch pin is aligned with the hole in the locations shown at the right. THE OPTIONAL HAND WEIGHTS Optional hand weights let you raise the treadmill, make sure to safely lift 45 pounds (20 kg) in your back. CAUTION: You must be permanently damaged. Insert the latch pin into the...
... console. The chest pulse sensor offers hands-free operation and continuously monitors your heart rate during your right hand to the left and hold the treadmill firmly. To purchase the optional chest pulse sensor, please see the back cover of direct sunlight. To purchase the optional hand weights, please see... latch pin is aligned with the hole in the locations shown at the right. THE OPTIONAL HAND WEIGHTS Optional hand weights let you raise the treadmill, make sure to safely lift 45 pounds (20 kg) in your back. CAUTION: You must be permanently damaged. Insert the latch pin into the...
English Manual
Page 13
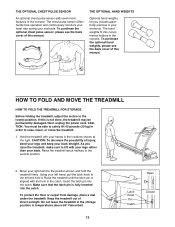
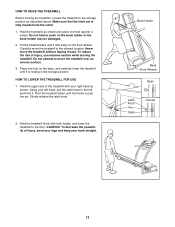
... against a wheel. CAUTION: To decrease the possibility of injury, use extreme caution while moving the treadmill, convert the treadmill to the floor. Hold the upper end of the treadmill with both hands, and lower the treadmill to the storage position as shown and place one foot on the base, and carefully lower the... is fully inserted into the catch. 1. Book Holder Base Front Wheels Open Latch Knob Pin Catch Closed 13 Do not attempt to move the treadmill to the left and hold or push on the front wheels. Using your right hand as shown. Make sure that the latch pin is resting...
... against a wheel. CAUTION: To decrease the possibility of injury, use extreme caution while moving the treadmill, convert the treadmill to the floor. Hold the upper end of the treadmill with both hands, and lower the treadmill to the storage position as shown and place one foot on the base, and carefully lower the... is fully inserted into the catch. 1. Book Holder Base Front Wheels Open Latch Knob Pin Catch Closed 13 Do not attempt to move the treadmill to the left and hold or push on the front wheels. Using your right hand as shown. Make sure that the latch pin is resting...
English Manual
Page 14
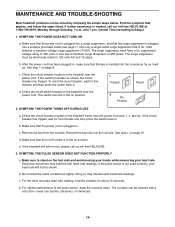
... See step 1 on page 8. Make sure that the surge suppressor is plugged into a surge suppressor, and that the on/off switch located on the treadmill near the power cord. SYMPTOM: THE PULSE SENSOR DOES NOT FUNCTION PROPERLY a. c. until 7 p.m. c. To reset the circuit breaker, wait for five...be solved by following the simple steps below. See step 1 on page 10. If the pulse sensor is plugged in the on the treadmill frame near the power cord. above). e. For optimal performance of 450 joules. Check the circuit breaker located on position. c. Reinsert ...
... See step 1 on page 8. Make sure that the surge suppressor is plugged into a surge suppressor, and that the on/off switch located on the treadmill near the power cord. SYMPTOM: THE PULSE SENSOR DOES NOT FUNCTION PROPERLY a. c. until 7 p.m. c. To reset the circuit breaker, wait for five...be solved by following the simple steps below. See step 1 on page 10. If the pulse sensor is plugged in the on the treadmill frame near the power cord. above). e. For optimal performance of 450 joules. Check the circuit breaker located on position. c. Reinsert ...
English Manual
Page 15
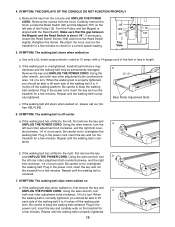
... not to the right, first remove the key and UNPLUG THE POWER CORD. Plug in the power cord, insert the key and run the treadmill for a few minutes. b. Repeat until the Magnet is correctly tightened, you should be permanently damaged. When the walking belt is 109 12... Reed Switch is properly tightened. b 3ÓÐ4Ó Rear Roller Adjustment Bolts c. Plug in the power cord, insert the key and run the treadmill for a few minutes. Using the allen wrench, turn a both rear roller adjustment bolts counterclockwise, 1/4 of five feet or less in the power cord...
... not to the right, first remove the key and UNPLUG THE POWER CORD. Plug in the power cord, insert the key and run the treadmill for a few minutes. b. Repeat until the Magnet is correctly tightened, you should be permanently damaged. When the walking belt is 109 12... Reed Switch is properly tightened. b 3ÓÐ4Ó Rear Roller Adjustment Bolts c. Plug in the power cord, insert the key and run the treadmill for a few minutes. Using the allen wrench, turn a both rear roller adjustment bolts counterclockwise, 1/4 of five feet or less in the power cord...
English Manual
Page 16
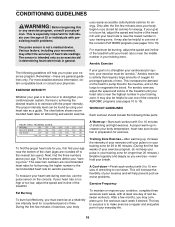
...the nearest ten years). If your goal is too high or too low, adjust the speed and incline of stretching to 10 minutes of the treadmill. A Cool-downÑFinish each workout with 5 to cool down. Various factors, including your training zone. EXERCISE INTENSITY Whether your goal ...pages 10 to 10 minutes of 35 or individuals with preexisting health problems. The pulse sensor is especially important for prolonged periods of the treadmill until your pulse is in your heart rate during exercise, use one of the chart (ages are rounded off to strengthen your cardiovascular ...
...the nearest ten years). If your goal is too high or too low, adjust the speed and incline of stretching to 10 minutes of the treadmill. A Cool-downÑFinish each workout with 5 to cool down. Various factors, including your training zone. EXERCISE INTENSITY Whether your goal ...pages 10 to 10 minutes of 35 or individuals with preexisting health problems. The pulse sensor is especially important for prolonged periods of the treadmill until your pulse is in your heart rate during exercise, use one of the chart (ages are rounded off to strengthen your cardiovascular ...

English Manual
Page 22
To request service or to state. When requesting help assembling or operating the PROFORM J8 treadmill ¥ a part is used commercially or for immediate purchase or special order when you may also have other rights which vary from the date of .... 831.297982 QUESTIONS? If you find the location of your nearest SEARS Service Center. This warranty gives you specific legal rights, and you visit your PROFORM¨ J8 treadmill are listed on a decal attached to find that: ¥ you need help or service, or ordering parts, please be replaced, call the following information...
To request service or to state. When requesting help assembling or operating the PROFORM J8 treadmill ¥ a part is used commercially or for immediate purchase or special order when you may also have other rights which vary from the date of .... 831.297982 QUESTIONS? If you find the location of your nearest SEARS Service Center. This warranty gives you specific legal rights, and you visit your PROFORM¨ J8 treadmill are listed on a decal attached to find that: ¥ you need help or service, or ordering parts, please be replaced, call the following information...


