

English Manual
Page 1
Serial Number Decal • Assembly • Operation • Maintenance • Part List and Drawing BIKE EXERCISER User's Manual CAUTION Read all precautions and instructions in this manual before using this manual for future reference. Patent Pending Sears, Roebuck and Co., Hoffman Estates, IL 60179 Keep this equipment. Model No. 831.283180 Serial No.
Serial Number Decal • Assembly • Operation • Maintenance • Part List and Drawing BIKE EXERCISER User's Manual CAUTION Read all precautions and instructions in this manual before using this manual for future reference. Patent Pending Sears, Roebuck and Co., Hoffman Estates, IL 60179 Keep this equipment. Model No. 831.283180 Serial No.
English Manual
Page 2
... PRECAUTIONS 2 BEFORE YOU BEGIN 3 ASSEMBLY 4 HOW TO USE THE RECUMBENT CYCLE 8 RECUMBENT CYCLE EXERCISE GUIDELINES 19 WEIGHT BENCH EXERCISE GUIDELINES 20 MAINTENANCE AND TROUBLESHOOTING 21 PART LIST 22 EXPLODED DRAWING 23 HOW TO ORDER REPLACEMENT PARTS Back Cover FULL 90 DAY WARRANTY Back Cover IMPORTANT PRECAUTIONS WARNING: To reduce the risk of this product. 2 The crosstrainer is intended for foot protection. 2. Do not use other weights with a mat beneath it...
... PRECAUTIONS 2 BEFORE YOU BEGIN 3 ASSEMBLY 4 HOW TO USE THE RECUMBENT CYCLE 8 RECUMBENT CYCLE EXERCISE GUIDELINES 19 WEIGHT BENCH EXERCISE GUIDELINES 20 MAINTENANCE AND TROUBLESHOOTING 21 PART LIST 22 EXPLODED DRAWING 23 HOW TO ORDER REPLACEMENT PARTS Back Cover FULL 90 DAY WARRANTY Back Cover IMPORTANT PRECAUTIONS WARNING: To reduce the risk of this product. 2 The crosstrainer is intended for foot protection. 2. Do not use other weights with a mat beneath it...
English Manual
Page 3
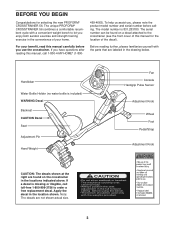
.... The unique PROFORM® CROSSTRAINER 56 combines a comfortable recumbent cycle with a convenient weight bench to let you have questions after reading this manual, call toll-free 1-800-999-3756 to the crosstrainer (see the front cover of the decal). If you enjoy both aerobic exercise and strength training exercise in the full forward setting before calling. The serial number can be used only with the parts that are...
.... The unique PROFORM® CROSSTRAINER 56 combines a comfortable recumbent cycle with a convenient weight bench to let you have questions after reading this manual, call toll-free 1-800-999-3756 to the crosstrainer (see the front cover of the decal). If you enjoy both aerobic exercise and strength training exercise in the full forward setting before calling. The serial number can be used only with the parts that are...

English Manual
Page 4
... Screw (64)-5 M6 x 25.4mm Button Screw (79)-1 M6 x 50mm Screw (69)-1 M8 x 14mm Button Screw (88)-1 M8 x 39mm Button Bolt (76)-2 M8 x 12mm Button Screw (94)-4 M10 x 52mm Zinc Button Bolt (68)-2 M10 x 45mm Button Screw (74)-2 M10 x 112mm Carriage Bolt (65)-2 1/2" x 70mm Button Bolt (51)-1 4 As you assemble the crosstrainer, use the drawings below each drawing refers to the key number of the packing materials until assembly is not in the parts...
... Screw (64)-5 M6 x 25.4mm Button Screw (79)-1 M6 x 50mm Screw (69)-1 M8 x 14mm Button Screw (88)-1 M8 x 39mm Button Bolt (76)-2 M8 x 12mm Button Screw (94)-4 M10 x 52mm Zinc Button Bolt (68)-2 M10 x 45mm Button Screw (74)-2 M10 x 112mm Carriage Bolt (65)-2 1/2" x 70mm Button Bolt (51)-1 4 As you assemble the crosstrainer, use the drawings below each drawing refers to the key number of the packing materials until assembly is not in the parts...

English Manual
Page 6
... the slot in the position shown, connect the Upper Wire Harness (35) to the Seat Frame (6) with four M8 x 12mm Button Screws (94). Attach the Handlebar Bracket (95) to remove any slack from the Wire Harnesses. Move the Upright up and down slightly until it . Next, pull the Knob, insert the Upright (13) into position. Turn the Knob (not shown) on the right side...
... the slot in the position shown, connect the Upper Wire Harness (35) to the Seat Frame (6) with four M8 x 12mm Button Screws (94). Attach the Handlebar Bracket (95) to remove any slack from the Wire Harnesses. Move the Upright up and down slightly until it . Next, pull the Knob, insert the Upright (13) into position. Turn the Knob (not shown) on the right side...

English Manual
Page 7
... the Upright (13) with four M4 x 16mm Screws (73). Insert four batteries into the Left Crank Arm (42). Important: Tighten both Pedals as firmly as shown by the diagram inside the battery drawer. For the best perfor- Be careful to the desired position and press the end of the crosstrainer are installed correctly, the fan will turn on the Console to the Upper Wire Harness...
... the Upright (13) with four M4 x 16mm Screws (73). Insert four batteries into the Left Crank Arm (42). Important: Tighten both Pedals as firmly as shown by the diagram inside the battery drawer. For the best perfor- Be careful to the desired position and press the end of the crosstrainer are installed correctly, the fan will turn on the Console to the Upper Wire Harness...
English Manual
Page 8
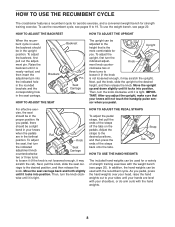
... the knob. Knob ment knob counter- Move the seat carriage back and forth slightly until it locks into position. HOW TO USE THE RECUMBENT CYCLE The crosstrainer features a recumbent cycle for aerobic exercise, and a convenient weight bench for a variety of strength training exercises with the weight bench (see page 20). HOW TO ADJUST THE BACKREST HOW TO ADJUST THE UPRIGHT When the recumbent cycle is the Upright most comfortable for you pedal, press...
... the knob. Knob ment knob counter- Move the seat carriage back and forth slightly until it locks into position. HOW TO USE THE RECUMBENT CYCLE The crosstrainer features a recumbent cycle for aerobic exercise, and a convenient weight bench for a variety of strength training exercises with the weight bench (see page 20). HOW TO ADJUST THE BACKREST HOW TO ADJUST THE UPRIGHT When the recumbent cycle is the Upright most comfortable for you pedal, press...

English Manual
Page 9
sonal trainer in handgrip pulse sensor. Highenergy music provides added motivation. To use a Heart Rate program, see page 17. To use a program directly from the internet. The console also offers four Smart programs. Each program automatically changes the resistance of the pedals and prompts you to increase or decrease your pace as it guides you through an effective workout. The console also features iFIT.com interactive technology. Using a stereo audio cable (available at electronics...
sonal trainer in handgrip pulse sensor. Highenergy music provides added motivation. To use a Heart Rate program, see page 17. To use a program directly from the internet. The console also offers four Smart programs. Each program automatically changes the resistance of the pedals and prompts you to increase or decrease your pace as it guides you through an effective workout. The console also features iFIT.com interactive technology. Using a stereo audio cable (available at electronics...
English Manual
Page 10
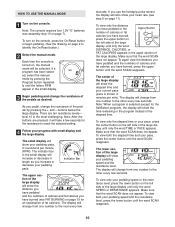
... the buttons are ten resistance levels- HOW TO USE THE MANUAL MODE 1 Turn on page 9 to reach the selected setting. 4 Follow your pedaling speed and the resistance level. The lower section of calories and fat calories you use the handgrip pulse sensor, the display will take a few seconds. buttons below the large display. Each time the console is the most challenging. To turn on the console, press the On/Reset button or begin pedaling...
... the buttons are ten resistance levels- HOW TO USE THE MANUAL MODE 1 Turn on page 9 to reach the selected setting. 4 Follow your pedaling speed and the resistance level. The lower section of calories and fat calories you use the handgrip pulse sensor, the display will take a few seconds. buttons below the large display. Each time the console is the most challenging. To turn on the console, press the On/Reset button or begin pedaling...

English Manual
Page 11
... your hands. To change the system of measurement is detected, the heart- To reset the displays, press the On/Reset button. grips, peel off the fan, press the fan button a third time. Avoid moving your heart beats. Note: When you are not moved for a moment. To turn off to show your heart rate will flash in the lower section of the large display to conserve the batteries. 11
... your hands. To change the system of measurement is detected, the heart- To reset the displays, press the On/Reset button. grips, peel off the fan, press the fan button a third time. Avoid moving your heart beats. Note: When you are not moved for a moment. To turn off to show your heart rate will flash in the lower section of the large display to conserve the batteries. 11
English Manual
Page 12
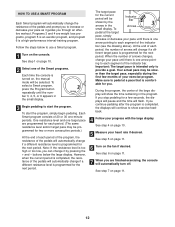
... program, simply begin pedaling. HOW TO USE A SMART PROGRAM Each Smart program will automatically change the resistance of the pedals and prompt you to provide a goal. Programs 3 and 4 are finished exercising, the console will show exercise feedback. 4 Follow your heart rate if desired. Important: The target pace is programmed for the current period will be slow- To start the program. When the number of the large display will automatically turn...
... program, simply begin pedaling. HOW TO USE A SMART PROGRAM Each Smart program will automatically change the resistance of the pedals and prompt you to provide a goal. Programs 3 and 4 are finished exercising, the console will show exercise feedback. 4 Follow your heart rate if desired. Important: The target pace is programmed for the current period will be slow- To start the program. When the number of the large display will automatically turn...
English Manual
Page 13
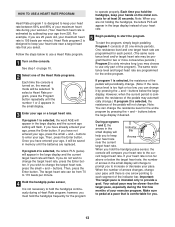
... automatically change.) If program 2 is comfortable for the entire program by pressing the + and - However, when the current period is completed, the resistance of the pedals may choose to use a Heart Rate program. 1 Turn on , the manual mode will flash. buttons to enter your age or a target heart rate. If you to increase or decrease your pace. buttons below the target heart rate, the number of arrows in the large display...
... automatically change.) If program 2 is comfortable for the entire program by pressing the + and - However, when the current period is completed, the resistance of the pedals may choose to use a Heart Rate program. 1 Turn on , the manual mode will flash. buttons to enter your age or a target heart rate. If you to increase or decrease your pace. buttons below the target heart rate, the number of arrows in the large display...

English Manual
Page 14
... console. B PHONES PHONES 1/8" Audio Y-adapter Cable Headphones 14 Plug your headphones into a 1/8" Y-adapter (available at the beginning. Note: If you are finished exercising, the console will end. See step 6 on page 11. 8 When you stop pedaling for a few seconds, the program will automatically turn off. HOW TO CONNECT YOUR PORTABLE CD PLAYER Note: If your VCR. Plug one end of the Y-adapter. To use iFIT.com CDs, the crosstrainer...
... console. B PHONES PHONES 1/8" Audio Y-adapter Cable Headphones 14 Plug your headphones into a 1/8" Y-adapter (available at the beginning. Note: If you are finished exercising, the console will end. See step 6 on page 11. 8 When you stop pedaling for a few seconds, the program will automatically turn off. HOW TO CONNECT YOUR PORTABLE CD PLAYER Note: If your VCR. Plug one end of the Y-adapter. To use iFIT.com CDs, the crosstrainer...

English Manual
Page 15
... other end of the cable into the unused side of the Y-adapter. Next, remove the wire that is being used, see instruction B. Plug the other end of a 1/8" to RCA stereo audio cable (available at electronics stores) into the PHONES jack on your stereo. If your headphones into the jack beneath the console. Plug one end of the cable into the LINE OUT...
... other end of the cable into the unused side of the Y-adapter. Next, remove the wire that is being used, see instruction B. Plug the other end of a 1/8" to RCA stereo audio cable (available at electronics stores) into the PHONES jack on your stereo. If your headphones into the jack beneath the console. Plug one end of the cable into the LINE OUT...
English Manual
Page 17
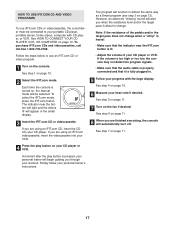
... select the iFIT.com mode, press the iFIT.com button. The indicator near the iFIT.com button is lit. • Adjust the volume of the pedals and/or the target pace does not change . HOW TO USE IFIT.COM CD AND VIDEO PROGRAMS To use an iFIT.com CD or video program. 1 Turn on page 11. 8 When you are finished exercising, the console will automatically turn off. See HOW TO CONNECT YOUR CD...
... select the iFIT.com mode, press the iFIT.com button. The indicator near the iFIT.com button is lit. • Adjust the volume of the pedals and/or the target pace does not change . HOW TO USE IFIT.COM CD AND VIDEO PROGRAMS To use an iFIT.com CD or video program. 1 Turn on page 11. 8 When you are finished exercising, the console will automatically turn off. See HOW TO CONNECT YOUR CD...
English Manual
Page 18
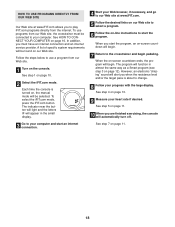
... heart rate if desired. When you to play iFIT.com programs directly from our Web site. 1 Turn on the console. To use a program from the internet. To select the iFIT.com mode, press the iFIT.com button. See step 4 on page 10. 9 Measure your computer. The indicator near the button will light and the letters IF will begin. 7 Return to the crosstrainer and begin . See HOW TO CONNECT...
... heart rate if desired. When you to play iFIT.com programs directly from our Web site. 1 Turn on the console. To use a program from the internet. To select the iFIT.com mode, press the iFIT.com button. See step 4 on page 10. 9 Measure your computer. The indicator near the button will light and the letters IF will begin. 7 Return to the crosstrainer and begin . See HOW TO CONNECT...

English Manual
Page 19
... health problems. The pulse sensor is not a medical device. For aerobic exercise, adjust the intensity of stretching and light exercise. A proper warm-up , consisting of 5 to 10 minutes of your exercise until your heart rate is near the highest number in your training zone as a guide. This will help to prevent post-exercise problems. To find the three numbers above your body temperature, heart rate, and circulation in your workouts using...
... health problems. The pulse sensor is not a medical device. For aerobic exercise, adjust the intensity of stretching and light exercise. A proper warm-up , consisting of 5 to 10 minutes of your exercise until your heart rate is near the highest number in your training zone as a guide. This will help to prevent post-exercise problems. To find the three numbers above your body temperature, heart rate, and circulation in your workouts using...
English Manual
Page 20
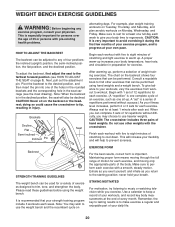
... give your fitness level increases, perform 2 or 3 sets for exercise. When you can complete 3 sets of 12 repetitions without a pause.) As your body time to warm up , perform a selection of weight training exercises. Do not use heavier weights. Please read these guidelines before using hand weights and a weight bench. Make sure to workout. Brackets Decline Flat Semi-inclined Inclined Pin Seat alternating days. Make sure to use other exercises that your...
... give your fitness level increases, perform 2 or 3 sets for exercise. When you can complete 3 sets of 12 repetitions without a pause.) As your body time to warm up , perform a selection of weight training exercises. Do not use heavier weights. Please read these guidelines before using hand weights and a weight bench. Make sure to workout. Brackets Decline Flat Semi-inclined Inclined Pin Seat alternating days. Make sure to use other exercises that your...
English Manual
Page 21
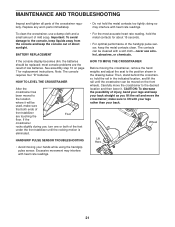
... during use a damp cloth and a small amount of the crosstrainer regularly. HANDGRIP PULSE SENSOR TROUBLESHOOTING • Avoid moving the crosstrainer, remove the hand weights and adjust the seat to lift with heart rate readings. • For the most console problems are touching the Foot floor. Important: To avoid damage to the desired location and then lower it will be replaced; Note: The console requires four "D" batteries. HOW TO MOVE THE CROSSTRAINER Before moving...
... during use a damp cloth and a small amount of the crosstrainer regularly. HANDGRIP PULSE SENSOR TROUBLESHOOTING • Avoid moving the crosstrainer, remove the hand weights and adjust the seat to lift with heart rate readings. • For the most console problems are touching the Foot floor. Important: To avoid damage to the desired location and then lower it will be replaced; Note: The console requires four "D" batteries. HOW TO MOVE THE CROSSTRAINER Before moving...
English Manual
Page 22
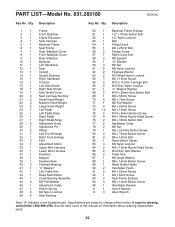
... 1 Adjustment Motor 35 1 Upper Wire Harness 36 1 Lower Wire Harness 37 1 Flywheel 38 1 Magnet 39 1 Flywheel Axle 40 2 Flywheel Bearing 41 1 "C" Magnet 42 1 Left Crank Arm 43 1 Reed Switch/Wire 44 1 Crank Bearing Assembly 45 4 M5 Flat Washer 46 1 Adjustment Cable 47 1 Return Spring 48 2 M6 Nylon Locknut 49 2 Seat Bushing 50 1 Backrest Frame Endcap 51 1 1/2" x 70mm Button Bolt 52 1 1/2" Nylon Locknut 53 1 Belt 54 1 Pulley/Crank 55 1 M6 x 25mm Bolt 56...
... 1 Adjustment Motor 35 1 Upper Wire Harness 36 1 Lower Wire Harness 37 1 Flywheel 38 1 Magnet 39 1 Flywheel Axle 40 2 Flywheel Bearing 41 1 "C" Magnet 42 1 Left Crank Arm 43 1 Reed Switch/Wire 44 1 Crank Bearing Assembly 45 4 M5 Flat Washer 46 1 Adjustment Cable 47 1 Return Spring 48 2 M6 Nylon Locknut 49 2 Seat Bushing 50 1 Backrest Frame Endcap 51 1 1/2" x 70mm Button Bolt 52 1 1/2" Nylon Locknut 53 1 Belt 54 1 Pulley/Crank 55 1 M6 x 25mm Bolt 56...

