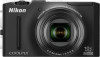

S8100 User's Manual
Page 3
Introduction First Steps Basic Photography and Playback: A (Auto) Mode More on Shooting More on Playback Editing Images Movie Recording and Playback Connecting to Televisions, Computers and Printers Basic Camera Setup Caring for the Camera Technical Notes and Index i
Introduction First Steps Basic Photography and Playback: A (Auto) Mode More on Shooting More on Playback Editing Images Movie Recording and Playback Connecting to Televisions, Computers and Printers Basic Camera Setup Caring for the Camera Technical Notes and Index i
S8100 User's Manual
Page 4
... could result in the event of flammable gas Do not use the product will read before using this Nikon product, to prevent possible injury. Do not use the camera or Charging AC Adapter in the presence of malfunction Should you notice smoke or an unusual smell coming ...battery. WARNINGS Turn off in explosion or fire. After removing or disconnecting the power source, take the product to a Nikon-authorized service representative for inspection. Handle the camera strap with care Never place the strap around the neck of children Particular care should be read them. Repairs should ...
... could result in the event of flammable gas Do not use the product will read before using this Nikon product, to prevent possible injury. Do not use the camera or Charging AC Adapter in the presence of malfunction Should you notice smoke or an unusual smell coming ...battery. WARNINGS Turn off in explosion or fire. After removing or disconnecting the power source, take the product to a Nikon-authorized service representative for inspection. Handle the camera strap with care Never place the strap around the neck of children Particular care should be read them. Repairs should ...
S8100 User's Manual
Page 5
...(supplied). iii Failure to heat or flames. Observe the following precautions when handling the battery for inspection. Charge the battery by using a camera that supports battery charging or by computer function. • When inserting the battery, do not attempt to insert it upside down or backwards....the terminal cover when transporting the battery. Failure to observe this precaution could result in or expose to another or with the camera, use could damage the product or cause overheating or fire. Observe the following precautions when handling the Charging AC Adapter • Keep...
...(supplied). iii Failure to heat or flames. Observe the following precautions when handling the battery for inspection. Charge the battery by using a camera that supports battery charging or by computer function. • When inserting the battery, do not attempt to insert it upside down or backwards....the terminal cover when transporting the battery. Failure to observe this precaution could result in or expose to another or with the camera, use could damage the product or cause overheating or fire. Observe the following precautions when handling the Charging AC Adapter • Keep...
S8100 User's Manual
Page 6
... impairment. For Your Safety Use appropriate cables When connecting cables to the input and output jacks, use only the cables provided or sold by Nikon for the purpose, to prevent liquid crystal from the subject. CD-ROMs The CD-ROMs supplied with care Be careful that your subject's eyes... could cause hearing loss or damage the equipment. Observe caution when using the flash Using the flash close to observe this camera may disrupt the electronic systems of the airplane or the instruments of the hospital when using inside an airplane or the hospital Turn the power...
... impairment. For Your Safety Use appropriate cables When connecting cables to the input and output jacks, use only the cables provided or sold by Nikon for the purpose, to prevent liquid crystal from the subject. CD-ROMs The CD-ROMs supplied with care Be careful that your subject's eyes... could cause hearing loss or damage the equipment. Observe caution when using the flash Using the flash close to observe this camera may disrupt the electronic systems of the airplane or the instruments of the hospital when using inside an airplane or the hospital Turn the power...
S8100 User's Manual
Page 9
... About This Manual ...1 Information and Precautions...2 Parts of the Camera...4 The Camera Body ...4 The Monitor...6 Main Features of the Operation Controls 8 Using Camera Menus...10 Switching Between Tabs...11 The Shutter-release Button...11 Attaching the Camera Strap ...11 First Steps ...12 Inserting the Battery ...12 ... Date, and Time 18 Inserting Memory Cards ...20 Removing Memory Cards...20 Basic Photography and Playback: A (Auto) Mode 22 Step 1 Turn the Camera On and Select A (Auto) Mode 22 Indicators Displayed in A (Auto) Mode 23 Step 2 Frame a Picture ...24 Using the Zoom...25 ...
... About This Manual ...1 Information and Precautions...2 Parts of the Camera...4 The Camera Body ...4 The Monitor...6 Main Features of the Operation Controls 8 Using Camera Menus...10 Switching Between Tabs...11 The Shutter-release Button...11 Attaching the Camera Strap ...11 First Steps ...12 Inserting the Battery ...12 ... Date, and Time 18 Inserting Memory Cards ...20 Removing Memory Cards...20 Basic Photography and Playback: A (Auto) Mode 22 Step 1 Turn the Camera On and Select A (Auto) Mode 22 Indicators Displayed in A (Auto) Mode 23 Step 2 Frame a Picture ...24 Using the Zoom...25 ...

S8100 User's Manual
Page 10
......49 AF Area Mode ...50 Autofocus Mode...54 Shooting Suited to Scenes (Scene Mode 55 Shooting in the Scene Mode Selected by the Camera (Scene Auto Selector 56 Choosing a Scene and Shooting (Scene Mode Types and Characteristics 58 Shooting for a Panorama...68 Focusing on a ...(Subject Tracking Mode 70 Changing Subject Tracking Mode Settings 72 Burst Shooting (Continuous Shooting Mode 73 Changing Continuous Shooting Mode Settings 75 Camera Settings that Cannot Be Applied Simultaneously 78 More on Playback...80 Operations in Full-frame Playback Mode 80 Displaying the Histogram and Shooting...
......49 AF Area Mode ...50 Autofocus Mode...54 Shooting Suited to Scenes (Scene Mode 55 Shooting in the Scene Mode Selected by the Camera (Scene Auto Selector 56 Choosing a Scene and Shooting (Scene Mode Types and Characteristics 58 Shooting for a Panorama...68 Focusing on a ...(Subject Tracking Mode 70 Changing Subject Tracking Mode Settings 72 Burst Shooting (Continuous Shooting Mode 73 Changing Continuous Shooting Mode Settings 75 Camera Settings that Cannot Be Applied Simultaneously 78 More on Playback...80 Operations in Full-frame Playback Mode 80 Displaying the Histogram and Shooting...
S8100 User's Manual
Page 11
... to Televisions, Computers and Printers 143 Connecting to a TV...143 Connecting to a Computer...145 Before Connecting the Camera...145 Transferring Images from a Camera to a Computer 146 Charging While Connecting to a Computer 150 Connecting to a Printer...151 Connecting the Camera to a Printer...152 Printing Images One at a Time...153 Printing Multiple Images...154 ix
... to Televisions, Computers and Printers 143 Connecting to a TV...143 Connecting to a Computer...145 Before Connecting the Camera...145 Transferring Images from a Camera to a Computer 146 Charging While Connecting to a Computer 150 Connecting to a Printer...151 Connecting the Camera to a Printer...152 Printing Images One at a Time...153 Printing Multiple Images...154 ix
S8100 User's Manual
Page 12
Table of Contents Basic Camera Setup ...157 Setup Menu...157 Welcome Screen ...159 Date...160 Monitor Settings...163 Date Imprint (Imprinting Date and Time 165 Vibration Reduction ...166 Motion Detection ....../Format Card ...172 Language...173 TV Settings ...173 Charge by Computer...174 Blink Warning ...175 Reset All ...177 Firmware Version ...179 Caring for the Camera...180 Maximizing Camera Life and Performance 180 Cleaning ...182 Storage ...182 Technical Notes and Index...183 Optional Accessories ...183 Approved Memory Cards ...184 Image/Sound File and...
Table of Contents Basic Camera Setup ...157 Setup Menu...157 Welcome Screen ...159 Date...160 Monitor Settings...163 Date Imprint (Imprinting Date and Time 165 Vibration Reduction ...166 Motion Detection ....../Format Card ...172 Language...173 TV Settings ...173 Charge by Computer...174 Blink Warning ...175 Reset All ...177 Firmware Version ...179 Caring for the Camera...180 Maximizing Camera Life and Performance 180 Cleaning ...182 Storage ...182 Technical Notes and Index...183 Optional Accessories ...183 Approved Memory Cards ...184 Image/Sound File and...
S8100 User's Manual
Page 13
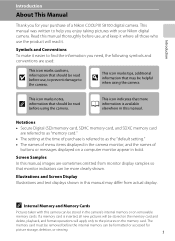
...that monitor indicators can be read before use, to prevent damage to as "memory card." • The setting at the time of a Nikon COOLPIX S8100 digital camera. D This icon marks tips, additional information that should be more A information is available elsewhere in this manual thoroughly before the internal memory ...8226; The names of buttons or messages displayed on the memory card. The memory card must be formatted or accessed for your Nikon digital camera. This icon marks notes, C information that more clearly shown. If a memory card is referred to the...
...that monitor indicators can be read before use, to prevent damage to as "memory card." • The setting at the time of a Nikon COOLPIX S8100 digital camera. D This icon marks tips, additional information that should be more A information is available elsewhere in this manual thoroughly before the internal memory ...8226; The names of buttons or messages displayed on the memory card. The memory card must be formatted or accessed for your Nikon digital camera. This icon marks notes, C information that more clearly shown. If a memory card is referred to the...
S8100 User's Manual
Page 14
... that may be reproduced, transmitted, transcribed, stored in a retrieval system, or translated into any language in any form, by Nikon specifically for contact information: http://imaging.nikon.com/ Use Only Nikon Brand Electronic Accessories Nikon COOLPIX cameras are engineered and proven to operate within the operational and safety requirements of this device as at any time...
... that may be reproduced, transmitted, transcribed, stored in a retrieval system, or translated into any language in any form, by Nikon specifically for contact information: http://imaging.nikon.com/ Use Only Nikon Brand Electronic Accessories Nikon COOLPIX cameras are engineered and proven to operate within the operational and safety requirements of this device as at any time...
S8100 User's Manual
Page 15
... as passes and meal coupons. • Comply with copyright notices The copying or reproduction of copyrighted creative works such as memory cards or built-in camera memory does not completely erase the original image data. The copying or reproduction of paper money, coins, or securities which are to be recovered from...; Items prohibited by national and international copyright laws. Unless the prior permission of the government was digitally copied or reproduced by means of a scanner, digital camera or other device may be taken to avoid injury or damage to infringe copyright laws.
... as passes and meal coupons. • Comply with copyright notices The copying or reproduction of copyrighted creative works such as memory cards or built-in camera memory does not completely erase the original image data. The copying or reproduction of paper money, coins, or securities which are to be recovered from...; Items prohibited by national and international copyright laws. Unless the prior permission of the government was digitally copied or reproduced by means of a scanner, digital camera or other device may be taken to avoid injury or damage to infringe copyright laws.
S8100 User's Manual
Page 16
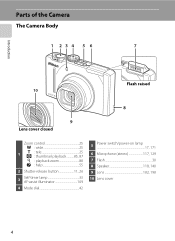
Introduction Parts of the Camera The Camera Body 1 234 5 6 7 Flash raised 10 8 9 Lens cover closed Zoom control 25 f : wide 25 1 g : tele 25 h : thumbnail playback...........85, 87 i : playback zoom 88 j : help 55 2 Shutter-release button 11, 26 3 Self-timer lamp 33 AF-assist illuminator 169 4 Mode dial 42 5 Power switch/power-on lamp 17, 171 6 Microphone (stereo 117, 129 7 Flash 30 8 Speaker 118, 140 9 Lens 182, 198 10 Lens cover 4
Introduction Parts of the Camera The Camera Body 1 234 5 6 7 Flash raised 10 8 9 Lens cover closed Zoom control 25 f : wide 25 1 g : tele 25 h : thumbnail playback...........85, 87 i : playback zoom 88 j : help 55 2 Shutter-release button 11, 26 3 Self-timer lamp 33 AF-assist illuminator 169 4 Mode dial 42 5 Power switch/power-on lamp 17, 171 6 Microphone (stereo 117, 129 7 Flash 30 8 Speaker 118, 140 9 Lens 182, 198 10 Lens cover 4
S8100 User's Manual
Page 18
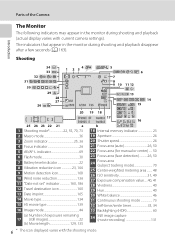
... 12 Travel destination icon 160 13 Date imprint 165 14 Movie type 134 15 HS movie type 139 16 Image mode 44 (a) Number of the Camera Introduction The Monitor The following indicators may appear in the monitor during shooting and playback (actual display varies with the shooting mode. Parts of exposures... 73 32 Self-timer/smile timer 33, 34 33 Backlighting (HDR 60 34 Still image capture (movie recording 131 6 * The icon displayed varies with current camera settings).
... 12 Travel destination icon 160 13 Date imprint 165 14 Movie type 134 15 HS movie type 139 16 Image mode 44 (a) Number of the Camera Introduction The Monitor The following indicators may appear in the monitor during shooting and playback (actual display varies with the shooting mode. Parts of exposures... 73 32 Self-timer/smile timer 33, 34 33 Backlighting (HDR 60 34 Still image capture (movie recording 131 6 * The icon displayed varies with current camera settings).
S8100 User's Manual
Page 19
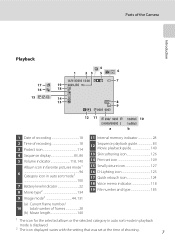
... category in auto sort mode in playback mode is displayed. 2 The icon displayed varies with the setting that was set at the time of the Camera Introduction Playback 17 16 15 4 1 23 5 6 15/11/2010 12:00 7 19 9 9 9 9 . Parts of shooting. 7
... category in auto sort mode in playback mode is displayed. 2 The icon displayed varies with the setting that was set at the time of the Camera Introduction Playback 17 16 15 4 1 23 5 6 15/11/2010 12:00 7 19 9 9 9 9 . Parts of shooting. 7
S8100 User's Manual
Page 20
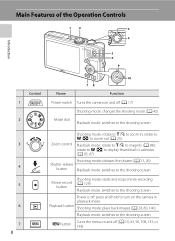
...: starts and stops movie recording (A 129) Playback mode: switches to the shooting screen Power is off: press and hold to turn on the camera in ; Main Features of the Operation Controls 12 3 4 Introduction 5 6 9 1 2 3 4 5 6 7 8 Control 10 78 Name Function Power switch Turns the... camera on and off (A 17) Shooting mode: changes the shooting mode (A 42) Mode dial Playback mode: switches to the shooting screen Shooting mode: rotate to g (i)...
...: starts and stops movie recording (A 129) Playback mode: switches to the shooting screen Power is off: press and hold to turn on the camera in ; Main Features of the Operation Controls 12 3 4 Introduction 5 6 9 1 2 3 4 5 6 7 8 Control 10 78 Name Function Power switch Turns the... camera on and off (A 17) Shooting mode: changes the shooting mode (A 42) Mode dial Playback mode: switches to the shooting screen Shooting mode: rotate to g (i)...

S8100 User's Manual
Page 22
... multi selector (A 9) to choose an item, and then press K or the k button. Introduction Main Features of the Operation Controls Using Camera Menus Press the d button (A 8) to display the menu for displaying the setup menu K is displayed when previous menu items are available ...the rotary multi selector H or I to choose an item and press the k button. The setting is finished, press the d button. 10 The camera exits the menu display. Continuous Image mode White balance Metering Continuous ISO sensitivity AF area mode Exit Continuous Autofocus mode Exit Autofocus mode Single AF...
... multi selector (A 9) to choose an item, and then press K or the k button. Introduction Main Features of the Operation Controls Using Camera Menus Press the d button (A 8) to display the menu for displaying the setup menu K is displayed when previous menu items are available ...the rotary multi selector H or I to choose an item and press the k button. The setting is finished, press the d button. 10 The camera exits the menu display. Continuous Image mode White balance Metering Continuous ISO sensitivity AF area mode Exit Continuous Autofocus mode Exit Autofocus mode Single AF...
S8100 User's Manual
Page 23
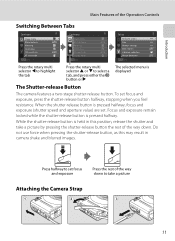
...and exposure Press the rest of the way down . Focus and exposure remain locked while the shutter-release button is held in camera shake and blurred images. To set focus and exposure, press the shutter-release button halfway, stopping when you feel resistance. While... the shutter-release button is pressed halfway. When the shutter-release button is displayed The Shutter-release Button The camera features a two-stage shutter-release button. Introduction Main Features of the Operation Controls Switching Between Tabs Continuous Image mode White balance ...
...and exposure Press the rest of the way down . Focus and exposure remain locked while the shutter-release button is held in camera shake and blurred images. To set focus and exposure, press the shutter-release button halfway, stopping when you feel resistance. While... the shutter-release button is pressed halfway. When the shutter-release button is displayed The Shutter-release Button The camera features a two-stage shutter-release button. Introduction Main Features of the Operation Controls Switching Between Tabs Continuous Image mode White balance ...
S8100 User's Manual
Page 24
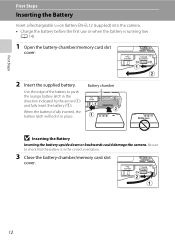
...by the arrow (1) and fully insert the battery (2). Battery chamber B Inserting the Battery Inserting the battery upside down or backwards could damage the camera. Be sure to push the orange battery latch in the correct orientation. 3 Close the battery-chamber/memory card slot cover. 12 First Steps ...First Steps Inserting the Battery Insert a Rechargeable Li-ion Battery EN-EL12 (supplied) into the camera. • Charge the battery before the first use or when the battery is fully inserted, the battery latch will lock it in place....
...by the arrow (1) and fully insert the battery (2). Battery chamber B Inserting the Battery Inserting the battery upside down or backwards could damage the camera. Be sure to push the orange battery latch in the correct orientation. 3 Close the battery-chamber/memory card slot cover. 12 First Steps ...First Steps Inserting the Battery Insert a Rechargeable Li-ion Battery EN-EL12 (supplied) into the camera. • Charge the battery before the first use or when the battery is fully inserted, the battery latch will lock it in place....
S8100 User's Manual
Page 25
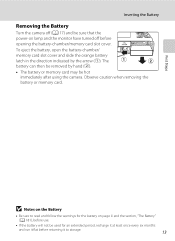
... the power-on page iii and the section, "The Battery" (A 181), before use. • If the battery will not be hot immediately after using the camera. Inserting the Battery Removing the Battery Turn the camera off before returning it flat before opening the battery-chamber/memory card slot cover.
... the power-on page iii and the section, "The Battery" (A 181), before use. • If the battery will not be hot immediately after using the camera. Inserting the Battery Removing the Battery Turn the camera off before returning it flat before opening the battery-chamber/memory card slot cover.

S8100 User's Manual
Page 26
...forcibly remove the plug adapter could damage the product. * The shape of the plug adapter varies according to the country or region in which the camera was purchased in Argentina, the shape of the Charging AC Adapter EH-68P (AR) differs from that supplied in other countries, and a plug ... 1 Prepare the Charging AC Adapter EH-68P. First Steps Charging the Battery Charge the supplied Rechargeable Li-ion Battery EN-EL12 inserted into the camera, by connecting the supplied Charging AC Adapter EH-68P to insert connectors at an angle, and do not use force when connecting or disconnecting the...
...forcibly remove the plug adapter could damage the product. * The shape of the plug adapter varies according to the country or region in which the camera was purchased in Argentina, the shape of the Charging AC Adapter EH-68P (AR) differs from that supplied in other countries, and a plug ... 1 Prepare the Charging AC Adapter EH-68P. First Steps Charging the Battery Charge the supplied Rechargeable Li-ion Battery EN-EL12 inserted into the camera, by connecting the supplied Charging AC Adapter EH-68P to insert connectors at an angle, and do not use force when connecting or disconnecting the...


