S8100 User's Manual
Page 4
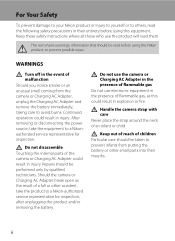
... service representative for inspection, after unplugging the product and/or removing the battery. Repairs should be read before using this equipment. WARNINGS Turn off in injury. Continued operation could result in the event of a fall or other small parts into their entirety before using this... Nikon product, to prevent possible injury. Should the camera or Charging AC Adapter break open as this could result in explosion or fire...
... service representative for inspection, after unplugging the product and/or removing the battery. Repairs should be read before using this equipment. WARNINGS Turn off in injury. Continued operation could result in the event of a fall or other small parts into their entirety before using this... Nikon product, to prevent possible injury. Should the camera or Charging AC Adapter break open as this could result in explosion or fire...
S8100 User's Manual
Page 5
... avoid damage to the product, be damaged and the wires become exposed, take it is prone to observe this product: • Before replacing the battery, turn the product off. Failure to leakage when fully discharged. Observe the following precautions when handling the battery for inspection. Observe the following precautions when handling...
... avoid damage to the product, be damaged and the wires become exposed, take it is prone to observe this product: • Before replacing the battery, turn the product off. Failure to leakage when fully discharged. Observe the following precautions when handling the battery for inspection. Observe the following precautions when handling...
S8100 User's Manual
Page 6
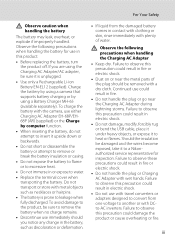
...by this camera may disrupt the electronic systems of the airplane or the instruments of the hospital when using inside an airplane or the hospital Turn the power off while inside the airplane during take off when using while in a hospital. CD-ROMs The CD-ROMs supplied with product regulations...equipment. For Your Safety Use appropriate cables When connecting cables to the input and output jacks, use only the cables provided or sold by Nikon for the purpose, to maintain compliance with this device should not be taken to avoid injury caused by broken glass and to observe this ...
...by this camera may disrupt the electronic systems of the airplane or the instruments of the hospital when using inside an airplane or the hospital Turn the power off while inside the airplane during take off when using while in a hospital. CD-ROMs The CD-ROMs supplied with product regulations...equipment. For Your Safety Use appropriate cables When connecting cables to the input and output jacks, use only the cables provided or sold by Nikon for the purpose, to maintain compliance with this device should not be taken to avoid injury caused by broken glass and to observe this ...

S8100 User's Manual
Page 7
... unit is no guarantee that interference will not occur in a vertical or floor mount position. These limits are not expressly approved by Nikon Corporation may void the user's authority to be correctly orientated in a particular installation. If this device that to which can radiate radio...connection to Part 15 of the FCC rules. SAVE THESE INSTRUCTIONS. CAUTIONS Modifications The FCC requires the user to be determined by turning the equipment off and on a circuit different from that are designed to radio communications. Using other interface cables may cause harmful ...
... unit is no guarantee that interference will not occur in a vertical or floor mount position. These limits are not expressly approved by Nikon Corporation may void the user's authority to be correctly orientated in a particular installation. If this device that to which can radiate radio...connection to Part 15 of the FCC rules. SAVE THESE INSTRUCTIONS. CAUTIONS Modifications The FCC requires the user to be determined by turning the equipment off and on a circuit different from that are designed to radio communications. Using other interface cables may cause harmful ...
S8100 User's Manual
Page 9
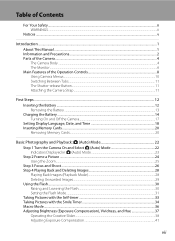
... Button...11 Attaching the Camera Strap ...11 First Steps ...12 Inserting the Battery ...12 Removing the Battery ...13 Charging the Battery ...14 Turning On and Off the Camera...17 Setting Display Language, Date, and Time 18 Inserting Memory Cards ...20 Removing Memory Cards...20 Basic Photography ...and Playback: A (Auto) Mode 22 Step 1 Turn the Camera On and Select A (Auto) Mode 22 Indicators Displayed in A (Auto) Mode 23 Step 2 Frame a Picture ...24 Using the Zoom...25 ...
... Button...11 Attaching the Camera Strap ...11 First Steps ...12 Inserting the Battery ...12 Removing the Battery ...13 Charging the Battery ...14 Turning On and Off the Camera...17 Setting Display Language, Date, and Time 18 Inserting Memory Cards ...20 Removing Memory Cards...20 Basic Photography ...and Playback: A (Auto) Mode 22 Step 1 Turn the Camera On and Select A (Auto) Mode 22 Indicators Displayed in A (Auto) Mode 23 Step 2 Frame a Picture ...24 Using the Zoom...25 ...
S8100 User's Manual
Page 20
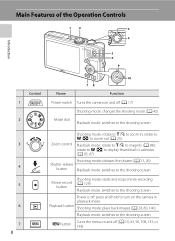
... Power is off (A 10, 43, 90, 108, 133, or 158) Main Features of the Operation Controls 12 3 4 Introduction 5 6 9 1 2 3 4 5 6 7 8 Control 10 78 Name Function Power switch Turns the camera on and off (A 17) Shooting mode: changes the shooting mode (A 42) Mode dial Playback mode: switches to the shooting screen Shooting mode: rotate... to g (i) to zoom in playback mode Playback button Shooting mode: plays back images (A 28, 80, 140) Playback mode: switches to the shooting screen d button Turns the menu on and off : press and hold to...
... Power is off (A 10, 43, 90, 108, 133, or 158) Main Features of the Operation Controls 12 3 4 Introduction 5 6 9 1 2 3 4 5 6 7 8 Control 10 78 Name Function Power switch Turns the camera on and off (A 17) Shooting mode: changes the shooting mode (A 42) Mode dial Playback mode: switches to the shooting screen Shooting mode: rotate... to g (i) to zoom in playback mode Playback button Shooting mode: plays back images (A 28, 80, 140) Playback mode: switches to the shooting screen d button Turns the menu on and off : press and hold to...
S8100 User's Manual
Page 25
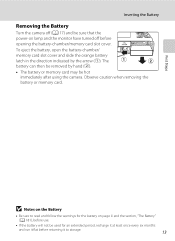
... and the section, "The Battery" (A 181), before use. • If the battery will not be sure that the power-on lamp and the monitor have turned off (A 17) and be used for an extended period, recharge it at least once every six months and run it flat before opening the battery...
... and the section, "The Battery" (A 181), before use. • If the battery will not be sure that the power-on lamp and the monitor have turned off (A 17) and be used for an extended period, recharge it at least once every six months and run it flat before opening the battery...

S8100 User's Manual
Page 26
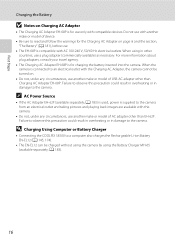
... the supplied Rechargeable Li-ion Battery EN-EL12 inserted into the camera, by connecting the supplied Charging AC Adapter EH-68P to step 2. Do not turn the camera on the Charging AC Adapter. Be sure that supplied in which the camera was purchased in place. Do not attempt to the country...
... the supplied Rechargeable Li-ion Battery EN-EL12 inserted into the camera, by connecting the supplied Charging AC Adapter EH-68P to step 2. Do not turn the camera on the Charging AC Adapter. Be sure that supplied in which the camera was purchased in place. Do not attempt to the country...

S8100 User's Manual
Page 27
... not charging. Flickers (green) • The ambient temperature is not suited to indicate that the battery is complete, the charge lamp stops blinking green and turns off. First Steps 4 Plug the Charging AC Adapter into the electrical outlet. The charge lamp slowly blinks green to charging.
... not charging. Flickers (green) • The ambient temperature is not suited to indicate that the battery is complete, the charge lamp stops blinking green and turns off. First Steps 4 Plug the Charging AC Adapter into the electrical outlet. The charge lamp slowly blinks green to charging.
S8100 User's Manual
Page 28
... the AC Adapter EH-62F (available separately; D Charging Using Computer or Battery Charger • Connecting the COOLPIX S8100 to a computer also charges the Rechargeable Li-ion Battery EN-EL12 (A 145, 174). • The EN-EL12 can be turned on page iii and the section, "The Battery" (A 181), before use. • The EH-68P...
... the AC Adapter EH-62F (available separately; D Charging Using Computer or Battery Charger • Connecting the COOLPIX S8100 to a computer also charges the Rechargeable Li-ion Battery EN-EL12 (A 145, 174). • The EN-EL12 can be turned on page iii and the section, "The Battery" (A 181), before use. • The EH-68P...

S8100 User's Manual
Page 29
... lamp will enter standby mode, and the power-on . - When the camera is turned off, the power-on lamp and the monitor will turn off. • If the camera is blinking, the following operations will turn off option (A 171) in playback mode (A 28). Pressing the power switch, shutter-... Power Saving Function (Auto Off) If no operations are performed for another three minutes, the camera will turn off automatically. When the power-on lamp is turned off when the monitor turns on the camera. If no operations are performed for a while, the monitor will enter standby mode in ...
... lamp will enter standby mode, and the power-on . - When the camera is turned off, the power-on lamp and the monitor will turn off. • If the camera is blinking, the following operations will turn off option (A 171) in playback mode (A 28). Pressing the power switch, shutter-... Power Saving Function (Auto Off) If no operations are performed for another three minutes, the camera will turn off automatically. When the power-on lamp is turned off when the monitor turns on the camera. If no operations are performed for a while, the monitor will enter standby mode in ...

S8100 User's Manual
Page 30
...H to enable the daylight saving time function while setting the region in step 4. The power-on lamp (green) will light, and then the monitor will turn on ). 2 Use the rotary multi selector to choose the desired language and press the k button. Press I to disable the daylight saving time function. 18... Back London Casablanca Back First Steps Setting Display Language, Date, and Time When the first time the camera is turned on, the language-selection screen and the date and time setting screen for the camera clock are displayed. 1 Press the power switch to...
...H to enable the daylight saving time function while setting the region in step 4. The power-on lamp (green) will light, and then the monitor will turn on ). 2 Use the rotary multi selector to choose the desired language and press the k button. Press I to disable the daylight saving time function. 18... Back London Casablanca Back First Steps Setting Display Language, Date, and Time When the first time the camera is turned on, the language-selection screen and the date and time setting screen for the camera clock are displayed. 1 Press the power switch to...
S8100 User's Manual
Page 32
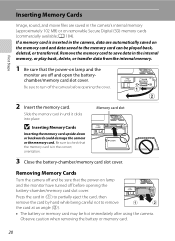
... transfer data from the internal memory. 1 Be sure that the power-on removable Secure Digital (SD) memory cards (commercially available; Removing Memory Cards Turn the camera off and be sure that the memory card is inserted in (1) to partially eject the card, then remove the card by hand while...saved in the camera's internal memory (approximately 102 MB) or on lamp and the monitor are automatically saved on lamp and the monitor have turned off the camera before opening the cover. B Inserting Memory Cards Inserting the memory card upside down or backwards could damage the camera or the...
... transfer data from the internal memory. 1 Be sure that the power-on removable Secure Digital (SD) memory cards (commercially available; Removing Memory Cards Turn the camera off and be sure that the memory card is inserted in (1) to partially eject the card, then remove the card by hand while...saved in the camera's internal memory (approximately 102 MB) or on lamp and the monitor are automatically saved on lamp and the monitor have turned off the camera before opening the cover. B Inserting Memory Cards Inserting the memory card upside down or backwards could damage the camera or the...
S8100 User's Manual
Page 33
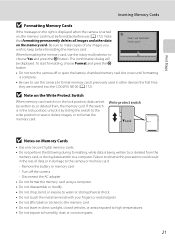
.... First Steps Inserting Memory Cards B Formatting Memory Cards If the message on the right is displayed when the camera is turned on, the memory card must be written to, or deleted from the memory card, or during formatting, while data is...the switch to the write position to save or delete images, or to humidity, dust, or corrosive gases. 21 Turn off or open the battery-chamber/memory card slot cover until formatting is in the loss of any images you wish... formatting permanently deletes all images and other devices the first time they are inserted into the COOLPIX S8100 (A 172).
.... First Steps Inserting Memory Cards B Formatting Memory Cards If the message on the right is displayed when the camera is turned on, the memory card must be written to, or deleted from the memory card, or during formatting, while data is...the switch to the write position to save or delete images, or to humidity, dust, or corrosive gases. 21 Turn off or open the battery-chamber/memory card slot cover until formatting is in the loss of any images you wish... formatting permanently deletes all images and other devices the first time they are inserted into the COOLPIX S8100 (A 172).
S8100 User's Manual
Page 34
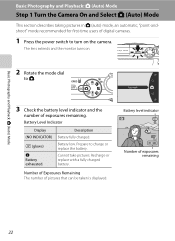
...be taken is displayed. Description Battery fully charged. Number of Exposures Remaining The number of digital cameras. 1 Press the power switch to turn on . 2 Rotate the mode dial to charge or replace the battery. Recharge or replace with a fully charged battery. The lens extends and... the monitor turns on the camera. Battery level indicator 35 Number of exposures remaining. Battery low. Auto mode 3 Check the battery level indicator and the...
...be taken is displayed. Description Battery fully charged. Number of Exposures Remaining The number of digital cameras. 1 Press the power switch to turn on . 2 Rotate the mode dial to charge or replace the battery. Recharge or replace with a fully charged battery. The lens extends and... the monitor turns on the camera. Battery level indicator 35 Number of exposures remaining. Battery low. Auto mode 3 Check the battery level indicator and the...

S8100 User's Manual
Page 35
... back on the camera's internal memory (approximately 102 MB). Internal memory indicator Indicates that images will turn off after a few seconds (A 163). • When the monitor has turned off in standby mode to save power (the poweron lamp is inserted in the setup menu (A 157) for more information....option is L 4000 × 3000. • The indicators and photo info displayed during shooting. 23 Basic Photography and Playback: A (Auto) Mode Step 1 Turn the Camera On and Select A (Auto) Mode Indicators Displayed in A (Auto) Mode Shooting mode A displayed in A (auto) mode.
... back on the camera's internal memory (approximately 102 MB). Internal memory indicator Indicates that images will turn off after a few seconds (A 163). • When the monitor has turned off in standby mode to save power (the poweron lamp is inserted in the setup menu (A 157) for more information....option is L 4000 × 3000. • The indicators and photo info displayed during shooting. 23 Basic Photography and Playback: A (Auto) Mode Step 1 Turn the Camera On and Select A (Auto) Mode Indicators Displayed in A (Auto) Mode Shooting mode A displayed in A (auto) mode.
S8100 User's Manual
Page 36
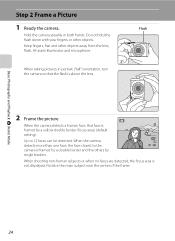
Basic Photography and Playback: A (Auto) Mode Step 2 Frame a Picture 1 Ready the camera. Hold the camera steadily in portrait ("tall") orientation, turn the camera so that face is not displayed. Do not hold the flash down with your fingers or other objects away from the lens, flash, ...
Basic Photography and Playback: A (Auto) Mode Step 2 Frame a Picture 1 Ready the camera. Hold the camera steadily in portrait ("tall") orientation, turn the camera so that face is not displayed. Do not hold the flash down with your fingers or other objects away from the lens, flash, ...

S8100 User's Manual
Page 37
Interpolation is rotated. Zoom out Zoom in • When the camera is turned on, the zoom is at the widest position. • A zoom indicator is displayed at the top of the zoom positions at which shooting without interpolation ... and the focus area is not displayed when digital zoom is possible at zoom positions beyond the V position, interpolation is initiated and the zoom indicator turns yellow to indicate that interpolation is zoomed in , increasing the size of picture quality according to the image mode (A 44) and digital zoom magnification. Digital...
Interpolation is rotated. Zoom out Zoom in • When the camera is turned on, the zoom is at the widest position. • A zoom indicator is displayed at the top of the zoom positions at which shooting without interpolation ... and the focus area is not displayed when digital zoom is possible at zoom positions beyond the V position, interpolation is initiated and the zoom indicator turns yellow to indicate that interpolation is zoomed in , increasing the size of picture quality according to the image mode (A 44) and digital zoom magnification. Digital...
S8100 User's Manual
Page 40
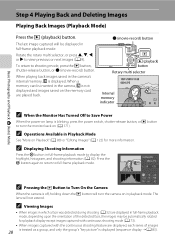
... 82). Press the k button again to return to full-frame playback mode. 100NIKON 0004.JPG 1 / 2 5 0 F 3.5 C Pressing the c Button to Turn On the Camera +1.0 ISO 100 4/ 4 When the camera is blinking, press the power switch, shutter-release button, or c button to Save Power When the power...selector 15/11/2010 15:30 0004.JPG Internal memory indicator 4/ 4 Basic Photography and Playback: A (Auto) Mode C When the Monitor Has Turned Off to turn the camera on in the camera, C is displayed (sequence display ➝ A 83). When a memory card is displayed. When playing back...
... 82). Press the k button again to return to full-frame playback mode. 100NIKON 0004.JPG 1 / 2 5 0 F 3.5 C Pressing the c Button to Turn On the Camera +1.0 ISO 100 4/ 4 When the camera is blinking, press the power switch, shutter-release button, or c button to Save Power When the power...selector 15/11/2010 15:30 0004.JPG Internal memory indicator 4/ 4 Basic Photography and Playback: A (Auto) Mode C When the Monitor Has Turned Off to turn the camera on in the camera, C is displayed (sequence display ➝ A 83). When a memory card is displayed. When playing back...
S8100 User's Manual
Page 44
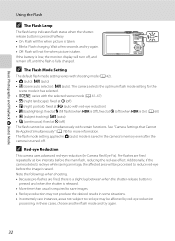
... fired, there is a slight lag between when the shutter-release button is pressed and when the shutter is released. • More time than usual is turned off ) (when HDR is taken. Wait a few seconds and try again. 32 C Red-eye Reduction This camera uses advanced red-eye reduction (In... • Red-eye reduction may not produce the desired results in these cases, choose another flash mode and try again. • Off: Flash will turn off, and remain off ) The flash cannot be affected by red-eye reduction processing; Note the followings when shooting. • Because pre-flashes are ...
... fired, there is a slight lag between when the shutter-release button is pressed and when the shutter is released. • More time than usual is turned off ) (when HDR is taken. Wait a few seconds and try again. 32 C Red-eye Reduction This camera uses advanced red-eye reduction (In... • Red-eye reduction may not produce the desired results in these cases, choose another flash mode and try again. • Off: Flash will turn off, and remain off ) The flash cannot be affected by red-eye reduction processing; Note the followings when shooting. • Because pre-flashes are ...


