S8100 User's Manual
Page 24
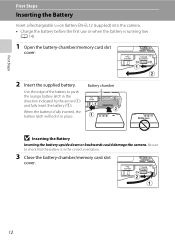
... of the battery to check that the battery is fully inserted, the battery latch will lock it in place. When the battery is in the direction indicated by the arrow (1) and fully insert the battery (2). Be sure to push the orange battery latch in the correct orientation. 3 Close the battery-chamber...
... of the battery to check that the battery is fully inserted, the battery latch will lock it in place. When the battery is in the direction indicated by the arrow (1) and fully insert the battery (2). Be sure to push the orange battery latch in the correct orientation. 3 Close the battery-chamber...
S8100 User's Manual
Page 25
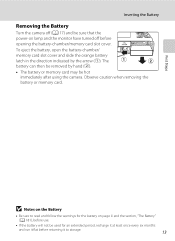
... the battery or memory card. To eject the battery, open the battery-chamber/ memory card slot cover and slide the orange battery latch in the direction indicated by hand (2). • The battery or memory card may be used for an extended period, recharge it at least once every six months and...
... the battery or memory card. To eject the battery, open the battery-chamber/ memory card slot cover and slide the orange battery latch in the direction indicated by hand (2). • The battery or memory card may be used for an extended period, recharge it at least once every six months and...
S8100 User's Manual
Page 33
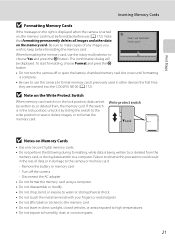
... Failure to observe this camera to format the memory card. Turn off or open the battery-chamber/memory card slot cover until formatting is in direct sunlight, closed vehicles, or areas exposed to high temperatures. • Do not expose to choose Yes and press the k button. The confirmation dialog... choose Format and press the k button. Note that formatting permanently deletes all images and other devices the first time they are inserted into the COOLPIX S8100 (A 172). Format card? If the switch is not formatted. Yes No • Do not turn the camera off the camera -
... Failure to observe this camera to format the memory card. Turn off or open the battery-chamber/memory card slot cover until formatting is in direct sunlight, closed vehicles, or areas exposed to high temperatures. • Do not expose to choose Yes and press the k button. The confirmation dialog... choose Format and press the k button. Note that formatting permanently deletes all images and other devices the first time they are inserted into the COOLPIX S8100 (A 172). Format card? If the switch is not formatted. Yes No • Do not turn the camera off the camera -

S8100 User's Manual
Page 58
... whether seen in the color of the light source. This is automatically adjusted to changes in the shade, direct sunlight, or under most situations. e Fluorescent Use under overcast skies. See "Preset Manual" for direct sunlight. a Auto (default setting) White balance is known as "white balance." The human brain is displayed. However, when...
... whether seen in the color of the light source. This is automatically adjusted to changes in the shade, direct sunlight, or under most situations. e Fluorescent Use under overcast skies. See "Preset Manual" for direct sunlight. a Auto (default setting) White balance is known as "white balance." The human brain is displayed. However, when...

S8100 User's Manual
Page 65
... the shutter-release button halfway. Press the shutter-release button halfway again to focus. 1 / 2 5 0 F 3.5 Press the shutter-release button the rest of factors, including the direction in which the camera focuses depend upon a variety of the way down to focus on (A 27), the subject may be rotated and displayed automatically according...
... the shutter-release button halfway. Press the shutter-release button halfway again to focus. 1 / 2 5 0 F 3.5 Press the shutter-release button the rest of factors, including the direction in which the camera focuses depend upon a variety of the way down to focus on (A 27), the subject may be rotated and displayed automatically according...
S8100 User's Manual
Page 80
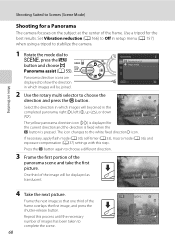
...of the frame overlaps the first image, and press the shutter-release button. Press the k button again to the white fixed direction I icon. The icon changes to choose a different direction. 3 Frame the first portion of images has been taken to y, press the d button and choose p Panorama assist (A... 55). Use a tripod for 35 the current direction and the direction is fixed when the k button is displayed for the best results. right (I ) is pressed. Frame the next image so that one third...
...of the frame overlaps the first image, and press the shutter-release button. Press the k button again to the white fixed direction I icon. The icon changes to choose a different direction. 3 Frame the first portion of images has been taken to y, press the d button and choose p Panorama assist (A... 55). Use a tripod for 35 the current direction and the direction is fixed when the k button is displayed for the best results. right (I ) is pressed. Frame the next image so that one third...
S8100 User's Manual
Page 124
...-compatible (A 201) printer that supports printing of shooting date and shooting data is used. • Shooting data cannot be printed when the camera is connected directly to remove print marking from printers that do not support printing of the date on images.
...-compatible (A 201) printer that supports printing of shooting date and shooting data is used. • Shooting data cannot be printed when the camera is connected directly to remove print marking from printers that do not support printing of the date on images.

S8100 User's Manual
Page 128
... images (A 83, 121). Still images can be rotated. When the Rotate image screen is displayed, images cannot be rotated up to 180 degrees in either direction. Rotate image Rotate image Rotate image Back Rotate Rotate 90 degrees counterclockwise Back Rotate Back Rotate Rotate 90 degrees clockwise Press the k button to rotate...
... images (A 83, 121). Still images can be rotated. When the Rotate image screen is displayed, images cannot be rotated up to 180 degrees in either direction. Rotate image Rotate image Rotate image Back Rotate Rotate 90 degrees counterclockwise Back Rotate Back Rotate Rotate 90 degrees clockwise Press the k button to rotate...

S8100 User's Manual
Page 138
... show Protect Exit Skin softening Normal Exit Amount Preview Back Save 15/11/2010 15:30 0004.JPG B Note on Skin Softening 4/ 4 Depending upon the direction in which skin softening was softened, press the rotary multi selector J or K to which faces are softened. If no faces are saved as expected. Skin...
... show Protect Exit Skin softening Normal Exit Amount Preview Back Save 15/11/2010 15:30 0004.JPG B Note on Skin Softening 4/ 4 Depending upon the direction in which skin softening was softened, press the rotary multi selector J or K to which faces are softened. If no faces are saved as expected. Skin...
S8100 User's Manual
Page 163
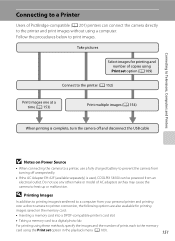
...AC Adapter EH-62F (available separately) is used, COOLPIX S8100 can be powered from an electrical outlet. D Printing Images In addition to printing images transferred to a computer from your personal printer and printing over a direct camera-to-printer connection, the following options are also ...109). 151 Connecting to Televisions, Computers and Printers Connecting to a Printer Users of PictBridge-compatible (A 201) printers can connect the camera directly to prevent the camera from turning off and disconnect the USB cable B Notes on the memory card: • Inserting a memory ...
...AC Adapter EH-62F (available separately) is used, COOLPIX S8100 can be powered from an electrical outlet. D Printing Images In addition to printing images transferred to a computer from your personal printer and printing over a direct camera-to-printer connection, the following options are also ...109). 151 Connecting to Televisions, Computers and Printers Connecting to a Printer Users of PictBridge-compatible (A 201) printers can connect the camera directly to prevent the camera from turning off and disconnect the USB cable B Notes on the memory card: • Inserting a memory ...
S8100 User's Manual
Page 178
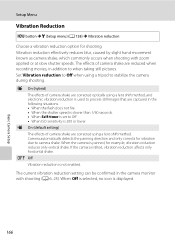
... reduction to when taking still pictures. When Off is selected, no icon is tilted, vibration reduction affects only horizontal shake. Camera automatically detects the panning direction and only corrects for vibration due to stabilize the camera during shooting. If the camera is displayed. 166 k Off Vibration reduction is panned, for shooting...
... reduction to when taking still pictures. When Off is selected, no icon is tilted, vibration reduction affects only horizontal shake. Camera automatically detects the panning direction and only corrects for vibration due to stabilize the camera during shooting. If the camera is displayed. 166 k Off Vibration reduction is panned, for shooting...

S8100 User's Manual
Page 186
... if the printer complies with the PictBridge standard. • When Auto is selected for Charge by computer, it may be impossible to print images with direct connection of the camera to the 174 printer.
... if the printer complies with the PictBridge standard. • When Auto is selected for Charge by computer, it may be impossible to print images with direct connection of the camera to the 174 printer.
S8100 User's Manual
Page 213
... when images are output from Exif-compliant printers. • PictBridge: A standard developed cooperatively by the digital camera and printer industries, allowing photographs to be output directly to a printer without connecting the camera to a computer. 201 Technical Notes and Index
... when images are output from Exif-compliant printers. • PictBridge: A standard developed cooperatively by the digital camera and printer industries, allowing photographs to be output directly to a printer without connecting the camera to a computer. 201 Technical Notes and Index
S8100 User's Manual
Page 215
... 38 Crop 128 D Date 18, 160 Date imprint 165 Daylight 46 Daylight saving time 18, 161 Delete 29, 84, 118, 140 Digital zoom 25, 169 Direct print 151 D-Lighting 125 DPOF 201 DPOF print 156 DSCN 185 Dusk/dawn i 63 E EH-68P/EH-68P (AR) 14 EN-EL12 12, 14 Exposure...
... 38 Crop 128 D Date 18, 160 Date imprint 165 Daylight 46 Daylight saving time 18, 161 Delete 29, 84, 118, 140 Digital zoom 25, 169 Direct print 151 D-Lighting 125 DPOF 201 DPOF print 156 DSCN 185 Dusk/dawn i 63 E EH-68P/EH-68P (AR) 14 EN-EL12 12, 14 Exposure...


