S8100 User's Manual
Page 5
... when transporting the battery. Failure to observe this precaution could result in electric shock. • Do not damage, modify, forcibly tug or bend the USB cable, place it under heavy objects, or expose it upside down or backwards. • Do not short or disassemble the battery or attempt to remove or...
... when transporting the battery. Failure to observe this precaution could result in electric shock. • Do not damage, modify, forcibly tug or bend the USB cable, place it under heavy objects, or expose it upside down or backwards. • Do not short or disassemble the battery or attempt to remove or...
S8100 User's Manual
Page 6
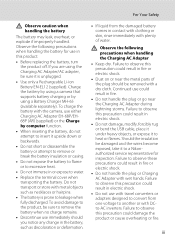
... hospital. Avoid contact with product regulations. Turn the power off or landing. For Your Safety Use appropriate cables When connecting cables to the input and output jacks, use only the cables provided or sold by Nikon for the purpose, to your fingers or other objects are not pinched by the lens cover or other...
... hospital. Avoid contact with product regulations. Turn the power off or landing. For Your Safety Use appropriate cables When connecting cables to the input and output jacks, use only the cables provided or sold by Nikon for the purpose, to your fingers or other objects are not pinched by the lens cover or other...

S8100 User's Manual
Page 7
... can be determined by turning the equipment off and on a circuit different from that to radio communications. Interface Cables Use the interface cables sold or provided by Nikon Corporation may void the user's authority to correct the interference by one or more of the proper configuration for ...help. These limits are not expressly approved by Nikon for a Class B digital device, pursuant to comply with the instructions, may exceed the limits of Class B Part 15 of the FCC rules. Using other interface cables may cause harmful interference to which can radiate radio ...
... can be determined by turning the equipment off and on a circuit different from that to radio communications. Interface Cables Use the interface cables sold or provided by Nikon Corporation may void the user's authority to correct the interference by one or more of the proper configuration for ...help. These limits are not expressly approved by Nikon for a Class B digital device, pursuant to comply with the instructions, may exceed the limits of Class B Part 15 of the FCC rules. Using other interface cables may cause harmful interference to which can radiate radio ...

S8100 User's Manual
Page 26
... camera was purchased. Proceed to insert connectors at an angle, and do not use force when connecting or disconnecting the USB cable. Do not attempt to step 2. USB cable 14 Once the two are properly oriented. Be sure that connectors are connected, attempting to forcibly remove the plug adapter could ... firmly until it is included, attach the plug adapter to the plug on . 3 Use the supplied USB cable to connect the Charging AC Adapter to the camera via the supplied USB Cable UC-E6, and then plugging the Charging AC Adapter into an electrical outlet. 1 Prepare the Charging AC Adapter...
... camera was purchased. Proceed to insert connectors at an angle, and do not use force when connecting or disconnecting the USB cable. Do not attempt to step 2. USB cable 14 Once the two are properly oriented. Be sure that connectors are connected, attempting to forcibly remove the plug adapter could ... firmly until it is included, attach the plug adapter to the plug on . 3 Use the supplied USB cable to connect the Charging AC Adapter to the camera via the supplied USB Cable UC-E6, and then plugging the Charging AC Adapter into an electrical outlet. 1 Prepare the Charging AC Adapter...

S8100 User's Manual
Page 27
...exhausted battery. Charging the Battery The following chart explains charge lamp status when the camera is a problem with the battery. Disconnect the USB cable or unplug the Charging AC Adapter and correctly connect it again, or change the battery. 5 Disconnect the Charging AC Adapter from the electrical... outlet and then disconnect the USB cable. 15 Off Battery not charging. The charge lamp slowly blinks green to 95 °F). • The USB cable or Charging AC Adapter is not properly connected, or there is plugged into an ...
...exhausted battery. Charging the Battery The following chart explains charge lamp status when the camera is a problem with the battery. Disconnect the USB cable or unplug the Charging AC Adapter and correctly connect it again, or change the battery. 5 Disconnect the Charging AC Adapter from the electrical... outlet and then disconnect the USB cable. 15 Off Battery not charging. The charge lamp slowly blinks green to 95 °F). • The USB cable or Charging AC Adapter is not properly connected, or there is plugged into an ...
S8100 User's Manual
Page 124
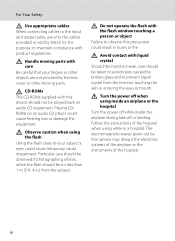
... selected in the print set in step 3 of "Print Set (Creating a DPOF Print Order)" (A 109) and press the k button to a printer, via the supplied USB cable, for DPOF printing (A 156). • Note that Date and Info settings are captured. Images with shooting date and time imprinted on the image when they...
... selected in the print set in step 3 of "Print Set (Creating a DPOF Print Order)" (A 109) and press the k button to a printer, via the supplied USB cable, for DPOF printing (A 156). • Note that Date and Info settings are captured. Images with shooting date and time imprinted on the image when they...

S8100 User's Manual
Page 155
When using a commercially available HDMI cable Connect the plug to HDMI jack 143 HDMI mini connector (Type C) to the HDMI jack on the TV...camera to a television to play images or movies back on the TV. Yellow White Red When using the supplied audio/video cable Connect the yellow plug to the video-in jack and the white and red plugs to the audio-in jacks on the ...television. If your TV is equipped with an HDMI jack, a commercially available HDMI cable can be used to connect the camera to the TV for high-definition display. 1 Turn off the camera. 2 Connect the ...
When using a commercially available HDMI cable Connect the plug to HDMI jack 143 HDMI mini connector (Type C) to the HDMI jack on the TV...camera to a television to play images or movies back on the TV. Yellow White Red When using the supplied audio/video cable Connect the yellow plug to the video-in jack and the white and red plugs to the audio-in jacks on the ...television. If your TV is equipped with an HDMI jack, a commercially available HDMI cable can be used to connect the camera to the TV for high-definition display. 1 Turn off the camera. 2 Connect the ...

S8100 User's Manual
Page 156
...end of HD 720p (1280 × 720) or higher are recommended for details. 4 Hold down the c button to the video channel. When purchasing an HDMI cable, be sure that will be sure that the camera's video mode setting in the Set up menu (A 157) ➝ TV settings (A 173) 144 conforms ... not pull the connector at an angle. • Do not connect the HDMI cable and audio/video cable to the camera simultaneously. • Do not connect the HDMI cable and USB cable to the camera. Use a commercially available HDMI cable to connect the camera to a high-definition TV. B Notes on this camera is ...
...end of HD 720p (1280 × 720) or higher are recommended for details. 4 Hold down the c button to the video channel. When purchasing an HDMI cable, be sure that will be sure that the camera's video mode setting in the Set up menu (A 157) ➝ TV settings (A 173) 144 conforms ... not pull the connector at an angle. • Do not connect the HDMI cable and audio/video cable to the camera simultaneously. • Do not connect the HDMI cable and USB cable to the camera. Use a commercially available HDMI cable to connect the camera to a high-definition TV. B Notes on this camera is ...
S8100 User's Manual
Page 157
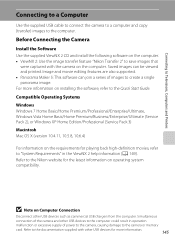
...Start Guide. Connecting to Televisions, Computers and Printers Connecting to a Computer Use the supplied USB cable to connect the camera to a computer and copy (transfer) images to the Nikon website for the latest information on operating system compatibility. Before Connecting the Camera Install the Software...Simultaneous connection of images to the documentation supplied with the camera on the computer. • ViewNX 2: Use the image transfer feature "Nikon Transfer 2" to the camera or memory card. Saved images can join a series of the camera and other USB devices such as ...
...Start Guide. Connecting to Televisions, Computers and Printers Connecting to a Computer Use the supplied USB cable to connect the camera to a computer and copy (transfer) images to the Nikon website for the latest information on operating system compatibility. Before Connecting the Camera Install the Software...Simultaneous connection of images to the documentation supplied with the camera on the computer. • ViewNX 2: Use the image transfer feature "Nikon Transfer 2" to the camera or memory card. Saved images can join a series of the camera and other USB devices such as ...

S8100 User's Manual
Page 158
... (A 150, 174). • If the AC Adapter EH-62F (A 183) (available separately) is used, COOLPIX S8100 can be recognized if the camera is automatically charged using the supplied USB cable. The camera monitor will light. B Connecting the USB Cable 146 The connection may cause the camera to overheat or malfunction. Be sure that the...
... (A 150, 174). • If the AC Adapter EH-62F (A 183) (available separately) is used, COOLPIX S8100 can be recognized if the camera is automatically charged using the supplied USB cable. The camera monitor will light. B Connecting the USB Cable 146 The connection may cause the camera to overheat or malfunction. Be sure that the...

S8100 User's Manual
Page 160
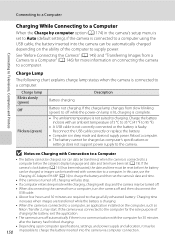
... setting of ViewNX 2). B Charging the Battery 148 The charge lamp slowly blinks green while the battery inserted into the camera is connected via the USB cable. For more information on using ViewNX 2, refer to a Computer ViewNX 2 starts automatically when the transfer is complete, turn off automatically if there is no communication...
... setting of ViewNX 2). B Charging the Battery 148 The charge lamp slowly blinks green while the battery inserted into the camera is connected via the USB cable. For more information on using ViewNX 2, refer to a Computer ViewNX 2 starts automatically when the transfer is complete, turn off automatically if there is no communication...
S8100 User's Manual
Page 162
...be automatically charged depending on the ability of 5 °C to 35 °C (41 °F to 95 °F). • A USB cable is not correctly connected or the battery is connected to a computer. Charging time increases when images are required to charge a fully exhausted battery. Reconnect...specifications, settings, and power supply and allocation, it may be 150 impossible to charge the battery inserted into the camera can be charged as Nikon Transfer 2, may start. See "Before Connecting the Camera" (A 145) and "Transferring Images from a computer, turn the camera off automatically...
...be automatically charged depending on the ability of 5 °C to 35 °C (41 °F to 95 °F). • A USB cable is not correctly connected or the battery is connected to a computer. Charging time increases when images are required to charge a fully exhausted battery. Reconnect...specifications, settings, and power supply and allocation, it may be 150 impossible to charge the battery inserted into the camera can be charged as Nikon Transfer 2, may start. See "Before Connecting the Camera" (A 145) and "Transferring Images from a computer, turn the camera off automatically...
S8100 User's Manual
Page 163
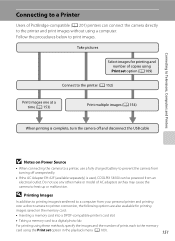
... from turning off unexpectedly. • If the AC Adapter EH-62F (available separately) is complete, turn the camera off and disconnect the USB cable B Notes on the memory card: • Inserting a memory card into a DPOF-compatible printer's card slot • Taking a memory card...) Connect to the printer (A 152) Print images one at a time (A 153) Print multiple images (A 154) When printing is used, COOLPIX S8100 can connect the camera directly to the printer and print images without using a computer. Connecting to Televisions, Computers and Printers Connecting to a Printer...
... from turning off unexpectedly. • If the AC Adapter EH-62F (available separately) is complete, turn the camera off and disconnect the USB cable B Notes on the memory card: • Inserting a memory card into a DPOF-compatible printer's card slot • Taking a memory card...) Connect to the printer (A 152) Print images one at a time (A 153) Print multiple images (A 154) When printing is used, COOLPIX S8100 can connect the camera directly to the printer and print images without using a computer. Connecting to Televisions, Computers and Printers Connecting to a Printer...

S8100 User's Manual
Page 164
... the Camera to a Printer 1 Turn off and disconnect the USB cable. Be sure that connectors are properly oriented. When properly connected, the PictBridge startup screen (1) will be displayed in the camera's setup menu to the printer using the supplied USB cable. Do not attempt to insert connectors at an angle, and do... not use force when connecting or disconnecting the USB cable. 4 The camera is automatically turned on the printer. Set the Charge by computer option (A 174) 152 in the camera monitor, followed by the Print selection ...
... the Camera to a Printer 1 Turn off and disconnect the USB cable. Be sure that connectors are properly oriented. When properly connected, the PictBridge startup screen (1) will be displayed in the camera's setup menu to the printer using the supplied USB cable. Do not attempt to insert connectors at an angle, and do... not use force when connecting or disconnecting the USB cable. 4 The camera is automatically turned on the printer. Set the Charge by computer option (A 174) 152 in the camera monitor, followed by the Print selection ...
S8100 User's Manual
Page 169
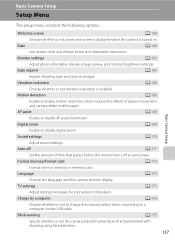
... reduction is turned on images. Charge by computer A 174 Choose whether or not to charge the camera battery when connecting to a computer via the USB cable.
... reduction is turned on images. Charge by computer A 174 Choose whether or not to charge the camera battery when connecting to a computer via the USB cable.

S8100 User's Manual
Page 186
... the camera is connected to the 174 printer. Set Charge by the computer. B Notes on , turn the camera off and disconnect the USB cable. Auto (default setting) When the camera is connected to some printers. If the PictBridge startup screen is not displayed in the monitor after the ...camera is connected to a computer via the USB cable (A 150). Basic Camera Setup Setup Menu Charge by Computer d button M z (Setup menu) (A 158) M Charge by computer Choose whether or not the battery ...
... the camera is connected to the 174 printer. Set Charge by the computer. B Notes on , turn the camera off and disconnect the USB cable. Auto (default setting) When the camera is connected to some printers. If the PictBridge startup screen is not displayed in the monitor after the ...camera is connected to a computer via the USB cable (A 150). Basic Camera Setup Setup Menu Charge by Computer d button M z (Setup menu) (A 158) M Charge by computer Choose whether or not the battery ...

S8100 User's Manual
Page 195
... Charging AC Adapter EH-68P*, EH-68P (AR)* Battery Charger MH-65 AC Adapter EH-62F Connecting the EH-62F AC adapter USB cable Audio/video cable Be sure that the AC adapter cord has been properly aligned in the grooves, the cover and cord may be damaged when the cover... is not properly aligned in AC adapter and battery chamber grooves before closing the battery-chamber/memory card slot cover. USB Cable UC-E6 Audio Video Cable EG-CP16 * When using in other countries, use a plug adapter (commercially available) as necessary. For more information about plug adapters, consult your...
... Charging AC Adapter EH-68P*, EH-68P (AR)* Battery Charger MH-65 AC Adapter EH-62F Connecting the EH-62F AC adapter USB cable Audio/video cable Be sure that the AC adapter cord has been properly aligned in the grooves, the cover and cord may be damaged when the cover... is not properly aligned in AC adapter and battery chamber grooves before closing the battery-chamber/memory card slot cover. USB Cable UC-E6 Audio Video Cable EG-CP16 * When using in other countries, use a plug adapter (commercially available) as necessary. For more information about plug adapters, consult your...
S8100 User's Manual
Page 201
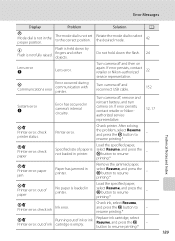
Error Messages Display Problem Solution A P Mode dial is not in camera's internal circuitry. Flash is empty. If error persists, contact retailer or Nikon-authorized 22 service representative. P Communications error Error occurred during communication with printer. select Resume, and press the k button to - printing.* PR ... error: check printer status. printing.* PR Printer error: paper jam Paper has jammed in printer. Turn camera off and reconnect USB cable. 152 System error Q Error has occurred in the proper position. The mode dial is not fully raised.
Error Messages Display Problem Solution A P Mode dial is not in camera's internal circuitry. Flash is empty. If error persists, contact retailer or Nikon-authorized 22 service representative. P Communications error Error occurred during communication with printer. select Resume, and press the k button to - printing.* PR ... error: check printer status. printing.* PR Printer error: paper jam Paper has jammed in printer. Turn camera off and reconnect USB cable. 152 System error Q Error has occurred in the proper position. The mode dial is not fully raised.
S8100 User's Manual
Page 203
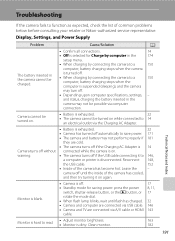
...or printer is disconnected. Monitor is blank. • Camera is off if the USB cable connecting it on . Troubleshooting If the camera fails to read. • Adjust monitor... When charging by connecting the camera to 14 an electrical outlet via USB cable. • Camera and TV are cold. • The camera turns ... connected while the camera is on again. Reconnect 148, the USB cable. 152 • Inside of the camera has cooled, and then ... camera may not perform properly if 181 they are connected via A/V cable or HDMI cable. 17 8, 11, 17 32 146 143 Monitor is hard to ...
...or printer is disconnected. Monitor is blank. • Camera is off if the USB cable connecting it on . Troubleshooting If the camera fails to read. • Adjust monitor... When charging by connecting the camera to 14 an electrical outlet via USB cable. • Camera and TV are cold. • The camera turns ... connected while the camera is on again. Reconnect 148, the USB cable. 152 • Inside of the camera has cooled, and then ... camera may not perform properly if 181 they are connected via A/V cable or HDMI cable. 17 8, 11, 17 32 146 143 Monitor is hard to ...

S8100 User's Manual
Page 205
... when the shutter-release button is set to shooting mode. Troubleshooting Shooting Problem Cause/Solution A Cannot switch to 75 Multi-shot 16 - Disconnect HDMI cable or USB cable. 143, 146, 152 • When camera is in the setup menu to On), and 61 Portrait scene modes - When using the scene auto selector...
... when the shutter-release button is set to shooting mode. Troubleshooting Shooting Problem Cause/Solution A Cannot switch to 75 Multi-shot 16 - Disconnect HDMI cable or USB cable. 143, 146, 152 • When camera is in the setup menu to On), and 61 Portrait scene modes - When using the scene auto selector...


