S8100 User's Manual
Page 9
... Strap ...11 First Steps ...12 Inserting the Battery ...12 Removing the Battery ...13 Charging the Battery ...14 Turning On and Off the Camera...17 Setting Display Language, Date, and Time 18 Inserting Memory Cards ...20 Removing Memory Cards...20 Basic Photography and Playback: A (Auto) Mode 22 Step 1... Deleting Images 28 Playing Back Images (Playback Mode)...28 Deleting Unwanted Images...29 Using the Flash...30 Raising and Lowering the Flash...30 Setting the Flash Mode...31 Taking Pictures with the Self-timer 33 Taking Pictures with the Smile Timer 34 Macro Mode...36 Adjusting Brightness ...
... Strap ...11 First Steps ...12 Inserting the Battery ...12 Removing the Battery ...13 Charging the Battery ...14 Turning On and Off the Camera...17 Setting Display Language, Date, and Time 18 Inserting Memory Cards ...20 Removing Memory Cards...20 Basic Photography and Playback: A (Auto) Mode 22 Step 1... Deleting Images 28 Playing Back Images (Playback Mode)...28 Deleting Unwanted Images...29 Using the Flash...30 Raising and Lowering the Flash...30 Setting the Flash Mode...31 Taking Pictures with the Self-timer 33 Taking Pictures with the Smile Timer 34 Macro Mode...36 Adjusting Brightness ...

S8100 User's Manual
Page 10
Table of Contents More on Shooting ...42 Selecting a Shooting Mode (Mode Dial 42 Changing A (Auto) Mode Settings (Shooting Menu 43 Image Mode (Image Quality/Image Size 44 White Balance (Adjusting Hue) ...46 Metering ...48 ISO Sensitivity...49 AF Area... for a Panorama...68 Focusing on a Moving Subject (Subject Tracking Mode 70 Changing Subject Tracking Mode Settings 72 Burst Shooting (Continuous Shooting Mode 73 Changing Continuous Shooting Mode Settings 75 Camera Settings that Cannot Be Applied Simultaneously 78 More on Playback...80 Operations in Full-frame Playback Mode 80 Displaying...
Table of Contents More on Shooting ...42 Selecting a Shooting Mode (Mode Dial 42 Changing A (Auto) Mode Settings (Shooting Menu 43 Image Mode (Image Quality/Image Size 44 White Balance (Adjusting Hue) ...46 Metering ...48 ISO Sensitivity...49 AF Area... for a Panorama...68 Focusing on a Moving Subject (Subject Tracking Mode 70 Changing Subject Tracking Mode Settings 72 Burst Shooting (Continuous Shooting Mode 73 Changing Continuous Shooting Mode Settings 75 Camera Settings that Cannot Be Applied Simultaneously 78 More on Playback...80 Operations in Full-frame Playback Mode 80 Displaying...
S8100 User's Manual
Page 11
... a Cropped Copy...128 Movie Recording and Playback 129 Recording Movies ...129 Capturing Still Images While Recording Movies 131 Changing Movie Recording Settings 132 Movie of Movie Options (Normal Speed Movie Type 134 Autofocus Mode ...135 Wind Noise Reduction...136 Recording Movies in Slow Motion... and Fast Motion (HS Movie 137 Changing HS Movie Settings (HS Movie Type 139 Movie Playback ...140 Deleting Movies...140 Editing Movies...141 Connecting to Televisions, Computers and Printers 143 Connecting...
... a Cropped Copy...128 Movie Recording and Playback 129 Recording Movies ...129 Capturing Still Images While Recording Movies 131 Changing Movie Recording Settings 132 Movie of Movie Options (Normal Speed Movie Type 134 Autofocus Mode ...135 Wind Noise Reduction...136 Recording Movies in Slow Motion... and Fast Motion (HS Movie 137 Changing HS Movie Settings (HS Movie Type 139 Movie Playback ...140 Deleting Movies...140 Editing Movies...141 Connecting to Televisions, Computers and Printers 143 Connecting...
S8100 User's Manual
Page 12
... Imprint (Imprinting Date and Time 165 Vibration Reduction ...166 Motion Detection ...168 AF Assist...169 Digital Zoom ...169 Sound Settings...170 Auto Off ...171 Format Memory/Format Card ...172 Language...173 TV Settings ...173 Charge by Computer...174 Blink Warning ...175 Reset All ...177 Firmware Version ...179 Caring for the Camera...180...
... Imprint (Imprinting Date and Time 165 Vibration Reduction ...166 Motion Detection ...168 AF Assist...169 Digital Zoom ...169 Sound Settings...170 Auto Off ...171 Format Memory/Format Card ...172 Language...173 TV Settings ...173 Charge by Computer...174 Blink Warning ...175 Reset All ...177 Firmware Version ...179 Caring for the Camera...180...
S8100 User's Manual
Page 13
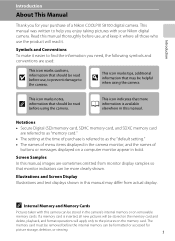
..., all new pictures will be read it where all those who use the product will apply only to as "memory card." • The setting at the time of a Nikon COOLPIX S8100 digital camera. If a memory card is available elsewhere in the camera's internal memory or on a computer monitor appear in bold. D This icon marks...
..., all new pictures will be read it where all those who use the product will apply only to as "memory card." • The setting at the time of a Nikon COOLPIX S8100 digital camera. If a memory card is available elsewhere in the camera's internal memory or on a computer monitor appear in bold. D This icon marks...
S8100 User's Manual
Page 15
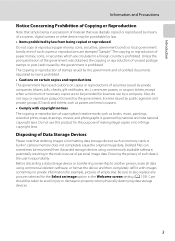
... postage stamps or post cards issued by the government is prohibited. Care should be provided for the Select an image option in the Welcome screen setting (A 159). Introduction Information and Precautions Notice Concerning Prohibition of Copying or Reproduction Note that simply being copied or reproduced Do not copy or reproduce paper...
... postage stamps or post cards issued by the government is prohibited. Care should be provided for the Select an image option in the Welcome screen setting (A 159). Introduction Information and Precautions Notice Concerning Prohibition of Copying or Reproduction Note that simply being copied or reproduced Do not copy or reproduce paper...
S8100 User's Manual
Page 18
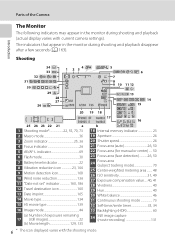
... 32 Self-timer/smile timer 33, 34 33 Backlighting (HDR 60 34 Still image capture (movie recording 131 6 * The icon displayed varies with current camera settings). Shooting 34 33 32 10 2 31 30 29 28 27 26 1 2 34 +1.0 1 6 0 0 1 / 2 5 0 F 3.5 5 6 7 8 9 10 11 12 13 14 999 15 20 999 9999... mode 30 7 Battery level indicator 22 8 Vibration reduction icon 23, 166 9 Motion detection icon 168 10 Wind noise reduction 136 11 "Date not set" indicator 160, 186 12 Travel destination icon 160 13 Date imprint 165 14 Movie type 134 15 HS movie type 139 16 Image mode 44...
... 32 Self-timer/smile timer 33, 34 33 Backlighting (HDR 60 34 Still image capture (movie recording 131 6 * The icon displayed varies with current camera settings). Shooting 34 33 32 10 2 31 30 29 28 27 26 1 2 34 +1.0 1 6 0 0 1 / 2 5 0 F 3.5 5 6 7 8 9 10 11 12 13 14 999 15 20 999 9999... mode 30 7 Battery level indicator 22 8 Vibration reduction icon 23, 166 9 Motion detection icon 168 10 Wind noise reduction 136 11 "Date not set" indicator 160, 186 12 Travel destination icon 160 13 Date imprint 165 14 Movie type 134 15 HS movie type 139 16 Image mode 44...
S8100 User's Manual
Page 19
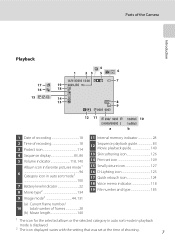
... 28 (b) Movie length 140 11 Internal memory indicator 28 12 Sequence playback guide 83 Movie playback guide 140 13 Skin softening icon 126 14 Print set icon 109 15 Small picture icon 127 16 D-Lighting icon 125 17 Quick retouch icon 124 18 Voice memo indicator 118 19 File number and... 1 The icon for the selected album or the selected category in auto sort mode in playback mode is displayed. 2 The icon displayed varies with the setting that was set at the time of the Camera Introduction Playback 17 16 15 4 1 23 5 6 15/11/2010 12:00 7 19 9 9 9 9 . Parts of ...
... 28 (b) Movie length 140 11 Internal memory indicator 28 12 Sequence playback guide 83 Movie playback guide 140 13 Skin softening icon 126 14 Print set icon 109 15 Small picture icon 127 16 D-Lighting icon 125 17 Quick retouch icon 124 18 Voice memo indicator 118 19 File number and... 1 The icon for the selected album or the selected category in auto sort mode in playback mode is displayed. 2 The icon displayed varies with the setting that was set at the time of the Camera Introduction Playback 17 16 15 4 1 23 5 6 15/11/2010 12:00 7 19 9 9 9 9 . Parts of ...

S8100 User's Manual
Page 21
...: selects the next image During menu display: moves the highlight down Rotary multi selector (right) Shooting mode: displays creative slider (A 38), displays the o (exposure compensation) setting screen (A 41) Playback mode: selects the next image During menu display: moves the highlight right/ proceeds to next screen (applies selection) Playback mode: selects the...
...: selects the next image During menu display: moves the highlight down Rotary multi selector (right) Shooting mode: displays creative slider (A 38), displays the o (exposure compensation) setting screen (A 41) Playback mode: selects the next image During menu display: moves the highlight right/ proceeds to next screen (applies selection) Playback mode: selects the...

S8100 User's Manual
Page 22
...or more menu items to follow 1 Press the d button. 2 Press the rotary multi selector H or I to navigate the menus. The setting is finished, press the d button. 10 The camera exits the menu display. Continuous Image mode White balance Metering Continuous ISO sensitivity AF area mode... Exit Continuous Autofocus mode Exit Autofocus mode Single AF Full-time AF Exit 4 When setting is applied. To change tabs, press J (A 11). Items can also be chosen by rotating the rotary multi selector (A 9). Introduction ...
...or more menu items to follow 1 Press the d button. 2 Press the rotary multi selector H or I to navigate the menus. The setting is finished, press the d button. 10 The camera exits the menu display. Continuous Image mode White balance Metering Continuous ISO sensitivity AF area mode... Exit Continuous Autofocus mode Exit Autofocus mode Single AF Full-time AF Exit 4 When setting is applied. To change tabs, press J (A 11). Items can also be chosen by rotating the rotary multi selector (A 9). Introduction ...
S8100 User's Manual
Page 23
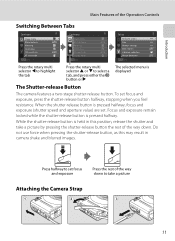
... in camera shake and blurred images. While the shutter-release button is pressed halfway, focus and exposure (shutter speed and aperture value) are set focus and exposure Press the rest of the way down to take a picture by pressing the shutter-release button the rest of the Operation ... Features of the way down. Press halfway to select a tab, and press either the k button or K The selected menu is pressed halfway. To set focus and exposure, press the shutter-release button halfway, stopping when you feel resistance. Focus and exposure remain locked while the shutter-release button is...
... in camera shake and blurred images. While the shutter-release button is pressed halfway, focus and exposure (shutter speed and aperture value) are set focus and exposure Press the rest of the way down to take a picture by pressing the shutter-release button the rest of the Operation ... Features of the way down. Press halfway to select a tab, and press either the k button or K The selected menu is pressed halfway. To set focus and exposure, press the shutter-release button halfway, stopping when you feel resistance. Focus and exposure remain locked while the shutter-release button is...

S8100 User's Manual
Page 29
..., the camera will blink. Rotating the mode dial • In shooting or playback mode, the camera will enter standby mode in about one minute (default setting). • The time allowed to turn off , the camera will enter standby mode, and the power-on lamp will turn the camera on in the...
..., the camera will blink. Rotating the mode dial • In shooting or playback mode, the camera will enter standby mode in about one minute (default setting). • The time allowed to turn off , the camera will enter standby mode, and the power-on lamp will turn the camera on in the...

S8100 User's Manual
Page 30
..., W is displayed at the top of the monitor. Yes No Cancel London Casablanca D Daylight Saving Time If daylight saving time is in step 4. First Steps Setting Display Language, Date, and Time When the first time the camera is turned on, the language-selection screen and the date and time... for the camera clock are displayed. 1 Press the power switch to enable the daylight saving time function while setting the region in effect, press H to turn on (the power-on lamp turns off when the monitor turns on the camera. Rotary multi selector 3 Press H ...
..., W is displayed at the top of the monitor. Yes No Cancel London Casablanca D Daylight Saving Time If daylight saving time is in step 4. First Steps Setting Display Language, Date, and Time When the first time the camera is turned on, the language-selection screen and the date and time... for the camera clock are displayed. 1 Press the power switch to enable the daylight saving time function while setting the region in effect, press H to turn on (the power-on lamp turns off when the monitor turns on the camera. Rotary multi selector 3 Press H ...

S8100 User's Manual
Page 31
..., enable date imprint from the Date imprint option (A 165) in the setup menu (A 157) after the date and time have been set. • To change the camera's internal time setting, select Date from the Date option (A 160) in the setup menu (A 157) and follow the procedure described from step 5. •...; To change the time zone and daylight saving time settings, select Time zone from the Date option (A 160) in which the day, month, and year are displayed) and press the k button or press K. Select...
..., enable date imprint from the Date imprint option (A 165) in the setup menu (A 157) after the date and time have been set. • To change the camera's internal time setting, select Date from the Date option (A 160) in the setup menu (A 157) and follow the procedure described from step 5. •...; To change the time zone and daylight saving time settings, select Time zone from the Date option (A 160) in which the day, month, and year are displayed) and press the k button or press K. Select...

S8100 User's Manual
Page 35
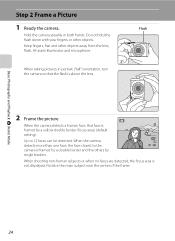
...camera, C does not appear and images will be saved on the memory card. The combination of image quality (compression) and image size can be set by using a tripod to stabilize the camera during shooting and playback will be saved on . ➝ Power switch or Shutter-release button D ... be applied. • Brightness (exposure compensation), vividness, and hue can be adjusted with the creative slider (A 37). • Press the d button to specify settings for all shooting menu items (A 43) according to Off when using the Image mode option in standby mode to turn it back on the camera...
...camera, C does not appear and images will be saved on the memory card. The combination of image quality (compression) and image size can be set by using a tripod to stabilize the camera during shooting and playback will be saved on . ➝ Power switch or Shutter-release button D ... be applied. • Brightness (exposure compensation), vividness, and hue can be adjusted with the creative slider (A 37). • Press the d button to specify settings for all shooting menu items (A 43) according to Off when using the Image mode option in standby mode to turn it back on the camera...
S8100 User's Manual
Page 36
... lens. When the camera detects a human face, that the flash is framed by a double border and the others by a yellow double border (focus area) (default setting). Keep fingers, hair and other objects. Position the main subject near the center of the frame. 24 Hold the camera steadily in portrait ("tall") orientation...
... lens. When the camera detects a human face, that the flash is framed by a double border and the others by a yellow double border (focus area) (default setting). Keep fingers, hair and other objects. Position the main subject near the center of the frame. 24 Hold the camera steadily in portrait ("tall") orientation...

S8100 User's Manual
Page 37
... subject. When zoom is increased beyond the maximum magnification of the zoom positions at which shooting without interpolation is applied at the current image mode setting. Digital zoom can be disabled from the Digital zoom option (A 169) in slight deterioration of the frame and the focus area is not displayed when...
... subject. When zoom is increased beyond the maximum magnification of the zoom positions at which shooting without interpolation is applied at the current image mode setting. Digital zoom can be disabled from the Digital zoom option (A 169) in slight deterioration of the frame and the focus area is not displayed when...
S8100 User's Manual
Page 38
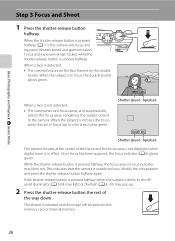
... and Shoot 1 Press the shutter-release button halfway. When the shutter-release button is in effect. When the subject is pressed halfway (A 11), the camera sets focus and exposure (shutter speed and aperture value).
... and Shoot 1 Press the shutter-release button halfway. When the shutter-release button is in effect. When the subject is pressed halfway (A 11), the camera sets focus and exposure (shutter speed and aperture value).
S8100 User's Manual
Page 39
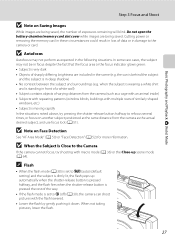
...same distance from the camera (such as the actual desired subject, and use focus lock (A 51). C Flash • When the flash mode (A 30) is set to W (off) (A 30), the camera can shoot pictures with macro mode (A 36) or the Close-up automatically when the shutter-release button is pressed ...B Autofocus Autofocus may not be in focus despite the fact that the focus area or the focus indicator glows green: • Subject is set to U (auto) (default setting) and the subject is dimly lit, the flash pops up scene mode (A 64). Cutting power or removing the memory card in these circumstances...
...same distance from the camera (such as the actual desired subject, and use focus lock (A 51). C Flash • When the flash mode (A 30) is set to W (off) (A 30), the camera can shoot pictures with macro mode (A 36) or the Close-up automatically when the shutter-release button is pressed ...B Autofocus Autofocus may not be in focus despite the fact that the focus area or the focus indicator glows green: • Subject is set to U (auto) (default setting) and the subject is dimly lit, the flash pops up scene mode (A 64). Cutting power or removing the memory card in these circumstances...

S8100 User's Manual
Page 42
... Suited to Auto, the flash has a range of 0.5-4.0 m (1 ft. 8 in .) at night or under dim lighting. The camera can be set to match the shooting conditions. • When ISO sensitivity is dim. X Fill flash Flash fires whenever a picture is dim. Flash illuminates main subject...; When not taking pictures, lower the flash. U Auto Flash fires automatically when lighting is set to evening and night portraits that include background scenery. The camera determines whether or not the flash pops up based on the brightness of ...
... Suited to Auto, the flash has a range of 0.5-4.0 m (1 ft. 8 in .) at night or under dim lighting. The camera can be set to match the shooting conditions. • When ISO sensitivity is dim. X Fill flash Flash fires whenever a picture is dim. Flash illuminates main subject...; When not taking pictures, lower the flash. U Auto Flash fires automatically when lighting is set to evening and night portraits that include background scenery. The camera determines whether or not the flash pops up based on the brightness of ...


