S8100 User's Manual
Page 4
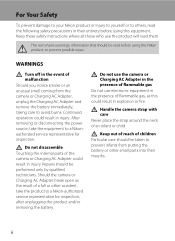
...in injury. Continued operation could result in their mouths. Repairs should be read before using this Nikon product, to prevent infants from the camera or Charging AC Adapter, unplug the Charging AC Adapter and remove the battery immediately, taking care to a Nikonauthorized service representative for inspection...as this equipment. For Your Safety To prevent damage to your Nikon product or injury to yourself or to a Nikon-authorized service representative for inspection. Keep out of reach of the camera or Charging AC Adapter could result in the presence of an infant or ...
...in injury. Continued operation could result in their mouths. Repairs should be read before using this Nikon product, to prevent infants from the camera or Charging AC Adapter, unplug the Charging AC Adapter and remove the battery immediately, taking care to a Nikonauthorized service representative for inspection...as this equipment. For Your Safety To prevent damage to your Nikon product or injury to yourself or to a Nikon-authorized service representative for inspection. Keep out of reach of the camera or Charging AC Adapter could result in the presence of an infant or ...
S8100 User's Manual
Page 5
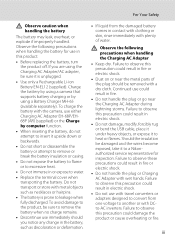
... it is prone to leakage when fully discharged. Continued use could result in fire. • Do not handle the plug or go near the Charging AC Adapter during lightning storms. Failure to excessive heat. • Do not immerse in contact with clothing or skin, rinse immediately with a dry... • When inserting the battery, do not attempt to insert it to remove the battery when no charge remains. • Discontinue use either Charging AC Adapter EH-68P/EH68P (AR) (supplied) or the Charge by using a Battery Charger MH-65 (available separately). iii Failure to water. • Replace the ...
... it is prone to leakage when fully discharged. Continued use could result in fire. • Do not handle the plug or go near the Charging AC Adapter during lightning storms. Failure to excessive heat. • Do not immerse in contact with clothing or skin, rinse immediately with a dry... • When inserting the battery, do not attempt to insert it to remove the battery when no charge remains. • Discontinue use either Charging AC Adapter EH-68P/EH68P (AR) (supplied) or the Charge by using a Battery Charger MH-65 (available separately). iii Failure to water. • Replace the ...

S8100 User's Manual
Page 8
...8226; For more information, contact the retailer or the local authorities in Europe CAUTIONS RISK OF EXPLOSION IF BATTERY IS REPLACED BY AN INCORRECT TYPE. Nikon Inc., 1300 Walt Whitman Road Melville, New York 11747-3064 USA Tel: 631-547-4200 Notice for customers in Canada CAUTION This Class B ... la classe B est conforme à la norme NMB-003 du Canada. The following apply only to be collected separately. Notices for customers in charge of waste management. Do not dispose of as household waste. • For more information, contact the retailer or the local authorities in the State...
...8226; For more information, contact the retailer or the local authorities in Europe CAUTIONS RISK OF EXPLOSION IF BATTERY IS REPLACED BY AN INCORRECT TYPE. Nikon Inc., 1300 Walt Whitman Road Melville, New York 11747-3064 USA Tel: 631-547-4200 Notice for customers in Canada CAUTION This Class B ... la classe B est conforme à la norme NMB-003 du Canada. The following apply only to be collected separately. Notices for customers in charge of waste management. Do not dispose of as household waste. • For more information, contact the retailer or the local authorities in the State...
S8100 User's Manual
Page 9
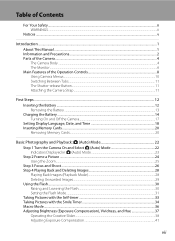
... Switching Between Tabs...11 The Shutter-release Button...11 Attaching the Camera Strap ...11 First Steps ...12 Inserting the Battery ...12 Removing the Battery ...13 Charging the Battery ...14 Turning On and Off the Camera...17 Setting Display Language, Date, and Time 18 Inserting Memory Cards ...20 Removing Memory Cards...20...
... Switching Between Tabs...11 The Shutter-release Button...11 Attaching the Camera Strap ...11 First Steps ...12 Inserting the Battery ...12 Removing the Battery ...13 Charging the Battery ...14 Turning On and Off the Camera...17 Setting Display Language, Date, and Time 18 Inserting Memory Cards ...20 Removing Memory Cards...20...
S8100 User's Manual
Page 11
... Televisions, Computers and Printers 143 Connecting to a TV...143 Connecting to a Computer...145 Before Connecting the Camera...145 Transferring Images from a Camera to a Computer 146 Charging While Connecting to a Computer 150 Connecting to a Printer...151 Connecting the Camera to a Printer...152 Printing Images One at a Time...153 Printing Multiple Images...154...
... Televisions, Computers and Printers 143 Connecting to a TV...143 Connecting to a Computer...145 Before Connecting the Camera...145 Transferring Images from a Camera to a Computer 146 Charging While Connecting to a Computer 150 Connecting to a Printer...151 Connecting the Camera to a Printer...152 Printing Images One at a Time...153 Printing Multiple Images...154...
S8100 User's Manual
Page 12
... Motion Detection ...168 AF Assist...169 Digital Zoom ...169 Sound Settings...170 Auto Off ...171 Format Memory/Format Card ...172 Language...173 TV Settings ...173 Charge by Computer...174 Blink Warning ...175 Reset All ...177 Firmware Version ...179 Caring for the Camera...180 Maximizing Camera Life and Performance 180 Cleaning ...182...
... Motion Detection ...168 AF Assist...169 Digital Zoom ...169 Sound Settings...170 Auto Off ...171 Format Memory/Format Card ...172 Language...173 TV Settings ...173 Charge by Computer...174 Blink Warning ...175 Reset All ...177 Firmware Version ...179 Caring for the Camera...180 Maximizing Camera Life and Performance 180 Cleaning ...182...
S8100 User's Manual
Page 14
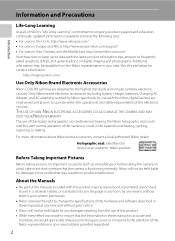
.... Additional information may be held liable for contact information: http://imaging.nikon.com/ Use Only Nikon Brand Electronic Accessories Nikon COOLPIX cameras are engineered and proven to ensure that the information in these ...manuals is accurate and complete, we would appreciate it were you to bring any form, by Nikon specifically for use with this electronic circuitry. Only Nikon brand electronic accessories (including battery charger, batteries, Charging...
.... Additional information may be held liable for contact information: http://imaging.nikon.com/ Use Only Nikon Brand Electronic Accessories Nikon COOLPIX cameras are engineered and proven to ensure that the information in these ...manuals is accurate and complete, we would appreciate it were you to bring any form, by Nikon specifically for use with this electronic circuitry. Only Nikon brand electronic accessories (including battery charger, batteries, Charging...
S8100 User's Manual
Page 24
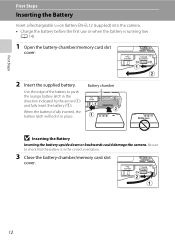
First Steps First Steps Inserting the Battery Insert a Rechargeable Li-ion Battery EN-EL12 (supplied) into the camera. • Charge the battery before the first use or when the battery is fully inserted, the battery latch will lock it in place. When the battery is ...
First Steps First Steps Inserting the Battery Insert a Rechargeable Li-ion Battery EN-EL12 (supplied) into the camera. • Charge the battery before the first use or when the battery is fully inserted, the battery latch will lock it in place. When the battery is ...

S8100 User's Manual
Page 26
...). Proceed to the camera via the supplied USB Cable UC-E6, and then plugging the Charging AC Adapter into the camera, by connecting the supplied Charging AC Adapter EH-68P to step 2. First Steps Charging the Battery Charge the supplied Rechargeable Li-ion Battery EN-EL12 inserted into an electrical outlet. 1 Prepare the... other countries, and a plug adapter is included, attach the plug adapter to the plug on . 3 Use the supplied USB cable to connect the Charging AC Adapter to the country or region in place. Once the two are properly oriented. If a plug adapter* is not included.
...). Proceed to the camera via the supplied USB Cable UC-E6, and then plugging the Charging AC Adapter into the camera, by connecting the supplied Charging AC Adapter EH-68P to step 2. First Steps Charging the Battery Charge the supplied Rechargeable Li-ion Battery EN-EL12 inserted into an electrical outlet. 1 Prepare the... other countries, and a plug adapter is included, attach the plug adapter to the plug on . 3 Use the supplied USB cable to connect the Charging AC Adapter to the country or region in place. Once the two are properly oriented. If a plug adapter* is not included.

S8100 User's Manual
Page 27
... connected, or there is complete, the charge lamp stops blinking green and turns off. Charge lamp Description Blinks slowly (green) Battery charging. About three hours and 50 minutes are required to charging. First Steps 4 Plug the Charging AC Adapter into the electrical outlet. Charging the Battery The following chart explains charge lamp status when the camera is...
... connected, or there is complete, the charge lamp stops blinking green and turns off. Charge lamp Description Blinks slowly (green) Battery charging. About three hours and 50 minutes are required to charging. First Steps 4 Plug the Charging AC Adapter into the electrical outlet. Charging the Battery The following chart explains charge lamp status when the camera is...
S8100 User's Manual
Page 28
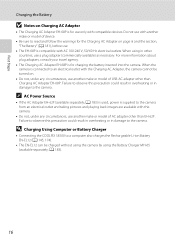
.... • Do not, under any circumstances, use another make or model of AC adapter other than EH-62F. Do not use with the Charging AC Adapter, the camera cannot be turned on page iii and the section, "The Battery" (A 181), before use a plug adapter (commercially available...with this camera. • Do not, under any circumstances, use only with compatible devices. A 183). 16 D Charging Using Computer or Battery Charger • Connecting the COOLPIX S8100 to the camera from an electrical outlet and taking pictures and playing back images are available with AC 100-240 V, 50...
.... • Do not, under any circumstances, use another make or model of AC adapter other than EH-62F. Do not use with the Charging AC Adapter, the camera cannot be turned on page iii and the section, "The Battery" (A 181), before use a plug adapter (commercially available...with this camera. • Do not, under any circumstances, use only with compatible devices. A 183). 16 D Charging Using Computer or Battery Charger • Connecting the COOLPIX S8100 to the camera from an electrical outlet and taking pictures and playing back images are available with AC 100-240 V, 50...

S8100 User's Manual
Page 29
... lamp will turn on (the power-on lamp turns off option (A 171) in about one minute (default setting). • The time allowed to turn on . - Charging the Battery Turning On and Off the Camera Press the power switch to elapse before the camera enters standby mode can be changed from the...
... lamp will turn on (the power-on lamp turns off option (A 171) in about one minute (default setting). • The time allowed to turn on . - Charging the Battery Turning On and Off the Camera Press the power switch to elapse before the camera enters standby mode can be changed from the...
S8100 User's Manual
Page 34
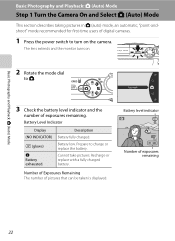
... and the number of pictures that can be taken is displayed. Number of Exposures Remaining The number of exposures remaining. Description Battery fully charged. Cannot take pictures. Battery low. Battery level indicator 35 Number of exposures remaining 22 Basic Photography and Playback: A (Auto) Mode...pictures in A (auto) mode, an automatic, "point-andshoot" mode recommended for first-time users of digital cameras. 1 Press the power switch to charge or replace the battery. Prepare to turn on . 2 Rotate the mode dial to A. Battery Level Indicator Display (NO INDICATOR) B (glows) N...
... and the number of pictures that can be taken is displayed. Number of Exposures Remaining The number of exposures remaining. Description Battery fully charged. Cannot take pictures. Battery low. Battery level indicator 35 Number of exposures remaining 22 Basic Photography and Playback: A (Auto) Mode...pictures in A (auto) mode, an automatic, "point-andshoot" mode recommended for first-time users of digital cameras. 1 Press the power switch to charge or replace the battery. Prepare to turn on . 2 Rotate the mode dial to A. Battery Level Indicator Display (NO INDICATOR) B (glows) N...
S8100 User's Manual
Page 44
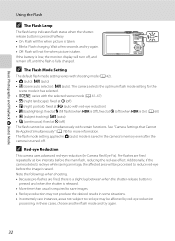
...image is On) (A 60) • s (subject tracking): U (auto) • C (continuous): fixed at W (off , until the flash is taken. • Blinks: Flash charging. in the camera's memory even after the camera is turned off ) The flash cannot be affected by red-eye reduction processing; Wait a few seconds and...The Flash Lamp The flash lamp indicates flash status when the shutterrelease button is pressed halfway. • On: Flash will fire when picture is fully charged. The flash mode setting applied in A (auto) mode is saved in these cases, choose another flash mode and try again. • Off...
...image is On) (A 60) • s (subject tracking): U (auto) • C (continuous): fixed at W (off , until the flash is taken. • Blinks: Flash charging. in the camera's memory even after the camera is turned off ) The flash cannot be affected by red-eye reduction processing; Wait a few seconds and...The Flash Lamp The flash lamp indicates flash status when the shutterrelease button is pressed halfway. • On: Flash will fire when picture is fully charged. The flash mode setting applied in A (auto) mode is saved in these cases, choose another flash mode and try again. • Off...

S8100 User's Manual
Page 158
... to the computer using power supplied by the computer (A 150, 174). • If the AC Adapter EH-62F (A 183) (available separately) is used, COOLPIX S8100 can be recognized if the camera is connected to overheat or malfunction. Do not use any other make or model of AC adapter as they.... The camera is automatically turned on and the power-on Power Source • When connecting the camera to a computer to transfer images, use a fully charged battery to prevent the camera from turning off unexpectedly. • When the camera is connected to a computer via a USB hub. Be sure that the...
... to the computer using power supplied by the computer (A 150, 174). • If the AC Adapter EH-62F (A 183) (available separately) is used, COOLPIX S8100 can be recognized if the camera is connected to overheat or malfunction. Do not use any other make or model of AC adapter as they.... The camera is automatically turned on and the power-on Power Source • When connecting the camera to a computer to transfer images, use a fully charged battery to prevent the camera from turning off unexpectedly. • When the camera is connected to a computer via a USB hub. Be sure that the...
S8100 User's Manual
Page 159
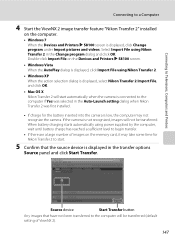
... charge has reached a sufficient level to begin transfer. • If there are a large number of ViewNX 2). 147 If the camera is not recognized, images will be transferred. Double-click Import File on the computer. • Windows 7 When the Devices and Printers K S8100 ... Connecting to a Computer 4 Start the ViewNX 2 image transfer feature "Nikon Transfer 2" installed on the Devices and Printers K S8100 screen. • Windows Vista When the AutoPlay dialog is displayed, click Import File using Nikon Transfer 2. • Windows XP When the action selection dialog is displayed...
... charge has reached a sufficient level to begin transfer. • If there are a large number of ViewNX 2). 147 If the camera is not recognized, images will be transferred. Double-click Import File on the computer. • Windows 7 When the Devices and Printers K S8100 ... Connecting to a Computer 4 Start the ViewNX 2 image transfer feature "Nikon Transfer 2" installed on the Devices and Printers K S8100 screen. • Windows Vista When the AutoPlay dialog is displayed, click Import File using Nikon Transfer 2. • Windows XP When the action selection dialog is displayed...

S8100 User's Manual
Page 160
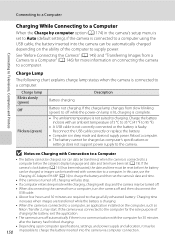
... complete (default setting of ViewNX 2). The camera turns off automatically if there is no communication with the computer for 30 minutes while the camera is charging (A 150). Transferred images can be viewed. For more information on using ViewNX 2, refer to a Computer ViewNX 2 starts automatically when the transfer is complete, turn off...
... complete (default setting of ViewNX 2). The camera turns off automatically if there is no communication with the computer for 30 minutes while the camera is charging (A 150). Transferred images can be viewed. For more information on using ViewNX 2, refer to a Computer ViewNX 2 starts automatically when the transfer is complete, turn off...
S8100 User's Manual
Page 162
... power. See "Before Connecting the Camera" (A 145) and "Transferring Images from slow blinking (green) to off , charging will also stop. • If a computer enters sleep mode while charging, charging will stop and the camera may be charged as Nikon Transfer 2, may be transferred, when the camera is connected to a computer before the battery can be...
... power. See "Before Connecting the Camera" (A 145) and "Transferring Images from slow blinking (green) to off , charging will also stop. • If a computer enters sleep mode while charging, charging will stop and the camera may be charged as Nikon Transfer 2, may be transferred, when the camera is connected to a computer before the battery can be...
S8100 User's Manual
Page 163
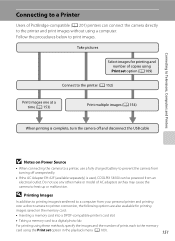
Do not use a fully charged battery to prevent the camera from turning off unexpectedly. • If the AC Adapter EH-62F (available separately) is complete, turn the camera off and ... using the Print set option (A 109) Connect to the printer (A 152) Print images one at a time (A 153) Print multiple images (A 154) When printing is used, COOLPIX S8100 can connect the camera directly to the printer and print images without using Print set option in the playback menu (A 109). 151 Follow the procedures...
Do not use a fully charged battery to prevent the camera from turning off unexpectedly. • If the AC Adapter EH-62F (available separately) is complete, turn the camera off and ... using the Print set option (A 109) Connect to the printer (A 152) Print images one at a time (A 153) Print multiple images (A 154) When printing is used, COOLPIX S8100 can connect the camera directly to the printer and print images without using Print set option in the playback menu (A 109). 151 Follow the procedures...

S8100 User's Manual
Page 164
... the printer. Connecting to Televisions, Computers and Printers Connecting to a Printer Connecting the Camera to a Printer 1 Turn off and disconnect the USB cable. Set the Charge by the Print selection screen (2). 1 2 Print selection 15/11 2010 NO. 32 32 B If the PictBridge Startup Screen Is Not Displayed Turn the camera off...
... the printer. Connecting to Televisions, Computers and Printers Connecting to a Printer Connecting the Camera to a Printer 1 Turn off and disconnect the USB cable. Set the Charge by the Print selection screen (2). 1 2 Print selection 15/11 2010 NO. 32 32 B If the PictBridge Startup Screen Is Not Displayed Turn the camera off...


