S8100 User's Manual
Page 9
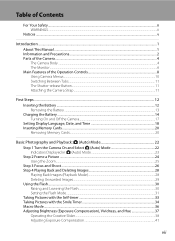
... Contents For Your Safety...ii WARNINGS...ii Notices ...v Introduction ...1 About This Manual ...1 Information and Precautions...2 Parts of the Camera...4 The Camera Body ...4 The Monitor...6 Main Features of the Operation Controls 8 Using Camera Menus...10 Switching Between Tabs...11 The Shutter-release Button...11 Attaching the Camera Strap ...11 First Steps ...12...
... Contents For Your Safety...ii WARNINGS...ii Notices ...v Introduction ...1 About This Manual ...1 Information and Precautions...2 Parts of the Camera...4 The Camera Body ...4 The Monitor...6 Main Features of the Operation Controls 8 Using Camera Menus...10 Switching Between Tabs...11 The Shutter-release Button...11 Attaching the Camera Strap ...11 First Steps ...12...
S8100 User's Manual
Page 20
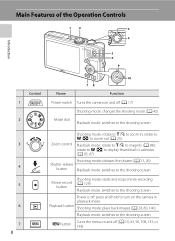
Main Features of the Operation Controls 12 3 4 Introduction 5 6 9 1 2 3 4 5 6 7 8 Control 10 78 Name Function Power switch Turns the camera on and off (A 17) Shooting mode: changes the shooting ...
Main Features of the Operation Controls 12 3 4 Introduction 5 6 9 1 2 3 4 5 6 7 8 Control 10 78 Name Function Power switch Turns the camera on and off (A 17) Shooting mode: changes the shooting ...

S8100 User's Manual
Page 21
Main Features of the Operation Controls Introduction Control 8 Name Delete button Rotary multi selector (up) Function Shooting mode: deletes the last image captured (A 29) Playback mode: deletes ...
Main Features of the Operation Controls Introduction Control 8 Name Delete button Rotary multi selector (up) Function Shooting mode: deletes the last image captured (A 29) Playback mode: deletes ...

S8100 User's Manual
Page 22
... Continuous ISO sensitivity AF area mode Exit Continuous Autofocus mode Exit Autofocus mode Single AF Full-time AF Exit 4 When setting is applied. Introduction Main Features of the Operation Controls Using Camera Menus Press the d button (A 8) to display the menu for displaying the setup menu K is displayed when previous menu items...
... Continuous ISO sensitivity AF area mode Exit Continuous Autofocus mode Exit Autofocus mode Single AF Full-time AF Exit 4 When setting is applied. Introduction Main Features of the Operation Controls Using Camera Menus Press the d button (A 8) to display the menu for displaying the setup menu K is displayed when previous menu items...
S8100 User's Manual
Page 23
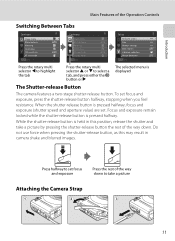
...rest of the way down . Focus and exposure remain locked while the shutter-release button is displayed The Shutter-release Button The camera features a two-stage shutter-release button. Do not use force when pressing the shutter-release button, as this may result in this position..., release the shutter and take a picture Attaching the Camera Strap 11 Introduction Main Features of the Operation Controls Switching Between Tabs Continuous Image mode White balance Metering Continuous ISO sensitivity AF area mode Exit Continuous Image mode...
...rest of the way down . Focus and exposure remain locked while the shutter-release button is displayed The Shutter-release Button The camera features a two-stage shutter-release button. Do not use force when pressing the shutter-release button, as this may result in this position..., release the shutter and take a picture Attaching the Camera Strap 11 Introduction Main Features of the Operation Controls Switching Between Tabs Continuous Image mode White balance Metering Continuous ISO sensitivity AF area mode Exit Continuous Image mode...
S8100 User's Manual
Page 40
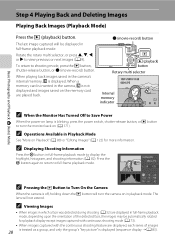
... Playback" (A 80) or "Editing Images" (A 122) for playback display except images captured with continuous shooting mode (A 73). • When images captured with the continuous shooting feature are played back. C Viewing Images • When images in which a face was detected during shooting (A 52) are displayed in full-frame playback mode. Rotate the...
... Playback" (A 80) or "Editing Images" (A 122) for playback display except images captured with continuous shooting mode (A 73). • When images captured with the continuous shooting feature are played back. C Viewing Images • When images in which a face was detected during shooting (A 52) are displayed in full-frame playback mode. Rotate the...

S8100 User's Manual
Page 41
... current image or voice memo (A 118) is displayed. Erase selected images: Multiple images can be deleted (A 114). • Deleting images captured with the continuous shooting feature ➝ "Deleting Images in a Sequence" (A 84) C Deleting the Last Image Captured While in the monitor. Deleted images cannot be restored. To cancel, press H or I to...
... current image or voice memo (A 118) is displayed. Erase selected images: Multiple images can be deleted (A 114). • Deleting images captured with the continuous shooting feature ➝ "Deleting Images in a Sequence" (A 84) C Deleting the Last Image Captured While in the monitor. Deleted images cannot be restored. To cancel, press H or I to...

S8100 User's Manual
Page 46
...-timer menu is automatically released. Each time the shutter is detected, press the k button and select the face to the center of human faces. This feature can be detected. When more than one face, the double border (focus 35 area) is set to choose a (smile timer) and press the k button. Press...
...-timer menu is automatically released. Each time the shutter is detected, press the k button and select the face to the center of human faces. This feature can be detected. When more than one face, the double border (focus 35 area) is set to choose a (smile timer) and press the k button. Press...

S8100 User's Manual
Page 58
... that white objects appear white whether seen in most types of the light source, with certain functions. Although the default setting, Auto, can mimic this feature cannot be set by processing images according to changes in the monitor (A 6). f Cloudy Use when taking pictures under incandescent lighting. However, when Auto is selected...
... that white objects appear white whether seen in most types of the light source, with certain functions. Although the default setting, Auto, can mimic this feature cannot be set by processing images according to changes in the monitor (A 6). f Cloudy Use when taking pictures under incandescent lighting. However, when Auto is selected...
S8100 User's Manual
Page 72
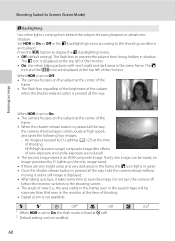
... left of shooting. • Digital zoom is set to the shooting conditions and subject. Shooting Suited to prevent the subject from behind the subject, throwing features or details into shadow. An image processed by D-Lighting is the only image saved. • If there are very bright areas and very dark areas...
... left of shooting. • Digital zoom is set to the shooting conditions and subject. Shooting Suited to prevent the subject from behind the subject, throwing features or details into shadow. An image processed by D-Lighting is the only image saved. • If there are very bright areas and very dark areas...

S8100 User's Manual
Page 86
... may take some time to Pre-shooting cache or Sport continuous, accurate exposure may not be achieved (images may be adjusted with the continuous shooting feature. More on Shooting Burst Shooting (Continuous Shooting Mode) B Notes on bright sunny days. • Note that flickers at high speeds, such as a "sequence" (A 83). D More...
... may take some time to Pre-shooting cache or Sport continuous, accurate exposure may not be achieved (images may be adjusted with the continuous shooting feature. More on Shooting Burst Shooting (Continuous Shooting Mode) B Notes on bright sunny days. • Note that flickers at high speeds, such as a "sequence" (A 83). D More...

S8100 User's Manual
Page 91
... illuminator does not light. More on Digital Zoom" (A 169) for more information. 79 Blink warning does not function. When using continuous shooting mode, the following features cannot be used. • Flash mode (A 30) • Self-timer (A 33)/smile timer (A 34) • Motion detection (A 168) • Blink warning (A 175) D More Information See...
... illuminator does not light. More on Digital Zoom" (A 169) for more information. 79 Blink warning does not function. When using continuous shooting mode, the following features cannot be used. • Flash mode (A 30) • Self-timer (A 33)/smile timer (A 34) • Motion detection (A 168) • Blink warning (A 175) D More Information See...

S8100 User's Manual
Page 127
When Selected images is selected, a confirmation dialog is displayed with the image. Back ON/OFF 3 Press the k button to 12- Only one of the following features, a screen like Protect that shown on the right is displayed when selecting images. • Print set > Select images (A 109) • Protect (A 114) • Rotate image (A ...
When Selected images is selected, a confirmation dialog is displayed with the image. Back ON/OFF 3 Press the k button to 12- Only one of the following features, a screen like Protect that shown on the right is displayed when selecting images. • Print set > Select images (A 109) • Protect (A 114) • Rotate image (A ...

S8100 User's Manual
Page 139
... 4 Choose Yes and press the k button. A new, small copy is displayed. 2 Use the rotary multi selector to choose g Small picture and press the k button. This feature is displayed with a compression ratio of the current image. Playback menu Rotate image Small picture Voice memo Copy Sequence display options Choose key picture Exit...
... 4 Choose Yes and press the k button. A new, small copy is displayed. 2 Use the rotary multi selector to choose g Small picture and press the k button. This feature is displayed with a compression ratio of the current image. Playback menu Rotate image Small picture Voice memo Copy Sequence display options Choose key picture Exit...
S8100 User's Manual
Page 157
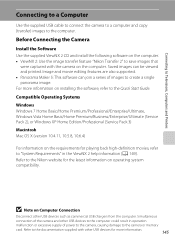
...(version 10.4.11, 10.5.8, 10.6.4) For information on the requirements for the latest information on operating system compatibility. Refer to the Nikon website for playing back high-definition movies, refer to "System Requirements" in operation malfunction or excessive supply of power to the camera,...image. Refer to save images that were captured with the camera on the computer. • ViewNX 2: Use the image transfer feature "Nikon Transfer 2" to the documentation supplied with other USB devices for more information on Computer Connection Disconnect other USB devices to the computer ...
...(version 10.4.11, 10.5.8, 10.6.4) For information on the requirements for the latest information on operating system compatibility. Refer to the Nikon website for playing back high-definition movies, refer to "System Requirements" in operation malfunction or excessive supply of power to the camera,...image. Refer to save images that were captured with the camera on the computer. • ViewNX 2: Use the image transfer feature "Nikon Transfer 2" to the documentation supplied with other USB devices for more information on Computer Connection Disconnect other USB devices to the computer ...
S8100 User's Manual
Page 159
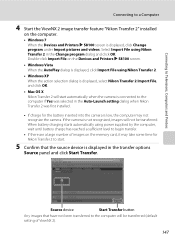
... program under Import pictures and videos. Connecting to Televisions, Computers and Printers Connecting to a Computer 4 Start the ViewNX 2 image transfer feature "Nikon Transfer 2" installed on the computer. • Windows 7 When the Devices and Printers K S8100 screen is not recognized, images will not be transferred (default setting of images on the Devices and Printers...
... program under Import pictures and videos. Connecting to Televisions, Computers and Printers Connecting to a Computer 4 Start the ViewNX 2 image transfer feature "Nikon Transfer 2" installed on the computer. • Windows 7 When the Devices and Printers K S8100 screen is not recognized, images will not be transferred (default setting of images on the Devices and Printers...
S8100 User's Manual
Page 161
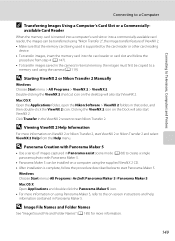
...Printers Connecting to the on-screen instructions and help information contained in Panorama Maker 5. Mac OS X Open the Applications folder, open the Nikon Software > ViewNX 2 folders in that the memory card being used is supported by the card reader or other card reading device. •... D Panorama Creation with Panorama Maker 5 • Use a series of images captured in the ViewNX 2 screen to a memory card using "Nikon Transfer 2", the image transfer feature of ViewNX 2. • Make sure that order, and then double-click the ViewNX 2 icon. Double-clicking the ViewNX 2 shortcut icon on...
...Printers Connecting to the on-screen instructions and help information contained in Panorama Maker 5. Mac OS X Open the Applications folder, open the Nikon Software > ViewNX 2 folders in that the memory card being used is supported by the card reader or other card reading device. •... D Panorama Creation with Panorama Maker 5 • Use a series of images captured in the ViewNX 2 screen to a memory card using "Nikon Transfer 2", the image transfer feature of ViewNX 2. • Make sure that order, and then double-click the ViewNX 2 icon. Double-clicking the ViewNX 2 shortcut icon on...


