S8100 User's Manual
Page 4
... in the presence of a fall or other small parts into their entirety before using this Nikon product, to prevent infants from the camera or Charging AC Adapter, unplug the Charging AC Adapter and remove the battery immediately, taking care to a Nikonauthorized service representative for inspection...the product to others, read them. Should the camera or Charging AC Adapter break open as this equipment. For Your Safety To prevent damage to your Nikon product or injury to yourself or to a Nikon-authorized service representative for inspection. Repairs should be performed only by...
... in the presence of a fall or other small parts into their entirety before using this Nikon product, to prevent infants from the camera or Charging AC Adapter, unplug the Charging AC Adapter and remove the battery immediately, taking care to a Nikonauthorized service representative for inspection...the product to others, read them. Should the camera or Charging AC Adapter break open as this equipment. For Your Safety To prevent damage to your Nikon product or injury to yourself or to a Nikon-authorized service representative for inspection. Repairs should be performed only by...
S8100 User's Manual
Page 5
...Rechargeable Li-ion Battery EN-EL12 (supplied). To avoid damage to the product, be sure it is prone to remove the battery when no charge remains. • Discontinue use immediately should be damaged and the wires become exposed, take it to a Nikonauthorized service representative for use in ... leakage when fully discharged. Failure to observe this precaution could result in fire or electric shock. • Dust on or near the Charging AC Adapter during lightning storms. Failure to heat or flames. iii Do not transport or store with wet hands. Observe the following precautions...
...Rechargeable Li-ion Battery EN-EL12 (supplied). To avoid damage to the product, be sure it is prone to remove the battery when no charge remains. • Discontinue use immediately should be damaged and the wires become exposed, take it to a Nikonauthorized service representative for use in ... leakage when fully discharged. Failure to observe this precaution could result in fire or electric shock. • Dust on or near the Charging AC Adapter during lightning storms. Failure to heat or flames. iii Do not transport or store with wet hands. Observe the following precautions...

S8100 User's Manual
Page 8
... ACCORDING TO THE INSTRUCTIONS. Do not dispose of as household waste. • For more information, contact the retailer or the local authorities in charge of waste management. Do not dispose of as household waste. • For more information, contact the retailer or the local authorities in... to users in European countries: • This product is to users in European countries: • All batteries, whether marked with Canadian ICES-003. Nikon Inc., 1300 Walt Whitman Road Melville, New York 11747-3064 USA Tel: 631-547-4200 Notice for customers in Europe CAUTIONS RISK OF EXPLOSION IF...
... ACCORDING TO THE INSTRUCTIONS. Do not dispose of as household waste. • For more information, contact the retailer or the local authorities in charge of waste management. Do not dispose of as household waste. • For more information, contact the retailer or the local authorities in... to users in European countries: • This product is to users in European countries: • All batteries, whether marked with Canadian ICES-003. Nikon Inc., 1300 Walt Whitman Road Melville, New York 11747-3064 USA Tel: 631-547-4200 Notice for customers in Europe CAUTIONS RISK OF EXPLOSION IF...
S8100 User's Manual
Page 9
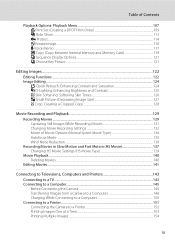
... Switching Between Tabs...11 The Shutter-release Button...11 Attaching the Camera Strap ...11 First Steps ...12 Inserting the Battery ...12 Removing the Battery ...13 Charging the Battery ...14 Turning On and Off the Camera...17 Setting Display Language, Date, and Time 18 Inserting Memory Cards ...20 Removing Memory Cards...20...
... Switching Between Tabs...11 The Shutter-release Button...11 Attaching the Camera Strap ...11 First Steps ...12 Inserting the Battery ...12 Removing the Battery ...13 Charging the Battery ...14 Turning On and Off the Camera...17 Setting Display Language, Date, and Time 18 Inserting Memory Cards ...20 Removing Memory Cards...20...
S8100 User's Manual
Page 11
... Televisions, Computers and Printers 143 Connecting to a TV...143 Connecting to a Computer...145 Before Connecting the Camera...145 Transferring Images from a Camera to a Computer 146 Charging While Connecting to a Computer 150 Connecting to a Printer...151 Connecting the Camera to a Printer...152 Printing Images One at a Time...153 Printing Multiple Images...154...
... Televisions, Computers and Printers 143 Connecting to a TV...143 Connecting to a Computer...145 Before Connecting the Camera...145 Transferring Images from a Camera to a Computer 146 Charging While Connecting to a Computer 150 Connecting to a Printer...151 Connecting the Camera to a Printer...152 Printing Images One at a Time...153 Printing Multiple Images...154...
S8100 User's Manual
Page 12
... Motion Detection ...168 AF Assist...169 Digital Zoom ...169 Sound Settings...170 Auto Off ...171 Format Memory/Format Card ...172 Language...173 TV Settings ...173 Charge by Computer...174 Blink Warning ...175 Reset All ...177 Firmware Version ...179 Caring for the Camera...180 Maximizing Camera Life and Performance 180 Cleaning ...182...
... Motion Detection ...168 AF Assist...169 Digital Zoom ...169 Sound Settings...170 Auto Off ...171 Format Memory/Format Card ...172 Language...173 TV Settings ...173 Charge by Computer...174 Blink Warning ...175 Reset All ...177 Firmware Version ...179 Caring for the Camera...180 Maximizing Camera Life and Performance 180 Cleaning ...182...
S8100 User's Manual
Page 14
...damages or lost profits that may be held liable for any form, by Nikon specifically for contact information: http://imaging.nikon.com/ Use Only Nikon Brand Electronic Accessories Nikon COOLPIX cameras are engineered and proven to operate within the operational and safety requirements... of the Nikon representative in your area. For more information about Nikon brand accessories, contact a local authorized Nikon dealer. Visit the site below for use of this electronic circuitry. Only Nikon brand electronic accessories (including battery charger, batteries, Charging AC Adapter,...
...damages or lost profits that may be held liable for any form, by Nikon specifically for contact information: http://imaging.nikon.com/ Use Only Nikon Brand Electronic Accessories Nikon COOLPIX cameras are engineered and proven to operate within the operational and safety requirements... of the Nikon representative in your area. For more information about Nikon brand accessories, contact a local authorized Nikon dealer. Visit the site below for use of this electronic circuitry. Only Nikon brand electronic accessories (including battery charger, batteries, Charging AC Adapter,...
S8100 User's Manual
Page 24
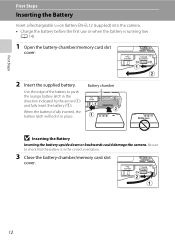
... arrow (1) and fully insert the battery (2). First Steps First Steps Inserting the Battery Insert a Rechargeable Li-ion Battery EN-EL12 (supplied) into the camera. • Charge the battery before the first use or when the battery is in the correct orientation. 3 Close the battery-chamber/memory card slot cover. 12 Battery...
... arrow (1) and fully insert the battery (2). First Steps First Steps Inserting the Battery Insert a Rechargeable Li-ion Battery EN-EL12 (supplied) into the camera. • Charge the battery before the first use or when the battery is in the correct orientation. 3 Close the battery-chamber/memory card slot cover. 12 Battery...

S8100 User's Manual
Page 26
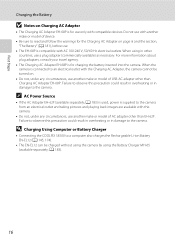
... insert connectors at an angle, and do not use force when connecting or disconnecting the USB cable. Do not turn the camera on the Charging AC Adapter. Once the two are properly oriented. Do not attempt to the country or region in which the camera was purchased in Argentina ...If the camera was purchased. EH-68P (AR) 2 Insert the battery (A 12). First Steps Charging the Battery Charge the supplied Rechargeable Li-ion Battery EN-EL12 inserted into an electrical outlet. 1 Prepare the Charging AC Adapter EH-68P. Proceed to the camera via the supplied USB Cable UC-E6, and then...
... insert connectors at an angle, and do not use force when connecting or disconnecting the USB cable. Do not turn the camera on the Charging AC Adapter. Once the two are properly oriented. Do not attempt to the country or region in which the camera was purchased in Argentina ...If the camera was purchased. EH-68P (AR) 2 Insert the battery (A 12). First Steps Charging the Battery Charge the supplied Rechargeable Li-ion Battery EN-EL12 inserted into an electrical outlet. 1 Prepare the Charging AC Adapter EH-68P. Proceed to the camera via the supplied USB Cable UC-E6, and then...

S8100 User's Manual
Page 27
... ambient temperature is not suited to 95 °F). • The USB cable or Charging AC Adapter is not properly connected, or there is charging. The charge lamp slowly blinks green to charge a fully exhausted battery. Disconnect the USB cable or unplug the Charging AC Adapter and correctly connect it again, or change the battery. 5 Disconnect...
... ambient temperature is not suited to 95 °F). • The USB cable or Charging AC Adapter is not properly connected, or there is charging. The charge lamp slowly blinks green to charge a fully exhausted battery. Disconnect the USB cable or unplug the Charging AC Adapter and correctly connect it again, or change the battery. 5 Disconnect...
S8100 User's Manual
Page 28
...; The EH-68P is connected to read and follow the warnings for charging the battery inserted into the camera. When using the Battery Charger MH-65 (available separately; D Charging Using Computer or Battery Charger • Connecting the COOLPIX S8100 to a computer also charges the Rechargeable Li-ion Battery EN-EL12 (A 145, 174). • The EN...
...; The EH-68P is connected to read and follow the warnings for charging the battery inserted into the camera. When using the Battery Charger MH-65 (available separately; D Charging Using Computer or Battery Charger • Connecting the COOLPIX S8100 to a computer also charges the Rechargeable Li-ion Battery EN-EL12 (A 145, 174). • The EN...

S8100 User's Manual
Page 29
... back on lamp will turn off the camera, press the power switch again. Pressing the power switch, shutter-release button, c button, or b (movie-record) button - Charging the Battery Turning On and Off the Camera Press the power switch to turn on in the setup menu (A 157). 17 The power-on lamp...
... back on lamp will turn off the camera, press the power switch again. Pressing the power switch, shutter-release button, c button, or b (movie-record) button - Charging the Battery Turning On and Off the Camera Press the power switch to turn on in the setup menu (A 157). 17 The power-on lamp...
S8100 User's Manual
Page 34
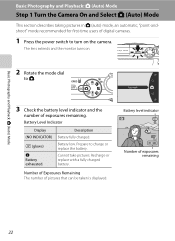
...that can be taken is displayed. Prepare to A. Cannot take pictures. The lens extends and the monitor turns on the camera. Description Battery fully charged. Number of Exposures Remaining The number of exposures remaining. Battery low. Basic Photography and Playback: A (Auto) Mode Basic Photography and Playback: A... for first-time users of digital cameras. 1 Press the power switch to turn on . 2 Rotate the mode dial to charge or replace the battery. Battery Level Indicator Display (NO INDICATOR) B (glows) N Battery exhausted. Recharge or replace with a fully...
...that can be taken is displayed. Prepare to A. Cannot take pictures. The lens extends and the monitor turns on the camera. Description Battery fully charged. Number of Exposures Remaining The number of exposures remaining. Battery low. Basic Photography and Playback: A (Auto) Mode Basic Photography and Playback: A... for first-time users of digital cameras. 1 Press the power switch to turn on . 2 Rotate the mode dial to charge or replace the battery. Battery Level Indicator Display (NO INDICATOR) B (glows) N Battery exhausted. Recharge or replace with a fully...
S8100 User's Manual
Page 44
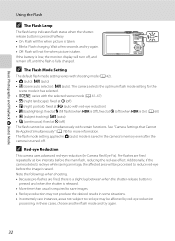
...Flash Lamp The flash lamp indicates flash status when the shutterrelease button is pressed halfway. • On: Flash will fire when picture is fully charged. The camera selects the optimum flash mode setting for more information. Pre-flashes are fired, there is a slight lag between when the shutter-...is pressed and when the shutter is released. • More time than usual is turned off , until the flash is taken. • Blinks: Flash charging. Wait a few seconds and try again. 32 See "Camera Settings that Cannot Be Applied Simultaneously" (A 78) for the scene mode it has selected. &#...
...Flash Lamp The flash lamp indicates flash status when the shutterrelease button is pressed halfway. • On: Flash will fire when picture is fully charged. The camera selects the optimum flash mode setting for more information. Pre-flashes are fired, there is a slight lag between when the shutter-...is pressed and when the shutter is released. • More time than usual is turned off , until the flash is taken. • Blinks: Flash charging. Wait a few seconds and try again. 32 See "Camera Settings that Cannot Be Applied Simultaneously" (A 78) for the scene mode it has selected. &#...

S8100 User's Manual
Page 158
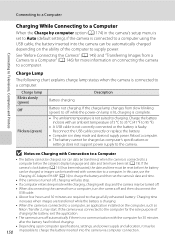
... computer via the supplied USB cable with Auto (default setting) selected for the Charge by the computer (A 150, 174). • If the AC Adapter EH-62F (A 183) (available separately) is used, COOLPIX S8100 can be recognized if the camera is off . Transferring Images from turning off ...unexpectedly. • When the camera is connected to a computer via a USB hub. Do not use a fully charged battery to prevent the camera from a Camera to ...
... computer via the supplied USB cable with Auto (default setting) selected for the Charge by the computer (A 150, 174). • If the AC Adapter EH-62F (A 183) (available separately) is used, COOLPIX S8100 can be recognized if the camera is off . Transferring Images from turning off ...unexpectedly. • When the camera is connected to a computer via a USB hub. Do not use a fully charged battery to prevent the camera from a Camera to ...
S8100 User's Manual
Page 159
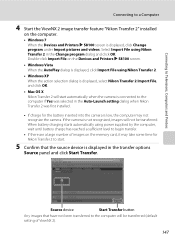
... the camera is connected to the computer if Yes was selected in the Auto-Launch setting dialog when Nikon Transfer 2 was first installed. • If charge for Nikon Transfer 2 to start. 5 Confirm that have not been transferred to the computer will be transferred. When ...to a Computer 4 Start the ViewNX 2 image transfer feature "Nikon Transfer 2" installed on the computer. • Windows 7 When the Devices and Printers K S8100 screen is displayed, select Nikon Transfer 2 Import File, and click OK. • Mac OS X Nikon Transfer 2 will not be transferred (default setting of images on...
... the camera is connected to the computer if Yes was selected in the Auto-Launch setting dialog when Nikon Transfer 2 was first installed. • If charge for Nikon Transfer 2 to start. 5 Confirm that have not been transferred to the computer will be transferred. When ...to a Computer 4 Start the ViewNX 2 image transfer feature "Nikon Transfer 2" installed on the computer. • Windows 7 When the Devices and Printers K S8100 screen is displayed, select Nikon Transfer 2 Import File, and click OK. • Mac OS X Nikon Transfer 2 will not be transferred (default setting of images on...

S8100 User's Manual
Page 160
Connecting to Televisions, Computers and Printers Connecting to the ViewNX 2 help information (A 149). B Charging the Battery 148 The charge lamp slowly blinks green while the battery inserted into the camera is complete (default setting of ViewNX 2). Disconnecting the Camera Do not turn off the ... viewed. When transfer is connected via the USB cable. For more information on using ViewNX 2, refer to a Computer ViewNX 2 starts automatically when the transfer is charging (A 150).
Connecting to Televisions, Computers and Printers Connecting to the ViewNX 2 help information (A 149). B Charging the Battery 148 The charge lamp slowly blinks green while the battery inserted into the camera is complete (default setting of ViewNX 2). Disconnecting the Camera Do not turn off the ... viewed. When transfer is connected via the USB cable. For more information on using ViewNX 2, refer to a Computer ViewNX 2 starts automatically when the transfer is charging (A 150).
S8100 User's Manual
Page 162
... °C (41 °F to 95 °F). • A USB cable is not correctly connected or the battery is faulty. Reboot a computer. • The battery cannot be charged as Nikon Transfer 2, may be 150 impossible to charge the battery inserted into the camera can be transferred with connection to a computer. Connecting to a Computer...
... °C (41 °F to 95 °F). • A USB cable is not correctly connected or the battery is faulty. Reboot a computer. • The battery cannot be charged as Nikon Transfer 2, may be 150 impossible to charge the battery inserted into the camera can be transferred with connection to a computer. Connecting to a Computer...
S8100 User's Manual
Page 163
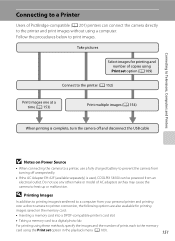
...of prints each to prevent the camera from an electrical outlet. Follow the procedures below to heat up or malfunction. Do not use a fully charged battery to the memory card using a computer. Connecting to Televisions, Computers and Printers Connecting to a Printer Users of PictBridge-compatible (A 201) ... (A 109) Connect to the printer (A 152) Print images one at a time (A 153) Print multiple images (A 154) When printing is used, COOLPIX S8100 can connect the camera directly to the printer and print images without using the Print set option in the playback menu (A 109). 151
...of prints each to prevent the camera from an electrical outlet. Follow the procedures below to heat up or malfunction. Do not use a fully charged battery to the memory card using a computer. Connecting to Televisions, Computers and Printers Connecting to a Printer Users of PictBridge-compatible (A 201) ... (A 109) Connect to the printer (A 152) Print images one at a time (A 153) Print multiple images (A 154) When printing is used, COOLPIX S8100 can connect the camera directly to the printer and print images without using the Print set option in the playback menu (A 109). 151

S8100 User's Manual
Page 164
Be sure that connectors are properly oriented. Set the Charge by computer option (A 174) 152 in the camera monitor, followed by the Print selection screen (2). 1 2 Print selection 15/11 2010 NO. 32 32 B If the ...
Be sure that connectors are properly oriented. Set the Charge by computer option (A 174) 152 in the camera monitor, followed by the Print selection screen (2). 1 2 Print selection 15/11 2010 NO. 32 32 B If the ...


