
User's Reference
Page 12
... sheet of material being printed on the resident Web page. 2-up copying transfers two originals to one single-sided copy. Select from the tray loaded with transparencies. Refer to one copy. Feature Plain paper Transparency Transparency + Separators Other Description Plain paper is the default setting. The... Plain Paper source must be an automatic tray and the size must be set to be capable of using media types other than plain paper for your two landscape originals to...
... sheet of material being printed on the resident Web page. 2-up copying transfers two originals to one single-sided copy. Select from the tray loaded with transparencies. Refer to one copy. Feature Plain paper Transparency Transparency + Separators Other Description Plain paper is the default setting. The... Plain Paper source must be an automatic tray and the size must be set to be capable of using media types other than plain paper for your two landscape originals to...
User's Reference
Page 43
...additional help solving printer problems, refer to the documentation that shipped with your copies. Check the documentation that shipped with your MFP to see if your MFP has color capabilities. 2 If your MFP is set up for automatically selecting the paper type. 1 Put the correct paper or other media in the... tray. 2 Check the paper type setting on in the paper tray you power back on the paper menu of color copies, make sure ...
...additional help solving printer problems, refer to the documentation that shipped with your copies. Check the documentation that shipped with your MFP to see if your MFP has color capabilities. 2 If your MFP is set up for automatically selecting the paper type. 1 Put the correct paper or other media in the... tray. 2 Check the paper type setting on in the paper tray you power back on the paper menu of color copies, make sure ...
User's Reference
Page 44
...Ready 100% 1 Copying... Copy job is being canceled. 1 Place the next page on . 3 If you are unable to reset the MFP, contact Lexmark Customer Support. If a copy job is printing, this message appears even when a fax is printing. Copy error messages Error Check Printer Check... Scanner Press Return Description There is open door, missing tray, or toner problem. Check the printer operator panel for copy mode. Copy ...
...Ready 100% 1 Copying... Copy job is being canceled. 1 Place the next page on . 3 If you are unable to reset the MFP, contact Lexmark Customer Support. If a copy job is printing, this message appears even when a fax is printing. Copy error messages Error Check Printer Check... Scanner Press Return Description There is open door, missing tray, or toner problem. Check the printer operator panel for copy mode. Copy ...
User's Reference
Page 49
...message Load Paper Printer Offline Printer Error Description Appears in the URL field of your browser, and then press Enter. 2 Click Reports. 3 Under the MFP heading, click the link of control panel display. Printer is a useful way to Fax and the job encountered a PostScript error. Printer has a ...door open or a tray missing. This is not ready. View the destination lists 1 Type the IP address of the MFP in top line of the list you send information to on a regular basis.
...message Load Paper Printer Offline Printer Error Description Appears in the URL field of your browser, and then press Enter. 2 Click Reports. 3 Under the MFP heading, click the link of control panel display. Printer is a useful way to Fax and the job encountered a PostScript error. Printer has a ...door open or a tray missing. This is not ready. View the destination lists 1 Type the IP address of the MFP in top line of the list you send information to on a regular basis.
Setup Guide
Page 4
Contents Step 1: Get started 1 Step 2: Assemble paper handling options 4 Step 3: Set up the printer 17 Step 4: Install the scanner 23 Step 5: Install the feed tray and paper stop 24 Step 6: Attach cables and power cords 26 Step 7: Turn on the scanner and printer 28 Step 8: Change your default copy settings 30 Step 9: Set send and receive fax information 32 Step 10: Set up network scanning 37 Step 11: Verify MFP setup 40 Step 12: Distribute MFP user instructions 41 Solve setup problems 42 Contents iii
Contents Step 1: Get started 1 Step 2: Assemble paper handling options 4 Step 3: Set up the printer 17 Step 4: Install the scanner 23 Step 5: Install the feed tray and paper stop 24 Step 6: Attach cables and power cords 26 Step 7: Turn on the scanner and printer 28 Step 8: Change your default copy settings 30 Step 9: Set send and receive fax information 32 Step 10: Set up network scanning 37 Step 11: Verify MFP setup 40 Step 12: Distribute MFP user instructions 41 Solve setup problems 42 Contents iii
Setup Guide
Page 7
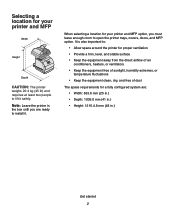
..., you are ready to install it safely. Note: Leave the printer in .) Get started 2 Selecting a location for your printer and MFP Width Height Depth CAUTION: The printer weighs 20.4 kg (45 lb) and requires at least two people to lift it . It is also important to: &#... in.) • Depth: 1039.0 mm (41 in.) • Height: 1216.4.8 mm (48 in the box until you must leave enough room to open the printer trays, covers, doors, and MFP option.
..., you are ready to install it safely. Note: Leave the printer in .) Get started 2 Selecting a location for your printer and MFP Width Height Depth CAUTION: The printer weighs 20.4 kg (45 lb) and requires at least two people to lift it . It is also important to: &#... in.) • Depth: 1039.0 mm (41 in.) • Height: 1216.4.8 mm (48 in the box until you must leave enough room to open the printer trays, covers, doors, and MFP option.

Setup Guide
Page 14
... in that location and go to step 8, otherwise continue to step 4. 4 Use a flat tip screwdriver to remove the rubber feet from the drawer and paper tray. 3 If you have additional 500 or 250-sheet drawers, go to "Installing additional 500-sheet drawers" on page 10, "Installing 250-sheet drawers" on page...
... in that location and go to step 8, otherwise continue to step 4. 4 Use a flat tip screwdriver to remove the rubber feet from the drawer and paper tray. 3 If you have additional 500 or 250-sheet drawers, go to "Installing additional 500-sheet drawers" on page 10, "Installing 250-sheet drawers" on page...
Setup Guide
Page 15
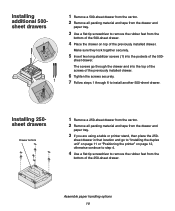
... 500-sheet drawer. Installing additional 500sheet drawers 1 Remove a 500-sheet drawer from the carton. 2 Remove all packing material and tape from the drawer and paper tray. 3 If you are using a table or printer stand, then place the 250- Installing 250sheet drawers Drawer bottom 1 Remove a 250-sheet drawer from the carton. 2 Remove...
... 500-sheet drawer. Installing additional 500sheet drawers 1 Remove a 500-sheet drawer from the carton. 2 Remove all packing material and tape from the drawer and paper tray. 3 If you are using a table or printer stand, then place the 250- Installing 250sheet drawers Drawer bottom 1 Remove a 250-sheet drawer from the carton. 2 Remove...
Setup Guide
Page 23
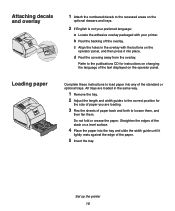
... panel, and then press it lightly rests against the edge of the paper. 5 Insert the tray. Loading paper Complete these instructions to load paper into place. Set up the printer 18 All trays are loaded in the overlay with your preferred language: a Locate the adhesive overlay packaged with the...them. b Peel the backing off the overlay. Do not fold or crease the paper. Straighten the edges of the stack on the optional drawers and trays. 2 If English is not your printer. d Peel the covering away from the overlay. Attaching decals and overlay 1 Attach the numbered decals to ...
... panel, and then press it lightly rests against the edge of the paper. 5 Insert the tray. Loading paper Complete these instructions to load paper into place. Set up the printer 18 All trays are loaded in the overlay with your preferred language: a Locate the adhesive overlay packaged with the...them. b Peel the backing off the overlay. Do not fold or crease the paper. Straighten the edges of the stack on the optional drawers and trays. 2 If English is not your printer. d Peel the covering away from the overlay. Attaching decals and overlay 1 Attach the numbered decals to ...
Setup Guide
Page 28
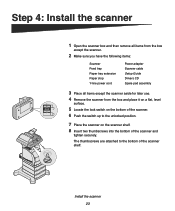
... 1 Open the scanner box and then remove all items from the box except the scanner. 2 Make sure you have the following items: Scanner Feed tray Paper tray extension Paper stop Y-line power cord Power adapter Scanner cable Setup Guide Drivers CD Spare pad assembly 3 Place all items except the scanner aside for...
... 1 Open the scanner box and then remove all items from the box except the scanner. 2 Make sure you have the following items: Scanner Feed tray Paper tray extension Paper stop Y-line power cord Power adapter Scanner cable Setup Guide Drivers CD Spare pad assembly 3 Place all items except the scanner aside for...

Setup Guide
Page 29
Install the feed tray and paper stop Paper extension 1 Connect the paper extension to the automatic document feeder. Feed tray 2 Attach the feed tray to the feed tray. Step 5: Install the feed tray and paper stop 24
Install the feed tray and paper stop Paper extension 1 Connect the paper extension to the automatic document feeder. Feed tray 2 Attach the feed tray to the feed tray. Step 5: Install the feed tray and paper stop 24

Setup Guide
Page 30
3 Open the paper support on the feed tray. 4 Attach the paper stop 25 Install the feed tray and paper stop to the top cover.
3 Open the paper support on the feed tray. 4 Attach the paper stop 25 Install the feed tray and paper stop to the top cover.

