Quick Reference
Page 1
... Go/Send. Press Menu> until you see Cancel fax, then press Select. c Press # and then enter the shortcut number assigned to the scan destination. 5 Press Go/Send. ©Copyright Lexmark International, Inc., 2002. Press Menu > repeatedly until you see Enter Phone # in the automatic feeder or on next to...already scanned into memory, press Menu > until you see the fax you see your job name. Scan a document 1 At your PC, type the IP address of the MFP in the URL field of your browser or use the ScanBack Utility to define your scan profile. 2 Locate the network-attached...
... Go/Send. Press Menu> until you see Cancel fax, then press Select. c Press # and then enter the shortcut number assigned to the scan destination. 5 Press Go/Send. ©Copyright Lexmark International, Inc., 2002. Press Menu > repeatedly until you see Enter Phone # in the automatic feeder or on next to...already scanned into memory, press Menu > until you see the fax you see your job name. Scan a document 1 At your PC, type the IP address of the MFP in the URL field of your browser or use the ScanBack Utility to define your scan profile. 2 Locate the network-attached...
Quick Reference
Page 2
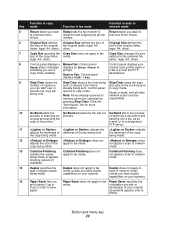
...copies or selecting network scans. Pause inserts a two second pause when entering an outgoing fax number on your printed copies (plain paper, transparencies, and so on the control panel display.... Return takes you back to memory. Network scan modes must be accessible. MFP Quick Reference Collation/ Finishing Paper saver Duplex Content text mixed Copy media Fax resolution Reduce...configured to faxes or network scans. Set duplex options for your copies. Copy Media specifies the type of your network scan. Adjusts the darkness of the original documents. Menu > or < ...
...copies or selecting network scans. Pause inserts a two second pause when entering an outgoing fax number on your printed copies (plain paper, transparencies, and so on the control panel display.... Return takes you back to memory. Network scan modes must be accessible. MFP Quick Reference Collation/ Finishing Paper saver Duplex Content text mixed Copy media Fax resolution Reduce...configured to faxes or network scans. Set duplex options for your copies. Copy Media specifies the type of your network scan. Adjusts the darkness of the original documents. Menu > or < ...
User's Reference
Page 25
...displays SCAN → Fax. Collation/Finishing does not apply to scan to network mode. 14 Duplex specifies the Duplex does not apply to fax type of duplex copies mode, unless you Paper Saver does not apply to fax Paper Saver specifies the print copies 2-up in order to save ...). Duplex does not apply to scan to network mode, unless you back to to previous menu redial the last outgoing fax phone previous menu choice. number. 6 Original Size defines Original Size defines the size of Original Size defines the the size of the original the original (letter, legal, A4, ...
...displays SCAN → Fax. Collation/Finishing does not apply to scan to network mode. 14 Duplex specifies the Duplex does not apply to fax type of duplex copies mode, unless you Paper Saver does not apply to fax Paper Saver specifies the print copies 2-up in order to save ...). Duplex does not apply to scan to network mode, unless you back to to previous menu redial the last outgoing fax phone previous menu choice. number. 6 Original Size defines Original Size defines the size of Original Size defines the the size of the original the original (letter, legal, A4, ...
User's Reference
Page 28
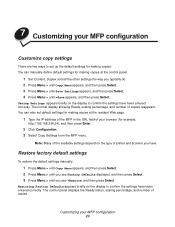
... settings for making copies at the resident Web page. 1 Type the IP address of the MFP in the URL field of printer and scanner you have. The normal display showing Ready, scaling percentage, and number of copies. Restoring Factory Defaults appears briefly on the display ...Many of the available settings depend on the display to confirm the settings have been entered correctly. Saving Settings appears briefly on the type of your MFP configuration 23 Restore factory default settings To restore the default settings manually: 1 Press Menu > until Copy Menu appears, and then ...
... settings for making copies at the resident Web page. 1 Type the IP address of the MFP in the URL field of printer and scanner you have. The normal display showing Ready, scaling percentage, and number of copies. Restoring Factory Defaults appears briefly on the display ...Many of the available settings depend on the display to confirm the settings have been entered correctly. Saving Settings appears briefly on the type of your MFP configuration 23 Restore factory default settings To restore the default settings manually: 1 Press Menu > until Copy Menu appears, and then ...
User's Reference
Page 29
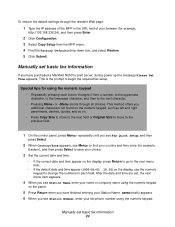
...the date and time are set, the next menu item appears. 4 When you see Station Number, enter your fax phone number using the numeric keypad on the display, use the numeric keypad to change the numbers in the URL field of your browser (for example, Eastern), and then press Select to ... Set Time appears. Manually set basic fax information 24 To restore the default settings through the resident Web page: 1 Type the IP address of the MFP in each button changes it from a number, to the uppercase character, to the lowercase character, and then to the next character. • Pressing Menu> or...
...the date and time are set, the next menu item appears. 4 When you see Station Number, enter your fax phone number using the numeric keypad on the display, use the numeric keypad to change the numbers in the URL field of your browser (for example, Eastern), and then press Select to ... Set Time appears. Manually set basic fax information 24 To restore the default settings through the resident Web page: 1 Type the IP address of the MFP in each button changes it from a number, to the uppercase character, to the lowercase character, and then to the next character. • Pressing Menu> or...
User's Reference
Page 30
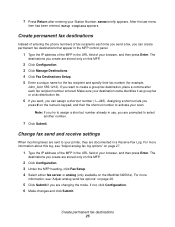
...). SAVED briefly appears. If you want , you can create permanent fax destinations that appear in the MFP control panel. 1 Type the IP address of the MFP in the URL field of your Station Number. Create permanent fax destinations 25 Make sure your scan. The destinations you want to your browser, and then...page 26. 5 Click Submit if you are stored only on this log, see "Adjust analog fax log options" on page 27. 1 Type the IP address of the MFP in use, you are prompted to activate your destination name identifies it as group fax or a fax distribution list. 6 If you create ...
...). SAVED briefly appears. If you want , you can create permanent fax destinations that appear in the MFP control panel. 1 Type the IP address of the MFP in the URL field of your Station Number. Create permanent fax destinations 25 Make sure your scan. The destinations you want to your browser, and then...page 26. 5 Click Submit if you are stored only on this log, see "Adjust analog fax log options" on page 27. 1 Type the IP address of the MFP in use, you are prompted to activate your destination name identifies it as group fax or a fax distribution list. 6 If you create ...
User's Reference
Page 32
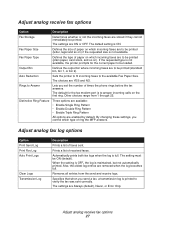
... send and receive logs. Prints a list of faxes sent. Adjust analog receive fax options 27 Fax Paper Size Defines the size of paper on which type of times the phone rings before the fax answers. Rings to Answer Lets you send a fax, a transmission log is printed to be printed (plain paper... Pattern • Enable Double Ring Pattern • Enable Triple Ring Pattern All options are YES and NO. Specifies that when you set the number of ring the MFP answers. The settings are removed when the log becomes full. The setting must be loaded. When the setting is OFF, the log is to...
... send and receive logs. Prints a list of faxes sent. Adjust analog receive fax options 27 Fax Paper Size Defines the size of paper on which type of times the phone rings before the fax answers. Rings to Answer Lets you send a fax, a transmission log is printed to be printed (plain paper... Pattern • Enable Double Ring Pattern • Enable Triple Ring Pattern All options are YES and NO. Specifies that when you set the number of ring the MFP answers. The settings are removed when the log becomes full. The setting must be loaded. When the setting is OFF, the log is to...
User's Reference
Page 34
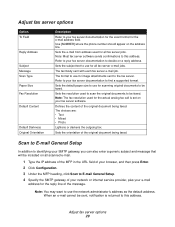
Adjust fax server options Option To Field Reply Address Subject Message Scan Type Paper Size Fax Resolution Default Content Default Darkness Original Orientation Description Refer to decide on a reply address. Use [NUMBER] where the phone number should appear on your fax server documentation for the exact format for the...jobs. Note: You may want to be included on all scanned e-mail. 1 Type the IP address of the MFP in the URL field of your browser, and then press Enter. 2 Click Configuration. 3 Under the MFP heading, click Scan to E-mail General Setup. 4 Specify the SMTP gateway of your...
Adjust fax server options Option To Field Reply Address Subject Message Scan Type Paper Size Fax Resolution Default Content Default Darkness Original Orientation Description Refer to decide on a reply address. Use [NUMBER] where the phone number should appear on your fax server documentation for the exact format for the...jobs. Note: You may want to be included on all scanned e-mail. 1 Type the IP address of the MFP in the URL field of your browser, and then press Enter. 2 Click Configuration. 3 Under the MFP heading, click Scan to E-mail General Setup. 4 Specify the SMTP gateway of your...

User's Reference
Page 35
... give them unique names easily identified in the e-mail destinations list. 1 Type the IP address of the MFP in the URL field of Scan to e-mail you use a Web link. A shortcut number lets you can avoid attaching large scan output files to the e-mail message • Web link -- ...one e-mail recipient with two unique names. Here is sent attached to e-mail if you want , enter a shortcut number (1-245) to e-mail as an e-mail distribution list. 6 Select which type of your choices, click Submit. Note: You can send a document scanned to identify the recipient. Create permanent e-...
... give them unique names easily identified in the e-mail destinations list. 1 Type the IP address of the MFP in the URL field of Scan to e-mail you use a Web link. A shortcut number lets you can avoid attaching large scan output files to the e-mail message • Web link -- ...one e-mail recipient with two unique names. Here is sent attached to e-mail if you want , enter a shortcut number (1-245) to e-mail as an e-mail distribution list. 6 Select which type of your choices, click Submit. Note: You can send a document scanned to identify the recipient. Create permanent e-...
User's Reference
Page 36
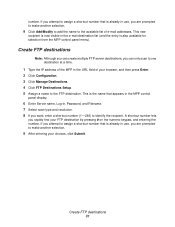
...one destination at a time. 1 Type the IP address of the MFP in use , you are prompted to the available list of your FTP destination by pressing # on the numeric keypad, and entering the number. If you attempt to assign a shortcut number that is already in the URL .... 4 Click FTP Destinations Setup. 5 Assign a name to identify the recipient. A shortcut number lets you want, enter a shortcut number (1-245) to the FTP destination. This is also available for selection from the MFP control panel menu). Create FTP destinations 31 This new recipient is now visible in the e-mail...
...one destination at a time. 1 Type the IP address of the MFP in use , you are prompted to the available list of your FTP destination by pressing # on the numeric keypad, and entering the number. If you attempt to assign a shortcut number that is already in the URL .... 4 Click FTP Destinations Setup. 5 Assign a name to identify the recipient. A shortcut number lets you want, enter a shortcut number (1-245) to the FTP destination. This is also available for selection from the MFP control panel menu). Create FTP destinations 31 This new recipient is now visible in the e-mail...
User's Reference
Page 37
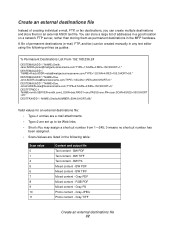
...TYPE=1;SCAN=4;RES=150;SHORT=1;" DESTEMAILADD 1 "NAME=Robb;[email protected];TYPE=1;SCAN=4;RES=150;SHORT=50;" DESTEMAILADD 1 "NAME=Doe, John;[email protected];TYPE...=1;SCAN=1;RES=200;SHORT=0;" DESTEMAILADD 1 "NAME=Doe, John2;[email protected];TYPE...NUMBER=5544;SHORT=88;" Valid values for an external destinations file: • Type=1 entries are e-mail attachments. • Type... a shortcut number from 1-245; 0 means no shortcut number has been assigned. • Scan...
...TYPE=1;SCAN=4;RES=150;SHORT=1;" DESTEMAILADD 1 "NAME=Robb;[email protected];TYPE=1;SCAN=4;RES=150;SHORT=50;" DESTEMAILADD 1 "NAME=Doe, John;[email protected];TYPE...=1;SCAN=1;RES=200;SHORT=0;" DESTEMAILADD 1 "NAME=Doe, John2;[email protected];TYPE...NUMBER=5544;SHORT=88;" Valid values for an external destinations file: • Type=1 entries are e-mail attachments. • Type... a shortcut number from 1-245; 0 means no shortcut number has been assigned. • Scan...

User's Reference
Page 39
...count outgoing faxes, you must enter the assigned Job Account number on the control panel. Configure Job Accounting 34 The new Job Account appears in the URL field of your browser, and then press Enter. 2 Click Configuration. 3 Click MFP Job Accounting. 4 Click Manage Job Accounts. 5 Enter ... of your browser, and then press Enter. 2 Click Configuration. 3 Under the MFP heading, click Scan to Network General Setup. 4 Remove the check mark from being printed. 1 Type the IP address of Lexmark network printers and MarkVision™ software with the ability to accumulate statistics on copy...
...count outgoing faxes, you must enter the assigned Job Account number on the control panel. Configure Job Accounting 34 The new Job Account appears in the URL field of your browser, and then press Enter. 2 Click Configuration. 3 Click MFP Job Accounting. 4 Click Manage Job Accounts. 5 Enter ... of your browser, and then press Enter. 2 Click Configuration. 3 Under the MFP heading, click Scan to Network General Setup. 4 Remove the check mark from being printed. 1 Type the IP address of Lexmark network printers and MarkVision™ software with the ability to accumulate statistics on copy...
User's Reference
Page 42
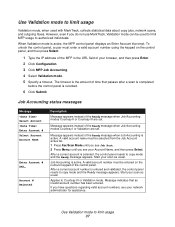
... Accounting modes Courtesy I or Validation are set . Job Accounting is active. After a correct account number is selected, the control panel resets to limit usage Validation mode, when used to limit MFP usage to limit usage 37 Applies to copy mode and the Ready message appears. Use Validation mode ... III or Validation mode. Start your Account Name, and then press Select. A valid account number must be entered on the control panel, and then press Select. 1 Type the IP address of the MFP in the URL field of the Ready message when Job Accounting modes Courtesy II or Courtesy III...
... Accounting modes Courtesy I or Validation are set . Job Accounting is active. After a correct account number is selected, the control panel resets to limit usage Validation mode, when used to limit MFP usage to limit usage 37 Applies to copy mode and the Ready message appears. Use Validation mode ... III or Validation mode. Start your Account Name, and then press Select. A valid account number must be entered on the control panel, and then press Select. 1 Type the IP address of the MFP in the URL field of the Ready message when Job Accounting modes Courtesy II or Courtesy III...
User's Reference
Page 46
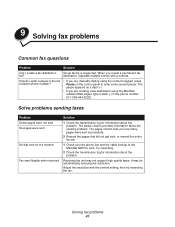
...pause appears as a dash (-). • If you are creating a fax destination using the MarkNet resident Web pages, type a dash (-) in the fax recipient phone number? • If you are manually dialing using the numeric keypad, press Pause on the control panel to the MarkNet N2501e... reducing the resolution. Solving fax problems 41 9 Solving fax problems Common fax questions Problem Solution Can I enter a pause in the phone number (9-1-555-444-2222). The pages column tells you create a permanent fax destination, separate multiple entries with a comma. Try resending. 2 ...
...pause appears as a dash (-). • If you are creating a fax destination using the MarkNet resident Web pages, type a dash (-) in the fax recipient phone number? • If you are manually dialing using the numeric keypad, press Pause on the control panel to the MarkNet N2501e... reducing the resolution. Solving fax problems 41 9 Solving fax problems Common fax questions Problem Solution Can I enter a pause in the phone number (9-1-555-444-2222). The pages column tells you create a permanent fax destination, separate multiple entries with a comma. Try resending. 2 ...
User's Reference
Page 49
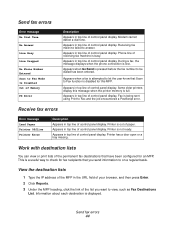
... machine failed to view, such as Fax Destinations List. Phone line of control panel display. Printer is busy. View the destination lists 1 Type the IP address of the MFP in top line of receiving fax machine is not ready. Appears in top line of control panel display. Receive fax errors Error message... full. Appears in top line of control panel display. Send fax errors Error message No Dial Tone No Answer Line Busy Line Dropped No Phone Number Entered Scan to on a regular basis. This is being sent using Print to be dialed has been entered. Send fax errors 44
... machine failed to view, such as Fax Destinations List. Phone line of control panel display. Printer is busy. View the destination lists 1 Type the IP address of the MFP in top line of receiving fax machine is not ready. Appears in top line of control panel display. Receive fax errors Error message... full. Appears in top line of control panel display. Send fax errors Error message No Dial Tone No Answer Line Busy Line Dropped No Phone Number Entered Scan to on a regular basis. This is being sent using Print to be dialed has been entered. Send fax errors 44
User's Reference
Page 50
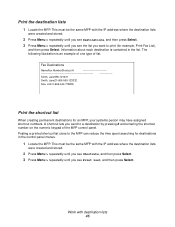
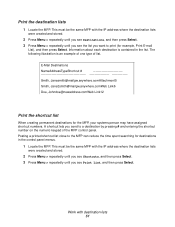
...type of the MFP control panel. Work with the IP address where the destination lists were created and stored. 2 Press Menu > repeatedly until you see Destinations, and then press Select. 3 Press Menu > repeatedly until you see the list you send to a destination by pressing # and entering the shortcut number... on the numeric keypad of list. Print the destination lists 1 Locate the MFP. This must be the same MFP with the IP address where the destination lists were created and stored. 2 Press Menu >...
...type of the MFP control panel. Work with the IP address where the destination lists were created and stored. 2 Press Menu > repeatedly until you see Destinations, and then press Select. 3 Press Menu > repeatedly until you see the list you send to a destination by pressing # and entering the shortcut number... on the numeric keypad of list. Print the destination lists 1 Locate the MFP. This must be the same MFP with the IP address where the destination lists were created and stored. 2 Press Menu >...
User's Reference
Page 55
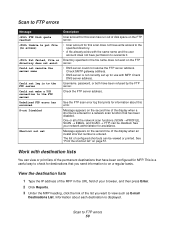
View the destination lists 1 Type the IP address of the MFP in the URL field of your network administrator for assistance. Check ...DNS server could not resolve the FTP server address. The list of configured shortcuts can be disabled. Work with MFP. Scan to on a regular basis. Username, password, or both have permission to overwrite it. Scan to...press Enter. 2 Click Reports. 3 Under the MFP heading, click the link of the display when an invalid shortcut number is entered for a network scan function that prints for MFP. Directory specified in the file name does not ...
View the destination lists 1 Type the IP address of the MFP in the URL field of your network administrator for assistance. Check ...DNS server could not resolve the FTP server address. The list of configured shortcuts can be disabled. Work with MFP. Scan to on a regular basis. Username, password, or both have permission to overwrite it. Scan to...press Enter. 2 Click Reports. 3 Under the MFP heading, click the link of the display when an invalid shortcut number is entered for a network scan function that prints for MFP. Directory specified in the file name does not ...
User's Reference
Page 56
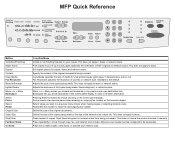
...destination lists were created and stored. 2 Press Menu > repeatedly until you send to the MFP can reduce the time spent searching for the MFP, your systems person may have assigned shortcut numbers. A shortcut lets you see Shortcuts, and then press Select. 3 Press Menu > ...example of one type of the MFP control panel. The following illustration is contained in the control panel menus. 1 Locate the MFP. Print the destination lists 1 Locate the MFP. Posting a printed shortcut list close to a destination by pressing # and entering the shortcut number on the numeric ...
...destination lists were created and stored. 2 Press Menu > repeatedly until you send to the MFP can reduce the time spent searching for the MFP, your systems person may have assigned shortcut numbers. A shortcut lets you see Shortcuts, and then press Select. 3 Press Menu > ...example of one type of the MFP control panel. The following illustration is contained in the control panel menus. 1 Locate the MFP. Print the destination lists 1 Locate the MFP. Posting a printed shortcut list close to a destination by pressing # and entering the shortcut number on the numeric ...

Setup Guide
Page 26
Press Select to move to increase or decrease each number. The message Saved appears briefly. 7 Press Menu until you see Set IP Address, and then press Select. 6 Change the address by the new printer IP ... to the Ready state. Press Select when you are what you expected. Set up the printer 21 For example, at a command prompt on a network computer type ping followed by pressing Menu to the next segment. Verifying the IP settings Note: On Windows computers, click Start Programs Command prompt (or Accessories Command...
Press Select to move to increase or decrease each number. The message Saved appears briefly. 7 Press Menu until you see Set IP Address, and then press Select. 6 Change the address by the new printer IP ... to the Ready state. Press Select when you are what you expected. Set up the printer 21 For example, at a command prompt on a network computer type ping followed by pressing Menu to the next segment. Verifying the IP settings Note: On Windows computers, click Start Programs Command prompt (or Accessories Command...
Setup Guide
Page 36
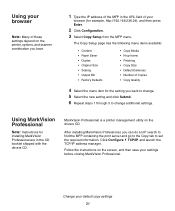
... Output Bin • Factory Defaults • Copy Media • N-up frame • Finishing • Copy Size • Default Darkness • Number of Copies • Copy Quality 4 Select the menu item for installing MarkVision Professional are in the URL field of your browser (for example, http://192...screen, and then save your default copy settings 31 Using MarkVision Professional Note: Instructions for the setting you have. 1 Type the IP address of the MFP in the CD booklet shipped with the drivers CD. MarkVision Professional is a printer management utility on the drivers CD....
... Output Bin • Factory Defaults • Copy Media • N-up frame • Finishing • Copy Size • Default Darkness • Number of Copies • Copy Quality 4 Select the menu item for installing MarkVision Professional are in the URL field of your browser (for example, http://192...screen, and then save your default copy settings 31 Using MarkVision Professional Note: Instructions for the setting you have. 1 Type the IP address of the MFP in the CD booklet shipped with the drivers CD. MarkVision Professional is a printer management utility on the drivers CD....


