
Setup Guide
Page 14
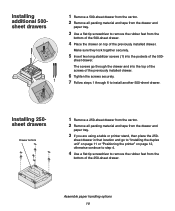
... of the 500- Installing screws in that location and go to step 8, otherwise continue to step 4. 4 Use a flat tip screwdriver to remove the rubber feet from the drawer and paper tray. 3 If you have additional 500 or 250-sheet drawers, go to "Installing the duplex unit" on page 11, or "Positioning the...
... of the 500- Installing screws in that location and go to step 8, otherwise continue to step 4. 4 Use a flat tip screwdriver to remove the rubber feet from the drawer and paper tray. 3 If you have additional 500 or 250-sheet drawers, go to "Installing the duplex unit" on page 11, or "Positioning the...
Setup Guide
Page 15
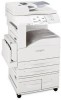
... of the previously installed drawer. Installing 250sheet drawers Drawer bottom 1 Remove a 250-sheet drawer from the carton. 2 Remove all packing material and tape from the drawer and paper tray. 3 Use a flat tip screwdriver to remove the rubber feet from the bottom of the 500-sheet drawer. ...4 Use a flat tip screwdriver to install another 500-sheet drawer. Installing additional 500sheet drawers 1 Remove a 500-sheet drawer from the carton. 2 Remove all packing material and tape from the drawer and paper tray. 3 If you are using a table or printer stand, then place the 250- sheet drawer...
... of the previously installed drawer. Installing 250sheet drawers Drawer bottom 1 Remove a 250-sheet drawer from the carton. 2 Remove all packing material and tape from the drawer and paper tray. 3 Use a flat tip screwdriver to remove the rubber feet from the bottom of the 500-sheet drawer. ...4 Use a flat tip screwdriver to install another 500-sheet drawer. Installing additional 500sheet drawers 1 Remove a 500-sheet drawer from the carton. 2 Remove all packing material and tape from the drawer and paper tray. 3 If you are using a table or printer stand, then place the 250- sheet drawer...
Setup Guide
Page 23
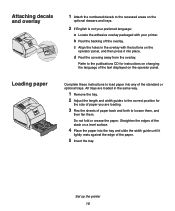
... not fold or crease the paper. Set up the printer 18 All trays are loading. 3 Flex the sheets of the standard or optional trays. c Align the holes in the same way. 1 Remove the tray. 2 Adjust the length and width guides to the correct position for instructions on changing the language of the ...text displayed on a level surface. 4 Place the paper into any of paper back and forth to load paper into the tray and slide the width guide until...
... not fold or crease the paper. Set up the printer 18 All trays are loading. 3 Flex the sheets of the standard or optional trays. c Align the holes in the same way. 1 Remove the tray. 2 Adjust the length and width guides to the correct position for instructions on changing the language of the ...text displayed on a level surface. 4 Place the paper into any of paper back and forth to load paper into the tray and slide the width guide until...
Setup Guide
Page 28
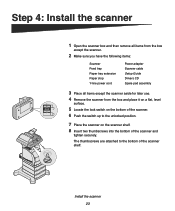
... and tighten securely. Step 4: Install the scanner 1 Open the scanner box and then remove all items from the box except the scanner. 2 Make sure you have the following items: Scanner Feed tray Paper tray extension Paper stop Y-line power cord Power adapter Scanner cable Setup Guide Drivers CD Spare... pad assembly 3 Place all items except the scanner aside for later use. 4 Remove the scanner from the box and place it on a flat...
... and tighten securely. Step 4: Install the scanner 1 Open the scanner box and then remove all items from the box except the scanner. 2 Make sure you have the following items: Scanner Feed tray Paper tray extension Paper stop Y-line power cord Power adapter Scanner cable Setup Guide Drivers CD Spare... pad assembly 3 Place all items except the scanner aside for later use. 4 Remove the scanner from the box and place it on a flat...


