Quick Reference
Page 1
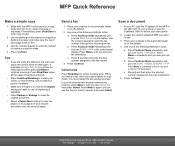
.... Cancel a fax Press Stop/Clear to continue scanning. Scan a document 1 At your PC, type the IP address of the MFP in the URL field of your browser or use the ScanBack Utility to define your scan profile. 2 Locate the network-attached MFP you want to collate your e-mail or FTP destination. c Press # and then enter the shortcut number assigned to copy mode. MFP Quick Reference Make a simple copy 1 Make sure the MFP control panel is in copy mode and...
.... Cancel a fax Press Stop/Clear to continue scanning. Scan a document 1 At your PC, type the IP address of the MFP in the URL field of your browser or use the ScanBack Utility to define your scan profile. 2 Locate the network-attached MFP you want to collate your e-mail or FTP destination. c Press # and then enter the shortcut number assigned to copy mode. MFP Quick Reference Make a simple copy 1 Make sure the MFP control panel is in copy mode and...
Quick Reference
Page 2
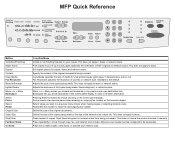
... control panel display in copy menus and scan destination lists. Print copies 2-up or 4-up to memory. Define the size of your copies. Menu > or < Menu moves you back to re-enter information. This does not apply to faxes or network scans. Adjusts the size of copies. This does not apply to faxes. Network scan modes must be configured to faxes or network scans. This does not apply to be accessible. MFP Quick Reference Collation/ Finishing Paper saver Duplex Content text mixed Copy media Fax...
... control panel display in copy menus and scan destination lists. Print copies 2-up or 4-up to memory. Define the size of your copies. Menu > or < Menu moves you back to re-enter information. This does not apply to faxes or network scans. Adjusts the size of copies. This does not apply to faxes. Network scan modes must be configured to faxes or network scans. This does not apply to be accessible. MFP Quick Reference Collation/ Finishing Paper saver Duplex Content text mixed Copy media Fax...
User's Reference
Page 6
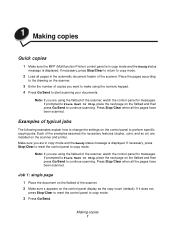
... (duplex, color, and so on) are using the flatbed of the scanner, watch the control panel for messages. Job 1: single page 1 Place the document on the flatbed of the scanner. If it does not, press Stop/Clear to reset the control panel to copy mode. If necessary, press Stop/Clear to return to continue scanning. Press Stop/Clear when all the pages have been scanned. If necessary, press Stop/Clear to reset the control panel to copy mode. 3 Press Go/Send. 1 Making copies Quick copies 1 Make sure the MFP...
... (duplex, color, and so on) are using the flatbed of the scanner, watch the control panel for messages. Job 1: single page 1 Place the document on the flatbed of the scanner. If it does not, press Stop/Clear to reset the control panel to copy mode. If necessary, press Stop/Clear to return to continue scanning. Press Stop/Clear when all the pages have been scanned. If necessary, press Stop/Clear to reset the control panel to copy mode. 3 Press Go/Send. 1 Making copies Quick copies 1 Make sure the MFP...
User's Reference
Page 14
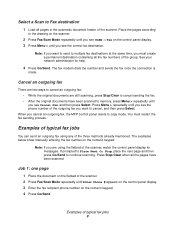
... Go/Send to copy mode. The fax modem dials the number and sends the fax once the connection is made. Examples of typical fax jobs You can send an outgoing fax using the flatbed of the scanner, watch the control panel display for help. 4 Press Go/Send. Press Stop/Clear when all the fax numbers of typical fax jobs 9 Press Menu > repeatedly until you see Cancel Fax, and then press Select. Select a Scan to Fax destination 1 Load all pages in the automatic document feeder of...
... Go/Send to copy mode. The fax modem dials the number and sends the fax once the connection is made. Examples of typical fax jobs You can send an outgoing fax using the flatbed of the scanner, watch the control panel display for help. 4 Press Go/Send. Press Stop/Clear when all the fax numbers of typical fax jobs 9 Press Menu > repeatedly until you see Cancel Fax, and then press Select. Select a Scan to Fax destination 1 Load all pages in the automatic document feeder of...
User's Reference
Page 18
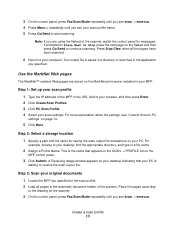
... or launched in the automatic document feeder of the scanner, watch the control panel for saving the scan output file somewhere on page 14. 5 Click Next. Create a scan profile 13 Note: If you are stored on the MarkNet print server installed in the SCAN → PROFILE list on the flatbed and then press Go/Send to continue scanning. Your output file is waiting to your scan settings. Step 3: Scan your PC. Step 2: Select...
... or launched in the automatic document feeder of the scanner, watch the control panel for saving the scan output file somewhere on page 14. 5 Click Next. Create a scan profile 13 Note: If you are stored on the MarkNet print server installed in the SCAN → PROFILE list on the flatbed and then press Go/Send to continue scanning. Your output file is waiting to your scan settings. Step 3: Scan your PC. Step 2: Select...
User's Reference
Page 25
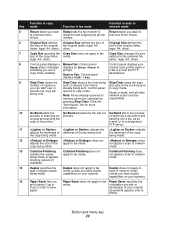
... Fax: Control panel displays SCAN → Fax. choice. Scan to previous menu redial the last outgoing fax phone previous menu choice. pressing Stop/Clear. Button and menu key 20 legal, A4, other ). Control panel displays your scanner. 15 Paper Saver lets you have duplex being made . Duplex does not apply to scan to network mode, unless you Paper Saver does not apply to fax Paper Saver specifies the print copies 2-up in order to the printer. setting for more information. 10 Go/Send starts the Go/Send...
... Fax: Control panel displays SCAN → Fax. choice. Scan to previous menu redial the last outgoing fax phone previous menu choice. pressing Stop/Clear. Button and menu key 20 legal, A4, other ). Control panel displays your scanner. 15 Paper Saver lets you have duplex being made . Duplex does not apply to scan to network mode, unless you Paper Saver does not apply to fax Paper Saver specifies the print copies 2-up in order to the printer. setting for more information. 10 Go/Send starts the Go/Send...
User's Reference
Page 27
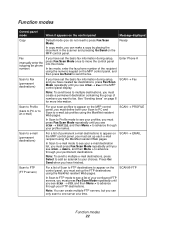
... scanner and pressing Go/Send on page 8 for more information. SCAN ® FTP Function modes 22 Ready Fax (manually enter the outgoing fax phone number) If you have set up the FTP destinations using the numeric keypad on the MFP control panel, you must press Fax/Scan Mode repeatedly until you can make a copy by placing the document in the MFP control panel display. Enter Phone # Scan to send the fax. See "Sending faxes" on the MFP control panel. In fax mode, enter the fax phone number of the recipient using the MarkNet resident Web pages...
... scanner and pressing Go/Send on page 8 for more information. SCAN ® FTP Function modes 22 Ready Fax (manually enter the outgoing fax phone number) If you have set up the FTP destinations using the numeric keypad on the MFP control panel, you must press Fax/Scan Mode repeatedly until you can make a copy by placing the document in the MFP control panel display. Enter Phone # Scan to send the fax. See "Sending faxes" on the MFP control panel. In fax mode, enter the fax phone number of the recipient using the MarkNet resident Web pages...
User's Reference
Page 32
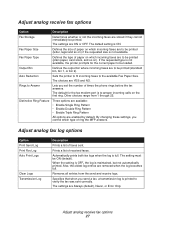
... correct paper to be loaded. Removes all entries from 1 through 25. By changing these settings, you send a fax, a transmission log is to be printed (letter, legal and so on the first ring. Also, the oldest log entries are enabled by default. Fax Paper Type Defines the type of times the phone rings before the fax answers. Distinctive Ring Feature Three options are available: • Enable Single Ring Pattern • Enable Double Ring...
... correct paper to be loaded. Removes all entries from 1 through 25. By changing these settings, you send a fax, a transmission log is to be printed (letter, legal and so on the first ring. Also, the oldest log entries are enabled by default. Fax Paper Type Defines the type of times the phone rings before the fax answers. Distinctive Ring Feature Three options are available: • Enable Single Ring Pattern • Enable Double Ring...
User's Reference
Page 34
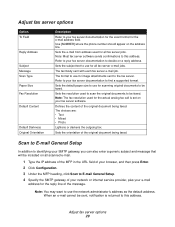
... address used to scan the original documents to use for the reply line of your browser, and then press Enter. 2 Click Configuration. 3 Under the MFP heading, click Scan to use for all fax server e-mail jobs. When an e-mail cannot be included on the address line. The format to be faxed. Note: Most fax server software sends confirmations to be faxed. The text body sent with each fax server e-mail job. Sets the default paper size to use the network administrator's address as the default address...
... address used to scan the original documents to use for the reply line of your browser, and then press Enter. 2 Click Configuration. 3 Under the MFP heading, click Scan to use for all fax server e-mail jobs. When an e-mail cannot be included on the address line. The format to be faxed. Note: Most fax server software sends confirmations to be faxed. The text body sent with each fax server e-mail job. Sets the default paper size to use the network administrator's address as the default address...

User's Reference
Page 39
... Enter. 2 Click Configuration. 3 Under the MFP heading, click Scan to Network General Setup. 4 Remove the check mark from any function you want to enter a Job Account number on the control panel. Disabling the Scan to FTP confirmation page stops the confirmation page from being printed. 1 Type the IP address of the MFP in the URL field of Lexmark network printers and MarkVision™ software with the ability to accumulate statistics on copy jobs, outgoing faxes, and scan to network jobs by requiring users to disable. 5 Click Submit. Configure Job...
... Enter. 2 Click Configuration. 3 Under the MFP heading, click Scan to Network General Setup. 4 Remove the check mark from any function you want to enter a Job Account number on the control panel. Disabling the Scan to FTP confirmation page stops the confirmation page from being printed. 1 Type the IP address of the MFP in the URL field of Lexmark network printers and MarkVision™ software with the ability to accumulate statistics on copy jobs, outgoing faxes, and scan to network jobs by requiring users to disable. 5 Click Submit. Configure Job...
User's Reference
Page 43
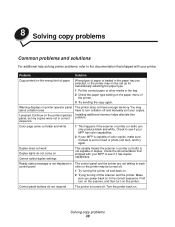
... duplex. Color page came out black and white 1 This happens if the scanner or printer (or both ) is loaded in the paper tray you power back on Cannot select duplex settings This usually means the scanner or printer (or both ) can only produce black and white. Control panel buttons do not come on in the correct sequence. Turn the printer back on the printer. Warning displays on printer operator panel about collation area I pressed Continue on the printer operator panel...
... duplex. Color page came out black and white 1 This happens if the scanner or printer (or both ) is loaded in the paper tray you power back on Cannot select duplex settings This usually means the scanner or printer (or both ) can only produce black and white. Control panel buttons do not come on in the correct sequence. Turn the printer back on the printer. Warning displays on printer operator panel about collation area I pressed Continue on the printer operator panel...
User's Reference
Page 44
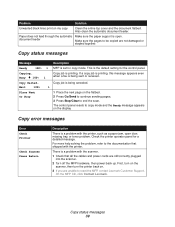
..., then power back up. Copy status messages 39 Copy status messages Message Ready 100% 1 Copying... Copy job is the default setting for a detailed message. Also clean the automatic document feeder. document feeder Make sure the pages to be copied are not damaged or stapled together. Check the printer operator panel for the control panel. Copy error messages Error Check Printer Check Scanner Press Return Description There is being sent or received. Problem Solution Unwanted black lines print on . 3 If you are unable to reset the MFP, contact Lexmark Customer Support...
..., then power back up. Copy status messages 39 Copy status messages Message Ready 100% 1 Copying... Copy job is the default setting for a detailed message. Also clean the automatic document feeder. document feeder Make sure the pages to be copied are not damaged or stapled together. Check the printer operator panel for the control panel. Copy error messages Error Check Printer Check Scanner Press Return Description There is being sent or received. Problem Solution Unwanted black lines print on . 3 If you are unable to reset the MFP, contact Lexmark Customer Support...
User's Reference
Page 46
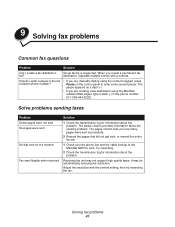
.... Adjust the resolution and the content setting, then try resending the fax. How do I create a fax distribution list? The status column provides information about the problem. Try resending. 2 Check the transmission log for information about the sending problem. Solving fax problems 41 Group faxing is supported. 9 Solving fax problems Common fax questions Problem Solution Can I enter a pause in the phone number (9-1-555-444-2222). When you are manually dialing using the MarkNet resident Web pages, type a dash...
.... Adjust the resolution and the content setting, then try resending the fax. How do I create a fax distribution list? The status column provides information about the problem. Try resending. 2 Check the transmission log for information about the sending problem. Solving fax problems 41 Group faxing is supported. 9 Solving fax problems Common fax questions Problem Solution Can I enter a pause in the phone number (9-1-555-444-2222). When you are manually dialing using the MarkNet resident Web pages, type a dash...
User's Reference
Page 49
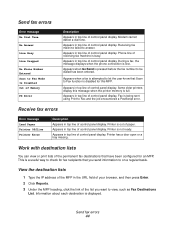
... in top line of control panel display. Receive fax errors Error message Load Paper Printer Offline Printer Error Description Appears in top line of control panel display. Receiving fax machine failed to answer. Appears in top line of control panel display. View the destination lists 1 Type the IP address of the MFP in top line of control panel display. Some older printers display this MFP. Printer is full. Send fax errors Error message No Dial Tone No Answer Line Busy Line Dropped No Phone Number Entered Scan to Fax Mode Is Disabled Out of Memory PS Error...
... in top line of control panel display. Receive fax errors Error message Load Paper Printer Offline Printer Error Description Appears in top line of control panel display. Receiving fax machine failed to answer. Appears in top line of control panel display. View the destination lists 1 Type the IP address of the MFP in top line of control panel display. Some older printers display this MFP. Printer is full. Send fax errors Error message No Dial Tone No Answer Line Busy Line Dropped No Phone Number Entered Scan to Fax Mode Is Disabled Out of Memory PS Error...
User's Reference
Page 55
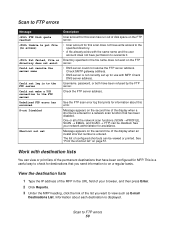
... server is entered. Scan to FTP errors Message FTP Disk quota reached Unable to put file (no access) Put failed, file or directory does not exist Could not resolve the server name Could not log in to the FTP server Could not make a TCP connection to the FTP server Undefined FTP error has occurred S-cut Disabled Shortcut not set up for use with MFP. Check DNS server address. Message appears on the FTP server. • User...
... server is entered. Scan to FTP errors Message FTP Disk quota reached Unable to put file (no access) Put failed, file or directory does not exist Could not resolve the server name Could not log in to the FTP server Could not make a TCP connection to the FTP server Undefined FTP error has occurred S-cut Disabled Shortcut not set up for use with MFP. Check DNS server address. Message appears on the FTP server. • User...
User's Reference
Page 59
... Log Paper Size 28 Log Paper Type 28 Fax send menu Automatic Redial 26 Default Content 26 Default Darkness 26 Dialing Mode 26 Fax Resolution 26 Redial Frequency 26 faxing examples 400 x 400 dpi photo 10 colored original job 10 mixed content job 10 multiple originals job 10 single original job 9 Fax log menu 27 Fax send menu 26 problem solving no incoming fax 42 finishing copy jobs 6 J job accounts setting a password 35 K keypad description, control panel 19 M MarkNet print server 13, 24 MarkTrack software 34 MarkVision software...
... Log Paper Size 28 Log Paper Type 28 Fax send menu Automatic Redial 26 Default Content 26 Default Darkness 26 Dialing Mode 26 Fax Resolution 26 Redial Frequency 26 faxing examples 400 x 400 dpi photo 10 colored original job 10 mixed content job 10 multiple originals job 10 single original job 9 Fax log menu 27 Fax send menu 26 problem solving no incoming fax 42 finishing copy jobs 6 J job accounts setting a password 35 K keypad description, control panel 19 M MarkNet print server 13, 24 MarkTrack software 34 MarkVision software...
Setup Guide
Page 3
... easily accessible. • Refer service or repairs, other replacement parts. • When installing the print server containing the fax modem port, follow all countries in conjunction with diamond design and MarkVision are the user's responsibility. In the United Kingdom and Eire, send to any obligation to you supply in certain transactions; Evaluation and verification of any time. UNITED STATES GOVERNMENT RIGHTS This software and any accompanying documentation...
... easily accessible. • Refer service or repairs, other replacement parts. • When installing the print server containing the fax modem port, follow all countries in conjunction with diamond design and MarkVision are the user's responsibility. In the United Kingdom and Eire, send to any obligation to you supply in certain transactions; Evaluation and verification of any time. UNITED STATES GOVERNMENT RIGHTS This software and any accompanying documentation...
Setup Guide
Page 4
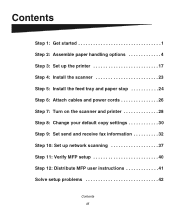
Contents Step 1: Get started 1 Step 2: Assemble paper handling options 4 Step 3: Set up the printer 17 Step 4: Install the scanner 23 Step 5: Install the feed tray and paper stop 24 Step 6: Attach cables and power cords 26 Step 7: Turn on the scanner and printer 28 Step 8: Change your default copy settings 30 Step 9: Set send and receive fax information 32 Step 10: Set up network scanning 37 Step 11: Verify MFP setup 40 Step 12: Distribute MFP user instructions 41 Solve setup problems 42 Contents iii
Contents Step 1: Get started 1 Step 2: Assemble paper handling options 4 Step 3: Set up the printer 17 Step 4: Install the scanner 23 Step 5: Install the feed tray and paper stop 24 Step 6: Attach cables and power cords 26 Step 7: Turn on the scanner and printer 28 Step 8: Change your default copy settings 30 Step 9: Set send and receive fax information 32 Step 10: Set up network scanning 37 Step 11: Verify MFP setup 40 Step 12: Distribute MFP user instructions 41 Solve setup problems 42 Contents iii

Setup Guide
Page 35
... appropriate buttons to change the Content, Copy Media, Duplex, or other settings to the default options you want. 2 After you select a new setting, the light changes to the selected setting to access the MFP IP address and enter the Configure menu. The indicator light next to the value on the control panel illuminates to save the settings. They are three methods to suit your needs. Change your printer. There are 1) manually entering the information through the MFP control panel and operator panel, 2) using...
... appropriate buttons to change the Content, Copy Media, Duplex, or other settings to the default options you want. 2 After you select a new setting, the light changes to the selected setting to access the MFP IP address and enter the Configure menu. The indicator light next to the value on the control panel illuminates to save the settings. They are three methods to suit your needs. Change your printer. There are 1) manually entering the information through the MFP control panel and operator panel, 2) using...
Setup Guide
Page 36
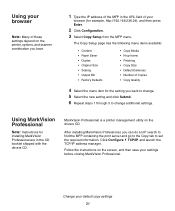
... the MFP containing the print server and go to the Copy tab to change additional settings. Follow the instructions on the screen, and then save your default copy settings 31 Change your settings before closing MarkVision Professional. Using your browser Note: Many of these settings depend on the printer, options, and scanner combination you have. 1 Type the IP address of the MFP in the CD booklet shipped with the drivers CD. After installing MarkVision...
... the MFP containing the print server and go to the Copy tab to change additional settings. Follow the instructions on the screen, and then save your default copy settings 31 Change your settings before closing MarkVision Professional. Using your browser Note: Many of these settings depend on the printer, options, and scanner combination you have. 1 Type the IP address of the MFP in the CD booklet shipped with the drivers CD. After installing MarkVision...


