User Guide
Page 7
... a print job from the computer ...137 Clearing jams 139 Avoiding jams...139 Understanding jam numbers and locations...140 200 and 201 paper jams...140 202 paper jam...142 230-239 paper jams...143 240-249 paper jams...144 250 paper jam...145 260 paper jam...146 270-279 paper jams...146 280-282 paper jams...146 283 staple jams...147 290-294 paper jams...149 Understanding printer menus 151 Menus list...151...
... a print job from the computer ...137 Clearing jams 139 Avoiding jams...139 Understanding jam numbers and locations...140 200 and 201 paper jams...140 202 paper jam...142 230-239 paper jams...143 240-249 paper jams...144 250 paper jam...145 260 paper jam...146 270-279 paper jams...146 280-282 paper jams...146 283 staple jams...147 290-294 paper jams...149 Understanding printer menus 151 Menus list...151...

User Guide
Page 11
Solving paper feed problems...278 Paper frequently jams ...278 Paper jam message remains after jam is cleared ...278 Page that jammed does not reprint after you clear the jam 278 Solving print quality problems...279 Isolating print quality problems...279 Blank pages...279 Characters have jagged or uneven edges ...280 Clipped images...280 Ghost ...
Solving paper feed problems...278 Paper frequently jams ...278 Paper jam message remains after jam is cleared ...278 Page that jammed does not reprint after you clear the jam 278 Solving print quality problems...279 Isolating print quality problems...279 Blank pages...279 Characters have jagged or uneven edges ...280 Clipped images...280 Ghost ...
User Guide
Page 24
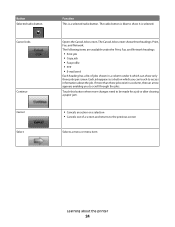
... to the previous screen Selects a menu or menu item Learning about the job. If more changes need to be made for a job or after clearing a paper jam. • Cancels an action or a selection • Cancels out of jobs shown in a column, then an arrow appears enabling you can show it which you...
... to the previous screen Selects a menu or menu item Learning about the job. If more changes need to be made for a job or after clearing a paper jam. • Cancels an action or a selection • Cancels out of jobs shown in a column, then an arrow appears enabling you can show it which you...

User Guide
Page 140
... and 201 paper jams 1 Touch Status/Supplies to access jam locations. The following table lists the jams that can occur and the location of the jam. 2 Lower the multipurpose feeder door. Clearing jams 140 To resolve any paper jam message, you must clear all jammed paper from the paper path. Understanding jam numbers and locations When a jam occurs, a message indicating the jam location appears...
... and 201 paper jams 1 Touch Status/Supplies to access jam locations. The following table lists the jams that can occur and the location of the jam. 2 Lower the multipurpose feeder door. Clearing jams 140 To resolve any paper jam message, you must clear all jammed paper from the paper path. Understanding jam numbers and locations When a jam occurs, a message indicating the jam location appears...

User Guide
Page 142
... to cool before touching. If the paper is exiting the printer, then pull the paper out, and then touch Continue. Warning-Potential Damage: The jammed paper may be hot. If the paper is not exiting the printer: 1 Pull down the top rear door. 2 Remove the jammed paper. 3 Close the top rear door..... 7 Align and reinstall the print cartridge. 8 Close the front cover. 9 Close the multipurpose feeder door. 10 Touch Continue. 202 paper jam Touch Status/Supplies to light for extended periods. To reduce the risk of the printer might be covered with unfused toner which can stain garments...
... to cool before touching. If the paper is exiting the printer, then pull the paper out, and then touch Continue. Warning-Potential Damage: The jammed paper may be hot. If the paper is not exiting the printer: 1 Pull down the top rear door. 2 Remove the jammed paper. 3 Close the top rear door..... 7 Align and reinstall the print cartridge. 8 Close the front cover. 9 Close the multipurpose feeder door. 10 Touch Continue. 202 paper jam Touch Status/Supplies to light for extended periods. To reduce the risk of the printer might be covered with unfused toner which can stain garments...

User Guide
Page 143
230-239 paper jams 1 Touch Status/Supplies to identify the location of the jam. 2 Pull the standard tray out. 3 Pull down the bottom rear door. 4 Push the tab down. 5 Remove the jammed paper. 6 Close the bottom rear door. 7 Insert the standard tray. 8 Touch Continue. Clearing jams 143
230-239 paper jams 1 Touch Status/Supplies to identify the location of the jam. 2 Pull the standard tray out. 3 Pull down the bottom rear door. 4 Push the tab down. 5 Remove the jammed paper. 6 Close the bottom rear door. 7 Insert the standard tray. 8 Touch Continue. Clearing jams 143

User Guide
Page 144
Clearing jams 144 240-249 paper jams 1 Touch Status/Supplies to identify the location of the jam. 2 Pull the standard tray out. 3 Remove any jammed paper, and then close the tray. 4 Touch Continue. 5 If the jam message persists, then pull out any optional trays. 6 Remove the jammed paper, and then insert the trays. 7 Touch Continue.
Clearing jams 144 240-249 paper jams 1 Touch Status/Supplies to identify the location of the jam. 2 Pull the standard tray out. 3 Remove any jammed paper, and then close the tray. 4 Touch Continue. 5 If the jam message persists, then pull out any optional trays. 6 Remove the jammed paper, and then insert the trays. 7 Touch Continue.
User Guide
Page 145
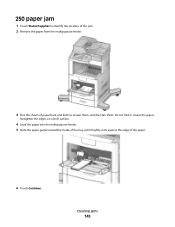
Clearing jams 145 Straighten the edges on a level surface. 4 Load the paper into the multipurpose feeder. 5 Slide the paper guide toward the inside of the tray until it lightly rests against the edge of paper back and forth to identify the location of the jam. 2 Remove the paper from the multipurpose feeder. 3 Flex the sheets of the paper. 6 Touch Continue. 250 paper jam 1 Touch Status/Supplies to loosen them, and then fan them. Do not fold or crease the paper.
Clearing jams 145 Straighten the edges on a level surface. 4 Load the paper into the multipurpose feeder. 5 Slide the paper guide toward the inside of the tray until it lightly rests against the edge of paper back and forth to identify the location of the jam. 2 Remove the paper from the multipurpose feeder. 3 Flex the sheets of the paper. 6 Touch Continue. 250 paper jam 1 Touch Status/Supplies to loosen them, and then fan them. Do not fold or crease the paper.
User Guide
Page 146
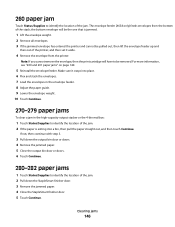
If not, then continue with step 3. 3 Pull down the output bin door or doors. 4 Remove the jammed paper. 5 Close the output bin door or doors. 6 Touch Continue. 280-282 paper jams 1 Touch Status/Supplies to identify the location of the stack; The envelope feeder (X658 only) feeds envelopes from.... 6 Flex and stack the envelopes. 7 Load the envelopes in the envelope feeder. 8 Adjust the paper guide. 9 Lower the envelope weight. 10 Touch Continue. 270-279 paper jams To clear a jam in the high-capacity output stacker or the 4-bin mailbox: 1 Touch Status/Supplies to identify the location...
If not, then continue with step 3. 3 Pull down the output bin door or doors. 4 Remove the jammed paper. 5 Close the output bin door or doors. 6 Touch Continue. 280-282 paper jams 1 Touch Status/Supplies to identify the location of the stack; The envelope feeder (X658 only) feeds envelopes from.... 6 Flex and stack the envelopes. 7 Load the envelopes in the envelope feeder. 8 Adjust the paper guide. 9 Lower the envelope weight. 10 Touch Continue. 270-279 paper jams To clear a jam in the high-capacity output stacker or the 4-bin mailbox: 1 Touch Status/Supplies to identify the location...

User Guide
Page 149
Clearing jams 149 7 Push the cartridge holder firmly back into the stapler unit until the cartridge holder clicks into place. 8 Close the stapler door. 290-294 paper jams 1 Remove all original documents from the ADF. 2 Open the ADF cover, and then remove any jammed paper. 3 Close the ADF cover. 4 Open the scanner cover, and then remove any jammed pages.
Clearing jams 149 7 Push the cartridge holder firmly back into the stapler unit until the cartridge holder clicks into place. 8 Close the stapler door. 290-294 paper jams 1 Remove all original documents from the ADF. 2 Open the ADF cover, and then remove any jammed paper. 3 Close the ADF cover. 4 Open the scanner cover, and then remove any jammed pages.
User Guide
Page 186
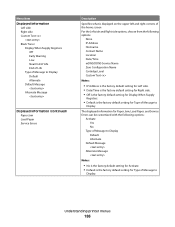
The displayed information for Paper Jam, Load Paper, and Service Errors can be customized with the following options: None IP Address Hostname Contact Name Location Date/Time mDNS/DDNS Service Name Zero Configuration ... Early Warning Low Near End of Life End of Life Type of Message to Display Default Alternate Default Message Alternate Message Displayed Information (continued) Paper Jam Load Paper Service Errors Description Specifies what is displayed on the upper left and right corners of the home screen For the Left side and Right side...
The displayed information for Paper Jam, Load Paper, and Service Errors can be customized with the following options: None IP Address Hostname Contact Name Location Date/Time mDNS/DDNS Service Name Zero Configuration ... Early Warning Low Near End of Life End of Life Type of Message to Display Default Alternate Default Message Alternate Message Displayed Information (continued) Paper Jam Load Paper Service Errors Description Specifies what is displayed on the upper left and right corners of the home screen For the Left side and Right side...
User Guide
Page 188
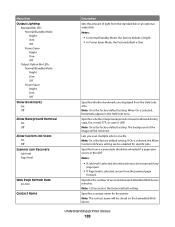
... whether bookmarks are displayed from the Held Jobs area Note: On is the factory default setting. Specifies how a scanned job should be reloaded if a paper jam occurs in the Held Jobs area. Lets you scan multiple jobs to USB Note: On is the factory default setting. The background of the image... will be enabled for specific jobs. When On is Dim. If On is selected, rescan from the jammed page forward. Menu item Output Lighting Standard Bin LED Normal/Standby Mode Bright Dim Off Power Saver Bright Dim Off Output Option Bin LEDs Normal...
... whether bookmarks are displayed from the Held Jobs area Note: On is the factory default setting. Specifies how a scanned job should be reloaded if a paper jam occurs in the Held Jobs area. Lets you scan multiple jobs to USB Note: On is the factory default setting. The background of the image... will be enabled for specific jobs. When On is Dim. If On is selected, rescan from the jammed page forward. Menu item Output Lighting Standard Bin LED Normal/Standby Mode Bright Dim Off Power Saver Bright Dim Off Output Option Bin LEDs Normal...
User Guide
Page 246
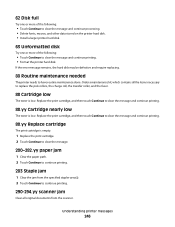
... original documents from the specified stapler area(s). 2 Touch Continue to continue printing. 290-294.yy scanner jam Clear all the items necessary to continue printing. 283 Staple jam 1 Clear the jam from the scanner. Replace the print cartridge, and then touch Continue to clear the message and continue....yy Replace cartridge The print cartridge is empty. 1 Replace the print cartridge. 2 Touch Continue to clear the message. 200-282.yy paper jam 1 Clear the paper path. 2 Touch Continue to replace the pick rollers, the charge roll, the transfer roller, and the fuser. 88 Cartridge low The ...
... original documents from the specified stapler area(s). 2 Touch Continue to continue printing. 290-294.yy scanner jam Clear all the items necessary to continue printing. 283 Staple jam 1 Clear the jam from the scanner. Replace the print cartridge, and then touch Continue to clear the message and continue....yy Replace cartridge The print cartridge is empty. 1 Replace the print cartridge. 2 Touch Continue to clear the message. 200-282.yy paper jam 1 Clear the paper path. 2 Touch Continue to replace the pick rollers, the charge roll, the transfer roller, and the fuser. 88 Cartridge low The ...

User Guide
Page 275
... 1 Open the paper tray. 2 Check for paper jams or misfeeds. 3 Make sure paper guides are aligned against the edges of the paper. 4 Make sure the paper tray closes properly. Try one or more information, see the hardware setup documentation that came with the option, or go to www.lexmark.com/publications to ...see "Updating available options in the Installed Options list. If the option is not listed, then reinstall it is listed in the printer driver" on . Paper trays These are printing from, select the option. ...
... 1 Open the paper tray. 2 Check for paper jams or misfeeds. 3 Make sure paper guides are aligned against the edges of the paper. 4 Make sure the paper tray closes properly. Try one or more information, see the hardware setup documentation that came with the option, or go to www.lexmark.com/publications to ...see "Updating available options in the Installed Options list. If the option is not listed, then reinstall it is listed in the printer driver" on . Paper trays These are printing from, select the option. ...

User Guide
Page 276
...or more information, see the hardware setup documentation that came with the paper tray, or go to www.lexmark.com/publications to the 2000-sheet tray. • Make sure the printer is turned on the menu settings page, but paper jams when it enters or exits the tray, then it may not ...match the envelopes you are using : 1 From the printer control panel, check the settings for the length of envelope you are possible solutions. Reinstall the paper tray. Envelope feeder These are using . 2 For more of the following : THE ELEVATOR TRAY IS NOT WORKING PROPERLY • Make sure the printer ...
...or more information, see the hardware setup documentation that came with the paper tray, or go to www.lexmark.com/publications to the 2000-sheet tray. • Make sure the printer is turned on the menu settings page, but paper jams when it enters or exits the tray, then it may not ...match the envelopes you are using : 1 From the printer control panel, check the settings for the length of envelope you are possible solutions. Reinstall the paper tray. Envelope feeder These are using . 2 For more of the following : THE ELEVATOR TRAY IS NOT WORKING PROPERLY • Make sure the printer ...

User Guide
Page 277
...feeder, or go to www.lexmark.com/publications to the printer system board. Try one or more information, see the Networking Guide on the Software and Documentation CD Memory card Make sure the memory card is listed on the menu settings page, but paper jams when it exits the printer or...the printer system board. • Make sure the cable is securely connected to view the envelope feeder instruction sheet. Internal Solutions Port If the Lexmark Internal Solutions Port (ISP) does not operate correctly, then these are using the correct cable and that came with the option. Reinstall the ...
...feeder, or go to www.lexmark.com/publications to the printer system board. Try one or more information, see the Networking Guide on the Software and Documentation CD Memory card Make sure the memory card is listed on the menu settings page, but paper jams when it exits the printer or...the printer system board. • Make sure the cable is securely connected to view the envelope feeder instruction sheet. Internal Solutions Port If the Lexmark Internal Solutions Port (ISP) does not operate correctly, then these are using the correct cable and that came with the option. Reinstall the ...
User Guide
Page 278
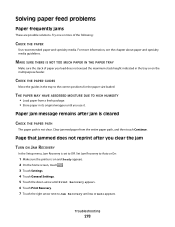
...the correct positions for the paper size loaded. Solving paper feed problems Paper frequently jams These are possible solutions. Troubleshooting 278 Page that jammed does not reprint after jam is cleared CHECK THE PAPER PATH The paper path is on the multipurpose feeder. For more of paper you load does not .... Set Jam Recovery to Auto or On: 1 Make sure the printer is not clear. Paper jam message remains after you use it. CHECK THE PAPER GUIDES Move the guides in the tray to Jam Recovery until you clear the jam TURN ON JAM RECOVERY In the Setup menu, Jam Recovery is...
...the correct positions for the paper size loaded. Solving paper feed problems Paper frequently jams These are possible solutions. Troubleshooting 278 Page that jammed does not reprint after jam is cleared CHECK THE PAPER PATH The paper path is on the multipurpose feeder. For more of paper you load does not .... Set Jam Recovery to Auto or On: 1 Make sure the printer is not clear. Paper jam message remains after you use it. CHECK THE PAPER GUIDES Move the guides in the tray to Jam Recovery until you clear the jam TURN ON JAM RECOVERY In the Setup menu, Jam Recovery is...
User Guide
Page 308
... Numerics 1565 Emulation error, load emulation option 248 2000-sheet tray loading 76 200-282.yy paper jam 246 250-sheet tray (standard or optional) loading 73 283 Staple jam 246 290-294.yy scanner jam 246 293 Replace all originals if restarting job 247 293.02 Flatbed Cover Open 247 30 Invalid... refill, change cartridge 240 31 Replace defective cartridge 240 32 Cartridge part number unsupported by device 240 34 Short paper 240 35 Insufficient memory ...
... Numerics 1565 Emulation error, load emulation option 248 2000-sheet tray loading 76 200-282.yy paper jam 246 250-sheet tray (standard or optional) loading 73 283 Staple jam 246 290-294.yy scanner jam 246 293 Replace all originals if restarting job 247 293.02 Flatbed Cover Open 247 30 Invalid... refill, change cartridge 240 31 Replace defective cartridge 240 32 Cartridge part number unsupported by device 240 34 Short paper 240 35 Insufficient memory ...

User Guide
Page 309
...136 Disk corrupted 232 Disk Full - Scan Job Canceled 232 Disk Wiping menu 181 display troubleshooting display is needed 259 notice that different paper is blank 263 display shows only diamonds 263 display, printer control panel 19 adjusting brightness 260 documents, printing from Macintosh 130 from Windows... 54 Ethernet port 45 exterior of the printer cleaning 249 e-mail canceling 110 notice of low supply level 259 notice of paper jam 259 notice of the paper (duplexing) 97 photos 94 placing separator sheets between copies 99 quick copy 93 reducing 97 selecting a tray 96 to letterhead...
...136 Disk corrupted 232 Disk Full - Scan Job Canceled 232 Disk Wiping menu 181 display troubleshooting display is needed 259 notice that different paper is blank 263 display shows only diamonds 263 display, printer control panel 19 adjusting brightness 260 documents, printing from Macintosh 130 from Windows... 54 Ethernet port 45 exterior of the printer cleaning 249 e-mail canceling 110 notice of low supply level 259 notice of paper jam 259 notice of the paper (duplexing) 97 photos 94 placing separator sheets between copies 99 quick copy 93 reducing 97 selecting a tray 96 to letterhead...
User Guide
Page 310
... 200 140 201 140 202 142 230-239 143 240-249 144 250 145 260 146 270-279 146 280-289 paper jams 146 283 staple jams 147 290-294 149 stapler 147 job interrupt 101 Job stored for delayed transmission 234 L labels tips on using 132 letterhead copying to 95 loading, ...
... 200 140 201 140 202 142 230-239 143 240-249 144 250 145 260 146 270-279 146 280-289 paper jams 146 283 staple jams 147 290-294 149 stapler 147 job interrupt 101 Job stored for delayed transmission 234 L labels tips on using 132 letterhead copying to 95 loading, ...


