User's Guide
Page 3
...36 Saving and deleting print settings...36 Copying 38 Making a copy...38 Copying 4 x 6 photos...38 Scanning 39 Scanning original documents...39 Canceling scan jobs...39 Faxing 41 Sending a fax...41 Receiving a fax automatically...41 Maintaining the printer 43 Maintaining print cartridges...43 Installing print cartridges...43 Removing a used print cartridge ...44 Refilling print cartridges...45 Using genuine Lexmark print cartridges...45 Cleaning the print cartridge nozzles...46 Wiping the print cartridge nozzles and contacts ...46 Preserving the print cartridges ...47 Cleaning the scanner...
...36 Saving and deleting print settings...36 Copying 38 Making a copy...38 Copying 4 x 6 photos...38 Scanning 39 Scanning original documents...39 Canceling scan jobs...39 Faxing 41 Sending a fax...41 Receiving a fax automatically...41 Maintaining the printer 43 Maintaining print cartridges...43 Installing print cartridges...43 Removing a used print cartridge ...44 Refilling print cartridges...45 Using genuine Lexmark print cartridges...45 Cleaning the print cartridge nozzles...46 Wiping the print cartridge nozzles and contacts ...46 Preserving the print cartridges ...47 Cleaning the scanner...
User's Guide
Page 6
... Finding information about the printer Publications See the Quick Setup sheet Printed Networking Guide / Fax Guide Electronic User's Guide Windows Help Mac Help Note: Your printer may not have support for using the printer software on a Windows operating system. Additional setup instructions. Additional instructions for Macintosh and may not come with the applications. 1 From the Finder desktop, double-click the printer folder. 2 Double-click the application. 3 From the application, click Help on a Macintosh operating system. The Help installs automatically with these publications...
... Finding information about the printer Publications See the Quick Setup sheet Printed Networking Guide / Fax Guide Electronic User's Guide Windows Help Mac Help Note: Your printer may not have support for using the printer software on a Windows operating system. Additional setup instructions. Additional instructions for Macintosh and may not come with the applications. 1 From the Finder desktop, double-click the printer folder. 2 Double-click the application. 3 From the application, click Help on a Macintosh operating system. The Help installs automatically with these publications...
User's Guide
Page 9
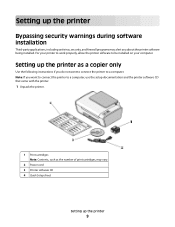
... a copier only Use the following instructions if you want to connect the printer to be installed on your computer. Setting up the printer as the number of print cartridges, may vary. 2 Power cord 3 Printer software CD 4 Quick Setup sheet Setting up the printer Bypassing security warnings during software installation Third-party applications, including antivirus, security, and firewall programs may alert you about the printer software being installed. For your printer to work properly, allow the printer software to a computer. Setting...
... a copier only Use the following instructions if you want to connect the printer to be installed on your computer. Setting up the printer as the number of print cartridges, may vary. 2 Power cord 3 Printer software CD 4 Quick Setup sheet Setting up the printer Bypassing security warnings during software installation Third-party applications, including antivirus, security, and firewall programs may alert you about the printer software being installed. For your printer to work properly, allow the printer software to a computer. Setting...
User's Guide
Page 15
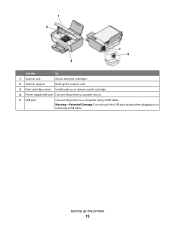
Use the To 1 Scanner unit Access the print cartridges. 2 Scanner support Hold up the printer 15 Warning-Potential Damage: Do not touch the USB port except when plugging in or removing a USB cable. Setting up the scanner unit. 3 Print cartridge carrier Install, replace, or remove a print cartridge. 4 Power supply with port Connect the printer to a power source. 5 USB port Connect the printer to a computer using a USB cable.
Use the To 1 Scanner unit Access the print cartridges. 2 Scanner support Hold up the printer 15 Warning-Potential Damage: Do not touch the USB port except when plugging in or removing a USB cable. Setting up the scanner unit. 3 Print cartridge carrier Install, replace, or remove a print cartridge. 4 Power supply with port Connect the printer to a power source. 5 USB port Connect the printer to a computer using a USB cable.
User's Guide
Page 16
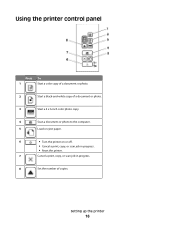
Using the printer control panel Press 1 To Start a color copy of a document or photo. 2 Start a black-and-white copy of a document or photo. 3 Start a 4 x 6-inch color photo copy. 4 Scan a document or photo to the computer. 5 Load or eject paper. 6 • Turn the printer on or off. • Cancel a print, copy, or scan job in progress. • Reset the printer. 7 Cancel a print, copy, or scan job in progress. 8 Set the number of copies. Setting up the printer 16
Using the printer control panel Press 1 To Start a color copy of a document or photo. 2 Start a black-and-white copy of a document or photo. 3 Start a 4 x 6-inch color photo copy. 4 Scan a document or photo to the computer. 5 Load or eject paper. 6 • Turn the printer on or off. • Cancel a print, copy, or scan job in progress. • Reset the printer. 7 Cancel a print, copy, or scan job in progress. 8 Set the number of copies. Setting up the printer 16
User's Guide
Page 18
... www.lexmark.com. 2 From the home page, navigate through the menu selection, and then click Drivers & Downloads. 3 Choose the printer and the printer driver for Windows Vista users. To use of the advanced XPS color and graphics features that automatically appears. 4 Double-click the Install icon. 5 Follow the instructions on the screens. Installing the optional XPS driver (Windows Vista users only) The XML Paper Specification (XPS) driver is an optional printer driver designed to download the driver and install the printer software...
... www.lexmark.com. 2 From the home page, navigate through the menu selection, and then click Drivers & Downloads. 3 Choose the printer and the printer driver for Windows Vista users. To use of the advanced XPS color and graphics features that automatically appears. 4 Double-click the Install icon. 5 Follow the instructions on the screens. Installing the optional XPS driver (Windows Vista users only) The XML Paper Specification (XPS) driver is an optional printer driver designed to download the driver and install the printer software...
User's Guide
Page 19
.... To install the XPS driver: 1 Click Control Panel. 2 Under Hardware and Sound, click Printer, and then click Add a Printer. 3 From the Add Printer dialog, click Add a local printer. 4 From the "Use an existing port" drop-down menu, select Virtual printer port for the printer. b Double-click Drivers, and then double-click Printer. Use the LexmarkTM Productivity Studio or Lexmark FastPics To • Scan, copy, fax, e-mail, or print a photo or document. • Transfer photos. • Make photo greeting cards. • Adjust settings for USB, and...
.... To install the XPS driver: 1 Click Control Panel. 2 Under Hardware and Sound, click Printer, and then click Add a Printer. 3 From the Add Printer dialog, click Add a local printer. 4 From the "Use an existing port" drop-down menu, select Virtual printer port for the printer. b Double-click Drivers, and then double-click Printer. Use the LexmarkTM Productivity Studio or Lexmark FastPics To • Scan, copy, fax, e-mail, or print a photo or document. • Transfer photos. • Make photo greeting cards. • Adjust settings for USB, and...
User's Guide
Page 20
... are saved in phone book. • Access the Lexmark Fax Setup Utility. These applications are also installed with a document open, a Printing Preferences dialog appears. When you select File Print with the printer software during installation. Use the Lexmark All-In-One Center Lexmark Fax Setup Utility To • Scan photos and documents. • Customize settings for scan jobs. • Customize settings for the print job such as the following: • Select the number of copies to be printed. • Print two-sided copies. • Select the paper type. • Add...
... are saved in phone book. • Access the Lexmark Fax Setup Utility. These applications are also installed with a document open, a Printing Preferences dialog appears. When you select File Print with the printer software during installation. Use the Lexmark All-In-One Center Lexmark Fax Setup Utility To • Scan photos and documents. • Customize settings for scan jobs. • Customize settings for the print job such as the following: • Select the number of copies to be printed. • Print two-sided copies. • Select the paper type. • Add...

User's Guide
Page 28
... Print. 1 Load paper. 2 Open a Web page using a supported browser. 3 Select a print option to print the copies as a set (collated) or to print the page. Note: The collate option is available only when you want to close any printer software dialogs. 5 Click OK or Print. Printing multiple copies of a document Using Windows 1 With a document open , click File Print. 2 Click Properties, Preferences, Options, or Setup. 3 From the Copies section of the Print Setup tab, enter the number of copies that you can also adjust settings or preview the page before printing. Printing...
... Print. 1 Load paper. 2 Open a Web page using a supported browser. 3 Select a print option to print the copies as a set (collated) or to print the page. Note: The collate option is available only when you want to close any printer software dialogs. 5 Click OK or Print. Printing multiple copies of a document Using Windows 1 With a document open , click File Print. 2 Click Properties, Preferences, Options, or Setup. 3 From the Copies section of the Print Setup tab, enter the number of copies that you can also adjust settings or preview the page before printing. Printing...
User's Guide
Page 32
... as greeting cards. • Iron-On transfer-A type of media that you want to cancel, and then click Delete. b Click All Programs or Programs, and then select the printer program folder from the list. Printing 32 It is great for those special photos to work with Lexmark's evercolorTM inks for Lexmark inkjet printers, but compatible with the glossy or printable side facing you. (If you are fade- Printing photos using printer software 1 Load photo paper with...
... as greeting cards. • Iron-On transfer-A type of media that you want to cancel, and then click Delete. b Click All Programs or Programs, and then select the printer program folder from the list. Printing 32 It is great for those special photos to work with Lexmark's evercolorTM inks for Lexmark inkjet printers, but compatible with the glossy or printable side facing you. (If you are fade- Printing photos using printer software 1 Load photo paper with...
User's Guide
Page 33
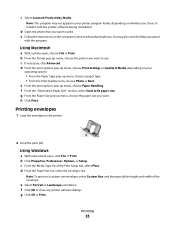
... to install it with the program. Printing 33 b From the Printer pop-up menu, choose a paper type. • From the Print Quality menu, choose Photo or Best. e From the print options pop-up menu, choose the paper size you chose to print. g From the Paper Size pop-up menu, choose Paper Handling. h Click Print. You may not appear in the printer. 2 Send the print job: Using Windows a With a document open , choose File Print. c If necessary, click Advanced. Printing envelopes 1 Load the envelopes in your operating...
... to install it with the program. Printing 33 b From the Printer pop-up menu, choose a paper type. • From the Print Quality menu, choose Photo or Best. e From the print options pop-up menu, choose the paper size you chose to print. g From the Paper Size pop-up menu, choose Paper Handling. h Click Print. You may not appear in the printer. 2 Send the print job: Using Windows a With a document open , choose File Print. c If necessary, click Advanced. Printing envelopes 1 Load the envelopes in your operating...
User's Guide
Page 36
... model. Printing 36 b Choose Library Printers YYYY Lexmark, and then select your setting, and then assign a name. Note: The first location contains Factory Default Settings, which cannot be changed or deleted. 6 Click Save. 7 Close all open , click File Print. 2 Click Properties, Preferences, Options, or Setup. 3 Make adjustments to the Mac OS X drive where the printer software was installed that you want to use. Using Windows 1 Do one of the custom paper size you installed the printer driver, some printer software was installed. Printing...
... model. Printing 36 b Choose Library Printers YYYY Lexmark, and then select your setting, and then assign a name. Note: The first location contains Factory Default Settings, which cannot be changed or deleted. 6 Click Save. 7 Close all open , click File Print. 2 Click Properties, Preferences, Options, or Setup. 3 Make adjustments to the Mac OS X drive where the printer software was installed that you want to use. Using Windows 1 Do one of the custom paper size you installed the printer driver, some printer software was installed. Printing...
User's Guide
Page 41
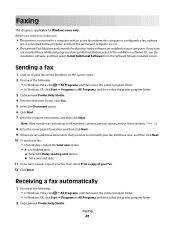
... select Install Additional Software from the Software Already Installed screen. Faxing This chapter is connected to the computer, and both the printer and computer are on. • The Lexmark Fax Solutions and Lexmark Productivity Studio software are any additional documents that you want a paper copy of your fax, then select Print a copy of your fax. 12 Click Send. Note: A fax number can include up to fax, a phone line is applicable for Windows users only. Faxing 41 Before you send a fax, make...
... select Install Additional Software from the Software Already Installed screen. Faxing This chapter is connected to the computer, and both the printer and computer are on. • The Lexmark Fax Solutions and Lexmark Productivity Studio software are any additional documents that you want a paper copy of your fax, then select Print a copy of your fax. 12 Click Send. Note: A fax number can include up to fax, a phone line is applicable for Windows users only. Faxing 41 Before you send a fax, make...
User's Guide
Page 47
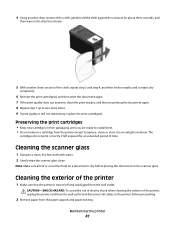
Cleaning the scanner glass 1 Dampen a clean, lint-free cloth with water. 2 Gently wipe the scanner glass clean. Note: Make sure all cables to the printer before placing the document on a document is dry before proceeding. 2 Remove paper from the paper support and paper exit tray. Maintaining the printer 47 Cleaning the exterior of the printer 1 Make sure that the printer is still not satisfactory, replace the print cartridge(s). The cartridges do not print correctly if left exposed for...
Cleaning the scanner glass 1 Dampen a clean, lint-free cloth with water. 2 Gently wipe the scanner glass clean. Note: Make sure all cables to the printer before placing the document on a document is dry before proceeding. 2 Remove paper from the paper support and paper exit tray. Maintaining the printer 47 Cleaning the exterior of the printer 1 Make sure that the printer is still not satisfactory, replace the print cartridge(s). The cartridges do not print correctly if left exposed for...
User's Guide
Page 48
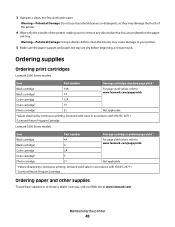
... Return Program Cartridge Lexmark 2690 Series models Item Part number Average cartridge standard page yield 1 Black cartridge 4A Black cartridge2 4 For page yield values, refer to www.lexmark.com/pageyields. Warning-Potential Damage: Using a damp cloth to clean the interior may damage the finish of the printer. 4 Wipe only the outside of the printer, making sure to locate a dealer near you, visit our Web site at www.lexmark.com. Color cartridge 15A Color cartridge2 15 Photo cartridge...
... Return Program Cartridge Lexmark 2690 Series models Item Part number Average cartridge standard page yield 1 Black cartridge 4A Black cartridge2 4 For page yield values, refer to www.lexmark.com/pageyields. Warning-Potential Damage: Using a damp cloth to clean the interior may damage the finish of the printer. 4 Wipe only the outside of the printer, making sure to locate a dealer near you, visit our Web site at www.lexmark.com. Color cartridge 15A Color cartridge2 15 Photo cartridge...

User's Guide
Page 50
... using. 5 Press to printer maintenance tasks and customer support. Method 2 1 Do one or more of these methods: Method 1 If it appears on by -step troubleshooting help and contains links to turn the printer off. 2 Disconnect the power cord from the wall outlet, and then from the list. 2 Select Lexmark Service Center. Setup troubleshooting Power button is on an error message dialog, click the For additional assistance, use the Lexmark Service Center link. To open the Lexmark Service Center, use one...
... using. 5 Press to printer maintenance tasks and customer support. Method 2 1 Do one or more of these methods: Method 1 If it appears on by -step troubleshooting help and contains links to turn the printer off. 2 Disconnect the power cord from the wall outlet, and then from the list. 2 Select Lexmark Service Center. Setup troubleshooting Power button is on an error message dialog, click the For additional assistance, use the Lexmark Service Center link. To open the Lexmark Service Center, use one...
User's Guide
Page 51
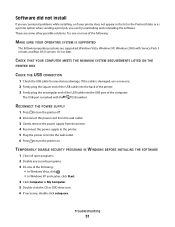
..., use a new one of the following: MAKE SURE YOUR OPERATING SYSTEM IS SUPPORTED The following : • In Windows Vista, click . • In Windows XP and earlier, click Start. 4 Click Computer or My Computer. 5 Double-click the CD or DVD drive icon. 6 If necessary, double-click setup.exe. CHECK THAT YOUR COMPUTER MEETS THE MINIMUM SYSTEM REQUIREMENTS LISTED ON THE PRINTER BOX CHECK THE USB CONNECTION 1 Check the USB cable for any security programs...
..., use a new one of the following: MAKE SURE YOUR OPERATING SYSTEM IS SUPPORTED The following : • In Windows Vista, click . • In Windows XP and earlier, click Start. 4 Click Computer or My Computer. 5 Double-click the CD or DVD drive icon. 6 If necessary, double-click setup.exe. CHECK THAT YOUR COMPUTER MEETS THE MINIMUM SYSTEM REQUIREMENTS LISTED ON THE PRINTER BOX CHECK THE USB CONNECTION 1 Check the USB cable for any security programs...
User's Guide
Page 52
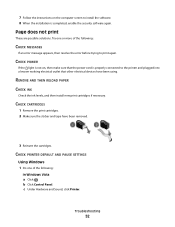
... make sure that the power cord is properly connected to the printer and plugged into a known working electrical outlet that other electrical devices have been removed. 3 Reinsert the cartridges. b Click Control Panel. REMOVE AND THEN RELOAD PAPER CHECK INK Check the ink levels, and then install new print cartridges if necessary. CHECK POWER If the light is completed, enable the security software again. Troubleshooting 52 c Under Hardware and Sound, click Printer. Try one of the following : In Windows Vista...
... make sure that the power cord is properly connected to the printer and plugged into a known working electrical outlet that other electrical devices have been removed. 3 Reinsert the cartridges. b Click Control Panel. REMOVE AND THEN RELOAD PAPER CHECK INK Check the ink levels, and then install new print cartridges if necessary. CHECK POWER If the light is completed, enable the security software again. Troubleshooting 52 c Under Hardware and Sound, click Printer. Try one of the following : In Windows Vista...
User's Guide
Page 73
... paper, loading 24 buttons, control panel 4 x 6 color copy 38 buttons, printer control panel 4 x 6 Copy 16 Black Copy 16 Cancel 16 Color Copy 16 Paper Feed 16 Power 16 Scan 16 Up arrow 16 C canceling print jobs 31 scan job 39 cards loading 24 cartridges, print cleaning 46 installing 43 ordering 48 preserving 47 removing 44 using genuine Lexmark 45 wiping 46 cleaning exterior of the printer 47 cleaning print cartridge nozzles 46 copying 38 4 x 6 photos 38 custom-size paper, loading 24, 35 custom-size paper, printing 35 D document multiple copies, printing 28 documents loading on scanner glass...
... paper, loading 24 buttons, control panel 4 x 6 color copy 38 buttons, printer control panel 4 x 6 Copy 16 Black Copy 16 Cancel 16 Color Copy 16 Paper Feed 16 Power 16 Scan 16 Up arrow 16 C canceling print jobs 31 scan job 39 cards loading 24 cartridges, print cleaning 46 installing 43 ordering 48 preserving 47 removing 44 using genuine Lexmark 45 wiping 46 cleaning exterior of the printer 47 cleaning print cartridge nozzles 46 copying 38 4 x 6 photos 38 custom-size paper, loading 24, 35 custom-size paper, printing 35 D document multiple copies, printing 28 documents loading on scanner glass...

User's Guide
Page 74
...R receiving a fax 41 recycling Lexmark products 49 WEEE statement 60 refilling print cartridges 45 removing print cartridges 44 reverse page order 29 S safety information 5 saving and deleting print settings 36 scanner glass 14 cleaning 47 loading documents 25, 39 scanner support 15 scanner unit 15 scanning canceling a scan 39 using the printer control panel 39 security information 9 Service Center 50 setup troubleshooting page does not print 52 power button is not lit 50 software did not install 51 setup, printer 9 software removing and reinstalling 54 Service Center 50 XPS driver 18 software...
...R receiving a fax 41 recycling Lexmark products 49 WEEE statement 60 refilling print cartridges 45 removing print cartridges 44 reverse page order 29 S safety information 5 saving and deleting print settings 36 scanner glass 14 cleaning 47 loading documents 25, 39 scanner support 15 scanner unit 15 scanning canceling a scan 39 using the printer control panel 39 security information 9 Service Center 50 setup troubleshooting page does not print 52 power button is not lit 50 software did not install 51 setup, printer 9 software removing and reinstalling 54 Service Center 50 XPS driver 18 software...


