User's Guide
Page 3
... a fax...41 Receiving a fax automatically...41 Maintaining the printer 43 Maintaining print cartridges...43 Installing print cartridges...43 Removing a used print cartridge ...44 Refilling print cartridges...45 Using genuine Lexmark print cartridges...45 Cleaning the print cartridge nozzles...46 Wiping the print cartridge nozzles and contacts ...46 Preserving the print cartridges ...47 Cleaning the scanner glass...47 Cleaning the exterior...
... a fax...41 Receiving a fax automatically...41 Maintaining the printer 43 Maintaining print cartridges...43 Installing print cartridges...43 Removing a used print cartridge ...44 Refilling print cartridges...45 Using genuine Lexmark print cartridges...45 Cleaning the print cartridge nozzles...46 Wiping the print cartridge nozzles and contacts ...46 Preserving the print cartridges ...47 Cleaning the scanner glass...47 Cleaning the exterior...
User's Guide
Page 9
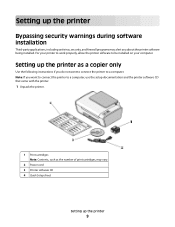
... not want to connect the printer to a computer, use the setup documentation and the printer software CD that came with the printer. 1 Unpack the printer. 1 Print cartridges Note: Contents, such as the number of print cartridges, may alert you want to connect the printer to be installed on your printer to work properly, allow the printer software to a computer.
... not want to connect the printer to a computer, use the setup documentation and the printer software CD that came with the printer. 1 Unpack the printer. 1 Print cartridges Note: Contents, such as the number of print cartridges, may alert you want to connect the printer to be installed on your printer to work properly, allow the printer software to a computer.
User's Guide
Page 11
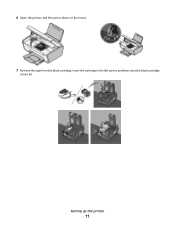
6 Open the printer, and then press down on the levers. 7 Remove the tape from the black cartridge, insert the cartridge in the left carrier, and then close the black cartridge carrier lid. Setting up the printer 11
6 Open the printer, and then press down on the levers. 7 Remove the tape from the black cartridge, insert the cartridge in the left carrier, and then close the black cartridge carrier lid. Setting up the printer 11

User's Guide
Page 12
Setting up the printer 12 8 Remove the tape from the color cartridge, insert the cartridge in the right carrier, and then close the color cartridge carrier lid. 9 Close the printer, and then load paper. 10 Press and hold the button for three seconds.
Setting up the printer 12 8 Remove the tape from the color cartridge, insert the cartridge in the right carrier, and then close the color cartridge carrier lid. 9 Close the printer, and then load paper. 10 Press and hold the button for three seconds.
User's Guide
Page 15
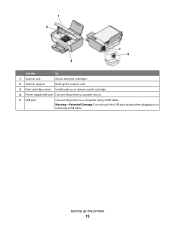
Setting up the scanner unit. 3 Print cartridge carrier Install, replace, or remove a print cartridge. 4 Power supply with port Connect the printer to a power source. 5 USB port Connect the printer to a computer using a USB cable. Use the To 1 Scanner unit Access the print cartridges. 2 Scanner support Hold up the printer 15 Warning-Potential Damage: Do not touch the USB port except when plugging in or removing a USB cable.
Setting up the scanner unit. 3 Print cartridge carrier Install, replace, or remove a print cartridge. 4 Power supply with port Connect the printer to a power source. 5 USB port Connect the printer to a computer using a USB cable. Use the To 1 Scanner unit Access the print cartridges. 2 Scanner support Hold up the printer 15 Warning-Potential Damage: Do not touch the USB port except when plugging in or removing a USB cable.
User's Guide
Page 17
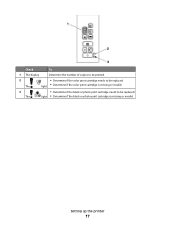
Setting up the printer 17 light • Determine if the black or photo print cartridge is missing or invalid. 3 The • Determine if the black or photo print cartridge needs to be replaced. light • Determine if the color print cartridge is missing or invalid. Check To 1 The display Determine the number of copies to be printed. 2 The • Determine if the color print cartridge needs to be replaced.
Setting up the printer 17 light • Determine if the black or photo print cartridge is missing or invalid. 3 The • Determine if the black or photo print cartridge needs to be replaced. light • Determine if the color print cartridge is missing or invalid. Check To 1 The display Determine the number of copies to be printed. 2 The • Determine if the color print cartridge needs to be replaced.

User's Guide
Page 21
...; Print an alignment page. • Clean the print cartridge nozzles. • Order ink or supplies. • Register the printer. • Contact customer support. Lexmark Printer Utility • Get help with these applications, depending on a wireless network. Understanding the printer software 21 Lexmark Wireless Setup Assistant Set up the printer on the features of a memory device inserted into...
...; Print an alignment page. • Clean the print cartridge nozzles. • Order ink or supplies. • Register the printer. • Contact customer support. Lexmark Printer Utility • Get help with these applications, depending on a wireless network. Understanding the printer software 21 Lexmark Wireless Setup Assistant Set up the printer on the features of a memory device inserted into...

User's Guide
Page 43
Maintaining the printer 43 Maintaining the printer Maintaining print cartridges Installing print cartridges 1 Open the printer, and then press down on the bottom of the black cartridge, insert the cartridge in the left carrier, and then close the black cartridge carrier lid. Warning-Potential Damage: Do not touch the gold contact area on the back or the metal nozzles on the cartridge carrier levers. 2 Remove the used print cartridge or cartridges. 3 If you are installing new print cartridges, remove the tape from the back and bottom of the cartridge.
Maintaining the printer 43 Maintaining the printer Maintaining print cartridges Installing print cartridges 1 Open the printer, and then press down on the bottom of the black cartridge, insert the cartridge in the left carrier, and then close the black cartridge carrier lid. Warning-Potential Damage: Do not touch the gold contact area on the back or the metal nozzles on the cartridge carrier levers. 2 Remove the used print cartridge or cartridges. 3 If you are installing new print cartridges, remove the tape from the back and bottom of the cartridge.
User's Guide
Page 44
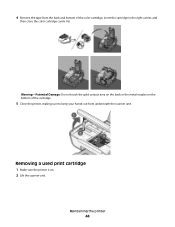
Warning-Potential Damage: Do not touch the gold contact area on the back or the metal nozzles on . 2 Lift the scanner unit. Removing a used print cartridge 1 Make sure the printer is on the bottom of the cartridge. 5 Close the printer, making sure to keep your hands out from the back and bottom of the color cartridge, insert the cartridge in the right carrier, and then close the color cartridge carrier lid. Maintaining the printer 44 4 Remove the tape from underneath the scanner unit.
Warning-Potential Damage: Do not touch the gold contact area on the back or the metal nozzles on . 2 Lift the scanner unit. Removing a used print cartridge 1 Make sure the printer is on the bottom of the cartridge. 5 Close the printer, making sure to keep your hands out from the back and bottom of the color cartridge, insert the cartridge in the right carrier, and then close the color cartridge carrier lid. Maintaining the printer 44 4 Remove the tape from underneath the scanner unit.

User's Guide
Page 45
... you receive an Out of a refilled cartridge. Refilling print cartridges The warranty does not cover repair of Original Lexmark Ink message appears: 1 Click Learn More on the cartridge carrier latch to raise the cartridge carrier lid. 4 Remove the used print cartridge. Using genuine Lexmark print cartridges Lexmark printers, print cartridges, and photo paper are removing both cartridges, repeat step 3 and step 4 for...
... you receive an Out of a refilled cartridge. Refilling print cartridges The warranty does not cover repair of Original Lexmark Ink message appears: 1 Click Learn More on the cartridge carrier latch to raise the cartridge carrier lid. 4 Remove the used print cartridge. Using genuine Lexmark print cartridges Lexmark printers, print cartridges, and photo paper are removing both cartridges, repeat step 3 and step 4 for...
User's Guide
Page 46
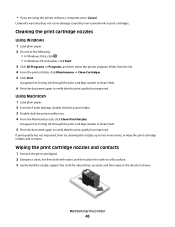
.... 2 From the Finder desktop, double click the printer folder. 3 Double-click the printer utility icon. 4 From the Maintenance tab, click Clean Print Nozzles. Lexmark's warranty does not cover damage caused by non-Lexmark ink or print cartridges. Cleaning the print cartridge nozzles Using Windows 1 Load plain paper. 2 Do one of the following: • In Windows Vista, click...
.... 2 From the Finder desktop, double click the printer folder. 3 Double-click the printer utility icon. 4 From the Maintenance tab, click Clean Print Nozzles. Lexmark's warranty does not cover damage caused by non-Lexmark ink or print cartridges. Cleaning the print cartridge nozzles Using Windows 1 Load plain paper. 2 Do one of the following: • In Windows Vista, click...
User's Guide
Page 47
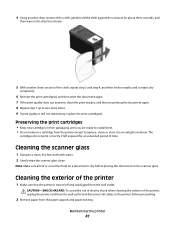
... to replace, clean, or store it in the direction shown. 5 With another clean section of the printer 1 Make sure that the printer is still not satisfactory, replace the print cartridge(s). The cartridges do not print correctly if left exposed for about three seconds, and then wipe in an airtight container.... Preserving the print cartridges • Keep new cartridges in their packaging until you are ready to install them. • Do not remove a cartridge from the printer except to two more times. 9 If print quality is turned off and...
... to replace, clean, or store it in the direction shown. 5 With another clean section of the printer 1 Make sure that the printer is still not satisfactory, replace the print cartridge(s). The cartridges do not print correctly if left exposed for about three seconds, and then wipe in an airtight container.... Preserving the print cartridges • Keep new cartridges in their packaging until you are ready to install them. • Do not remove a cartridge from the printer except to two more times. 9 If print quality is turned off and...
User's Guide
Page 48
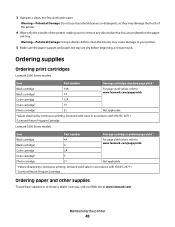
... on the paper exit tray. Ordering supplies Ordering print cartridges Lexmark 2600 Series models Item Part number Average cartridge standard page yield 1 Black cartridge 14A Black cartridge2 14 For page yield values, refer to www.lexmark.com/pageyields. Maintaining the printer 48 Color cartridge 15A Color cartridge2 15 Photo cartridge 31 Not applicable 1Values obtained by continuous printing...
... on the paper exit tray. Ordering supplies Ordering print cartridges Lexmark 2600 Series models Item Part number Average cartridge standard page yield 1 Black cartridge 14A Black cartridge2 14 For page yield values, refer to www.lexmark.com/pageyields. Maintaining the printer 48 Color cartridge 15A Color cartridge2 15 Photo cartridge 31 Not applicable 1Values obtained by continuous printing...
User's Guide
Page 49
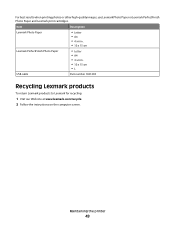
... cable Part number 1021294 Recycling Lexmark products To return Lexmark products to Lexmark for recycling: 1 Visit our Web site at www.lexmark.com/recycle. 2 Follow the instructions on the computer screen. For best results when printing photos or other high-quality images, use Lexmark Photo Paper or Lexmark PerfectFinish Photo Paper and Lexmark print cartridges. Maintaining the printer 49
... cable Part number 1021294 Recycling Lexmark products To return Lexmark products to Lexmark for recycling: 1 Visit our Web site at www.lexmark.com/recycle. 2 Follow the instructions on the computer screen. For best results when printing photos or other high-quality images, use Lexmark Photo Paper or Lexmark PerfectFinish Photo Paper and Lexmark print cartridges. Maintaining the printer 49
User's Guide
Page 52
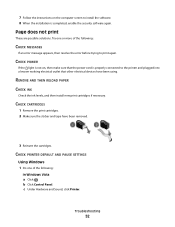
... THEN RELOAD PAPER CHECK INK Check the ink levels, and then install new print cartridges if necessary. Troubleshooting 52 b Click Control Panel. CHECK PRINTER DEFAULT AND PAUSE SETTINGS Using Windows 1 Do one or more of the following : CHECK MESSAGES If an error message appears, then ...other electrical devices have been removed. 3 Reinsert the cartridges. Try one of the following : In Windows Vista a Click . c Under Hardware and Sound, click Printer. CHECK POWER If the light is not on the computer screen to the printer and plugged into a known working electrical outlet that the...
... THEN RELOAD PAPER CHECK INK Check the ink levels, and then install new print cartridges if necessary. Troubleshooting 52 b Click Control Panel. CHECK PRINTER DEFAULT AND PAUSE SETTINGS Using Windows 1 Do one or more of the following : CHECK MESSAGES If an error message appears, then ...other electrical devices have been removed. 3 Reinsert the cartridges. Try one of the following : In Windows Vista a Click . c Under Hardware and Sound, click Printer. CHECK POWER If the light is not on the computer screen to the printer and plugged into a known working electrical outlet that the...
User's Guide
Page 62
... that is delivered to that the patented print cartridge(s) shipped with only genuine Lexmark ink cartridges for breach of those provisions to one of the following license/agreement: The patented print cartridge(s) contained inside is/are licensed for the hosting, performance, operation, maintenance, or content of the patented printer. The term "Software Program" includes machine-readable...
... that is delivered to that the patented print cartridge(s) shipped with only genuine Lexmark ink cartridges for breach of those provisions to one of the following license/agreement: The patented print cartridge(s) contained inside is/are licensed for the hosting, performance, operation, maintenance, or content of the patented printer. The term "Software Program" includes machine-readable...
User's Guide
Page 65
... requirements of XX75 Series products (including but not limited to models Z2390, Z2490, X2690, X3690, and X4690) are available through www.lexmark.com. ADOBE SYSTEMS INCORPORATED NOTICE Contains Flash®, Flash® Lite™ and/or Reader® technology by Microsoft Corporation. This ...equipment designed for herein, these terms and conditions, however. Replacement cartridges sold subject to these terms and conditions supersede all requirements of EN 60950. Except as otherwise provided for use within the printer boxes of EC Council directives 2004/108/EC and 2006/95/...
... requirements of XX75 Series products (including but not limited to models Z2390, Z2490, X2690, X3690, and X4690) are available through www.lexmark.com. ADOBE SYSTEMS INCORPORATED NOTICE Contains Flash®, Flash® Lite™ and/or Reader® technology by Microsoft Corporation. This ...equipment designed for herein, these terms and conditions, however. Replacement cartridges sold subject to these terms and conditions supersede all requirements of EN 60950. Except as otherwise provided for use within the printer boxes of EC Council directives 2004/108/EC and 2006/95/...
User's Guide
Page 73
... 16 Up arrow 16 C canceling print jobs 31 scan job 39 cards loading 24 cartridges, print cleaning 46 installing 43 ordering 48 preserving 47 removing 44 using genuine Lexmark 45 wiping 46 cleaning exterior of the printer 47 cleaning print cartridge nozzles 46 copying 38 4 x 6 photos 38 custom-size paper, loading 24, 35 custom...
... 16 Up arrow 16 C canceling print jobs 31 scan job 39 cards loading 24 cartridges, print cleaning 46 installing 43 ordering 48 preserving 47 removing 44 using genuine Lexmark 45 wiping 46 cleaning exterior of the printer 47 cleaning print cartridge nozzles 46 copying 38 4 x 6 photos 38 custom-size paper, loading 24, 35 custom...

User's Guide
Page 74
...cartridge carrier 15 print cartridge nozzles, cleaning 46 print cartridges cleaning 46 installing 43 ordering 48 preserving 47 refilling 45 removing 44 using genuine Lexmark 45 wiping 46 print jobs, canceling 31 print settings saving and deleting 36 printer setting up without a computer 9 printer control panel 14 using 16 printer... one sheet 29 photos using FastPics or Productivity Studio 32 reverse page order 29 specialty documents 36 Web page 27 publications, finding 6 R receiving a fax 41 recycling Lexmark products 49 WEEE statement 60 refilling print cartridges 45 removing print cartridges ...
...cartridge carrier 15 print cartridge nozzles, cleaning 46 print cartridges cleaning 46 installing 43 ordering 48 preserving 47 refilling 45 removing 44 using genuine Lexmark 45 wiping 46 print jobs, canceling 31 print settings saving and deleting 36 printer setting up without a computer 9 printer control panel 14 using 16 printer... one sheet 29 photos using FastPics or Productivity Studio 32 reverse page order 29 specialty documents 36 Web page 27 publications, finding 6 R receiving a fax 41 recycling Lexmark products 49 WEEE statement 60 refilling print cartridges 45 removing print cartridges ...


