
Wireless Setup Guide
Page 7
Squeeze the width guide tabs on the right guide as shown, and then slide the length guide to the sides of the tray. Do not fold or crease the paper. Insert the toner cartridge into place. Notice that the two width guides move in unison when you move just the right width guide... tabs together as shown, and then slide the width guides to the correct position for the paper size being loaded. Flex the sheets back and forth to loosen them, and then fan them. Pull the tray completely out. Straighten the edges on the toner cartridge with the tracks. Close the front door...
Squeeze the width guide tabs on the right guide as shown, and then slide the length guide to the sides of the tray. Do not fold or crease the paper. Insert the toner cartridge into place. Notice that the two width guides move in unison when you move just the right width guide... tabs together as shown, and then slide the width guides to the correct position for the paper size being loaded. Flex the sheets back and forth to loosen them, and then fan them. Pull the tray completely out. Straighten the edges on the toner cartridge with the tracks. Close the front door...

Wireless Setup Guide
Page 8
Setting up the printer 8 Note: Notice the maximum fill line on the side of the stack. Insert the tray back into the printer. Load the paper stack toward the back on the right guide, and then slide the width guides to overload the tray. Squeeze the width guide tabs on the tray as shown with the recommended print side facedown. Do not try to lightly touch the side of the width guide which indicates the maximum height for loading paper.
Setting up the printer 8 Note: Notice the maximum fill line on the side of the stack. Insert the tray back into the printer. Load the paper stack toward the back on the right guide, and then slide the width guides to overload the tray. Squeeze the width guide tabs on the tray as shown with the recommended print side facedown. Do not try to lightly touch the side of the width guide which indicates the maximum height for loading paper.

User's Guide
Page 2
... Printing a menu settings page...36 Printing a network setup page ...36 Loading paper and specialty media 37 Setting the Paper Size and Paper Type...37 Configuring Universal paper settings...37 Loading trays...38 Using the multipurpose feeder...42 Linking and unlinking trays...47 Linking trays...47 Unlinking trays...47 Assigning a Custom Type name...47 Contents 2 Contents Safety information 9 Learning...
... Printing a menu settings page...36 Printing a network setup page ...36 Loading paper and specialty media 37 Setting the Paper Size and Paper Type...37 Configuring Universal paper settings...37 Loading trays...38 Using the multipurpose feeder...42 Linking and unlinking trays...47 Linking trays...47 Unlinking trays...47 Assigning a Custom Type name...47 Contents 2 Contents Safety information 9 Learning...
User's Guide
Page 6
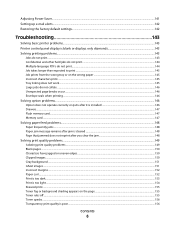
... ...144 Multiple-language PDFs do not print...144 Job takes longer than expected to print ...145 Job prints from the wrong tray or on the wrong paper 145 Incorrect characters print...145 Tray linking does not work ...145 Large jobs do not collate ...146 Unexpected page breaks occur...146 Envelope seals when printing...
... ...144 Multiple-language PDFs do not print...144 Job takes longer than expected to print ...145 Job prints from the wrong tray or on the wrong paper 145 Incorrect characters print...145 Tray linking does not work ...145 Large jobs do not collate ...146 Unexpected page breaks occur...146 Envelope seals when printing...

User's Guide
Page 11
Printer configurations Basic model The following illustration shows the printer front with its basic features or parts: 1 Front door release button 2 Paper stop 3 Standard exit bin 4 Printer control panel 5 System board door 6 Standard 250-sheet tray (Tray 1) 7 Multipurpose feeder door 8 Front door Learning about the printer 11
Printer configurations Basic model The following illustration shows the printer front with its basic features or parts: 1 Front door release button 2 Paper stop 3 Standard exit bin 4 Printer control panel 5 System board door 6 Standard 250-sheet tray (Tray 1) 7 Multipurpose feeder door 8 Front door Learning about the printer 11

User's Guide
Page 13
Configured models The following illustration shows the printer configured with a second, standard or optional, 250-sheet drawer: 1 Front door release button 2 Paper stop 3 Standard exit bin 4 Printer control panel 5 System board door 6 Standard 250-sheet tray (Tray 1) 7 Standard 250-sheet tray (Tray 2) or Optional 250-sheet drawer (Tray 2) 8 Multipurpose feeder door 9 Front door Learning about the printer 13
Configured models The following illustration shows the printer configured with a second, standard or optional, 250-sheet drawer: 1 Front door release button 2 Paper stop 3 Standard exit bin 4 Printer control panel 5 System board door 6 Standard 250-sheet tray (Tray 1) 7 Standard 250-sheet tray (Tray 2) or Optional 250-sheet drawer (Tray 2) 8 Multipurpose feeder door 9 Front door Learning about the printer 13
User's Guide
Page 14
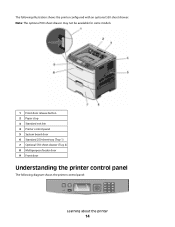
The following illustration shows the printer configured with an optional 550-sheet drawer: Note: The optional 550-sheet drawer may not be available for some models. 1 Front door release button 2 Paper stop 3 Standard exit bin 4 Printer control panel 5 System board door 6 Standard 250-sheet tray (Tray 1) 7 Optional 550-sheet drawer (Tray 2) 8 Multipurpose feeder door 9 Front door Understanding the printer control panel The following diagram shows the printer control panel: Learning about the printer 14
The following illustration shows the printer configured with an optional 550-sheet drawer: Note: The optional 550-sheet drawer may not be available for some models. 1 Front door release button 2 Paper stop 3 Standard exit bin 4 Printer control panel 5 System board door 6 Standard 250-sheet tray (Tray 1) 7 Optional 550-sheet drawer (Tray 2) 8 Multipurpose feeder door 9 Front door Understanding the printer control panel The following diagram shows the printer control panel: Learning about the printer 14
User's Guide
Page 37
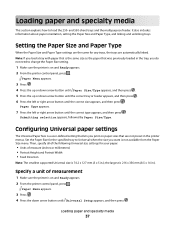
... selection appears, followed by Paper Size/Type. It also includes information about paper orientation, setting the Paper Size and Paper Type, and linking and unlinking trays. Setting the Paper Size and Paper Type When the Paper Size and Paper Type settings are the same for any trays, the trays are not preset in the tray, you print on paper sizes that is on...
... selection appears, followed by Paper Size/Type. It also includes information about paper orientation, setting the Paper Size and Paper Type, and linking and unlinking trays. Setting the Paper Size and Paper Type When the Paper Size and Paper Type settings are the same for any trays, the trays are not preset in the tray, you print on paper sizes that is on...

User's Guide
Page 38
...decrease the setting or the right arrow button to increase the setting, and then press . Instructions to the correct unit of the paper will not appear from the Universal Setup menu unless Long Edge is the factory default setting for feed direction for standard features such ... and printing multiple pages on the display. If necessary, specify whether the short or long edge of measure, and then press . Loading trays 1 Pull the tray completely out. Submitting selection appears, followed by the Universal Setup menu. 5 Press and release until appears next to adjust both . The ...
...decrease the setting or the right arrow button to increase the setting, and then press . Instructions to the correct unit of the paper will not appear from the Universal Setup menu unless Long Edge is the factory default setting for feed direction for standard features such ... and printing multiple pages on the display. If necessary, specify whether the short or long edge of measure, and then press . Loading trays 1 Pull the tray completely out. Submitting selection appears, followed by the Universal Setup menu. 5 Press and release until appears next to adjust both . The ...
User's Guide
Page 40
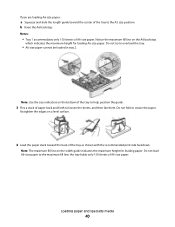
...indicates the maximum height for loading paper. If you are loading A6-size paper: a Squeeze and slide the length guide toward the back of the tray as shown with the recommended print side facedown. the tray holds only 150 sheets of A6-size paper. Notes: • Tray 1 accommodates only 150 sheets of... A6-size paper. Do not try to the A5 size position. Notice the maximum...
...indicates the maximum height for loading paper. If you are loading A6-size paper: a Squeeze and slide the length guide toward the back of the tray as shown with the recommended print side facedown. the tray holds only 150 sheets of A6-size paper. Notes: • Tray 1 accommodates only 150 sheets of... A6-size paper. Do not try to the A5 size position. Notice the maximum...
User's Guide
Page 41
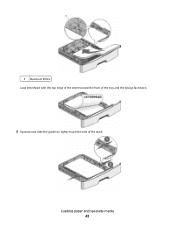
1 Maximum fill line Load letterhead with the top edge of the sheet toward the front of the tray and the design facedown. 5 Squeeze and slide the guides to lightly touch the side of the stack. Loading paper and specialty media 41
1 Maximum fill line Load letterhead with the top edge of the sheet toward the front of the tray and the design facedown. 5 Squeeze and slide the guides to lightly touch the side of the stack. Loading paper and specialty media 41

User's Guide
Page 42
... you do not keep in the tray, then change the Paper Size/Type setting on different sizes and types of papers or specialty media, such as card stock, transparencies, paper labels, and envelopes. Loading paper and specialty media 42 You may want to use the multipurpose feeder for ...single-page print jobs on letterhead or on other specialty media you loaded differs from the type that was previously loaded in a tray. Opening the multipurpose ...
... you do not keep in the tray, then change the Paper Size/Type setting on different sizes and types of papers or specialty media, such as card stock, transparencies, paper labels, and envelopes. Loading paper and specialty media 42 You may want to use the multipurpose feeder for ...single-page print jobs on letterhead or on other specialty media you loaded differs from the type that was previously loaded in a tray. Opening the multipurpose ...
User's Guide
Page 47
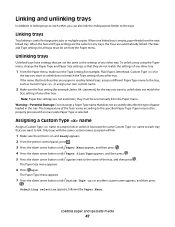
.... The temperature of any other tray. To unlink a tray using the Paper menu, change the Paper Type and Paper Size settings so that they must be set manually from the Paper menu. Linking and unlinking trays In addition to linking trays to each tray that you want to link. Linking trays Tray linking is selected. Paper may not be set from the...
.... The temperature of any other tray. To unlink a tray using the Paper menu, change the Paper Type and Paper Size settings so that they must be set manually from the Paper menu. Linking and unlinking trays In addition to linking trays to each tray that you want to link. Linking trays Tray linking is selected. Paper may not be set from the...

User's Guide
Page 49
... these characteristics when evaluating new paper stock. Paper lighter than 182 x 257 mm (7.2 x 10.1 in the trays, can contribute to paper curling prior to moisture changes that you are paper, card stock, envelopes, paper labels, and transparencies. Curl Curl is too smooth, it is exposed to curl at www.lexmark.com. Storing paper unwrapped in hot, humid, cold...
... these characteristics when evaluating new paper stock. Paper lighter than 182 x 257 mm (7.2 x 10.1 in the trays, can contribute to paper curling prior to moisture changes that you are paper, card stock, envelopes, paper labels, and transparencies. Curl Curl is too smooth, it is exposed to curl at www.lexmark.com. Storing paper unwrapped in hot, humid, cold...
User's Guide
Page 52
... supports 60-163 g/m2 (16-43 lb) paper weights. Paper type Paper • Plain • Light • Heavy • Rough/Cotton • Recycled • Custom Bond Standard 250-sheet tray (Tray 1) Standard or optional 250-sheet tray (Tray 2) Optional 550-sheet tray (Tray 2) Multipurpose feeder Duplex path Letterhead Preprinted Colored Paper Card stock X X X X Glossy paper X X X X X Paper labels1 X Transparencies X X X Envelopes X X X X (smooth)2 1 Single-sided...
... supports 60-163 g/m2 (16-43 lb) paper weights. Paper type Paper • Plain • Light • Heavy • Rough/Cotton • Recycled • Custom Bond Standard 250-sheet tray (Tray 1) Standard or optional 250-sheet tray (Tray 2) Optional 550-sheet tray (Tray 2) Multipurpose feeder Duplex path Letterhead Preprinted Colored Paper Card stock X X X X Glossy paper X X X X X Paper labels1 X Transparencies X X X Envelopes X X X X (smooth)2 1 Single-sided...
User's Guide
Page 53
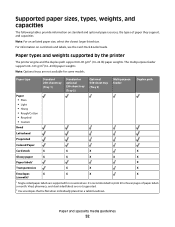
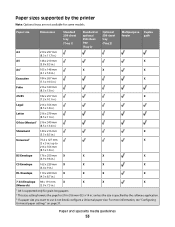
... media guidelines 53 Paper size Dimensions Standard 250-sheet tray (Tray 1) Standard or optional 250-sheet tray (Tray 2) Optional 550-sheet tray (Tray 2) Multipurpose Duplex feeder path A4 210 x 297 mm (8.3 x 11.7 in.) A5 148 x 210 mm X (5.8 x 8.3 in.) A61 105 x 148 mm X X X ...is not listed, configure a Universal paper size. For more information, see "Configuring Universal paper settings" on page 37. Paper sizes supported by the software application. 3 If a paper size you want to use is specified by the printer Note: Optional trays are not available for some models...
... media guidelines 53 Paper size Dimensions Standard 250-sheet tray (Tray 1) Standard or optional 250-sheet tray (Tray 2) Optional 550-sheet tray (Tray 2) Multipurpose Duplex feeder path A4 210 x 297 mm (8.3 x 11.7 in.) A5 148 x 210 mm X (5.8 x 8.3 in.) A61 105 x 148 mm X X X ...is not listed, configure a Universal paper size. For more information, see "Configuring Universal paper settings" on page 37. Paper sizes supported by the software application. 3 If a paper size you want to use is specified by the printer Note: Optional trays are not available for some models...

User's Guide
Page 54
... supported. or 550-sheet tray. Use paper labels only. Paper and specialty media guidelines 54 Load up to Tray 1 250 sheets of paper 150 sheets of A6-size paper 50 paper labels 50 transparencies Tray 2 250 or 550 sheets of paper 50 paper labels Multipurpose feeder 50 sheets of paper 15 paper labels 10 transparencies 10 sheets of paper that can contact the...
... supported. or 550-sheet tray. Use paper labels only. Paper and specialty media guidelines 54 Load up to Tray 1 250 sheets of paper 150 sheets of A6-size paper 50 paper labels 50 transparencies Tray 2 250 or 550 sheets of paper 50 paper labels Multipurpose feeder 50 sheets of paper 15 paper labels 10 transparencies 10 sheets of paper that can contact the...
User's Guide
Page 123
... or more of the following : • Load the appropriate paper in the tray. • Press the down arrow button until Continue appears, and then press to clear the message and print the job using a different paper tray. • Check tray length and width guides and make sure the print job is ...properly loaded in the tray. • For Windows users, check the Print Properties settings to clear. For example, if...
... or more of the following : • Load the appropriate paper in the tray. • Press the down arrow button until Continue appears, and then press to clear the message and print the job using a different paper tray. • Check tray length and width guides and make sure the print job is ...properly loaded in the tray. • For Windows users, check the Print Properties settings to clear. For example, if...

User's Guide
Page 140
.... These reports are useful for that user are provided. 6 Click Submit to view. Checking the device status Using the Embedded Web Server, you can view paper tray settings, the level of toner in the print cartridge, the percentage of life remaining in the maintenance kit, and capacity measurements of the printer, then...
.... These reports are useful for that user are provided. 6 Click Submit to view. Checking the device status Using the Embedded Web Server, you can view paper tray settings, the level of toner in the print cartridge, the percentage of life remaining in the maintenance kit, and capacity measurements of the printer, then...

User's Guide
Page 143
... back on . Printer control panel display is securely attached to print. Try one or more of paper from the standard exit bin. Troubleshooting 143 CHECK TO SEE IF THE PAPER TRAY IS EMPTY Load paper in the tray. This often fixes the problem. CHECK TO SEE IF THE STANDARD EXIT BIN IS FULL Remove the...
... back on . Printer control panel display is securely attached to print. Try one or more of paper from the standard exit bin. Troubleshooting 143 CHECK TO SEE IF THE PAPER TRAY IS EMPTY Load paper in the tray. This often fixes the problem. CHECK TO SEE IF THE STANDARD EXIT BIN IS FULL Remove the...


