
Wireless Setup Guide
Page 8
Do not try to lightly touch the side of the width guide which indicates the maximum height for loading paper. Load the paper stack toward the back on the right guide, and then slide the width guides to overload the tray. Note: Notice the maximum fill line on the side of the stack. Squeeze the width guide tabs on the tray as shown with the recommended print side facedown. Insert the tray back into the printer. Setting up the printer 8
Do not try to lightly touch the side of the width guide which indicates the maximum height for loading paper. Load the paper stack toward the back on the right guide, and then slide the width guides to overload the tray. Note: Notice the maximum fill line on the side of the stack. Squeeze the width guide tabs on the tray as shown with the recommended print side facedown. Insert the tray back into the printer. Setting up the printer 8
Wireless Setup Guide
Page 25
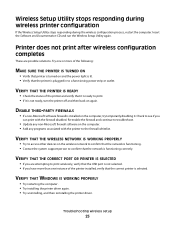
... the system support person to see if you are possible solutions. VERIFY THAT THE CORRECT PORT OR PRINTER IS SELECTED • If you can print with the printer to a functioning power strip or outlet. VERIFY THAT THE WIRELESS NETWORK IS WORKING PROPERLY • Try to access other devices on... and the power light is lit. • Verify that the network is not ready, turn the printer off and then back on again. Wireless Setup Utility stops ...
... the system support person to see if you are possible solutions. VERIFY THAT THE CORRECT PORT OR PRINTER IS SELECTED • If you can print with the printer to a functioning power strip or outlet. VERIFY THAT THE WIRELESS NETWORK IS WORKING PROPERLY • Try to access other devices on... and the power light is lit. • Verify that the network is not ready, turn the printer off and then back on again. Wireless Setup Utility stops ...
User's Guide
Page 6
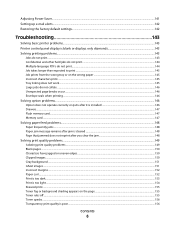
...jam message remains after jam is cleared ...148 Page that jammed does not reprint after you clear the jam 148 Solving print quality problems...149 Isolating print quality problems...149 Blank pages...150 Characters have jagged or uneven edges ...150 Clipped images...150 Gray background ...151 Ghost... images...151 Incorrect margins...152 Paper curl...152 Print is too dark...153 Print is too light ...154 Skewed print...155 Toner fog or background shading appears on the page 155 Toner rubs off...155 Toner specks...156 ...
...jam message remains after jam is cleared ...148 Page that jammed does not reprint after you clear the jam 148 Solving print quality problems...149 Isolating print quality problems...149 Blank pages...150 Characters have jagged or uneven edges ...150 Clipped images...150 Gray background ...151 Ghost... images...151 Incorrect margins...152 Paper curl...152 Print is too dark...153 Print is too light ...154 Skewed print...155 Toner fog or background shading appears on the page 155 Toner rubs off...155 Toner specks...156 ...
User's Guide
Page 15
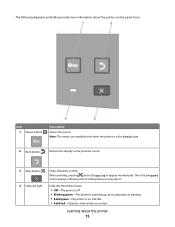
... screen appears offering a list of settings that you may select. 4 Indicator light Indicates the printer status: • Off-The power is off. • Blinking green-The printer is warming up, processing data, or printing. • Solid green-The printer is on, but idle. • Solid...the Ready state. 2 Back button ( ) Returns the display to the previous screen 3 Stop button ( ) Stops all printer activity When printing, pressing causes Stopping to appear momentarily. The following diagrams and tables provide more information about the printer 15 Learning about the printer control panel...
... screen appears offering a list of settings that you may select. 4 Indicator light Indicates the printer status: • Off-The power is off. • Blinking green-The printer is warming up, processing data, or printing. • Solid green-The printer is on, but idle. • Solid...the Ready state. 2 Back button ( ) Returns the display to the previous screen 3 Stop button ( ) Stops all printer activity When printing, pressing causes Stopping to appear momentarily. The following diagrams and tables provide more information about the printer 15 Learning about the printer control panel...
User's Guide
Page 52
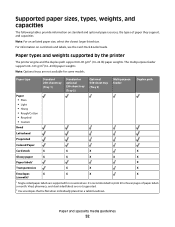
... by the printer The printer engine and the duplex path support 60-90 g/m2 (16-24 lb) paper weights. It is recommended to print 20 or fewer pages of paper they support, and capacities. Paper and specialty media guidelines 52 For information on card stock and labels, see... the Card Stock & Label Guide. Note: Optional trays are supported for some models. Paper type Paper • Plain • Light • Heavy • Rough/Cotton • Recycled • Custom Bond Standard 250-sheet tray (Tray 1) Standard or optional 250-sheet tray (Tray 2) ...
... by the printer The printer engine and the duplex path support 60-90 g/m2 (16-24 lb) paper weights. It is recommended to print 20 or fewer pages of paper they support, and capacities. Paper and specialty media guidelines 52 For information on card stock and labels, see... the Card Stock & Label Guide. Note: Optional trays are supported for some models. Paper type Paper • Plain • Light • Heavy • Rough/Cotton • Recycled • Custom Bond Standard 250-sheet tray (Tray 1) Standard or optional 250-sheet tray (Tray 2) ...

User's Guide
Page 81
...feeder (MP Feeder) is the US factory default setting. From the Paper menu, Configure MP must be used only for manual feed print jobs. Note: Only installed trays and feeders are listed in the multipurpose feeder. Manual Env Type Envelope Custom Type Specifies the type...item. Understanding printer menus 81 Menu item Description Manual Paper Type Plain Paper Card Stock Transparency Recycled Labels Bond Letterhead Preprinted Colored Paper Light Paper Heavy Paper Rough/Cotton Custom Type Specifies the type of paper being manually loaded in the multipurpose feeder Notes: • Plain...
...feeder (MP Feeder) is the US factory default setting. From the Paper menu, Configure MP must be used only for manual feed print jobs. Note: Only installed trays and feeders are listed in the multipurpose feeder. Manual Env Type Envelope Custom Type Specifies the type...item. Understanding printer menus 81 Menu item Description Manual Paper Type Plain Paper Card Stock Transparency Recycled Labels Bond Letterhead Preprinted Colored Paper Light Paper Heavy Paper Rough/Cotton Custom Type Specifies the type of paper being manually loaded in the multipurpose feeder Notes: • Plain...

User's Guide
Page 85
... setting. Colored Loading Duplex Off Determines whether 2-sided printing occurs for all jobs that specify Recycled as the paper type Note: Off is the factory default setting. Light Loading Duplex Off Determines whether 2-sided printing occurs for all jobs that specify Preprinted as the ... Off is the factory default setting. Understanding printer menus 85 Preprinted Loading Duplex Off Determines whether 2-sided printing occurs for all jobs that specify Light as the paper type Note: Off is the factory default setting. Heavy Loading Duplex Off Determines whether 2-...
... setting. Colored Loading Duplex Off Determines whether 2-sided printing occurs for all jobs that specify Recycled as the paper type Note: Off is the factory default setting. Light Loading Duplex Off Determines whether 2-sided printing occurs for all jobs that specify Preprinted as the ... Off is the factory default setting. Understanding printer menus 85 Preprinted Loading Duplex Off Determines whether 2-sided printing occurs for all jobs that specify Light as the paper type Note: Off is the factory default setting. Heavy Loading Duplex Off Determines whether 2-...

User's Guide
Page 103
.... Sets the amount of time the printer waits after a job is printed before returning the printer display to print with minimum warm-up times. • Select the lowest setting if the printer shares an electrical circuit with room lighting or you notice lights flickering in the room. • Select a high setting if the printer...
.... Sets the amount of time the printer waits after a job is printed before returning the printer display to print with minimum warm-up times. • Select the lowest setting if the printer shares an electrical circuit with room lighting or you notice lights flickering in the room. • Select a high setting if the printer...

User's Guide
Page 134
Extended light exposure can cause print quality problems. 4 Rotate the cartridge in all directions to direct light for an extended period of the photoconductor kit, and then pull the toner cartridge out using the handle. 3 Unpack the new toner cartridge. To replace the toner cartridge: 1 Open the front door by pressing the button on the left side of the printer and lowering the door. 2 Press the button on the base of time. Maintaining the printer 134 Warning-Potential Damage: When replacing a toner cartridge, do not leave the photoconductor kit exposed to distribute the toner.
Extended light exposure can cause print quality problems. 4 Rotate the cartridge in all directions to direct light for an extended period of the photoconductor kit, and then pull the toner cartridge out using the handle. 3 Unpack the new toner cartridge. To replace the toner cartridge: 1 Open the front door by pressing the button on the left side of the printer and lowering the door. 2 Press the button on the base of time. Maintaining the printer 134 Warning-Potential Damage: When replacing a toner cartridge, do not leave the photoconductor kit exposed to distribute the toner.
User's Guide
Page 154
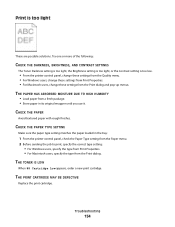
... following: CHECK THE DARKNESS, BRIGHTNESS, AND CONTRAST SETTINGS The Toner Darkness setting is too light, the Brightness setting is too light, or the Contrast setting is too light These are possible solutions. THE PRINT CARTRIDGE MAY BE DEFECTIVE Replace the print cartridge. CHECK THE PAPER TYPE SETTING Make sure the paper type setting matches the...
... following: CHECK THE DARKNESS, BRIGHTNESS, AND CONTRAST SETTINGS The Toner Darkness setting is too light, the Brightness setting is too light, or the Contrast setting is too light These are possible solutions. THE PRINT CARTRIDGE MAY BE DEFECTIVE Replace the print cartridge. CHECK THE PAPER TYPE SETTING Make sure the paper type setting matches the...
User's Guide
Page 175
...up e-mail alerts 142 Embedded Web Server Administrator's Guide 139 emission notices 162, 163, 164, 165 Enabling Menus 118 envelope seals when printing 146 envelopes loading 42 tips 57 Ethernet networking Macintosh 27 Windows 27 Ethernet port 26 exterior of the printer cleaning 130 e-mail notice of... Formatting Flash 118 G General Settings menu 102 H held jobs 59 printing for Macintosh users 60 printing for Windows users 60 Hex Trace 118 Hex Trace ready 118 HTML menu 114 I Image menu 115 indicator light 14 installation wireless network 31, 32 installing printer software 29 Invalid Engine Code 118...
...up e-mail alerts 142 Embedded Web Server Administrator's Guide 139 emission notices 162, 163, 164, 165 Enabling Menus 118 envelope seals when printing 146 envelopes loading 42 tips 57 Ethernet networking Macintosh 27 Windows 27 Ethernet port 26 exterior of the printer cleaning 130 e-mail notice of... Formatting Flash 118 G General Settings menu 102 H held jobs 59 printing for Macintosh users 60 printing for Windows users 60 Hex Trace 118 Hex Trace ready 118 HTML menu 114 I Image menu 115 indicator light 14 installation wireless network 31, 32 installing printer software 29 Invalid Engine Code 118...
User's Guide
Page 176
... 150 characters have jagged edges 150 clipped images 150 ghost images 151 gray background 151 poor transparency quality 156 print is too dark 153 print is too light 154 print quality test pages 149 skewed print 155 solid black streaks 158 solid white streaks 158 streaked horizontal lines 156 streaked vertical lines 157 toner fog...
... 150 characters have jagged edges 150 clipped images 150 ghost images 151 gray background 151 poor transparency quality 156 print is too dark 153 print is too light 154 print quality test pages 149 skewed print 155 solid black streaks 158 solid white streaks 158 streaked horizontal lines 156 streaked vertical lines 157 toner fog...
User's Guide
Page 179
... have jagged edges 150 clipped images 150 ghost images 151 gray background 151 poor transparency quality 156 print is too dark 153 print is too light 154 print quality test pages 149 skewed print 155 solid black streaks 158 solid white streaks 158 streaked horizontal lines 156 streaked vertical lines 157 ...37 Universal Setup menu 86 unlinking trays 47 USB menu 95 USB port 26 USB/USB 123 Utilities menu 109 V Verify print jobs 59 printing for Macintosh users 60 printing for Windows users 60 viewing reports 140 virtual display how to access 139 W Waiting, too many events ... DO NOT POWER...
... have jagged edges 150 clipped images 150 ghost images 151 gray background 151 poor transparency quality 156 print is too dark 153 print is too light 154 print quality test pages 149 skewed print 155 solid black streaks 158 solid white streaks 158 streaked horizontal lines 156 streaked vertical lines 157 ...37 Universal Setup menu 86 unlinking trays 47 USB menu 95 USB port 26 USB/USB 123 Utilities menu 109 V Verify print jobs 59 printing for Macintosh users 60 printing for Windows users 60 viewing reports 140 virtual display how to access 139 W Waiting, too many events ... DO NOT POWER...

Quick Reference
Page 1
Straighten the edges on the right guide, and slide the width guides to lightly touch the side of the tray. 4 Flex the sheets back and forth to loosen them, and then fan them. Note: Notice the maximum fill line ... placed facedown. 6 Squeeze the width guide tabs on a level surface. 5 Load the paper stack toward the front of the tray as shown with the recommended print side facedown. Quick Reference Loading paper 1 Pull the tray completely out. 3 Squeeze the length guide tabs together as shown, and slide the length guide to...
Straighten the edges on the right guide, and slide the width guides to lightly touch the side of the tray. 4 Flex the sheets back and forth to loosen them, and then fan them. Note: Notice the maximum fill line ... placed facedown. 6 Squeeze the width guide tabs on a level surface. 5 Load the paper stack toward the front of the tray as shown with the recommended print side facedown. Quick Reference Loading paper 1 Pull the tray completely out. 3 Squeeze the length guide tabs together as shown, and slide the length guide to...

Menu Map
Page 2
...is needed. Menu map Page 2 of settings that you may select. 4 Indicator light Indicates the printer status: • Off-The power is off. • Blinking green-The printer is warming up, processing data, or printing. • Solid green-The printer is on, but idle. • Solid ...red-Operator intervention is in the Ready state. 2 Back button ( ) Returns the display to the previous screen 3 Stop button ( ) Stops all printer activity When printing, pressing causes Stopping to appear ...
...is needed. Menu map Page 2 of settings that you may select. 4 Indicator light Indicates the printer status: • Off-The power is off. • Blinking green-The printer is warming up, processing data, or printing. • Solid green-The printer is on, but idle. • Solid ...red-Operator intervention is in the Ready state. 2 Back button ( ) Returns the display to the previous screen 3 Stop button ( ) Stops all printer activity When printing, pressing causes Stopping to appear ...

Media guide
Page 1
... not available for some models. Vinyl, pharmacy, and dual-sided labels are supported for the Universal setting. Select custom sizes up to print 20 or fewer pages of 4 Media guide The printer supports the following paper and other specialty media sizes. Paper type Paper • Plain... • Light • Heavy • Rough/Cotton • Recycled • Custom Bond Standard 250-sheet tray (Tray 1) Standard or optional 250-sheet tray (...
... not available for some models. Vinyl, pharmacy, and dual-sided labels are supported for the Universal setting. Select custom sizes up to print 20 or fewer pages of 4 Media guide The printer supports the following paper and other specialty media sizes. Paper type Paper • Plain... • Light • Heavy • Rough/Cotton • Recycled • Custom Bond Standard 250-sheet tray (Tray 1) Standard or optional 250-sheet tray (...

Printing guide
Page 3
the tray holds only 150 sheets of A6-size paper. 1 Maximum fill line Load letterhead with the top edge of the sheet toward the back of the tray as shown with the recommended print side facedown. Printing guide Page 3 of 10 4 Load the paper stack toward the front of the tray and the design facedown. 5 Squeeze and slide the guides to the maximum fill line; Note: The maximum fill line on the width guide indicates the maximum height for loading paper. Do not load A6-size paper to lightly touch the side of the stack.
the tray holds only 150 sheets of A6-size paper. 1 Maximum fill line Load letterhead with the top edge of the sheet toward the back of the tray as shown with the recommended print side facedown. Printing guide Page 3 of 10 4 Load the paper stack toward the front of the tray and the design facedown. 5 Squeeze and slide the guides to the maximum fill line; Note: The maximum fill line on the width guide indicates the maximum height for loading paper. Do not load A6-size paper to lightly touch the side of the stack.

Printing guide
Page 8
... Size and Paper Type. These envelopes may severely damage the printer. 4 Squeeze the tab located on the right width guide to adjust the guides to lightly touch the sides of 10 • Load envelopes with stamps, clasps, snaps, windows, coated linings, or self-stick adhesives. Make sure the paper fits ...the proper orientation for loading envelopes. Warning-Potential Damage: Never use envelopes with the flap side down and the stamp location in the position shown. Printing guide Page 8 of the stack. 5 Slide the paper gently into the multipurpose feeder until it comes to a stop.
... Size and Paper Type. These envelopes may severely damage the printer. 4 Squeeze the tab located on the right width guide to adjust the guides to lightly touch the sides of 10 • Load envelopes with stamps, clasps, snaps, windows, coated linings, or self-stick adhesives. Make sure the paper fits ...the proper orientation for loading envelopes. Warning-Potential Damage: Never use envelopes with the flap side down and the stamp location in the position shown. Printing guide Page 8 of the stack. 5 Slide the paper gently into the multipurpose feeder until it comes to a stop.

Supplies guide
Page 2
...Toner cartridge High Yield Toner Cartridge Extra High Yield Toner Cartridge Lexmark Return Program Cartridge E260A11L E360H11L E462U11L Regular cartridge E260A21L E360H21L E462U21G Ordering a photoconductor kit Depending on the display after 120,000 pages have printed to let you know it is time to let you ...; Using certain types of life. Notes: • The maintenance kit may require more frequent replacement of the photoconductor kit by printing a network setup page. See the following table for the maintenance kit part number for your printer model, the printer issues a message or...
...Toner cartridge High Yield Toner Cartridge Extra High Yield Toner Cartridge Lexmark Return Program Cartridge E260A11L E360H11L E462U11L Regular cartridge E260A21L E360H21L E462U21G Ordering a photoconductor kit Depending on the display after 120,000 pages have printed to let you know it is time to let you ...; Using certain types of life. Notes: • The maintenance kit may require more frequent replacement of the photoconductor kit by printing a network setup page. See the following table for the maintenance kit part number for your printer model, the printer issues a message or...


