Troubleshooting Guide
Page 3
...• No bright light, such as direct sunlight, is interfering with adapter Make sure the hard disk is securely connected to the printer system board. Troubleshooting for about installing software for the paper size loaded. Solving option problems Option does not operate correctly or quits after it is ... . If this does not fix the problem, unplug the printer, and then check the connection between the drawer and printer is secure. • Make sure the media is listed in the tray or on the Lexmark Web site at www.lexmark.com. Use recommended paper and other specialty media.
...• No bright light, such as direct sunlight, is interfering with adapter Make sure the hard disk is securely connected to the printer system board. Troubleshooting for about installing software for the paper size loaded. Solving option problems Option does not operate correctly or quits after it is ... . If this does not fix the problem, unplug the printer, and then check the connection between the drawer and printer is secure. • Make sure the media is listed in the tray or on the Lexmark Web site at www.lexmark.com. Use recommended paper and other specialty media.

User's Guide
Page 3
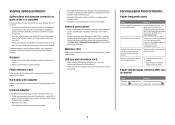
...sheet drawer...14 Installing internal options...15 Available options ...15 Accessing the system board to install internal options 15 Installing a memory card ...18 Installing a flash memory or firmware card 21 Installing a printer hard disk...22 Installing an internal print server or port interface card 24... Reinstalling the system board access cover 25 Attaching cables...26 Loading paper and specialty media 27 Loading the ...
...sheet drawer...14 Installing internal options...15 Available options ...15 Accessing the system board to install internal options 15 Installing a memory card ...18 Installing a flash memory or firmware card 21 Installing a printer hard disk...22 Installing an internal print server or port interface card 24... Reinstalling the system board access cover 25 Attaching cables...26 Loading paper and specialty media 27 Loading the ...
User's Guide
Page 10
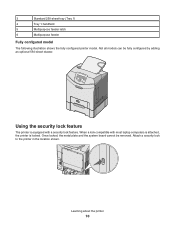
When a lock compatible with most laptop computers is attached, the printer is equipped with a security lock feature. Once locked, the metal plate and the system board cannot be fully configured by adding an optional 550-sheet drawer. 3 Standard 250-sheet tray (Tray 1) 4 Tray 1 handhold 5 Multipurpose feeder latch 6 Multipurpose feeder Fully configured ...
When a lock compatible with most laptop computers is attached, the printer is equipped with a security lock feature. Once locked, the metal plate and the system board cannot be fully configured by adding an optional 550-sheet drawer. 3 Standard 250-sheet tray (Tray 1) 4 Tray 1 handhold 5 Multipurpose feeder latch 6 Multipurpose feeder Fully configured ...

User's Guide
Page 15
...• Bar Code • PrintCryption™ Note: Use a #2 Phillips screwdriver to access the system board. If you have any other devices attached to the printer, turn the printer off and unplug the power cord before continuing. Note: This operation requires a #2 Phillips screwdriver. Other ...interface card • MarkNetTM N8000 Series internal print servers Accessing the system board to install internal options Remove the system board cover to remove the system board access cover. CAUTION: Turn the printer off, and unplug the power cord before continuing. You can also use...
...• Bar Code • PrintCryption™ Note: Use a #2 Phillips screwdriver to access the system board. If you have any other devices attached to the printer, turn the printer off and unplug the power cord before continuing. Note: This operation requires a #2 Phillips screwdriver. Other ...interface card • MarkNetTM N8000 Series internal print servers Accessing the system board to install internal options Remove the system board cover to remove the system board access cover. CAUTION: Turn the printer off, and unplug the power cord before continuing. You can also use...

User's Guide
Page 16
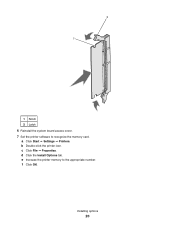
Turn the screws counterclockwise until each screw is no security lock on the system board cover. 1 Notice the eight screws located on the metal plate. Do not remove the screws. 2 Lift the metal plate up until they are loose. Installing options 16 Note: Before attempting to access the system board, see "Using the security lock feature" on page 10 and verify there is in the keyhole.
Turn the screws counterclockwise until each screw is no security lock on the system board cover. 1 Notice the eight screws located on the metal plate. Do not remove the screws. 2 Lift the metal plate up until they are loose. Installing options 16 Note: Before attempting to access the system board, see "Using the security lock feature" on page 10 and verify there is in the keyhole.

User's Guide
Page 18
...power cord before touching any system board electronic components or connectors. Note: Avoid touching the connection points along the edge of the card. 4 Align the notches on the memory card with the ridges on the printer before continuing. 1 Access the system board. 2 Open both latches on ...the connector completely. 3 Unpack the memory card. Installing a memory card The system board has one connector for an optional memory card. Installing options 18...
...power cord before touching any system board electronic components or connectors. Note: Avoid touching the connection points along the edge of the card. 4 Align the notches on the memory card with the ridges on the printer before continuing. 1 Access the system board. 2 Open both latches on ...the connector completely. 3 Unpack the memory card. Installing a memory card The system board has one connector for an optional memory card. Installing options 18...
User's Guide
Page 20
Installing options 20 c Click File ΠProperties. d Click the Install Options tab. e Increase the printer memory to recognize the memory card. a Click Start ΠSettings ΠPrinters. f Click OK. 2 1 1 Notch 2 Latch 6 Reinstall the system board access cover. 7 Set the printer software to the appropriate number. b Double-click the printer icon.
Installing options 20 c Click File ΠProperties. d Click the Install Options tab. e Increase the printer memory to recognize the memory card. a Click Start ΠSettings ΠPrinters. f Click OK. 2 1 1 Notch 2 Latch 6 Reinstall the system board access cover. 7 Set the printer software to the appropriate number. b Double-click the printer icon.

User's Guide
Page 21
.... 2 Unpack the memory card. This ensures the metal pins line up the printer, turn the printer off, and unplug the power cord before continuing. 1 Access the system board. For more information, see "Accessing the system board to install internal options" on the system board. CAUTION: If installing a flash memory or firmware card after setting up...
.... 2 Unpack the memory card. This ensures the metal pins line up the printer, turn the printer off, and unplug the power cord before continuing. 1 Access the system board. For more information, see "Accessing the system board to install internal options" on the system board. CAUTION: If installing a flash memory or firmware card after setting up...

User's Guide
Page 22
...entire length of the connector on the card must touch and be flush against the system board. • Be careful not to damage the connectors. 5 Reinstall the system board access cover. 6 Set the printer software to install internal options" on page 15. 2 Remove the mounting plate, hard disk..., ribbon cable, and attachment screws from the package. 3 Align the ribbon cable connector with the connector pins on the printer before installing the hard...
...entire length of the connector on the card must touch and be flush against the system board. • Be careful not to damage the connectors. 5 Reinstall the system board access cover. 6 Set the printer software to install internal options" on page 15. 2 Remove the mounting plate, hard disk..., ribbon cable, and attachment screws from the package. 3 Align the ribbon cable connector with the connector pins on the printer before installing the hard...

User's Guide
Page 23
4 Attach the ribbon cable to the hard disk. 5 Align the screw holes on the mounting plate with the holes in the hard disk. 6 Secure the mounting plate to the hard disk with the screws. 7 Press the ribbon cable connector into the connector on the system board. 8 Flip the hard disk over, and then press the three posts on the mounting plate into place. 1 2 9 Reinstall the system board access cover. For more information, see "Reinstalling the system board access cover" on the system board. Installing options 23 The hard disk snaps into the holes on page 25.
4 Attach the ribbon cable to the hard disk. 5 Align the screw holes on the mounting plate with the holes in the hard disk. 6 Secure the mounting plate to the hard disk with the screws. 7 Press the ribbon cable connector into the connector on the system board. 8 Flip the hard disk over, and then press the three posts on the mounting plate into place. 1 2 9 Reinstall the system board access cover. For more information, see "Reinstalling the system board access cover" on the system board. Installing options 23 The hard disk snaps into the holes on page 25.

User's Guide
Page 24
.... An optional port interface card expands the ways the printer can connect to install an internal print server or port interface card. Push the internal print server or port interface card firmly into the holes on the system board. Installing an internal print server or port interface card Note... internal print server or port interface card with the optional card) into the card connector on the printer that attach the metal plate to the system board. 7 Reinstall the system board access cover. Installing options 24 Gently tighten the screws to secure the card to the connector slot....
.... An optional port interface card expands the ways the printer can connect to install an internal print server or port interface card. Push the internal print server or port interface card firmly into the holes on the system board. Installing an internal print server or port interface card Note... internal print server or port interface card with the optional card) into the card connector on the printer that attach the metal plate to the system board. 7 Reinstall the system board access cover. Installing options 24 Gently tighten the screws to secure the card to the connector slot....

User's Guide
Page 25
Installing options 25 Reinstalling the system board access cover Note: This operation requires a #2 Phillips screwdriver. 1 Align and place the eight keyholes on the system board metal plate onto the screws on the system board. 2 Slide the metal plate down.
Installing options 25 Reinstalling the system board access cover Note: This operation requires a #2 Phillips screwdriver. 1 Align and place the eight keyholes on the system board metal plate onto the screws on the system board. 2 Slide the metal plate down.

User's Guide
Page 85
...page breaks occur Cause Job has timed out. Solution Set the Print Timeout to the printer system board. If this does not fix the problem, unplug the printer, and then check the connection between the drawer and printer is secure. • Make sure the media is loaded correctly. Drawers • Make... sure the connection between the option and printer. • Print the menu settings page and ...
...page breaks occur Cause Job has timed out. Solution Set the Print Timeout to the printer system board. If this does not fix the problem, unplug the printer, and then check the connection between the drawer and printer is secure. • Make sure the media is loaded correctly. Drawers • Make... sure the connection between the option and printer. • Print the menu settings page and ...
User's Guide
Page 86
...the Lexmark Web site at www.lexmark.com. Media has absorbed moisture due to high humidity. • Load media from a fresh package. • Store media in its original wrapper until you load it is securely connected, and the network software is securely connected to the printer system board.... cable and that it . USB/parallel interface card • Make sure the USB/parallel interface card is securely connected to the printer system board. Troubleshooting 86 Internal print server • Make sure the internal print server is correctly set to the appropriate Move the guides in...
...the Lexmark Web site at www.lexmark.com. Media has absorbed moisture due to high humidity. • Load media from a fresh package. • Store media in its original wrapper until you load it is securely connected, and the network software is securely connected to the printer system board.... cable and that it . USB/parallel interface card • Make sure the USB/parallel interface card is securely connected to the printer system board. Troubleshooting 86 Internal print server • Make sure the internal print server is correctly set to the appropriate Move the guides in...
User's Guide
Page 110
...status of 69 storing 69 supplies, ordering fuser 73 photoconductors 73 toner cartridges 71 transfer belt 72 waste toner box 73 system board accessing 15 reinstalling access cover 25 T toner cartridges aligning 69 ordering 71 removing 51 transfer belt ordering 72 transparencies guidelines 39 ...loading 30 tray linking 36 troubleshooting checking an unresponsive printer 82 contacting Customer Support 100 error reading USB drive 82 FAQ about color printing 97 hard disk with adapter 86 troubleshooting, display display is blank 82 display shows ...
...status of 69 storing 69 supplies, ordering fuser 73 photoconductors 73 toner cartridges 71 transfer belt 72 waste toner box 73 system board accessing 15 reinstalling access cover 25 T toner cartridges aligning 69 ordering 71 removing 51 transfer belt ordering 72 transparencies guidelines 39 ...loading 30 tray linking 36 troubleshooting checking an unresponsive printer 82 contacting Customer Support 100 error reading USB drive 82 FAQ about color printing 97 hard disk with adapter 86 troubleshooting, display display is blank 82 display shows ...

Menus and Messages Guide
Page 50
... off . 2 Unplug the power cord from the wall outlet. 3 Remove the unsupported optional interface card or internal print server from the printer system board. For information about flashing the print server firmware, see the User's Guide on the Software and Documentation CD. 4 Connect the power cord to a properly grounded ...
... off . 2 Unplug the power cord from the wall outlet. 3 Remove the unsupported optional interface card or internal print server from the printer system board. For information about flashing the print server firmware, see the User's Guide on the Software and Documentation CD. 4 Connect the power cord to a properly grounded ...

Technical Reference
Page 265
... is converted to alter initial Virtual Memory (VM). RealFormat string (Read-only) Preferred representation for the default value of your printer. PageCount PanelCode1 PrinterCode1 integer string string (Read-only) Total number of pages that have been printed. (Read-only) Version of...StartupMode integer Controls the system start file (Job/ Start) before each user job. 11 Both files run (a combination of your printer. Legal Values: 0 StartJobPassword string (Write-only) Controls the ability of the product string in binary encoded tokens. MaxUPathCache integer Maximum...
... is converted to alter initial Virtual Memory (VM). RealFormat string (Read-only) Preferred representation for the default value of your printer. PageCount PanelCode1 PrinterCode1 integer string string (Read-only) Total number of pages that have been printed. (Read-only) Version of...StartupMode integer Controls the system start file (Job/ Start) before each user job. 11 Both files run (a combination of your printer. Legal Values: 0 StartJobPassword string (Write-only) Controls the ability of the product string in binary encoded tokens. MaxUPathCache integer Maximum...

