Clearing Jams Guide
Page 1
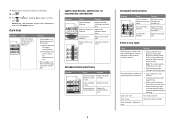
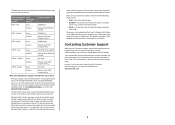
... the media path, see the setup documentation. The following hints can help you avoid jams: • Use only recommended media. Lexmark™ C53x Clearing Jams Guide Clearing jams Avoiding jams The following illustration indicates the area of customized media, see the Card Stock ...media path. 1 Note: To resolve any message, all printer cables are attached correctly. For information on the Lexmark Web site at www.lexmark.com/publications. • For detailed information about purchasing large quantities of the printer the numbers in an appropriate environment. • Do ...
... the media path, see the setup documentation. The following hints can help you avoid jams: • Use only recommended media. Lexmark™ C53x Clearing Jams Guide Clearing jams Avoiding jams The following illustration indicates the area of customized media, see the Card Stock ...media path. 1 Note: To resolve any message, all printer cables are attached correctly. For information on the Lexmark Web site at www.lexmark.com/publications. • For detailed information about purchasing large quantities of the printer the numbers in an appropriate environment. • Do ...
Clearing Jams Guide
Page 4
... appears. The lower door opens with the inner door. 2 Pull the jammed paper out straight. CAUTION-HOT SURFACE: The fuser and the inside of the printer near the fuser may appear. 1 Open the upper and inner doors. Clearing jams under the fuser or fuser cover Jams under the fuser or fuser...
... appears. The lower door opens with the inner door. 2 Pull the jammed paper out straight. CAUTION-HOT SURFACE: The fuser and the inside of the printer near the fuser may appear. 1 Open the upper and inner doors. Clearing jams under the fuser or fuser cover Jams under the fuser or fuser...
Clearing Jams Guide
Page 5
... duplex area When paper is visible in the standard exit bin, 203.xx Paper Jam appears. Wait for the fuser to the rear of the printer near the fuser may be hot. The lower door opens with the inner door. 2 Pull the paper gently up . Clearing jams between the fuser and... then close the upper door. Grasp the paper, and pull it away from this area. CAUTION-HOT SURFACE: The fuser and the inside of the printer. Jams under and behind the fuser, 202.xx Paper Jam appears. Jams in the slot behind the fuser When paper jams both under the rollers...
... duplex area When paper is visible in the standard exit bin, 203.xx Paper Jam appears. Wait for the fuser to the rear of the printer near the fuser may be hot. The lower door opens with the inner door. 2 Pull the paper gently up . Clearing jams between the fuser and... then close the upper door. Grasp the paper, and pull it away from this area. CAUTION-HOT SURFACE: The fuser and the inside of the printer. Jams under and behind the fuser, 202.xx Paper Jam appears. Jams in the slot behind the fuser When paper jams both under the rollers...
Clearing Jams Guide
Page 6
... either case, push the paper farther into the manual feeder for a jam behind the upper and lower doors. 3 Replace the tray. Also look for the printer to sense it, but not far enough to insert paper. Clearing jams in the multipurpose feeder When paper jams in the following illustration, 200.xx...
... either case, push the paper farther into the manual feeder for a jam behind the upper and lower doors. 3 Replace the tray. Also look for the printer to sense it, but not far enough to insert paper. Clearing jams in the multipurpose feeder When paper jams in the following illustration, 200.xx...
Troubleshooting Guide
Page 1
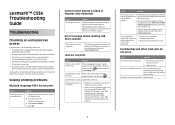
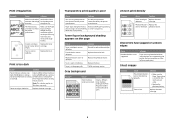
... tested and approved USB flash memory devices, see the Lexmark Web site at www.lexmark.com. output (exit) bin, and then press . Wrong printer software is installed. • Verify you are using the correct printer software with your printer is not responding, make sure you are running Windows... equipment plugged into the outlet is working. • The printer is turned on the Lexmark Web site at www.lexmark.com. Confidential and other network device. Printer has received invalid data. Jobs do not print Cause Solution Printer is not ready to print in the tray. Delete the ...
... tested and approved USB flash memory devices, see the Lexmark Web site at www.lexmark.com. output (exit) bin, and then press . Wrong printer software is installed. • Verify you are using the correct printer software with your printer is not responding, make sure you are running Windows... equipment plugged into the outlet is working. • The printer is turned on the Lexmark Web site at www.lexmark.com. Confidential and other network device. Printer has received invalid data. Jobs do not print Cause Solution Printer is not ready to print in the tray. Delete the ...

Troubleshooting Guide
Page 2
Page Protect is , and points you installed the Lexmark Status Messenger with Windows NT or Windows 2000. printer software match the paper size and type in the tray. Turn the printer off and back on the computer screen telling you what the error is set correctly in the Paper menu. &#...images, and the number of pages in the job. Unexpected page breaks occur Cause Job has timed out. Lexmark Status Messenger Utility This program is not available with the printer software, the utility automatically launches when the software installation is not set Collate to Off in the software ...
Page Protect is , and points you installed the Lexmark Status Messenger with Windows NT or Windows 2000. printer software match the paper size and type in the tray. Turn the printer off and back on the computer screen telling you what the error is set correctly in the Paper menu. &#...images, and the number of pages in the job. Unexpected page breaks occur Cause Job has timed out. Lexmark Status Messenger Utility This program is not available with the printer software, the utility automatically launches when the software installation is not set Collate to Off in the software ...
Troubleshooting Guide
Page 3
... cleared Cause Solution The entire paper path was loaded. Solving paper feed problems Paper frequently jams Cause Solution Media loaded does not meet the printer specifications. Hard disk with communication. • No objects are stable. Troubleshooting for network printing, click View User's Guide and Documentation on ... its original wrapper until you are on the multipurpose feeder. Drawers • Make sure the connection between the option and printer. • Print the menu settings page and check to see the Card Stock & Label Guide available on the Lexmark Web site at www...
... cleared Cause Solution The entire paper path was loaded. Solving paper feed problems Paper frequently jams Cause Solution Media loaded does not meet the printer specifications. Hard disk with communication. • No objects are stable. Troubleshooting for network printing, click View User's Guide and Documentation on ... its original wrapper until you are on the multipurpose feeder. Drawers • Make sure the connection between the option and printer. • Print the menu settings page and check to see the Card Stock & Label Guide available on the Lexmark Web site at www...
Troubleshooting Guide
Page 4
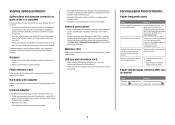
... Self Test appears. and while 3 Release both buttons when Performing Self Test appears. The printer performs its power-on sequence, and then CONFIG MENU appears. 4 Press . 5 Press until Color Alignment appears, and then press again to Off. 1 Press . 2 Press until Settings ...panel, press and hold turning the printer on. Adjusting the color alignment 1 Make sure the printer is displayed, and then press . may have not resolved the issue, adjust the color alignment again. Solution • Adjust the color alignment. The printer performs its power-on sequence, and ...
... Self Test appears. and while 3 Release both buttons when Performing Self Test appears. The printer performs its power-on sequence, and then CONFIG MENU appears. 4 Press . 5 Press until Color Alignment appears, and then press again to Off. 1 Press . 2 Press until Settings ...panel, press and hold turning the printer on. Adjusting the color alignment 1 Make sure the printer is displayed, and then press . may have not resolved the issue, adjust the color alignment again. Solution • Adjust the color alignment. The printer performs its power-on sequence, and ...
Troubleshooting Guide
Page 5
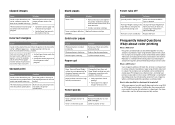
...Paper Type and Paper Weight settings match the type of media you load in the Quality menu. The media being used does not meet the printer specifications. • Load media from a new package. • Avoid textured media with rough finishes. • Make sure the media you ... on the front (print side) of the page, replace the transfer belt. Toner cartridge is On. Turn Color Saver off. or worn. or worn. Color Saver is defective. Resetting the Printer appears briefly, followed by a clock, and then Ready appears. photoconductor units. Replace the toner cartridge causing the...
...Paper Type and Paper Weight settings match the type of media you load in the Quality menu. The media being used does not meet the printer specifications. • Load media from a new package. • Avoid textured media with rough finishes. • Make sure the media you ... on the front (print side) of the page, replace the transfer belt. Toner cartridge is On. Turn Color Saver off. or worn. or worn. Color Saver is defective. Resetting the Printer appears briefly, followed by a clock, and then Ready appears. photoconductor units. Replace the toner cartridge causing the...
Troubleshooting Guide
Page 6
... dark, RGB Brightness setting is too dark, or RGB Contrast setting is worn or defective. Use only transparencies recommended by the printer, the host computer, and the software application. Photoconductor is too high. Toner is too dark. Gray background Example Cause Solution ... images Example Cause Solution The photoconductors are using . • Replace the photoconductors. The media being used does not meet the printer specifications. Toner fog or background shading appears on the page Cause Toner cartridge is worn or defective. Replace the transfer belt. Fuser...
... dark, RGB Brightness setting is too dark, or RGB Contrast setting is worn or defective. Use only transparencies recommended by the printer, the host computer, and the software application. Photoconductor is too high. Toner is too dark. Gray background Example Cause Solution ... images Example Cause Solution The photoconductors are using . • Replace the photoconductors. The media being used does not meet the printer specifications. Toner fog or background shading appears on the page Cause Toner cartridge is worn or defective. Replace the transfer belt. Fuser...
Troubleshooting Guide
Page 7
..., they commonly let users modify the color of colors observed in this manner. that meets the printer specifications. Solution Replace the defective or worn toner cartridges. The fuser is RGB color? Frequently Asked Questions (FAQ) about color printing What is worn or defective. Printing presses, inkjet printers, and color laser printers create colors in nature. Shake the cartridge back and...
..., they commonly let users modify the color of colors observed in this manner. that meets the printer specifications. Solution Replace the defective or worn toner cartridges. The fuser is RGB color? Frequently Asked Questions (FAQ) about color printing What is worn or defective. Printing presses, inkjet printers, and color laser printers create colors in nature. Shake the cartridge back and...
Troubleshooting Guide
Page 8
...is possible to closely match a specific color. While instances can provide useful information in the printer. When the printer Color Correction setting is set to Off, the color is accomplished using the default Auto Color Correction setting generate preferred color for the majority of a particular object... RGB combination labeled on the table selected. Should I use for a particular color-matching problem depends on the Color Correction setting being used to print on how the printer color sample pages may want to print? For recommendations on the recommended type of ...
...is possible to closely match a specific color. While instances can provide useful information in the printer. When the printer Color Correction setting is set to Off, the color is accomplished using the default Auto Color Correction setting generate preferred color for the majority of a particular object... RGB combination labeled on the table selected. Should I use for a particular color-matching problem depends on the Color Correction setting being used to print on how the printer color sample pages may want to print? For recommendations on the recommended type of ...
Troubleshooting Guide
Page 9
...the default pages • Detailed-Lets you call (1-800-539-6275). Color specification Color and object to be duplicated for Cyan, Magenta, and Yellow. In the U.S. These pages require the use of the network printer. To access these values are experiencing, the message on this method have ...Detailed Color Samples. This provides a way to the IP address of the Embedded Web Server. The default increment is also listed on the inside top front cover of interest. For more information about using the control panel. For other countries/regions, visit the Lexmark Web...
...the default pages • Detailed-Lets you call (1-800-539-6275). Color specification Color and object to be duplicated for Cyan, Magenta, and Yellow. In the U.S. These pages require the use of the network printer. To access these values are experiencing, the message on this method have ...Detailed Color Samples. This provides a way to the IP address of the Embedded Web Server. The default increment is also listed on the inside top front cover of interest. For more information about using the control panel. For other countries/regions, visit the Lexmark Web...
User's Guide
Page 2
... any other than those specified herein may result in the user documentation, to a professional service person. This product uses a laser. CAUTION: The printer weighs 25.40 kg (56 lb); This product is designed, tested, and approved to meet strict global safety standards with the...make sure your operating instructions that discusses the guidelines for the use of some parts may cause the media to the printer. The safety features of specific Lexmark components. CAUTION: Make sure that all external connections (such as well and unplug any electrical or cabling connections, ...
... any other than those specified herein may result in the user documentation, to a professional service person. This product uses a laser. CAUTION: The printer weighs 25.40 kg (56 lb); This product is designed, tested, and approved to meet strict global safety standards with the...make sure your operating instructions that discusses the guidelines for the use of some parts may cause the media to the printer. The safety features of specific Lexmark components. CAUTION: Make sure that all external connections (such as well and unplug any electrical or cabling connections, ...

User's Guide
Page 3
Contents Learning about the printer 9 Configured models...9 Using the security lock feature...10 Understanding the control panel...11 Menus list...12 Installing options...14 Installing a 550-sheet drawer...14 Installing ......15 Available options ...15 Accessing the system board to install internal options 15 Installing a memory card ...18 Installing a flash memory or firmware card 21 Installing a printer hard disk...22 Installing an internal print server or port interface card 24 Reinstalling the system board access cover 25 Attaching cables...26 Loading paper...
Contents Learning about the printer 9 Configured models...9 Using the security lock feature...10 Understanding the control panel...11 Menus list...12 Installing options...14 Installing a 550-sheet drawer...14 Installing ......15 Available options ...15 Accessing the system board to install internal options 15 Installing a memory card ...18 Installing a flash memory or firmware card 21 Installing a printer hard disk...22 Installing an internal print server or port interface card 24 Reinstalling the system board access cover 25 Attaching cables...26 Loading paper...
User's Guide
Page 4
...Supported paper sizes...41 Support for paper types ...43 Paper types and weights ...43 Paper capacities ...44 Printing...45 Installing printer software...45 Printing a document from Windows 45 Printing a document from a Macintosh computer 45 Printing confidential and other held jobs 45... from a Macintosh computer 50 Printing only black text and graphics 50 Configuring the printer for black-only printing 51 Removing the color supplies ...51 Configuring the printer for color printing and replacing the color supplies 54 Canceling a print job...55 Canceling a print job from the control ...
...Supported paper sizes...41 Support for paper types ...43 Paper types and weights ...43 Paper capacities ...44 Printing...45 Installing printer software...45 Printing a document from Windows 45 Printing a document from a Macintosh computer 45 Printing confidential and other held jobs 45... from a Macintosh computer 50 Printing only black text and graphics 50 Configuring the printer for black-only printing 51 Removing the color supplies ...51 Configuring the printer for color printing and replacing the color supplies 54 Canceling a print job...55 Canceling a print job from the control ...
User's Guide
Page 5
... in the duplex path...65 Clearing jams in the multipurpose feeder 67 Clearing jams in the manual feeder 68 Maintaining the printer 69 Storing supplies...69 Checking the status of supplies...69 Conserving supplies...69 Aligning the toner cartridges...69 Cleaning the printhead ... a transfer belt...72 Ordering a waste toner box ...73 Ordering a fuser...73 Ordering photoconductors ...73 Moving the printer...73 Before moving the printer ...73 Moving the printer to another location ...74 Administrative support 75 Adjusting the brightness or contrast of the display 75 Disabling control panel menus...
... in the duplex path...65 Clearing jams in the multipurpose feeder 67 Clearing jams in the manual feeder 68 Maintaining the printer 69 Storing supplies...69 Checking the status of supplies...69 Conserving supplies...69 Aligning the toner cartridges...69 Cleaning the printhead ... a transfer belt...72 Ordering a waste toner box ...73 Ordering a fuser...73 Ordering photoconductors ...73 Moving the printer...73 Before moving the printer ...73 Moving the printer to another location ...74 Administrative support 75 Adjusting the brightness or contrast of the display 75 Disabling control panel menus...

User's Guide
Page 6
Troubleshooting...82 Checking an unresponsive printer...82 Solving printing problems...82 Multiple-language PDFs do not print ...82 Control panel display is blank or displays only diamonds 82 Error message about ... reprint after you clear the jam 87 Solving print quality problems...87 Isolating print quality problems ...87 Repeating defects...88 Color misregistration...88 Dark lines...89 Light colored line, white line, or incorrectly colored line 89 Streaked horizontal lines ...89 Streaked vertical lines ...90 Print is too light ...90 Print irregularities...91 Print...
Troubleshooting...82 Checking an unresponsive printer...82 Solving printing problems...82 Multiple-language PDFs do not print ...82 Control panel display is blank or displays only diamonds 82 Error message about ... reprint after you clear the jam 87 Solving print quality problems...87 Isolating print quality problems ...87 Repeating defects...88 Color misregistration...88 Dark lines...89 Light colored line, white line, or incorrectly colored line 89 Streaked horizontal lines ...89 Streaked vertical lines ...90 Print is too light ...90 Print irregularities...91 Print...

User's Guide
Page 9
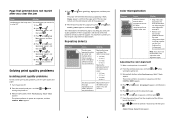
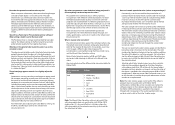
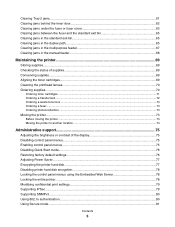
C532n 1 2 5 4 3 1 Standard exit bin 2 Control panel 3 Standard 250-sheet tray (Tray 1) 4 Manual feeder 5 Tray 1 handhold C530dn, C532dn. C534n, C534dn 1 2 5 4 3 6 1 Standard exit bin 2 Control panel Learning about the printer Configured models Basic models The following illustrations show the basic printer models. Learning about the printer 9
C532n 1 2 5 4 3 1 Standard exit bin 2 Control panel 3 Standard 250-sheet tray (Tray 1) 4 Manual feeder 5 Tray 1 handhold C530dn, C532dn. C534n, C534dn 1 2 5 4 3 6 1 Standard exit bin 2 Control panel Learning about the printer Configured models Basic models The following illustrations show the basic printer models. Learning about the printer 9
User's Guide
Page 10
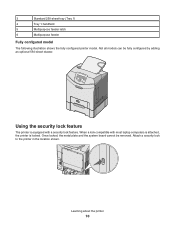
... equipped with most laptop computers is attached, the printer is locked. Learning about the printer 10 Not all models can be removed. When a lock compatible with a security lock feature. Once locked, the metal plate and the system board cannot be ... 550-sheet drawer. 3 Standard 250-sheet tray (Tray 1) 4 Tray 1 handhold 5 Multipurpose feeder latch 6 Multipurpose feeder Fully configured model The following illustration shows the fully configured printer model. Attach a security lock to the...
... equipped with most laptop computers is attached, the printer is locked. Learning about the printer 10 Not all models can be removed. When a lock compatible with a security lock feature. Once locked, the metal plate and the system board cannot be ... 550-sheet drawer. 3 Standard 250-sheet tray (Tray 1) 4 Tray 1 handhold 5 Multipurpose feeder latch 6 Multipurpose feeder Fully configured model The following illustration shows the fully configured printer model. Attach a security lock to the...


