Sending a fax using the computer
Page 1
... driver is installed. 2 Verify that the fax option is software that lets the computer communicate with the printer. This gives you need to install the software after setup, follow these instructions: Sending a fax using the computer 1 For Mac OS X version 10.4 or later users 1 With a document open , choose File > Print. 2 From the print options pop-up menu, choose Select a driver to add your printer fax model, and then click Add. b Select the printer from a computer lets you receive an error, "No fax...
... driver is installed. 2 Verify that the fax option is software that lets the computer communicate with the printer. This gives you need to install the software after setup, follow these instructions: Sending a fax using the computer 1 For Mac OS X version 10.4 or later users 1 With a document open , choose File > Print. 2 From the print options pop-up menu, choose Select a driver to add your printer fax model, and then click Add. b Select the printer from a computer lets you receive an error, "No fax...
Troubleshooting Guide
Page 1
... adjustable paper guides are properly configured. Unable to install the software. Note: Connecting over a network Make sure you are using . 5 Turn on the inside wall of the paper tray. • Do not remove the paper from the tray while printing. If the software installation screen does not appear: 1 From the desktop, double-click My Computer. If the MFP is not functioning properly or a communications error message appears, you may need to the Ready prompt. Lexmark™ X34x Troubleshooting Guide Setup troubleshooting...
... adjustable paper guides are properly configured. Unable to install the software. Note: Connecting over a network Make sure you are using . 5 Turn on the inside wall of the paper tray. • Do not remove the paper from the tray while printing. If the software installation screen does not appear: 1 From the desktop, double-click My Computer. If the MFP is not functioning properly or a communications error message appears, you may need to the Ready prompt. Lexmark™ X34x Troubleshooting Guide Setup troubleshooting...

Troubleshooting Guide
Page 2
... control panel, press Menu. 2 Press or repeatedly until MACHINE SETUP appears. 3 Press . 4 Press or repeatedly until scanning is complete before using the manual feeder, this is set as the default printer. 1 Click Start Settings Printers and Faxes or Printers. For more information, see the User's Guide. • Disconnect the USB cable, and then reconnect it back and forth. For more information, see "Removing and reinstalling the drivers software" on both sides. • For copies, adjust...
... control panel, press Menu. 2 Press or repeatedly until MACHINE SETUP appears. 3 Press . 4 Press or repeatedly until scanning is complete before using the manual feeder, this is set as the default printer. 1 Click Start Settings Printers and Faxes or Printers. For more information, see the User's Guide. • Disconnect the USB cable, and then reconnect it back and forth. For more information, see "Removing and reinstalling the drivers software" on both sides. • For copies, adjust...
Troubleshooting Guide
Page 3
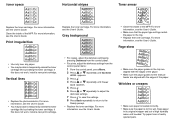
... control panel menu: 1 From the control panel, press Menu. 2 Press or repeatedly until MACHINE SETUP appears. 3 Press . 4 Press or repeatedly until needed. Toner specs AaBbCc AaBbCc AaBbCc AaBbCc AaBbCc Replace the toner cartridge. For more information, see the User's Guide. • Make sure that the paper type settings match the paper in the tray. • Replace the toner cartridge. Keep paper in the tray are aligned with the edges of the paper. • Make sure the paper guides for the manual feeder are aligned...
... control panel menu: 1 From the control panel, press Menu. 2 Press or repeatedly until MACHINE SETUP appears. 3 Press . 4 Press or repeatedly until needed. Toner specs AaBbCc AaBbCc AaBbCc AaBbCc AaBbCc Replace the toner cartridge. For more information, see the User's Guide. • Make sure that the paper type settings match the paper in the tray. • Replace the toner cartridge. Keep paper in the tray are aligned with the edges of the paper. • Make sure the paper guides for the manual feeder are aligned...

Troubleshooting Guide
Page 4
... used by another device, wait until FAX DEFAULTS appears. Scans very slowly • Close all applications not in the tray. Scan was unsuccessful • Restart the computer. • Remove and reinstall the software. If there is an error message, see the User's Guide. • Make sure the MFP is set as the default printer and is done before sending the scan job. • To change the scanning resolution to a lower value: 1 From the control panel...
... used by another device, wait until FAX DEFAULTS appears. Scans very slowly • Close all applications not in the tray. Scan was unsuccessful • Restart the computer. • Remove and reinstall the software. If there is an error message, see the User's Guide. • Make sure the MFP is set as the default printer and is done before sending the scan job. • To change the scanning resolution to a lower value: 1 From the control panel...
User's Guide
Page 3
... the parts of the MFP 17 Using the control panel buttons 20 Using the control panel menus 22 Navigating the control panel menus 22 Printing a list of menu items 22 Printing a network setup page (X342n only 22 Changing the default mode 24 Setting the Timeout option 24 Setting the network options (X342n only 25 Using the MFP software 26 Using Print Properties 26 Using Presto! PageManager (USB attach only 27 Using QLINK (USB attach only 27 Chapter 4: Loading paper and original documents 28 Loading paper in the paper tray 28 Loading paper in the manual feeder...
... the parts of the MFP 17 Using the control panel buttons 20 Using the control panel menus 22 Navigating the control panel menus 22 Printing a list of menu items 22 Printing a network setup page (X342n only 22 Changing the default mode 24 Setting the Timeout option 24 Setting the network options (X342n only 25 Using the MFP software 26 Using Print Properties 26 Using Presto! PageManager (USB attach only 27 Using QLINK (USB attach only 27 Chapter 4: Loading paper and original documents 28 Loading paper in the paper tray 28 Loading paper in the manual feeder...

User's Guide
Page 5
... Installing a toner cartridge 62 Redistributing toner ...63 Replacing the photoconductor 65 Cleaning the MFP ...67 Cleaning the scanner glass 67 Cleaning the outside of the MFP 67 Cleaning the inside of the MFP 68 Ordering supplies ...70 Recycling Lexmark products 70 Chapter 10: Troubleshooting 71 Setup troubleshooting ...72 Removing and reinstalling the drivers software 74 Jams and misfeeds troubleshooting 75 Clearing a paper jam 76 Print and copy troubleshooting 84 Print quality troubleshooting 85 Scan troubleshooting ...88 Fax troubleshooting ...89 Error messages troubleshooting...
... Installing a toner cartridge 62 Redistributing toner ...63 Replacing the photoconductor 65 Cleaning the MFP ...67 Cleaning the scanner glass 67 Cleaning the outside of the MFP 67 Cleaning the inside of the MFP 68 Ordering supplies ...70 Recycling Lexmark products 70 Chapter 10: Troubleshooting 71 Setup troubleshooting ...72 Removing and reinstalling the drivers software 74 Jams and misfeeds troubleshooting 75 Clearing a paper jam 76 Print and copy troubleshooting 84 Print quality troubleshooting 85 Scan troubleshooting ...88 Fax troubleshooting ...89 Error messages troubleshooting...
User's Guide
Page 7
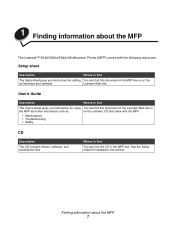
...; Troubleshooting • Safety CD Description The CD contains drivers, software, and publications files. Finding information about the MFP The Lexmark™ X340/X340n/X342n Multifunction Printer (MFP) comes with the following resources: Setup sheet Description Where to find The Setup sheet gives you instructions for using You can find this document in the MFP box. User's Guide Description Where to find The User's Guide gives you instructions for installation instructions. See the Setup sheet for setting...
...; Troubleshooting • Safety CD Description The CD contains drivers, software, and publications files. Finding information about the MFP The Lexmark™ X340/X340n/X342n Multifunction Printer (MFP) comes with the following resources: Setup sheet Description Where to find The Setup sheet gives you instructions for using You can find this document in the MFP box. User's Guide Description Where to find The User's Guide gives you instructions for installation instructions. See the Setup sheet for setting...
User's Guide
Page 12
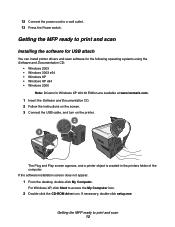
... Windows XP, click Start to print and scan Installing the software for USB attach You can install printer drivers and scan software for the following operating systems using the Software and Documentation CD: • Windows 2003 • Windows 2003 x64 • Windows XP • Windows XP x64 • Windows 2000 Note: Drivers for Windows XP x64 bit Edition are available at www.lexmark.com. 1 Insert the Software and Documentation CD. 2 Follow the instructions on the screen. 3 Connect the USB cable, and turn...
... Windows XP, click Start to print and scan Installing the software for USB attach You can install printer drivers and scan software for the following operating systems using the Software and Documentation CD: • Windows 2003 • Windows 2003 x64 • Windows XP • Windows XP x64 • Windows 2000 Note: Drivers for Windows XP x64 bit Edition are available at www.lexmark.com. 1 Insert the Software and Documentation CD. 2 Follow the instructions on the screen. 3 Connect the USB cable, and turn...
User's Guide
Page 13
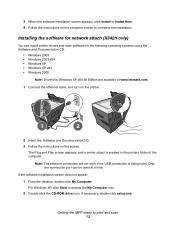
... one connection port can install printer drivers and scan software for the following operating systems using the Software and Documentation CD: • Windows 2003 • Windows 2003 x64 • Windows XP • Windows XP x64 • Windows 2000 Note: Drivers for network attach (X342n only) You can be used . Getting the MFP ready to access the My Computer icon. 2 Double-click the CD-ROM drive icon. Note: The ethernet connection will not work if the USB connection...
... one connection port can install printer drivers and scan software for the following operating systems using the Software and Documentation CD: • Windows 2003 • Windows 2003 x64 • Windows XP • Windows XP x64 • Windows 2000 Note: Drivers for network attach (X342n only) You can be used . Getting the MFP ready to access the My Computer icon. 2 Double-click the CD-ROM drive icon. Note: The ethernet connection will not work if the USB connection...
User's Guide
Page 17
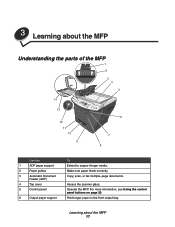
Learning about the MFP Understanding the parts of the MFP 1 2 3 4 5 14 13 12 11 10 9 6 7 8 Use the 1 ADF paper support 2 Paper guides 3 Automatic Document Feeder (ADF) 4 Top cover 5 Control panel 6 Output paper support To Extend to support longer media. Access the scanner glass. Operate the MFP. Hold longer paper in the front output tray. Copy, scan, or fax multiple-page documents. Make sure paper feeds correctly. 3 Learning about the MFP 17 For more information, see Using the control panel buttons on page 20.
Learning about the MFP Understanding the parts of the MFP 1 2 3 4 5 14 13 12 11 10 9 6 7 8 Use the 1 ADF paper support 2 Paper guides 3 Automatic Document Feeder (ADF) 4 Top cover 5 Control panel 6 Output paper support To Extend to support longer media. Access the scanner glass. Operate the MFP. Hold longer paper in the front output tray. Copy, scan, or fax multiple-page documents. Make sure paper feeds correctly. 3 Learning about the MFP 17 For more information, see Using the control panel buttons on page 20.
User's Guide
Page 21
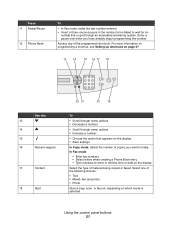
... menu options. • Decrease a number. • Scroll through an automated answering system. Using the control panel buttons 21 Select one of material being copied or faxed. Enter a pause only when you want to enter or edit the time or date on the display. Select the type of the following choices: • Text • Mixed-text and photo • Photo Start a copy, scan, or fax job, depending on which mode is selected. Access any of copies...
... menu options. • Decrease a number. • Scroll through an automated answering system. Using the control panel buttons 21 Select one of material being copied or faxed. Enter a pause only when you want to enter or edit the time or date on the display. Select the type of the following choices: • Text • Mixed-text and photo • Photo Start a copy, scan, or fax job, depending on which mode is selected. Access any of copies...
User's Guide
Page 23
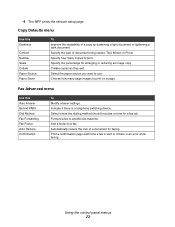
... fax machine. Add a footer to print on a page. Automatically reduce the size of document being copied: Text, Mixed, or Photo. Choose how many copies to print. Fax Advanced menu Use this Darkness Content Number Scale Collate Paper Source Paper Saver To Improve the readability of a copy by darkening a light document or lightening a dark document. 4 The MFP prints the network setup page. Using the control panel menus 23 Specify the type of a document for faxing. Print a confirmation page each time a fax is sent or if there is a telephone switching device...
... fax machine. Add a footer to print on a page. Automatically reduce the size of document being copied: Text, Mixed, or Photo. Choose how many copies to print. Fax Advanced menu Use this Darkness Content Number Scale Collate Paper Source Paper Saver To Improve the readability of a copy by darkening a light document or lightening a dark document. 4 The MFP prints the network setup page. Using the control panel menus 23 Specify the type of a document for faxing. Print a confirmation page each time a fax is sent or if there is a telephone switching device...
User's Guide
Page 24
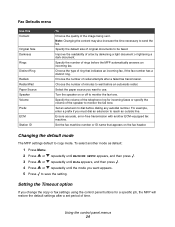
... line. Specify the volume of the telephone ring for a specific job, the MFP will restore the default settings after a failed fax transmission. For example, enter a prefix if you want to copy mode. Setting the Timeout option If you want appears. 5 Press to wait before an automatic redial. Select the paper source you change the copy or fax settings using the control panel buttons for incoming faxes or specify the volume of minutes to save...
... line. Specify the volume of the telephone ring for a specific job, the MFP will restore the default settings after a failed fax transmission. For example, enter a prefix if you want to copy mode. Setting the Timeout option If you want appears. 5 Press to wait before an automatic redial. Select the paper source you change the copy or fax settings using the control panel buttons for incoming faxes or specify the volume of minutes to save...
User's Guide
Page 59
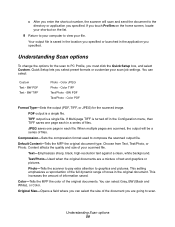
... saved. You can select: Custom Text - Original Size-Opens a field where you can select the size of the document you specified. c After you enter the shortcut number, the scanner will be a series of files. Understanding Scan options To change the options for the scanned image. BW PDF Text - Color JPEG Photo - TIFF output is a single file. Content affects the quality and size of the original documents. Understanding Scan options 59 Quick Setup lets you must click the Quick Setup...
... saved. You can select: Custom Text - Original Size-Opens a field where you can select the size of the document you specified. c After you enter the shortcut number, the scanner will be a series of files. Understanding Scan options To change the options for the scanned image. BW PDF Text - Color JPEG Photo - TIFF output is a single file. Content affects the quality and size of the original documents. Understanding Scan options 59 Quick Setup lets you must click the Quick Setup...

User's Guide
Page 88
... Removing and reinstalling the drivers software on hold or paused. 1 Click Start Æ Settings Æ Printers and Faxes or Printers. For more information, see Setting the paper type and size on the scanner glass. Scan troubleshooting Problem Scanner does not respond Scans very slowly Scan was unsuccessful. If there is an error message, see Scanning on page 91. Close all applications not in the tray. To change the scanning resolution to a lower value: 1 From the control panel, press Scan...
... Removing and reinstalling the drivers software on hold or paused. 1 Click Start Æ Settings Æ Printers and Faxes or Printers. For more information, see Setting the paper type and size on the scanner glass. Scan troubleshooting Problem Scanner does not respond Scans very slowly Scan was unsuccessful. If there is an error message, see Scanning on page 91. Close all applications not in the tray. To change the scanning resolution to a lower value: 1 From the control panel, press Scan...
User's Guide
Page 91
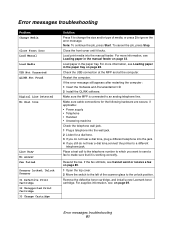
... a dial tone,connect the printer to an analog telephone line. Resend the fax. Error messages troubleshooting 91 Error messages troubleshooting Problem Change Media Close Front Door Load Manual Load Media USB Not Connected QLINK Not Found Digital Line Detected No dial tone Line Busy No answer Fax failed Scanner Locked, Unlock Scanner 31 Defective Print Cartridge 32 Unsupported Print Cartridge 33 Change Cartridge Solution Press 1 to change the size and/or type of the scanner glass to ignore the error message. To cancel the job, press Stop. Close the front cover...
... a dial tone,connect the printer to an analog telephone line. Resend the fax. Error messages troubleshooting 91 Error messages troubleshooting Problem Change Media Close Front Door Load Manual Load Media USB Not Connected QLINK Not Found Digital Line Detected No dial tone Line Busy No answer Fax failed Scanner Locked, Unlock Scanner 31 Defective Print Cartridge 32 Unsupported Print Cartridge 33 Change Cartridge Solution Press 1 to change the size and/or type of the scanner glass to ignore the error message. To cancel the job, press Stop. Close the front cover...
User's Guide
Page 92
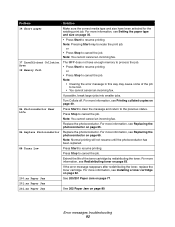
... fax. For more information, see Installing a toner cartridge on page 62. 200.xx Paper Jam See 200/201 Paper Jam on page 77. 201.xx Paper Jam 202.xx Paper Jam See 202 Paper Jam on page 40. 84 Photoconductor Near Life Press Start to clear the message and return to the previous status. or • Press Stop to cancel the job. Error messages troubleshooting 92 For more information, see Replacing the photoconductor on page 63. Problem Solution 34 Short paper Make...
... fax. For more information, see Installing a toner cartridge on page 62. 200.xx Paper Jam See 200/201 Paper Jam on page 77. 201.xx Paper Jam 202.xx Paper Jam See 202 Paper Jam on page 40. 84 Photoconductor Near Life Press Start to clear the message and return to the previous status. or • Press Stop to cancel the job. Error messages troubleshooting 92 For more information, see Replacing the photoconductor on page 63. Problem Solution 34 Short paper Make...
User's Guide
Page 103
... faxes 46 front cover 18 front output slot 18 I installing additional paper tray 11 control panel overlay 10 software 12, 13 J jams and misfeeds troubleshooting 75 K keypad, using 50 L labels 33 loading card stock 33 documents into the ADF 36 documents on the scanner glass 37 envelopes 33 labels 33 manual feeder 32 paper 28, 32 paper tray 28 transparencies 33 M menus, control panel Copy Defaults 23 Fax Advanced 23 Fax Defaults 24 MFP 84 mode, changing 24 N network setup 25 noise emission levels 100 O output location front output tray...
... faxes 46 front cover 18 front output slot 18 I installing additional paper tray 11 control panel overlay 10 software 12, 13 J jams and misfeeds troubleshooting 75 K keypad, using 50 L labels 33 loading card stock 33 documents into the ADF 36 documents on the scanner glass 37 envelopes 33 labels 33 manual feeder 32 paper 28, 32 paper tray 28 transparencies 33 M menus, control panel Copy Defaults 23 Fax Advanced 23 Fax Defaults 24 MFP 84 mode, changing 24 N network setup 25 noise emission levels 100 O output location front output tray...
User's Guide
Page 104
... removing software 74 toner cartridge 61 reports fax activity 47 Fax Call log 47 Fax Job log 47 menu 22 Phone Book 48 S safety information 2 Index scan troubleshooting 88 scanner glass cleaning 67 loading documents 37 scanning configuring additional applications 56 documents 55 from an application 56 options 59 using the computer 55 sending a fax at a scheduled time 44 automatically 43 manually 43 to a group (broadcast) 44 setting distinctive ring 49 paper size 35 paper type 35 Speed Dial 47 shortcuts setting up 47 using 48 software installing...
... removing software 74 toner cartridge 61 reports fax activity 47 Fax Call log 47 Fax Job log 47 menu 22 Phone Book 48 S safety information 2 Index scan troubleshooting 88 scanner glass cleaning 67 loading documents 37 scanning configuring additional applications 56 documents 55 from an application 56 options 59 using the computer 55 sending a fax at a scheduled time 44 automatically 43 manually 43 to a group (broadcast) 44 setting distinctive ring 49 paper size 35 paper type 35 Speed Dial 47 shortcuts setting up 47 using 48 software installing...


