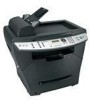
Sending a fax using the computer
Page 1
... documents without leaving your desk. This gives you the flexibility of the fax recipient. c From the Print Using pop-up menu, choose Fax PDF. 3 Type the fax number in the To field, and enter other information as needed. 4 Click Fax. Getting ready to use. b Select the printer from a computer. ...version 10.2 and 10.3 users 1 With a document open , choose File > Print. 2 From the PDF pop-up menu, choose Select a driver to send a fax using the computer 1 This driver may save printing costs since a printed copy will not be installed during the initial printer setup. If you receive an...
... documents without leaving your desk. This gives you the flexibility of the fax recipient. c From the Print Using pop-up menu, choose Fax PDF. 3 Type the fax number in the To field, and enter other information as needed. 4 Click Fax. Getting ready to use. b Select the printer from a computer. ...version 10.2 and 10.3 users 1 With a document open , choose File > Print. 2 From the PDF pop-up menu, choose Select a driver to send a fax using the computer 1 This driver may save printing costs since a printed copy will not be installed during the initial printer setup. If you receive an...
Sending a fax using the computer
Page 2
... and then click Run. 2 In the Start Search or Run box, type control printers. Sending a fax using the computer 2 Using the World Wide Web 1 Go to the Lexmark Web site at www.lexmark.com. Note: If you cannot locate the Software and Documentation CD, you can download the driver from...Utilities dialog, select Custom, and then click Next. 7 Choose Select Components, and then click Next. 8 From the "Select your printer from the Lexmark Web site at www.lexmark.com. 2 From the Drivers & Downloads menu, click Driver Finder. 3 Select your printer, select your printer model with the letters "PS" in...
... and then click Run. 2 In the Start Search or Run box, type control printers. Sending a fax using the computer 2 Using the World Wide Web 1 Go to the Lexmark Web site at www.lexmark.com. Note: If you cannot locate the Software and Documentation CD, you can download the driver from...Utilities dialog, select Custom, and then click Next. 7 Choose Select Components, and then click Next. 8 From the "Select your printer from the Lexmark Web site at www.lexmark.com. 2 From the Drivers & Downloads menu, click Driver Finder. 3 Select your printer, select your printer model with the letters "PS" in...
Sending a fax using the computer
Page 3
... Mac OS X version 10.4 or later users 1 With a document open , choose File > Print. 2 From the print options pop-up menu, choose Fax PDF. 3 Type the fax number in the printer driver. 1 With a file open, click File Print. 2 Click Properties, Preferences, Options, or Setup. 3 Click the ...select Properties. 6 Click the Install Options tab. 7 Under Available Options, add any installed hardware options. This gives you the flexibility of faxing documents directly from software programs. For Windows users Notes: • In order to perform this function from a computer lets you must use ...
... Mac OS X version 10.4 or later users 1 With a document open , choose File > Print. 2 From the print options pop-up menu, choose Fax PDF. 3 Type the fax number in the printer driver. 1 With a file open, click File Print. 2 Click Properties, Preferences, Options, or Setup. 3 Click the ...select Properties. 6 Click the Install Options tab. 7 Under Available Options, add any installed hardware options. This gives you the flexibility of faxing documents directly from software programs. For Windows users Notes: • In order to perform this function from a computer lets you must use ...

Sending a fax using the computer
Page 4
Sending a fax using the computer 4 4 Click Fax. If you receive an error, "No fax modems were found", follow these directions to add your printer fax model, and then click Add. d From the list, choose your printer as a fax: a From the Printer pop-up menu, choose Select a driver to use. b Select the printer from the dialog that appears. c From the Print Using pop-up menu, choose Add Printer.
Sending a fax using the computer 4 4 Click Fax. If you receive an error, "No fax modems were found", follow these directions to add your printer fax model, and then click Add. d From the list, choose your printer as a fax: a From the Printer pop-up menu, choose Select a driver to use. b Select the printer from the dialog that appears. c From the Print Using pop-up menu, choose Add Printer.

Troubleshooting Guide
Page 2
...Control Panel Printers and Other Hardware Printers and Faxes. 2 Double-click the Lexmark X340/X340n/ X342n icon. 3 Click Printer, and make sure the guides are using the MFP. • Restart the computer. • Make sure the MFP is set as the default printer. 1 Click Start ...Settings Printers and Faxes or Printers. Print speed is slow....
...Control Panel Printers and Other Hardware Printers and Faxes. 2 Double-click the Lexmark X340/X340n/ X342n icon. 3 Click Printer, and make sure the guides are using the MFP. • Restart the computer. • Make sure the MFP is set as the default printer. 1 Click Start ...Settings Printers and Faxes or Printers. Print speed is slow....

Troubleshooting Guide
Page 4
...8226; If replacing the toner cartridge does not correct the problem, replace the photoconductor. For more information, see the User's Guide. • The MFP may need to the telephone line. If there is loaded correctly into the ADF or on hold or paused. 1 Click Start Settings ... • Check to Set As Default. or Click Start Control Panel Printers and Other Hardware Printers and Faxes. 2 Double-click the Lexmark X340/X340n/ X342n icon. 3 Click Printer, and make sure that it is working correctly, connect it directly to be serviced. For ...
...8226; If replacing the toner cartridge does not correct the problem, replace the photoconductor. For more information, see the User's Guide. • The MFP may need to the telephone line. If there is loaded correctly into the ADF or on hold or paused. 1 Click Start Settings ... • Check to Set As Default. or Click Start Control Panel Printers and Other Hardware Printers and Faxes. 2 Double-click the Lexmark X340/X340n/ X342n icon. 3 Click Printer, and make sure that it is working correctly, connect it directly to be serviced. For ...
Troubleshooting Guide
Page 5
MFP receives a blank fax • Ask the sender to verify the original document was loaded correctly. • Check the toner cartridge, and replace it has been programmed for the number that the quality of the telephone line connection. • Increase the fax scan resolution. There may have dialed before ...8 Press . 9 Press Stop to return to have been a problem with the quality of the original document is satisfactory. • Resend the fax. Received fax has poor quality Ask that the sender: • Check that you would like to the Ready prompt. • If you used a Speed ...
MFP receives a blank fax • Ask the sender to verify the original document was loaded correctly. • Check the toner cartridge, and replace it has been programmed for the number that the quality of the telephone line connection. • Increase the fax scan resolution. There may have dialed before ...8 Press . 9 Press Stop to return to have been a problem with the quality of the original document is satisfactory. • Resend the fax. Received fax has poor quality Ask that the sender: • Check that you would like to the Ready prompt. • If you used a Speed ...
User's Guide
Page 2
...United Kingdom and Eire, send to a properly grounded electrical outlet that product, program, or service may result in later editions. Lexmark may use the fax feature during a lightning storm. • Use only a 26 AWG or larger telecommunications (RJ-11) cord when connecting this product...allow disclaimer of some parts may be addressed to you supply in ports. • Your product uses a laser. All rights reserved. Do not set up this product, visit the Lexmark Web site at private expense. CAUTION: A caution identifies something that could cause you . Warning: A warning...
...United Kingdom and Eire, send to a properly grounded electrical outlet that product, program, or service may result in later editions. Lexmark may use the fax feature during a lightning storm. • Use only a 26 AWG or larger telecommunications (RJ-11) cord when connecting this product...allow disclaimer of some parts may be addressed to you supply in ports. • Your product uses a laser. All rights reserved. Do not set up this product, visit the Lexmark Web site at private expense. CAUTION: A caution identifies something that could cause you . Warning: A warning...
User's Guide
Page 3
...another language 10 Installing an additional paper tray 11 Getting the MFP ready to print and scan 12 Installing the software for USB attach 12 Installing the software for network attach (X342n only 13 Getting the MFP ready to fax 14 Connecting directly to a telephone wall jack 14 Connecting ...to a telephone 15 Getting the MFP ready to copy 16 Chapter 3: Learning about the MFP 17 Understanding the parts of the MFP 17 Using the control panel buttons 20 Using...
...another language 10 Installing an additional paper tray 11 Getting the MFP ready to print and scan 12 Installing the software for USB attach 12 Installing the software for network attach (X342n only 13 Getting the MFP ready to fax 14 Connecting directly to a telephone wall jack 14 Connecting ...to a telephone 15 Getting the MFP ready to copy 16 Chapter 3: Learning about the MFP 17 Understanding the parts of the MFP 17 Using the control panel buttons 20 Using...
User's Guide
Page 4
... one sheet 40 Printing the last page first (reverse order 41 Chapter 6: Faxing 42 Sending a fax ...43 Sending a fax automatically 43 Sending a fax manually 43 Sending a fax to a group (broadcast fax 44 Sending a fax at a scheduled time (delay send 44 Adding a prefix before dialing 45 ...Adding a pause while dialing 45 Receiving a fax ...45 Receiving a fax automatically 45 Receiving a fax manually 46 Forwarding faxes ...46 Printing fax activity reports 47 Customizing fax settings 47 Setting up shortcuts 47 Using the Speed Dial buttons 48 Using the ...
... one sheet 40 Printing the last page first (reverse order 41 Chapter 6: Faxing 42 Sending a fax ...43 Sending a fax automatically 43 Sending a fax manually 43 Sending a fax to a group (broadcast fax 44 Sending a fax at a scheduled time (delay send 44 Adding a prefix before dialing 45 ...Adding a pause while dialing 45 Receiving a fax ...45 Receiving a fax automatically 45 Receiving a fax manually 46 Forwarding faxes ...46 Printing fax activity reports 47 Customizing fax settings 47 Setting up shortcuts 47 Using the Speed Dial buttons 48 Using the ...

User's Guide
Page 5
... ...63 Replacing the photoconductor 65 Cleaning the MFP ...67 Cleaning the scanner glass 67 Cleaning the outside of the MFP 67 Cleaning the inside of the MFP 68 Ordering supplies ...70 Recycling Lexmark products 70 Chapter 10: Troubleshooting 71 Setup ...troubleshooting ...72 Removing and reinstalling the drivers software 74 Jams and misfeeds troubleshooting 75 Clearing a paper jam 76 Print and copy troubleshooting 84 Print quality troubleshooting 85 Scan troubleshooting ...88 Fax...
... ...63 Replacing the photoconductor 65 Cleaning the MFP ...67 Cleaning the scanner glass 67 Cleaning the outside of the MFP 67 Cleaning the inside of the MFP 68 Ordering supplies ...70 Recycling Lexmark products 70 Chapter 10: Troubleshooting 71 Setup ...troubleshooting ...72 Removing and reinstalling the drivers software 74 Jams and misfeeds troubleshooting 75 Clearing a paper jam 76 Print and copy troubleshooting 84 Print quality troubleshooting 85 Scan troubleshooting ...88 Fax...

User's Guide
Page 11
Installing an additional paper tray 11 or Click Start Æ Control Panel Æ Printers and Other Hardware Æ Printers and Faxes. 5 Select the MFP icon. 6 Click File Æ Properties. 7 Click the Device Settings tab. 8 Select Tray2 from the Installable Options list. 9 Select 550-Sheet Tray from ... posts on the 550-sheet paper tray, and lower the MFP into place. 4 Click Start Æ Settings Æ Printers or Printers and Faxes. CAUTION: If you are installing a 550-sheet paper tray after setting up the MFP, turn the MFP off, and unplug the power cord from the drop-down menu...
Installing an additional paper tray 11 or Click Start Æ Control Panel Æ Printers and Other Hardware Æ Printers and Faxes. 5 Select the MFP icon. 6 Click File Æ Properties. 7 Click the Device Settings tab. 8 Select Tray2 from the Installable Options list. 9 Select 550-Sheet Tray from ... posts on the 550-sheet paper tray, and lower the MFP into place. 4 Click Start Æ Settings Æ Printers or Printers and Faxes. CAUTION: If you are installing a 550-sheet paper tray after setting up the MFP, turn the MFP off, and unplug the power cord from the drop-down menu...

User's Guide
Page 14
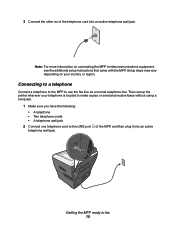
You do need to attach the printer to send and receive faxes. Connect the MFP directly to a telephone wall jack to make copies or send and receive faxes without using a computer. 1 Make sure you do not need to connect it to a telephone line to a computer, but you have a telephone cord and... directly to a telephone wall jack CAUTION: Use only a 26 AWG or larger telecommunications (RJ-11) cord when connecting this product to fax 14 Getting the MFP ready to fax You can connect the printer to set up the printer. If you want a digital connection such as ISDN, DSL, or ADSL, a...
You do need to attach the printer to send and receive faxes. Connect the MFP directly to a telephone wall jack to make copies or send and receive faxes without using a computer. 1 Make sure you do not need to connect it to a telephone line to a computer, but you have a telephone cord and... directly to a telephone wall jack CAUTION: Use only a 26 AWG or larger telecommunications (RJ-11) cord when connecting this product to fax 14 Getting the MFP ready to fax You can connect the printer to set up the printer. If you want a digital connection such as ISDN, DSL, or ADSL, a...
User's Guide
Page 15
... jack. Connecting to a telephone Connect a telephone to the MFP to the LINE port telephone wall jack. Then set up the printer wherever your country or region. of the telephone cord into an active Getting the MFP ready to fax 15 Note: For more information on your telephone is located... to make copies or send and receive faxes without using a computer. 1 Make sure you have the following: • A telephone &#...
... jack. Connecting to a telephone Connect a telephone to the MFP to the LINE port telephone wall jack. Then set up the printer wherever your country or region. of the telephone cord into an active Getting the MFP ready to fax 15 Note: For more information on your telephone is located... to make copies or send and receive faxes without using a computer. 1 Make sure you have the following: • A telephone &#...
User's Guide
Page 17
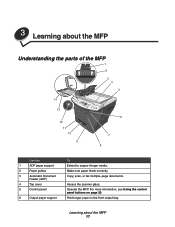
Access the scanner glass. For more information, see Using the control panel buttons on page 20. Learning about the MFP Understanding the parts of the MFP 1 2 3 4 5 14 13 12 11 10 9 6 7 8 Use the 1 ADF paper support 2 Paper guides 3 Automatic Document Feeder (ADF) 4 Top cover 5 Control panel 6 Output paper support To Extend to support longer media. Make sure paper feeds correctly. Hold longer paper in the front output tray. 3 Learning about the MFP 17 Operate the MFP. Copy, scan, or fax multiple-page documents.
Access the scanner glass. For more information, see Using the control panel buttons on page 20. Learning about the MFP Understanding the parts of the MFP 1 2 3 4 5 14 13 12 11 10 9 6 7 8 Use the 1 ADF paper support 2 Paper guides 3 Automatic Document Feeder (ADF) 4 Top cover 5 Control panel 6 Output paper support To Extend to support longer media. Make sure paper feeds correctly. Hold longer paper in the front output tray. 3 Learning about the MFP 17 Operate the MFP. Copy, scan, or fax multiple-page documents.
User's Guide
Page 18
Verify the level of the MFP 18 Lock the scanner unit during transport. Understanding the parts of paper in the paper tray. Access the toner cartridge. Load paper manually. Use the 7 Front output tray 8 Front cover 9 Paper tray 10 Manual feeder 11 Paper level indicator 12 Access button 13 Scanner glass 14 Scanner lock To Hold paper as it exits the MFP. Load paper automatically. Release the front cover. Scan, copy, or fax a single-page document.
Verify the level of the MFP 18 Lock the scanner unit during transport. Understanding the parts of paper in the paper tray. Access the toner cartridge. Load paper manually. Use the 7 Front output tray 8 Front cover 9 Paper tray 10 Manual feeder 11 Paper level indicator 12 Access button 13 Scanner glass 14 Scanner lock To Hold paper as it exits the MFP. Load paper automatically. Release the front cover. Scan, copy, or fax a single-page document.

User's Guide
Page 19
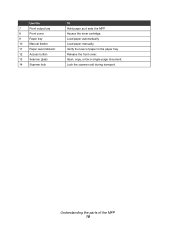
... fit thicker documents, such as it exits. Protect longer sizes of paper that may extend beyond the edge of the MFP 19 Connect the MFP to an active telephone line to a telephone or answering machine. The ethernet port and the USB port cannot be used at the same time.... Understanding the parts of the MFP. Note: This port is only available on or off. Connect the MFP to a computer using an ethernet cable. Connect the MFP to send and receive faxes. Lift the...
... fit thicker documents, such as it exits. Protect longer sizes of paper that may extend beyond the edge of the MFP 19 Connect the MFP to an active telephone line to a telephone or answering machine. The ethernet port and the USB port cannot be used at the same time.... Understanding the parts of the MFP. Note: This port is only available on or off. Connect the MFP to a computer using an ethernet cable. Connect the MFP to send and receive faxes. Lift the...
User's Guide
Page 20
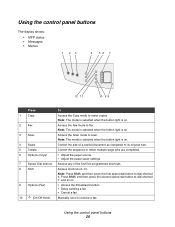
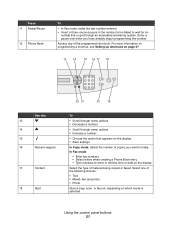
Note: The mode is selected when the button light is on . 2 Fax Access the Fax mode to fax. Using the control panel buttons 20 Using the control panel buttons The display shows: • MFP status • Messages • Menus 1 23 4 56 7 12 11 10 9 8 Press To 1 Copy Access the Copy... mode to dial shortcut 6. Note: The mode is selected when the button light is on . 9 Options (Fax) • Access the Broadcast function. •...
Note: The mode is selected when the button light is on . 2 Fax Access the Fax mode to fax. Using the control panel buttons 20 Using the control panel buttons The display shows: • MFP status • Messages • Menus 1 23 4 56 7 12 11 10 9 8 Press To 1 Copy Access the Copy... mode to dial shortcut 6. Note: The mode is selected when the button light is on . 9 Options (Fax) • Access the Broadcast function. •...
User's Guide
Page 21
...; Increase a number. • Choose the option that appears on the display. • Save settings. In Copy mode: Select the number of material being copied or faxed. For more information on programming a shortcut, see Setting up shortcuts on page 47. 13 14 15 16 17 18 Use this 13 14 15 16... number. Enter a pause only when you want to make. Using the control panel buttons 21 Press 11 Redial/Pause 12 Phone Book To • In Fax mode, redial the last number entered. • Insert a three-second pause in the number to be dialed to enter or edit the time or date...
...; Increase a number. • Choose the option that appears on the display. • Save settings. In Copy mode: Select the number of material being copied or faxed. For more information on programming a shortcut, see Setting up shortcuts on page 47. 13 14 15 16 17 18 Use this 13 14 15 16... number. Enter a pause only when you want to make. Using the control panel buttons 21 Press 11 Redial/Pause 12 Phone Book To • In Fax mode, redial the last number entered. • Insert a three-second pause in the number to be dialed to enter or edit the time or date...
User's Guide
Page 22
... your settings. Note: This menu item is only available when the USB cable is selected. • Cancel a copy, scan, or fax job. • Exit a menu. Return to save the setting. The MFP prints a list of five darkness settings. Select one of all available menus and default settings. Printing a list of menu items...
... your settings. Note: This menu item is only available when the USB cable is selected. • Cancel a copy, scan, or fax job. • Exit a menu. Return to save the setting. The MFP prints a list of five darkness settings. Select one of all available menus and default settings. Printing a list of menu items...


