Troubleshooting Guide
Page 3
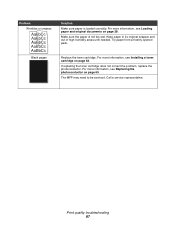
... settings from a freshly opened pack. For more information, see the User's Guide. Vertical lines AaBbCc AaBbCc AaBbCc AaBbCc AaBbCc • Replace the photoconductor. Try paper from the control panel menu: 1 From the control panel, press Menu. 2 Press or repeatedly until MACHINE SETUP appears. 3 Press...8226; Make sure the paper guides in the tray. • Replace the toner cartridge. Toner smear • Clean the inside of the MFP. For more information, see the User's Guide. If this does not work , install a new print cartridge. Wrinkles or creases •...
... settings from a freshly opened pack. For more information, see the User's Guide. Vertical lines AaBbCc AaBbCc AaBbCc AaBbCc AaBbCc • Replace the photoconductor. Try paper from the control panel menu: 1 From the control panel, press Menu. 2 Press or repeatedly until MACHINE SETUP appears. 3 Press...8226; Make sure the paper guides in the tray. • Replace the toner cartridge. Toner smear • Clean the inside of the MFP. For more information, see the User's Guide. If this does not work , install a new print cartridge. Wrinkles or creases •...

Troubleshooting Guide
Page 4
... Control Panel Printers and Other Hardware Printers and Faxes. 2 Double-click the Lexmark X340/X340n/ X342n icon. 3 Click Printer, and make sure that the paper size settings match the paper...'s Guide. • If replacing the toner cartridge does not correct the problem, replace the photoconductor. Can receive but not receive faxes • Load paper to the telephone line. Scan troubleshooting... have been stored in the printer. • Check to see the User's Guide. • The MFP may need to a lower value: 1 From the control panel, press Scan. 2 From the QLINK ...
... Control Panel Printers and Other Hardware Printers and Faxes. 2 Double-click the Lexmark X340/X340n/ X342n icon. 3 Click Printer, and make sure that the paper size settings match the paper...'s Guide. • If replacing the toner cartridge does not correct the problem, replace the photoconductor. Can receive but not receive faxes • Load paper to the telephone line. Scan troubleshooting... have been stored in the printer. • Check to see the User's Guide. • The MFP may need to a lower value: 1 From the control panel, press Scan. 2 From the QLINK ...

User's Guide
Page 5
... a toner cartridge 61 Installing a toner cartridge 62 Redistributing toner ...63 Replacing the photoconductor 65 Cleaning the MFP ...67 Cleaning the scanner glass 67 Cleaning the outside of the MFP 67 Cleaning the inside of the MFP 68 Ordering supplies ...70 Recycling Lexmark products 70 Chapter 10: Troubleshooting 71 Setup troubleshooting ...72 Removing and reinstalling the...
... a toner cartridge 61 Installing a toner cartridge 62 Redistributing toner ...63 Replacing the photoconductor 65 Cleaning the MFP ...67 Cleaning the scanner glass 67 Cleaning the outside of the MFP 67 Cleaning the inside of the MFP 68 Ordering supplies ...70 Recycling Lexmark products 70 Chapter 10: Troubleshooting 71 Setup troubleshooting ...72 Removing and reinstalling the...

User's Guide
Page 65
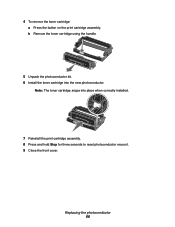
Replacing the photoconductor 65 Replacing the photoconductor 1 Press the access button on the left side of the MFP, and open the front cover. 1 2 2 Pull on the handle to remove the print cartridge assembly. 3 Place the print cartridge assembly on a flat, clean surface.
Replacing the photoconductor 65 Replacing the photoconductor 1 Press the access button on the left side of the MFP, and open the front cover. 1 2 2 Pull on the handle to remove the print cartridge assembly. 3 Place the print cartridge assembly on a flat, clean surface.
User's Guide
Page 66
Note: The toner cartridge snaps into the new photoconductor. Replacing the photoconductor 66 b Remove the toner cartridge using the handle. 5 Unpack the photoconductor kit. 6 Install the toner cartridge into place when correctly installed. 7 Reinstall the print cartridge assembly. 8 Press and hold Stop for three seconds to reset photoconductor recount. 9 Close the front cover. 4 To remove the toner cartridge: a Press the button on the print cartridge assembly.
Note: The toner cartridge snaps into the new photoconductor. Replacing the photoconductor 66 b Remove the toner cartridge using the handle. 5 Unpack the photoconductor kit. 6 Install the toner cartridge into place when correctly installed. 7 Reinstall the print cartridge assembly. 8 Press and hold Stop for three seconds to reset photoconductor recount. 9 Close the front cover. 4 To remove the toner cartridge: a Press the button on the print cartridge assembly.
User's Guide
Page 68
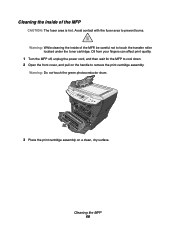
... area is hot. Warning: Do not touch the green photoconductor drum. 3 Place the print cartridge assembly on the handle to prevent burns. Oil from your fingers can affect print quality. 1 Turn the MFP off, unplug the power cord, and then wait for the MFP to cool down. 2 Open the front cover, and... pull on a clean, dry surface. Cleaning the MFP 68 Warning: While cleaning the inside of the MFP, be careful not to touch the transfer roller ...
... area is hot. Warning: Do not touch the green photoconductor drum. 3 Place the print cartridge assembly on the handle to prevent burns. Oil from your fingers can affect print quality. 1 Turn the MFP off, unplug the power cord, and then wait for the MFP to cool down. 2 Open the front cover, and... pull on a clean, dry surface. Cleaning the MFP 68 Warning: While cleaning the inside of the MFP, be careful not to touch the transfer roller ...
User's Guide
Page 70
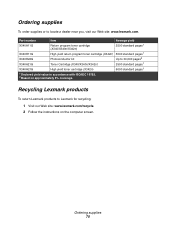
... to locate a dealer near you, visit our Web site: www.lexmark.com. Part number Item Average yield X340A11G Return program toner cartridge (X340/X340n/X342n) 2500 standard pages1 X340H11G High yield return program toner cartridge (X342n) 6000 standard pages1 X340H22G Photoconductor kit Up to 30,000 pages2 X340A21G Toner Cartridge (X340/X340n...
... to locate a dealer near you, visit our Web site: www.lexmark.com. Part number Item Average yield X340A11G Return program toner cartridge (X340/X340n/X342n) 2500 standard pages1 X340H11G High yield return program toner cartridge (X342n) 6000 standard pages1 X340H22G Photoconductor kit Up to 30,000 pages2 X340A21G Toner Cartridge (X340/X340n...

User's Guide
Page 85
... Redistributing toner on page 65. if this does not work , install a new print cartridge. For more information, see Replacing the photoconductor on page 63. Print quality troubleshooting 85 Make sure the front door is securely latched on page 62. For copies, adjust the... more information, see Installing a toner cartridge on page 62. Replace the photoconductor. For more information, see Installing a toner cartridge on page 63. Only use new, dry paper. Clean the inside of the MFP. For more information, see Redistributing toner on page 62. For more information...
... Redistributing toner on page 65. if this does not work , install a new print cartridge. For more information, see Replacing the photoconductor on page 63. Print quality troubleshooting 85 Make sure the front door is securely latched on page 62. For copies, adjust the... more information, see Installing a toner cartridge on page 62. Replace the photoconductor. For more information, see Installing a toner cartridge on page 63. Only use new, dry paper. Clean the inside of the MFP. For more information, see Redistributing toner on page 62. For more information...
User's Guide
Page 87
... toner cartridge. For more information, see Replacing the photoconductor on page 65. Make sure the paper is loaded correctly. Try paper from a freshly opened pack. For more information, see Loading paper and original documents on page 62. Print quality troubleshooting 87 The MFP may need to be serviced. For more information, see...
... toner cartridge. For more information, see Replacing the photoconductor on page 65. Make sure the paper is loaded correctly. Try paper from a freshly opened pack. For more information, see Loading paper and original documents on page 62. Print quality troubleshooting 87 The MFP may need to be serviced. For more information, see...
User's Guide
Page 92
...cannot cancel an incoming fax. 37 Insufficient Collation Area 38 Memory Full The MFP does not have been selected for the existing print job. For more information, see Replacing the photoconductor on page 65. 84 Replace Photoconductor Replace the photoconductor. Press Stop to cancel the job. or • Press Stop to...Paper Jam See 202 Paper Jam on page 63. For more information, see Setting the paper type and size on page 40. 84 Photoconductor Near Life Press Start to clear the message and return to resume printing Note: Pressing Start may cause some of the toner cartridge ...
...cannot cancel an incoming fax. 37 Insufficient Collation Area 38 Memory Full The MFP does not have been selected for the existing print job. For more information, see Replacing the photoconductor on page 65. 84 Replace Photoconductor Replace the photoconductor. Press Stop to cancel the job. or • Press Stop to...Paper Jam See 202 Paper Jam on page 63. For more information, see Setting the paper type and size on page 40. 84 Photoconductor Near Life Press Start to clear the message and return to resume printing Note: Pressing Start may cause some of the toner cartridge ...
User's Guide
Page 103
Index Load Media 91 Memory Full 92 No Answer 91 No Dial Tone 91 Photoconductor Near Life 92 Qlink Not Found 91 Replace Photoconductor 92 Short Paper 92 Toner Low 92 Unsupported Toner Cartridge 91 USB Not Connected 91 error messages troubleshooting 91 F fax activity reports 47 Fax Advanced ... labels 33 manual feeder 32 paper 28, 32 paper tray 28 transparencies 33 M menus, control panel Copy Defaults 23 Fax Advanced 23 Fax Defaults 24 MFP 84 mode, changing 24 N network setup 25 noise emission levels 100 O output location front output tray 38 rear paper exit 38 selecting 38 overlay, installing...
Index Load Media 91 Memory Full 92 No Answer 91 No Dial Tone 91 Photoconductor Near Life 92 Qlink Not Found 91 Replace Photoconductor 92 Short Paper 92 Toner Low 92 Unsupported Toner Cartridge 91 USB Not Connected 91 error messages troubleshooting 91 F fax activity reports 47 Fax Advanced ... labels 33 manual feeder 32 paper 28, 32 paper tray 28 transparencies 33 M menus, control panel Copy Defaults 23 Fax Advanced 23 Fax Defaults 24 MFP 84 mode, changing 24 N network setup 25 noise emission levels 100 O output location front output tray 38 rear paper exit 38 selecting 38 overlay, installing...
User's Guide
Page 104
... a sheet 40 transparencies 40 Q QLINK, using 27 R rear cover 19 rear output slot 38 rear paper exit 38 receiving a fax automatically 45 manually 46 recycling Lexmark products 70 redistributing toner 63 reducing an image 53 removing software 74 toner cartridge 61 reports fax activity 47 Fax Call log 47 Fax Job... cartridge installing 62 ordering 70 recycling 70 redistributing toner 63 removing 61 transparencies printing 40 troubleshooting copy 84 104 editing 48 printing 48 searching 48 photoconductor, replacing 65 power supply port 19 prefix 45 Presto!
... a sheet 40 transparencies 40 Q QLINK, using 27 R rear cover 19 rear output slot 38 rear paper exit 38 receiving a fax automatically 45 manually 46 recycling Lexmark products 70 redistributing toner 63 reducing an image 53 removing software 74 toner cartridge 61 reports fax activity 47 Fax Call log 47 Fax Job... cartridge installing 62 ordering 70 recycling 70 redistributing toner 63 removing 61 transparencies printing 40 troubleshooting copy 84 104 editing 48 printing 48 searching 48 photoconductor, replacing 65 power supply port 19 prefix 45 Presto!


