
Owners Manual
Page 1
... and serial number of power-saving guidelines issued by the U.S. P/NO : 38289U0559C (0601-REV00) Printed in Korea LCD TV OWNER'S MANUAL MODELS: 15LC1R * 20LC1R * Internet Home Page : http://www.lge.com http://www.lg.ca ENERGYSATR is a set of the set . See the label attached on the back cover and quote this...
... and serial number of power-saving guidelines issued by the U.S. P/NO : 38289U0559C (0601-REV00) Printed in Korea LCD TV OWNER'S MANUAL MODELS: 15LC1R * 20LC1R * Internet Home Page : http://www.lge.com http://www.lg.ca ENERGYSATR is a set of the set . See the label attached on the back cover and quote this...
Owners Manual
Page 2
...party responsible for compliance could void the user's authority to operate the equipment. U.S.A. REFER TO QUALIFIED SERVICE PERSONNEL. However, there is : LG Electronics U.S.A., Inc. 1000 Sylvan Avenue, Englewood Cliffs, NJ 07632 Phone: 1-201-816-2000 http://us.lge.com 2 Increase the separation ...as close to persons. The code provides guidelines for this product in any way without written authorization from LG Electronics Corporation. Consult the dealer or an experienced radio/TV technician for a Class B digital device, pursuant to Article 820-40 of the FCC Rules. REGULATORY...
...party responsible for compliance could void the user's authority to operate the equipment. U.S.A. REFER TO QUALIFIED SERVICE PERSONNEL. However, there is : LG Electronics U.S.A., Inc. 1000 Sylvan Avenue, Englewood Cliffs, NJ 07632 Phone: 1-201-816-2000 http://us.lge.com 2 Increase the separation ...as close to persons. The code provides guidelines for this product in any way without written authorization from LG Electronics Corporation. Consult the dealer or an experienced radio/TV technician for a Class B digital device, pursuant to Article 820-40 of the FCC Rules. REGULATORY...
Owners Manual
Page 4
... may be a small "flicker" when when it for long periods of this product with an exact replacement part by the manufacturer, or sold with TV. - If the TV feels cold to the regulations of mercury. Avoid touching the LCD screen or holding your local authority. 4 Overloaded wall outlets, loose or damaged wall...
... may be a small "flicker" when when it for long periods of this product with an exact replacement part by the manufacturer, or sold with TV. - If the TV feels cold to the regulations of mercury. Avoid touching the LCD screen or holding your local authority. 4 Overloaded wall outlets, loose or damaged wall...
Owners Manual
Page 5
... product doesn't fall over 12 External Equipment Connections . .13~16 Antenna Connection 13 VCR Setup 14 Cable TV Setup 14 External A/V Source Setup 15 DVD Setup 15 DTV Setup 16 PC Setup 16 Operation TV Operation Overview 17 Menu Language Selection 17 Channel Menu Options Memorizing the Channels with EZ Scan . .18...
... product doesn't fall over 12 External Equipment Connections . .13~16 Antenna Connection 13 VCR Setup 14 Cable TV Setup 14 External A/V Source Setup 15 DVD Setup 15 DTV Setup 16 PC Setup 16 Operation TV Operation Overview 17 Menu Language Selection 17 Channel Menu Options Memorizing the Channels with EZ Scan . .18...
Owners Manual
Page 6
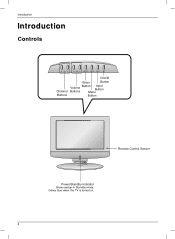
Introduction Introduction Controls CH VOL ENTER MENU INPUT /I On/Off Enter Button Channel Volume Buttons Button Input Button Menu Buttons Button Remote Control Sensor Power/Standby Indicator Glows amber in Standby mode, Glows blue when the TV is turned on. 6
Introduction Introduction Controls CH VOL ENTER MENU INPUT /I On/Off Enter Button Channel Volume Buttons Button Input Button Menu Buttons Button Remote Control Sensor Power/Standby Indicator Glows amber in Standby mode, Glows blue when the TV is turned on. 6
Owners Manual
Page 8
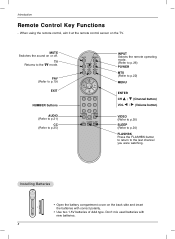
... the last channel you were watching. Installing Batteries • Open the battery compartment cover on the TV. Introduction Remote Control Key Functions - Don't mix used batteries with correct polarity. • Use two 1.5V batteries of AAA type. When using the remote control, ...) MENU ENTER CH D / E (Channel button) VOL F / G (Volume button) VIDEO (Refer to p.20) SLEEP (Refer to p.24) FLASHBK Press the FLASHBK button to return to the TV mode. MUTE Switches the sound on or off.
... the last channel you were watching. Installing Batteries • Open the battery compartment cover on the TV. Introduction Remote Control Key Functions - Don't mix used batteries with correct polarity. • Use two 1.5V batteries of AAA type. When using the remote control, ...) MENU ENTER CH D / E (Channel button) VOL F / G (Volume button) VIDEO (Refer to p.20) SLEEP (Refer to p.24) FLASHBK Press the FLASHBK button to return to the TV mode. MUTE Switches the sound on or off.
Owners Manual
Page 9
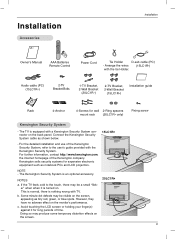
...System cable as notebook PCs and LCD projectors. If the TV feels cold to the user's guide provided with the tie Holder. (15LC1R*) Audio cable (PC) (15LC1R*) 2-TV Bracket Bolts 1-TV Bracket, 2-Wall Bracket (20LC1R*) 2-TV Bracket, 2-Wall Bracket (15LC1R*) Installation guide Rack 4-Anchor...wall 2-Ring spacers mount rack (20LC1R* only) Fixing screw Kensington Security System - This is normal, there is equipped with TV. b. Avoid touching the LCD screen or holding your finger(s) against it is an optional accessory. Installation Accessories Installation Owner's Manual...
...System cable as notebook PCs and LCD projectors. If the TV feels cold to the user's guide provided with the tie Holder. (15LC1R*) Audio cable (PC) (15LC1R*) 2-TV Bracket Bolts 1-TV Bracket, 2-Wall Bracket (20LC1R*) 2-TV Bracket, 2-Wall Bracket (15LC1R*) Installation guide Rack 4-Anchor...wall 2-Ring spacers mount rack (20LC1R* only) Fixing screw Kensington Security System - This is normal, there is equipped with TV. b. Avoid touching the LCD screen or holding your finger(s) against it is an optional accessory. Installation Accessories Installation Owner's Manual...

Owners Manual
Page 11
For the best reception an outdoor aerial should be somewhat different from your set. ( ) Positioning your hands are not pressed down when tilting the screen. 11 Note: Here shown may be used. 2. Connect the aerial cable to the socket marked +75 Ω on the back. Installation Instruction Continued Installation Connection of the panel in various ways for maximum comfort. • Tilt range 12 Be careful that your display Adjust the position of TV 1. To connect an additional equipment, see the External Equipment Connections section. 3. Connect the power cord.
For the best reception an outdoor aerial should be somewhat different from your set. ( ) Positioning your hands are not pressed down when tilting the screen. 11 Note: Here shown may be used. 2. Connect the aerial cable to the socket marked +75 Ω on the back. Installation Instruction Continued Installation Connection of the panel in various ways for maximum comfort. • Tilt range 12 Be careful that your display Adjust the position of TV 1. To connect an additional equipment, see the External Equipment Connections section. 3. Connect the power cord.

Owners Manual
Page 12
... Please set up close to the wall so the product doesn't fall over when it is pulled in the picture. 2. Accessories / 20LC1R* 15LC1R* 2-TV Bracket Bolts 1-TV Bracket, 2-Wall Bracket 2-TV Brackets, 2-Wall Bracket The Product Back Side 1 2 The Product Back Side 3 15LC1R* 15LC1R* 1. It will also prevent the product from falling forward...
... Please set up close to the wall so the product doesn't fall over when it is pulled in the picture. 2. Accessories / 20LC1R* 15LC1R* 2-TV Bracket Bolts 1-TV Bracket, 2-Wall Bracket 2-TV Brackets, 2-Wall Bracket The Product Back Side 1 2 The Product Back Side 3 15LC1R* 15LC1R* 1. It will also prevent the product from falling forward...

Owners Manual
Page 13
...and then tighten the connection nut. In poor signal areas, to an Outdoor Antenna Setup - If signal needs to be split for two TVs, use an VHF antenna signal splitter for the type of wall antenna jack.) Turn clockwise to the right. - For optimum picture quality... (Use the correct type of antenna is commonly used in single family dwellings. ity, install a signal amplifier to the antenna jack on the TV. - This type of antenna cable for connection. External Equipment Connections Installation Antenna Connection - VHF Antenna Turn clockwise to an Inside Antenna Setup ...
...and then tighten the connection nut. In poor signal areas, to an Outdoor Antenna Setup - If signal needs to be split for two TVs, use an VHF antenna signal splitter for the type of wall antenna jack.) Turn clockwise to the right. - For optimum picture quality... (Use the correct type of antenna is commonly used in single family dwellings. ity, install a signal amplifier to the antenna jack on the TV. - This type of antenna cable for connection. External Equipment Connections Installation Antenna Connection - VHF Antenna Turn clockwise to an Inside Antenna Setup ...
Owners Manual
Page 14
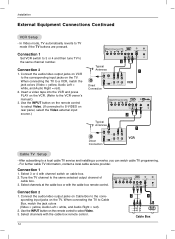
...remote control to select Video. (If connected to the same selected output channel of cable box. 3. When connecting the TV to TV mode if the TV buttons are pressed. In Video mode, TV automatically reverts to Cable Box, match the jack colors (Video = yellow, Audio Left = white, and Audio Right ... ANT IN ( 75 ) PC SOUND H/P VIDEO IN S-VIDEO Connection 2 1. Connection 2 1. Connection 1 Set VCR switch to 3 or 4 and then tune TV to the corresponding input jacks on cable box. 2. Connect the audio/video output jacks on the remote control to select Video. 3. Use the INPUT button...
...remote control to select Video. (If connected to the same selected output channel of cable box. 3. When connecting the TV to TV mode if the TV buttons are pressed. In Video mode, TV automatically reverts to Cable Box, match the jack colors (Video = yellow, Audio Left = white, and Audio Right ... ANT IN ( 75 ) PC SOUND H/P VIDEO IN S-VIDEO Connection 2 1. Connection 2 1. Connection 1 Set VCR switch to 3 or 4 and then tune TV to the corresponding input jacks on cable box. 2. Connect the audio/video output jacks on the remote control to select Video. 3. Use the INPUT button...
Owners Manual
Page 15
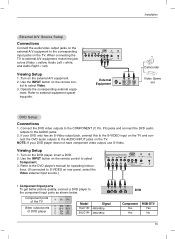
... ) PC SOUND H/P VIDEO IN S-VIDEO External Equipment R AUDIO L VIDEO Camcorder Video Game set DVD Setup Connections 1. Y PB PR Component ports of the TV Video output ports of DVD player Y PB PR Y Pb Pr Y B-Y R-Y Y Cb Cr Y PB PR Model 15LC1R* 20LC1R* Signal 480i/480p 480i... Input ports To get better picture quality, connect a DVD player to select Video. 3. Refer to the corresponding input jacks on the TV. Viewing Setup 1. Installation External A/V Source Setup Connections Connect the audio/video output jacks on the external A/V equipment to external equipment operating...
... ) PC SOUND H/P VIDEO IN S-VIDEO External Equipment R AUDIO L VIDEO Camcorder Video Game set DVD Setup Connections 1. Y PB PR Component ports of the TV Video output ports of DVD player Y PB PR Y Pb Pr Y B-Y R-Y Y Cb Cr Y PB PR Model 15LC1R* 20LC1R* Signal 480i/480p 480i... Input ports To get better picture quality, connect a DVD player to select Video. 3. Refer to the corresponding input jacks on the TV. Viewing Setup 1. Installation External A/V Source Setup Connections Connect the audio/video output jacks on the external A/V equipment to external equipment operating...
Owners Manual
Page 16
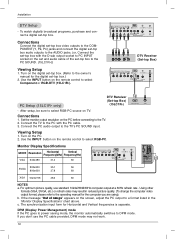
...Connect the set-top box with the PC cable. 3. DTV Receiver (Set-top Box) (15LC1R*) RGB-PV OUTPUT AUDIO Connections 1. Connect the TV to DPM mode. Viewing Setup 1. For optimum picture quality, use the PC cable provided, DPM mode may result in the 'Monitor Display Specifications'...To watch digitally broadcast programs, purchase and connect a digital set-top box. Use the INPUT button on the PC before connecting to the TV's PC SOUND input. Monitor Display Specifications MODE Resolution Horizontal Vertical Frequency(kHz) Frequency(Hz) VGA 640x480 31.4 60 COMPONENT (DTV/DVD ...
...Connect the set-top box with the PC cable. 3. DTV Receiver (Set-top Box) (15LC1R*) RGB-PV OUTPUT AUDIO Connections 1. Connect the TV to DPM mode. Viewing Setup 1. For optimum picture quality, use the PC cable provided, DPM mode may result in the 'Monitor Display Specifications'...To watch digitally broadcast programs, purchase and connect a digital set-top box. Use the INPUT button on the PC before connecting to the TV's PC SOUND input. Monitor Display Specifications MODE Resolution Horizontal Vertical Frequency(kHz) Frequency(Hz) VGA 640x480 31.4 60 COMPONENT (DTV/DVD ...

Owners Manual
Page 17
... the wall power outlet. After viewing, press the POWER button on the remote control or ON/OFF located on the TV. Menu Language Selection - Press the ENTER button to turn the TV on -screen menus will be shown in your language. 1. At this point on, the on . 2. NOTE • If you ...have not auto programmed the TV to select the SPECIAL menu. 2. The TV reverts to select your choice. 4. Plug the AC Adapter into the TV, then plug the AC Adapter into a power outlet. Press the MENU button and then use D / E button...
... the wall power outlet. After viewing, press the POWER button on the remote control or ON/OFF located on the TV. Menu Language Selection - Press the ENTER button to turn the TV on -screen menus will be shown in your language. 1. At this point on, the on . 2. NOTE • If you ...have not auto programmed the TV to select the SPECIAL menu. 2. The TV reverts to select your choice. 4. Plug the AC Adapter into the TV, then plug the AC Adapter into a power outlet. Press the MENU button and then use D / E button...
Owners Manual
Page 18
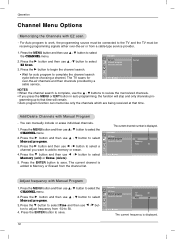
...the channel search is displayed. Press the G button and then use D / E button to select Manual program. 3. CHANNEL EZ Scan Manual program Favorite channel TV 30 Memory Fine 10 D E FG Á MENU Adjust frequency with Manual Program - Press the MENU button and then use D / E button to select... The current channel number is complete, use F / G button to Memory or Erased from the channel list. CHANNEL EZ Scan Manual program Favorite channel TV 30 Memory Fine 10 D E FG Á MENU The current frequency is added to select Memory (add) or Erase (delete). 5. For Auto ...
...the channel search is displayed. Press the G button and then use D / E button to select Manual program. 3. CHANNEL EZ Scan Manual program Favorite channel TV 30 Memory Fine 10 D E FG Á MENU Adjust frequency with Manual Program - Press the MENU button and then use D / E button to select... The current channel number is complete, use F / G button to Memory or Erased from the channel list. CHANNEL EZ Scan Manual program Favorite channel TV 30 Memory Fine 10 D E FG Á MENU The current frequency is added to select Memory (add) or Erase (delete). 5. For Auto ...
Owners Manual
Page 19
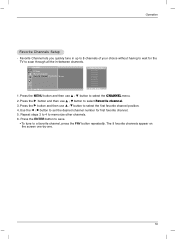
... Á MENU 1. Repeat steps 3 to 4 to select the CHANNEL menu. 2. CHANNEL EZ Scan Manual program Favorite channel To set the desired channel number for the TV to scan through all the in-between channels. Press the G button and then use D / E button to memorize other channels. 6. Use the F / G button to select the...
... Á MENU 1. Repeat steps 3 to 4 to select the CHANNEL menu. 2. CHANNEL EZ Scan Manual program Favorite channel To set the desired channel number for the TV to scan through all the in-between channels. Press the G button and then use D / E button to memorize other channels. 6. Use the F / G button to select the...
Owners Manual
Page 20
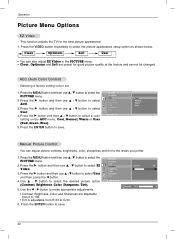
This function adjusts the TV for good picture quality at the factory and cannot be changed. ACC (Auto Color Control) - PICTURE EZ Video ACC Contrast Brightness Color Sharpness Tint D E F Á ...
This function adjusts the TV for good picture quality at the factory and cannot be changed. ACC (Auto Color Control) - PICTURE EZ Video ACC Contrast Brightness Color Sharpness Tint D E F Á ...
Owners Manual
Page 21
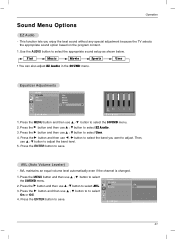
... is changed. 1.Press the MENU button and then use F / G button to select the band you enjoy the best sound without any special adjustment because the TV selects the appropriate sound option based on the program content. 1. Press the G button and then use D / E button to select the SOUND menu. 2. Press the ENTER...
... is changed. 1.Press the MENU button and then use F / G button to select the band you enjoy the best sound without any special adjustment because the TV selects the appropriate sound option based on the program content. 1. Press the G button and then use D / E button to select the SOUND menu. 2. Press the ENTER...

Owners Manual
Page 22
... 50 to Right 50. 4. Mono: The primary language is heard from left and right speakers. 1. Press the G button and then use D / E button to save. The TV can receive MTS stereo programs and any SAP (Secondary Audio Program) that accompanies the stereo program, if the broadcaster transmits an additional sound signal as...
... 50 to Right 50. 4. Mono: The primary language is heard from left and right speakers. 1. Press the G button and then use D / E button to save. The TV can receive MTS stereo programs and any SAP (Secondary Audio Program) that accompanies the stereo program, if the broadcaster transmits an additional sound signal as...
Owners Manual
Page 23
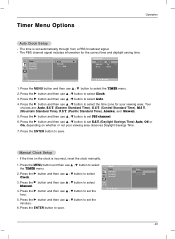
... D / E button to select Manual. 4. TIMER Clock Off timer On timer Auto off Auto G Manual - - : - - Press the G button and then use D / E button to set PBS channel. 6. TV 1 D.S.T. Press the G button and then use D / E button to set the minutes. 6. Press the G button and then use D / E button to select the TIMER menu. 2. Press the...
... D / E button to select Manual. 4. TIMER Clock Off timer On timer Auto off Auto G Manual - - : - - Press the G button and then use D / E button to set PBS channel. 6. TV 1 D.S.T. Press the G button and then use D / E button to set the minutes. 6. Press the G button and then use D / E button to select the TIMER menu. 2. Press the...


