
Owners Manual
Page 5
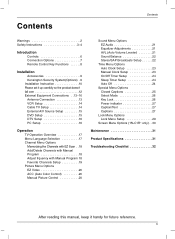
... Add/Delete Channels with Manual Program 18 Adjust frquency with Manual Program 18 Favorite Channels Setup 19 Picture Menu Options EZ Video 20 ACC (Auto Color Control 20 Manual Picture Control 20 Sound Menu Options EZ Audio 21 Equalizer Adjustments 21 AVL (Auto Volume Leveler 21 Sound Balance 22 Stereo/SAP Broadcasts Setup...
... Add/Delete Channels with Manual Program 18 Adjust frquency with Manual Program 18 Favorite Channels Setup 19 Picture Menu Options EZ Video 20 ACC (Auto Color Control 20 Manual Picture Control 20 Sound Menu Options EZ Audio 21 Equalizer Adjustments 21 AVL (Auto Volume Leveler 21 Sound Balance 22 Stereo/SAP Broadcasts Setup...
Owners Manual
Page 8
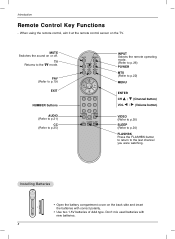
...) INPUT Selects the remote operating mode. (Refer to p.26) POWER MTS (Refer to p.22) MENU ENTER CH D / E (Channel button) VOL F / G (Volume button) VIDEO (Refer to p.20) SLEEP (Refer to p.24) FLASHBK Press the FLASHBK button to return to the TV mode. TV Returns to the last channel you were watching. Don...
...) INPUT Selects the remote operating mode. (Refer to p.26) POWER MTS (Refer to p.22) MENU ENTER CH D / E (Channel button) VOL F / G (Volume button) VIDEO (Refer to p.20) SLEEP (Refer to p.24) FLASHBK Press the FLASHBK button to return to the TV mode. TV Returns to the last channel you were watching. Don...
Owners Manual
Page 20
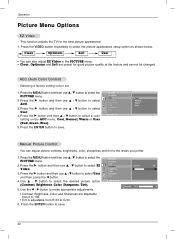
.... This function adjusts the TV for good picture quality at the factory and cannot be changed. Press the G button and then use D / E button to save . 20 Selecting a factory setting colour set. 1. Press the ENTER button to select User and then press the F button. Operation Picture Menu Options EZ Video - Press the...
.... This function adjusts the TV for good picture quality at the factory and cannot be changed. Press the G button and then use D / E button to save . 20 Selecting a factory setting colour set. 1. Press the ENTER button to select User and then press the F button. Operation Picture Menu Options EZ Video - Press the...
Owners Manual
Page 24
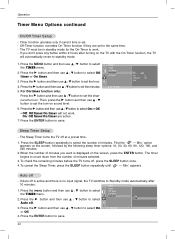
Timer function operates only if current time is displayed on the screen, followed by the following sleep timer options: 10, 20, 30, 60, 90, 120, 180, and 240 minutes. 2. Press the G button and then use D / E button to set to save . Then, press the G button and then ...
Timer function operates only if current time is displayed on the screen, followed by the following sleep timer options: 10, 20, 30, 60, 90, 120, 180, and 240 minutes. 2. Press the G button and then use D / E button to set to save . Then, press the G button and then ...
