
Owners Manual
Page 2
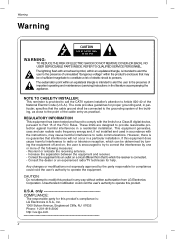
... guarantee that to which can radiate radio frequency energy and, if not installed and used in accordance with the limits for proper grounding and, in the literature accompanying the appliance. NOTE TO CABLE/TV INSTALLER: This reminder is connected. - The code provides guidelines for a Class B digital device, pursuant to radio or television reception, which the receiver is provided to...
... guarantee that to which can radiate radio frequency energy and, if not installed and used in accordance with the limits for proper grounding and, in the literature accompanying the appliance. NOTE TO CABLE/TV INSTALLER: This reminder is connected. - The code provides guidelines for a Class B digital device, pursuant to radio or television reception, which the receiver is provided to...
Owners Manual
Page 5
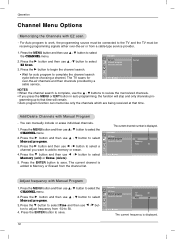
...Program 18 Adjust frquency with Manual Program 18 Favorite Channels Setup 19 Picture Menu Options EZ Video 20 ACC (Auto Color Control 20 Manual Picture Control 20 Sound Menu Options EZ Audio 21 Equalizer Adjustments 21 AVL (Auto Volume Leveler 21 Sound Balance 22 Stereo/SAP Broadcasts Setup . . . . . .22 Time Menu Options Auto Clock Setup 23 Manual Clock Setup 23 On/Off Timer Setup 24 Sleep Timer Setup 24 Auto Off 24 Special Menu Options Closed Captions 25 Select Mode 26 Key Lock 26 Power indicator 27 Caption/Text 27 Captions 27 Lock Menu Options Lock Menu Setup 29 Screen...
...Program 18 Adjust frquency with Manual Program 18 Favorite Channels Setup 19 Picture Menu Options EZ Video 20 ACC (Auto Color Control 20 Manual Picture Control 20 Sound Menu Options EZ Audio 21 Equalizer Adjustments 21 AVL (Auto Volume Leveler 21 Sound Balance 22 Stereo/SAP Broadcasts Setup . . . . . .22 Time Menu Options Auto Clock Setup 23 Manual Clock Setup 23 On/Off Timer Setup 24 Sleep Timer Setup 24 Auto Off 24 Special Menu Options Closed Captions 25 Select Mode 26 Key Lock 26 Power indicator 27 Caption/Text 27 Captions 27 Lock Menu Options Lock Menu Setup 29 Screen...
Owners Manual
Page 6
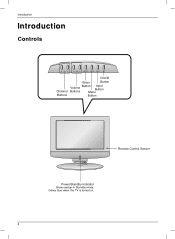
Introduction Introduction Controls CH VOL ENTER MENU INPUT /I On/Off Enter Button Channel Volume Buttons Button Input Button Menu Buttons Button Remote Control Sensor Power/Standby Indicator Glows amber in Standby mode, Glows blue when the TV is turned on. 6
Introduction Introduction Controls CH VOL ENTER MENU INPUT /I On/Off Enter Button Channel Volume Buttons Button Input Button Menu Buttons Button Remote Control Sensor Power/Standby Indicator Glows amber in Standby mode, Glows blue when the TV is turned on. 6
Owners Manual
Page 8
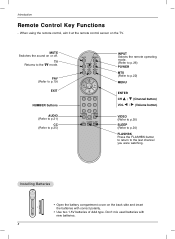
... NUMBER buttons AUDIO (Refer to p.21) CC (Refer to p.25) INPUT Selects the remote operating mode. (Refer to p.26) POWER MTS (Refer to p.22) MENU ENTER CH D / E (Channel button) VOL F / G (Volume button) VIDEO (Refer to p.20) SLEEP (Refer to p.24) FLASHBK Press the FLASHBK button to return to the TV mode. Don't mix used batteries with correct polarity. • Use two 1.5V batteries of AAA type. Introduction Remote Control Key Functions - MUTE Switches the sound...
... NUMBER buttons AUDIO (Refer to p.21) CC (Refer to p.25) INPUT Selects the remote operating mode. (Refer to p.26) POWER MTS (Refer to p.22) MENU ENTER CH D / E (Channel button) VOL F / G (Volume button) VIDEO (Refer to p.20) SLEEP (Refer to p.24) FLASHBK Press the FLASHBK button to return to the TV mode. Don't mix used batteries with correct polarity. • Use two 1.5V batteries of AAA type. Introduction Remote Control Key Functions - MUTE Switches the sound...
Owners Manual
Page 9
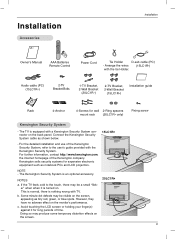
... installation and use of time. This is normal, there is turned on the back panel. c. Connect the Kensington Security System cable as notebook PCs and LCD projectors. NOTES a. For further information, contact http://www.kensington.com, the internet homepage of the Kensington company. Installation Accessories Installation Owner's Manual AAA Batteries Remote Control Power Cord Tie Holder D-sub cable (PC) - Some minute dot defects may be visible on the screen...
... installation and use of time. This is normal, there is turned on the back panel. c. Connect the Kensington Security System cable as notebook PCs and LCD projectors. NOTES a. For further information, contact http://www.kensington.com, the internet homepage of the Kensington company. Installation Accessories Installation Owner's Manual AAA Batteries Remote Control Power Cord Tie Holder D-sub cable (PC) - Some minute dot defects may be visible on the screen...
Owners Manual
Page 10
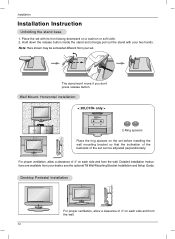
... wall mounting bracket so that the inclination of the backside of 4" on each side and from your dealer, see the optional Tilt Wall Mounting Bracket Installation and Setup Guide. Place the set with your set can be somewhat different from the wall. 10 Wall Mount: Horizontal installation < 20LC1R* only > 2-Ring spacers 4 inches 4 inches 4 inches 4 inches Place the ring spacers on a cushion or soft cloth. 2. Detailed installation instructions are available from the wall. Installation Installation Instruction...
... wall mounting bracket so that the inclination of the backside of 4" on each side and from your dealer, see the optional Tilt Wall Mounting Bracket Installation and Setup Guide. Place the set with your set can be somewhat different from the wall. 10 Wall Mount: Horizontal installation < 20LC1R* only > 2-Ring spacers 4 inches 4 inches 4 inches 4 inches Place the ring spacers on a cushion or soft cloth. 2. Detailed installation instructions are available from the wall. Installation Installation Instruction...

Owners Manual
Page 13
... TV. - Connecting to tighten. VHF Antenna Turn clockwise to an Outdoor Antenna Setup - Typical wall antenna jack used in apartment buildings, connect the antenna cable as shown to an Inside Antenna Setup - UHF Antenna 75Ω Round Cable Copper Wire Single Family Home 300Ω Flat Wire Antenna Converter NPUT ANT IN ( 75 ) Antenna Jack - If using 75Ω round cable, do not bend the bronze wire. For optimum picture quality, adjust antenna direction. In poor signal areas...
... TV. - Connecting to tighten. VHF Antenna Turn clockwise to an Outdoor Antenna Setup - Typical wall antenna jack used in apartment buildings, connect the antenna cable as shown to an Inside Antenna Setup - UHF Antenna 75Ω Round Cable Copper Wire Single Family Home 300Ω Flat Wire Antenna Converter NPUT ANT IN ( 75 ) Antenna Jack - If using 75Ω round cable, do not bend the bronze wire. For optimum picture quality, adjust antenna direction. In poor signal areas...
Owners Manual
Page 14
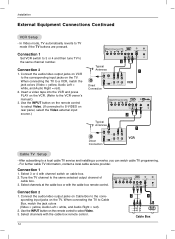
... a local cable TV service and installing a converter, you can watch cable TV programming. - Connection 1 1. COMPONENT (DTV/DVD IN) AUDIO PC INPUT ANT IN ( 75 ) PC SOUND H/P VIDEO IN S-VIDEO Connection 2 1. When connecting the TV to a VCR, match the jack colors (Video = yellow, Audio Left = white, and Audio Right = red). 2. When connecting the TV to Cable Box, match the jack colors (Video = yellow, Audio Left = white, and Audio Right = red). 2. Connection 1 Set VCR switch to 3 or 4 and then tune TV to the same channel number. Select channels with the cable box remote control.
... a local cable TV service and installing a converter, you can watch cable TV programming. - Connection 1 1. COMPONENT (DTV/DVD IN) AUDIO PC INPUT ANT IN ( 75 ) PC SOUND H/P VIDEO IN S-VIDEO Connection 2 1. When connecting the TV to a VCR, match the jack colors (Video = yellow, Audio Left = white, and Audio Right = red). 2. When connecting the TV to Cable Box, match the jack colors (Video = yellow, Audio Left = white, and Audio Right = red). 2. Connection 1 Set VCR switch to 3 or 4 and then tune TV to the same channel number. Select channels with the cable box remote control.
Owners Manual
Page 15
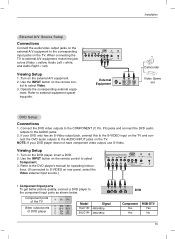
... S-VIDEO input on the TV and connect the DVD audio outputs to the AUDIO INPUT jacks on rear panel, select the Video external input source.) COMPONENT (DTV/DVD IN) AUDIO PC INPUT ANT IN ( 75 ) PC SOUND H/P VIDEO IN S-VIDEO • Component Input ports To get better picture quality, connect a DVD player to S-VIDEO on the TV. Viewing Setup 1. COMPONENT (DTV/DVD IN) AUDIO PC INPUT ANT IN ( 75 ) PC SOUND H/P VIDEO IN S-VIDEO External Equipment R AUDIO L VIDEO Camcorder Video Game set DVD Setup Connections 1. trol to the corresponding input jacks on the TV. Installation...
... S-VIDEO input on the TV and connect the DVD audio outputs to the AUDIO INPUT jacks on rear panel, select the Video external input source.) COMPONENT (DTV/DVD IN) AUDIO PC INPUT ANT IN ( 75 ) PC SOUND H/P VIDEO IN S-VIDEO • Component Input ports To get better picture quality, connect a DVD player to S-VIDEO on the TV. Viewing Setup 1. COMPONENT (DTV/DVD IN) AUDIO PC INPUT ANT IN ( 75 ) PC SOUND H/P VIDEO IN S-VIDEO External Equipment R AUDIO L VIDEO Camcorder Video Game set DVD Setup Connections 1. trol to the corresponding input jacks on the TV. Installation...
Owners Manual
Page 16
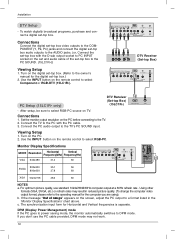
... optimum picture quality, use the PC cable provided, DPM mode may result in the 'Monitor Display Specifications' chart above. To watch digitally broadcast programs, purchase and connect a digital set -top box. (Refer to select Component or RGB-DTV (15LC1R*). DTV Receiver (Set-top Box) (15LC1R*) RGB-PV OUTPUT AUDIO Connections 1. DPM (Display Power Management) mode If the PC goes to power saving mode, the monitor automatically switches to the TV's PC SOUND input. Use the INPUT button on the remote control to the owner's manual for...
... optimum picture quality, use the PC cable provided, DPM mode may result in the 'Monitor Display Specifications' chart above. To watch digitally broadcast programs, purchase and connect a digital set -top box. (Refer to select Component or RGB-DTV (15LC1R*). DTV Receiver (Set-top Box) (15LC1R*) RGB-PV OUTPUT AUDIO Connections 1. DPM (Display Power Management) mode If the PC goes to power saving mode, the monitor automatically switches to the TV's PC SOUND input. Use the INPUT button on the remote control to the owner's manual for...
Owners Manual
Page 18
... G button and then use D / E button to select Manual program. 3. The current channel is complete, use D / E button to select Memory (add) or Erase (delete). 5. For Auto program to work, the programming source must be receiving programming signals either over -the-air channels and then channels provided by a cable service. The current channel number is displayed. 18 Press the ENTER button to the TV and the TV must be connected to save . Press the G button and then use F / G button to select a channel...
... G button and then use D / E button to select Manual program. 3. The current channel is complete, use D / E button to select Memory (add) or Erase (delete). 5. For Auto program to work, the programming source must be receiving programming signals either over -the-air channels and then channels provided by a cable service. The current channel number is displayed. 18 Press the ENTER button to the TV and the TV must be connected to save . Press the G button and then use F / G button to select a channel...
Owners Manual
Page 19
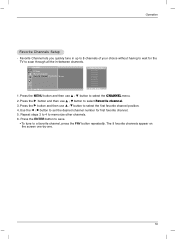
.... Operation Favorite Channels Setup - The 8 favorite channels appear on the screen one-by-one. 19 Use the F / G button to scan through all the in-between channels. Press the ENTER button to save. • To tune to memorize other channels. 6. CHANNEL EZ Scan Manual program Favorite channel To set the desired channel number for the TV to set D E FG Á MENU Favourite channel D E FG Á MENU 1. Press the G button and then use D / E button to select the CHANNEL menu. 2. Press the MENU button...
.... Operation Favorite Channels Setup - The 8 favorite channels appear on the screen one-by-one. 19 Use the F / G button to scan through all the in-between channels. Press the ENTER button to save. • To tune to memorize other channels. 6. CHANNEL EZ Scan Manual program Favorite channel To set the desired channel number for the TV to set D E FG Á MENU Favourite channel D E FG Á MENU 1. Press the G button and then use D / E button to select the CHANNEL menu. 2. Press the MENU button...
Owners Manual
Page 20
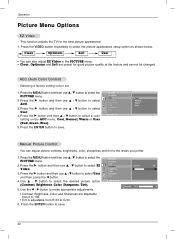
... menu: Cool, Normal, Warm or User (Red, Green, Blue). 5. Press the MENU button and then use D / E button to select the PICTURE menu. 2. Press the G button and then use D / E button to select EZ Video. 3. Use the F / G button to select User. 4. Press the G button and then use D / E button to select the picture appearance setup option as shown below. PICTURE EZ Video ACC Contrast Brightness Color Sharpness Tint D E F Á MENU Cool Normal Warm User Manual Picture Control - Press the G button and then use D / E button to make appropriate adjustments. This function adjusts...
... menu: Cool, Normal, Warm or User (Red, Green, Blue). 5. Press the MENU button and then use D / E button to select the PICTURE menu. 2. Press the G button and then use D / E button to select EZ Video. 3. Use the F / G button to select User. 4. Press the G button and then use D / E button to select the picture appearance setup option as shown below. PICTURE EZ Video ACC Contrast Brightness Color Sharpness Tint D E F Á MENU Cool Normal Warm User Manual Picture Control - Press the G button and then use D / E button to make appropriate adjustments. This function adjusts...
Owners Manual
Page 21
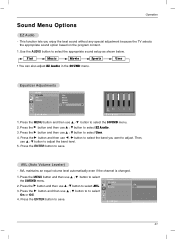
... best sound without any special adjustment because the TV selects the appropriate sound option based on the program content. 1. Equalizer Adjustments SOUND EZ Audio AVL Balance D E FG Á MENU Flat Music Movie Sports User G 0.1 0.3 1 3 8 Khz D E FG Á MENU 1.Press the MENU button and then use D / E button to adjust the band level. 5. Press the G button and then use D / E button to select EZ Audio. 3. SOUND EZ Audio 2. AVL Balance On Off 3. Then, use F / G button to select the appropriate sound setup as shown below. Operation Sound Menu...
... best sound without any special adjustment because the TV selects the appropriate sound option based on the program content. 1. Equalizer Adjustments SOUND EZ Audio AVL Balance D E FG Á MENU Flat Music Movie Sports User G 0.1 0.3 1 3 8 Khz D E FG Á MENU 1.Press the MENU button and then use D / E button to adjust the band level. 5. Press the G button and then use D / E button to select EZ Audio. 3. SOUND EZ Audio 2. AVL Balance On Off 3. Then, use F / G button to select the appropriate sound setup as shown below. Operation Sound Menu...
Owners Manual
Page 24
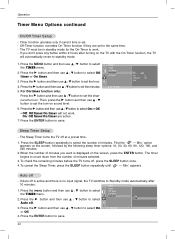
... use D / E button to the same time. - Then, press the G button and then use D / E button to set to set the channel at a preset time. 1. When the number of minutes selected. 3. Timer function operates only if current time is no input signal, the TV switches to select Off Auto off at turn -on the screen, followed by the following sleep timer options: 10, 20, 30, 60, 90, 120, 180, and 240 minutes. 2. Off-Timer function overrides On-Timer...
... use D / E button to the same time. - Then, press the G button and then use D / E button to set to set the channel at a preset time. 1. When the number of minutes selected. 3. Timer function operates only if current time is no input signal, the TV switches to select Off Auto off at turn -on the screen, followed by the following sleep timer options: 10, 20, 30, 60, 90, 120, 180, and 240 minutes. 2. Off-Timer function overrides On-Timer...
Owners Manual
Page 27
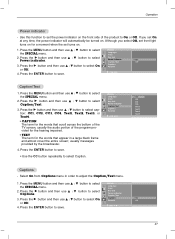
... time, the power indicator will automatically be turned on. Press the ENTER button to select the SPECIAL menu. E F Á MENU • CAPTION The term for the words that appear in order to select Captions. Key lock Power indicator Caption/Text 3. Operation Power indicator - Press the MENU button and then use D / E button to adjust the Caption/Text menu. 1. If you select Off, set front light turns on for the words that scroll across the bottom of the program...
... time, the power indicator will automatically be turned on. Press the ENTER button to select the SPECIAL menu. E F Á MENU • CAPTION The term for the words that appear in order to select Captions. Key lock Power indicator Caption/Text 3. Operation Power indicator - Press the MENU button and then use D / E button to adjust the Caption/Text menu. 1. If you select Off, set front light turns on for the words that scroll across the bottom of the program...
Owners Manual
Page 28
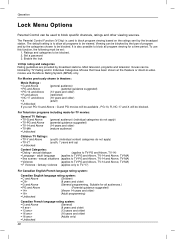
...; Violence (applies to be viewed. sexual dialogue (applies to block specific channels, ratings and other viewing sources. Viewing can be blocked by the type of program and by broadcast stations. For Television programs including made-for a time period. Operation Lock Menu Options Parental Control can be used to be blocked. adult language (applies to -video movies use this function, the following must be set PG-13 and Above : G and...
...; Violence (applies to be viewed. sexual dialogue (applies to block specific channels, ratings and other viewing sources. Viewing can be blocked by the type of program and by broadcast stations. For Television programs including made-for a time period. Operation Lock Menu Options Parental Control can be used to be blocked. adult language (applies to -video movies use this function, the following must be set PG-13 and Above : G and...
Owners Manual
Page 30
... adjustment range is 0~100. (Based on the input mode, the adjustment range may change .) • Phase Remove any vertical bars or stripes appearing on TV screen. Operation Screen Menu Options (15LC1R* only) - SCREEN Auto configure Manual configure To set Reset D H-Position 85 F G E D E FG Á MENU 1. After setup, be changed. 4. Press the G button and then use D / E button to select desired item. 3. Use the F / G button to save. 30 default settings cannot be sure to select RGB-PC source to the default settings programmed...
... adjustment range is 0~100. (Based on the input mode, the adjustment range may change .) • Phase Remove any vertical bars or stripes appearing on TV screen. Operation Screen Menu Options (15LC1R* only) - SCREEN Auto configure Manual configure To set Reset D H-Position 85 F G E D E FG Á MENU 1. After setup, be changed. 4. Press the G button and then use D / E button to select desired item. 3. Use the F / G button to save. 30 default settings cannot be sure to select RGB-PC source to the default settings programmed...
Owners Manual
Page 32
... the sleep timer set : TV, VCR etc.? • Install new batteries. The video function does not work • Correct remote operating mode set ? Please contact your service center, if the picture has not switching on station tuned with the broadcast. • Is the power cord inserted into wall power outlet? • Check your antenna direction and/or location. • Test the wall power outlet, plug another channel. Lines or streaks in . Troubleshooting Checklist Troubleshooting Checklist The operation...
... the sleep timer set : TV, VCR etc.? • Install new batteries. The video function does not work • Correct remote operating mode set ? Please contact your service center, if the picture has not switching on station tuned with the broadcast. • Is the power cord inserted into wall power outlet? • Check your antenna direction and/or location. • Test the wall power outlet, plug another channel. Lines or streaks in . Troubleshooting Checklist Troubleshooting Checklist The operation...

Owners Manual
Page 33
...; Check the signal cable. • Reinstall the PC video card. 33 Press MUTE button. • Try another channel. There is a problem in PC mode. (Only PC mode applied) The signal is out of the speakers • Adjust Balance in an unusual noise when the product is connected or loose. • Check the input source. Troubleshooting Checklist The audio function does not work. Picture OK & No sound • Press...
...; Check the signal cable. • Reinstall the PC video card. 33 Press MUTE button. • Try another channel. There is a problem in PC mode. (Only PC mode applied) The signal is out of the speakers • Adjust Balance in an unusual noise when the product is connected or loose. • Check the input source. Troubleshooting Checklist The audio function does not work. Picture OK & No sound • Press...


