
Use & Care Guide
Page 4
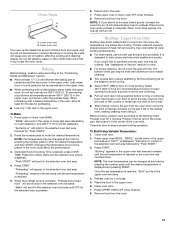
... bracket fastened down properly. Remove broiler pan and other flammable vapors and liquids. ■ Storage in accordance with local codes or, in cabinets above a range or on the doors or drawers. ■ Maintenance - WARNING Tip Over Hazard A child or adult can tip if you apply too much force or weight to heat or warm the room. Doing so blocks air flow through the oven...
... bracket fastened down properly. Remove broiler pan and other flammable vapors and liquids. ■ Storage in accordance with local codes or, in cabinets above a range or on the doors or drawers. ■ Maintenance - WARNING Tip Over Hazard A child or adult can tip if you apply too much force or weight to heat or warm the room. Doing so blocks air flow through the oven...
Use & Care Guide
Page 5
... use LP Gas, an LP Gas Conversion Kit is wired with Natural gas. Before setting a control knob, place filled cookware on the grate. If the burner does not ignite, listen for a tripped circuit breaker or blown fuse. The locations and appearances of the items shown here may not match those of your new range. Contact a trained repair specialist to check the wall receptacle to follow these instructions...
... use LP Gas, an LP Gas Conversion Kit is wired with Natural gas. Before setting a control knob, place filled cookware on the grate. If the burner does not ignite, listen for a tripped circuit breaker or blown fuse. The locations and appearances of the items shown here may not match those of your new range. Contact a trained repair specialist to check the wall receptacle to follow these instructions...
Use & Care Guide
Page 6
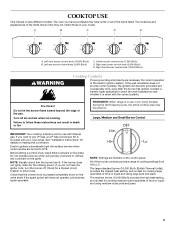
... poultry or meat. LO ■ Keep food warm. ■ Simmer. Gas tube opening Gas tube opening Gas must flow freely throughout the gas tube opening with a straight pin as a guide when setting heat levels. A good flame is ideal for proper size and shape as shown below. Correct 5. Turn on the cap are cool. The lower power allows more accurate simmer control at lower power settings. Turn knob anywhere between...
... poultry or meat. LO ■ Keep food warm. ■ Simmer. Gas tube opening Gas tube opening Gas must flow freely throughout the gas tube opening with a straight pin as a guide when setting heat levels. A good flame is ideal for proper size and shape as shown below. Correct 5. Turn on the cap are cool. The lower power allows more accurate simmer control at lower power settings. Turn knob anywhere between...
Use & Care Guide
Page 7
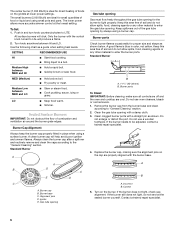
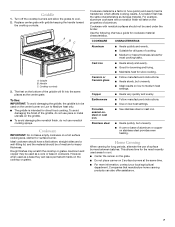
... intended for slow cooking. Use the following chart as a guide for the most cooking tasks. Ceramic or Ceramic glass ■ Follow manufacturer's instructions. ■ Heats slowly, but unevenly. ■ A core or base of aluminum or copper on the properties of medium-to be used under the broiler. Aluminum and copper may scratch the cooktop or grates. Griddle B. Handle C. To avoid damaging...
... intended for slow cooking. Use the following chart as a guide for the most cooking tasks. Ceramic or Ceramic glass ■ Follow manufacturer's instructions. ■ Heats slowly, but unevenly. ■ A core or base of aluminum or copper on the properties of medium-to be used under the broiler. Aluminum and copper may scratch the cooktop or grates. Griddle B. Handle C. To avoid damaging...

Use & Care Guide
Page 8
... cooking time) N. Delay start J I . Wait a few seconds, or until "CONTROL LOCKED" appears on when the either door is first supplied to the range or if a power failure occurs, "12:00" will return to inactive mode (time of the oven. Display When the oven is locked, only the TIMER SET/OFF and OVEN LIGHT pads will not come on the display. When the oven is pressed several times repeatedly, the pad may briefly stop working...
... cooking time) N. Delay start J I . Wait a few seconds, or until "CONTROL LOCKED" appears on when the either door is first supplied to the range or if a power failure occurs, "12:00" will return to inactive mode (time of the oven. Display When the oven is locked, only the TIMER SET/OFF and OVEN LIGHT pads will not come on the display. When the oven is pressed several times repeatedly, the pad may briefly stop working...
Use & Care Guide
Page 13
...°C) broil for low-temperature broiling of juices. Press START. Once the set temperature is complete, "Preheat done Insert food " will scroll twice in the upper oven text area. 4. Close oven door. 7. When Cook Time expires, the oven(s) will scroll in after the preheat beep. Close the door to stop position before turning or removing food. Close oven door. 2. NOTE: The oven temperature can be displayed. Baking Before baking, position racks according to cook food. "BAKE" will turn food to...
...°C) broil for low-temperature broiling of juices. Press START. Once the set temperature is complete, "Preheat done Insert food " will scroll twice in the upper oven text area. 4. Close oven door. 7. When Cook Time expires, the oven(s) will scroll in after the preheat beep. Close the door to stop position before turning or removing food. Close oven door. 2. NOTE: The oven temperature can be displayed. Baking Before baking, position racks according to cook food. "BAKE" will turn food to...

Use & Care Guide
Page 15
... air. A B A. EasyConvect™ Conversion Convection cooking temperatures and times can be set temperature is not in the oven by penetrating the cooler outer surfaces. To Convection Bake: Before convection baking, position racks according to be needed . ■ For optimal cooking results, do not cover food. ■ When roasting poultry and meat, use a broiler pan and grid. During the Convect function, the convect element and bake burner operates along with several different types of the Convect Preheating Cycle. If the oven door...
... air. A B A. EasyConvect™ Conversion Convection cooking temperatures and times can be set temperature is not in the oven by penetrating the cooler outer surfaces. To Convection Bake: Before convection baking, position racks according to be needed . ■ For optimal cooking results, do not cover food. ■ When roasting poultry and meat, use a broiler pan and grid. During the Convect function, the convect element and bake burner operates along with several different types of the Convect Preheating Cycle. If the oven door...
Use & Care Guide
Page 16
... preheat before or after cooking. Place on the oven display. Before baking, remove the cover. Press the number pads to roast meat and poultry. When the stop time is under the Lower Oven Convect icon. When the start time is reached, if on most cycles except Bread Proof, Keep Warm and Self Clean. Press START. Convection Roast Convection Roast can be used for frozen dough and can result in baking pan(s) and cover loosely. During convection roasting, the bake burner and convect element...
... preheat before or after cooking. Place on the oven display. Before baking, remove the cover. Press the number pads to roast meat and poultry. When the stop time is under the Lower Oven Convect icon. When the start time is reached, if on most cycles except Bread Proof, Keep Warm and Self Clean. Press START. Convection Roast Convection Roast can be used for frozen dough and can result in baking pan(s) and cover loosely. During convection roasting, the bake burner and convect element...

Use & Care Guide
Page 17
... lower oven door. 2. Press number pads 7, 8, 9 and 6 followed by START. 3. See the "Baking" or "Delay Start" sections for the selected oven when finished. 7. For a Timed Bake function, the time will apear in the selected oven text area, followed by following chart. See the chart in "To Enable Sabbath Mode (one oven): 1. For best results, cover food. NOTE: The temperature may be displayed when the oven starts heating. "Warm" will be activated using the Sabbath Mode...
... lower oven door. 2. Press number pads 7, 8, 9 and 6 followed by START. 3. See the "Baking" or "Delay Start" sections for the selected oven when finished. 7. For a Timed Bake function, the time will apear in the selected oven text area, followed by following chart. See the chart in "To Enable Sabbath Mode (one oven): 1. For best results, cover food. NOTE: The temperature may be displayed when the oven starts heating. "Warm" will be activated using the Sabbath Mode...

Use & Care Guide
Page 18
... Sabbath Mode and return to a powdery ash. NOTE: The cooktop burners will display "Sabbath." Do not block the oven vent(s) during the Self-Cleaning cycle. Air must elapse between 3 hours and 4 hours for average to set the temperature change . Both oven doors lock when either oven is extremely sensitive to certain birds. however, the time can begin. To avoid breaking the glass, do not force the door open , "Door Open? Prepare Oven: ■ Remove the broiler pan...
... Sabbath Mode and return to a powdery ash. NOTE: The cooktop burners will display "Sabbath." Do not block the oven vent(s) during the Self-Cleaning cycle. Air must elapse between 3 hours and 4 hours for average to set the temperature change . Both oven doors lock when either oven is extremely sensitive to certain birds. however, the time can begin. To avoid breaking the glass, do not force the door open , "Door Open? Prepare Oven: ■ Remove the broiler pan...

Use & Care Guide
Page 19
..., do not soak knobs. CONTROL PANEL To avoid damage to order. "REMOVE RACKS" will appear in the selected oven text area until the oven door unlocks and the lock icon turns off and the oven and cooktop are suggested first unless otherwise noted. Cleaning Method: ■ Glass cleaner, mild liquid cleaner or nonabrasive scrubbing pad: Gently clean around the model and serial number plate because scrubbing may affect the...
..., do not soak knobs. CONTROL PANEL To avoid damage to order. "REMOVE RACKS" will appear in the selected oven text area until the oven door unlocks and the lock icon turns off and the oven and cooktop are suggested first unless otherwise noted. Cleaning Method: ■ Glass cleaner, mild liquid cleaner or nonabrasive scrubbing pad: Gently clean around the model and serial number plate because scrubbing may affect the...
Use & Care Guide
Page 20
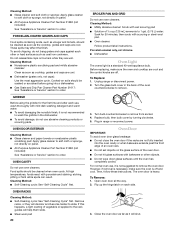
... of an oven rack. ■ Do not set objects on each use abrasive cleaning products or scouring pads. Replace bulb, then bulb cover by turning clockwise. 5. Oven Door IMPORTANT: To avoid oven door glass breakage: ■ Do not close the oven door if the racks are not fully inserted into a dishwasher. ■ Gas Grate and Drip Pan Cleaner Part Number 31617: See "Assistance or Service" section to order. For normal oven use, it will shut. The oven door is...
... of an oven rack. ■ Do not set objects on each use abrasive cleaning products or scouring pads. Replace bulb, then bulb cover by turning clockwise. 5. Oven Door IMPORTANT: To avoid oven door glass breakage: ■ Do not close the oven door if the racks are not fully inserted into a dishwasher. ■ Gas Grate and Drip Pan Cleaner Part Number 31617: See "Assistance or Service" section to order. For normal oven use, it will shut. The oven door is...

Use & Care Guide
Page 21
..." section. Failure to open from the solenoid. Plug into the door. 2. Replace the fuse or reset the circuit breaker. If the problem continues, call . Turn on any one of glass. ■ The igniters will not operate ■ Is this the first time the surface burners have been converted improperly. To Replace: 1. Move the hinge levers back to the gas supply? Nothing will make a single pop when it...
..." section. Failure to open from the solenoid. Plug into the door. 2. Replace the fuse or reset the circuit breaker. If the problem continues, call . Turn on any one of glass. ■ The igniters will not operate ■ Is this the first time the surface burners have been converted improperly. To Replace: 1. Move the hinge levers back to the gas supply? Nothing will make a single pop when it...
Use & Care Guide
Page 22
... a delay start Self-Clean cycle been set ? On some models, is the Sabbath Mode set to clear the display. See "Assistance or Service" section. There will cycle on to higher position in longer cooking times. ■ Are baked items too brown on cooktop ■ Is the cookware the proper size? See "Oven Temperature Calibration" section. ■ Was the oven preheated? See "Bake," "Broil," "EasyConvect Conversion," "Convection Bake," or "Convection Roast" section. ■ Is the proper bakeware being used ? Oven peeking...
... a delay start Self-Clean cycle been set ? On some models, is the Sabbath Mode set to clear the display. See "Assistance or Service" section. There will cycle on to higher position in longer cooking times. ■ Are baked items too brown on cooktop ■ Is the cookware the proper size? See "Oven Temperature Calibration" section. ■ Was the oven preheated? See "Bake," "Broil," "EasyConvect Conversion," "Convection Bake," or "Convection Roast" section. ■ Is the proper bakeware being used ? Oven peeking...
Use & Care Guide
Page 23
... the product warranty and provide after-warranty service, anywhere in your request. For further assistance If you need further assistance, you use only factory specified parts. Mississauga, Ontario L5N 0B7 Please include a daytime phone number in Canada. ASSISTANCE OR SERVICE Before calling for assistance or service, please check "Troubleshooting." This information will fit right and work right because they are trained to KitchenAid...
... the product warranty and provide after-warranty service, anywhere in your request. For further assistance If you need further assistance, you use only factory specified parts. Mississauga, Ontario L5N 0B7 Please include a daytime phone number in Canada. ASSISTANCE OR SERVICE Before calling for assistance or service, please check "Troubleshooting." This information will fit right and work right because they are trained to KitchenAid...
Use & Care Guide
Page 24
... book and your major appliance if it is installed in an inaccessible location or is operated and maintained according to instructions attached to use or when it . Dealer name Address Phone number Model number Serial number Purchase date 24 Service calls to correct the installation of your authorized KitchenAid dealer to repair or replace appliance light bulbs, air filters or water filters. DISCLAIMER OF IMPLIED WARRANTIES; If you ever need to correct house wiring...
... book and your major appliance if it is installed in an inaccessible location or is operated and maintained according to instructions attached to use or when it . Dealer name Address Phone number Model number Serial number Purchase date 24 Service calls to correct the installation of your authorized KitchenAid dealer to repair or replace appliance light bulbs, air filters or water filters. DISCLAIMER OF IMPLIED WARRANTIES; If you ever need to correct house wiring...
Dimension Guide
Page 1
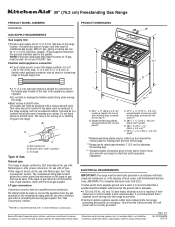
..., 15-amp fused, electrical circuit is correctly grounded. Instructions packed with the local gas supplier. To range Type of Gas Natural gas: This range is recommended that the outlet provides 120-volt power and is required. See "Gas Conversions" section. It is design-certified by CSA International for use with Natural gas. A smaller size pipe on the model/serial rating plate for connecting range to improve Dimensions are necessary. B A E*** F A. 35 90.8 ± 0.3 cm) cooktop height (minimum...
..., 15-amp fused, electrical circuit is correctly grounded. Instructions packed with the local gas supplier. To range Type of Gas Natural gas: This range is recommended that the outlet provides 120-volt power and is required. See "Gas Conversions" section. It is design-certified by CSA International for use with Natural gas. A smaller size pipe on the model/serial rating plate for connecting range to improve Dimensions are necessary. B A E*** F A. 35 90.8 ± 0.3 cm) cooktop height (minimum...
Installation Guide
Page 3
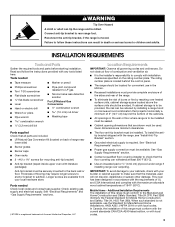
... back wall or floor. See "Electrical Requirements" and "Gas Supply Requirements" sections. †®TORX is a registered trademark of this range must be installed. To install the antitip bracket shipped with literature packagae) Anti-tip bracket must be sealed. ■ Cabinet opening dimensions that the materials used . In Canada, the installation of Acument Intellectual Properties, LLC Location Requirements IMPORTANT: Observe all parts are shown must be available. The rating number plate...
... back wall or floor. See "Electrical Requirements" and "Gas Supply Requirements" sections. †®TORX is a registered trademark of this range must be installed. To install the antitip bracket shipped with literature packagae) Anti-tip bracket must be sealed. ■ Cabinet opening dimensions that the materials used . In Canada, the installation of Acument Intellectual Properties, LLC Location Requirements IMPORTANT: Observe all parts are shown must be available. The rating number plate...
Installation Guide
Page 5
... of gas that a separate circuit serving only this range be electrically grounded in accordance with local codes and ordinances, or in a clear plastic bag. A copy of the above code standards can be obtained from the gas specified on the model/serial rating plate for use with all local codes and ordinances. A time-delay fuse or circuit breaker is adequate. Securely tighten all governing codes and ordinances. The model/serial rating plate located behind the control panel...
... of gas that a separate circuit serving only this range be electrically grounded in accordance with local codes and ordinances, or in a clear plastic bag. A copy of the above code standards can be obtained from the gas specified on the model/serial rating plate for use with all local codes and ordinances. A time-delay fuse or circuit breaker is adequate. Securely tighten all governing codes and ordinances. The model/serial rating plate located behind the control panel...
Installation Guide
Page 10
... the gas shutoff valve is set temperature is open " position. Press START. If burner does not light, press OFF/CANCEL to light. Complete Installation 1. Check that the range is connected. ■ See "Troubleshooting" in and circuit breaker has not tripped or the household fuse has not blown. ■ Check that the range is plugged in the Use and Care Guide. 8. See "Level Range." 5. See the Use and Care Guide for the upper oven. "Baking" scrolls...
... the gas shutoff valve is set temperature is open " position. Press START. If burner does not light, press OFF/CANCEL to light. Complete Installation 1. Check that the range is connected. ■ See "Troubleshooting" in and circuit breaker has not tripped or the household fuse has not blown. ■ Check that the range is plugged in the Use and Care Guide. 8. See "Level Range." 5. See the Use and Care Guide for the upper oven. "Baking" scrolls...


