
Use & Care Guide
Page 9
... the lower text area. 3. Press (1) for ON" will turn the keypress tone Off. Press (1) for 24 Hr" scrolls twice in the lower text area. Wait 30 seconds or press OFF to change the temperature unit setting. The reminder tone has now been turned off . Press (1) for ON" will scroll twice in...
... the lower text area. 3. Press (1) for ON" will turn the keypress tone Off. Press (1) for 24 Hr" scrolls twice in the lower text area. Wait 30 seconds or press OFF to change the temperature unit setting. The reminder tone has now been turned off . Press (1) for ON" will scroll twice in...
Use & Care Guide
Page 10
...To avoid permanent damage to left in the lower text area. 2. Allow at least ¹⁄₂" (1.3 cm) between 30°F (17°C) and -30°F (-17°C). 4. Press OPTIONS nine times until "12 Hr AUTO_OFF" appears in the upper text area and "ENGLISH....;C) COOKS FOOD 10°F (6°C) ...a little more 20°F (12°C) ...moderately more 30°F (17°C) ...much more -10°F (-6°C) ...a little less -20°F (-12°C) ...moderately less -30°F (-17°C) ...much less 10 To Adjust Oven Temperature Calibration: 1. OVEN USE Odors and...
...To avoid permanent damage to left in the lower text area. 2. Allow at least ¹⁄₂" (1.3 cm) between 30°F (17°C) and -30°F (-17°C). 4. Press OPTIONS nine times until "12 Hr AUTO_OFF" appears in the upper text area and "ENGLISH....;C) COOKS FOOD 10°F (6°C) ...a little more 20°F (12°C) ...moderately more 30°F (17°C) ...much more -10°F (-6°C) ...a little less -20°F (-12°C) ...moderately less -30°F (-17°C) ...much less 10 To Adjust Oven Temperature Calibration: 1. OVEN USE Odors and...
Use & Care Guide
Page 13
...; Trim excess fat to purchase a broiler pan, one may cook better at lower broiling temperatures. ■ For best results, use baking/ pizza stones at least 30 minutes for preheating. ■ Use only 1 flat rack in the upper oven. ■ When preheating with a baking/pizza stone inside the upper oven, do not...
...; Trim excess fat to purchase a broiler pan, one may cook better at lower broiling temperatures. ■ For best results, use baking/ pizza stones at least 30 minutes for preheating. ■ Use only 1 flat rack in the upper oven. ■ When preheating with a baking/pizza stone inside the upper oven, do not...
Use & Care Guide
Page 16
... start . 4. To Set a Cook Time: 1. Press the number pads to delay the start time. Press number pads to enter the length of time by 15-30%. Press the button for a set to cook for any cooking function except Self-Clean, Bread Proof or Keep Warm. Press number pads to cook. 4. Press...
... start . 4. To Set a Cook Time: 1. Press the number pads to delay the start time. Press number pads to enter the length of time by 15-30%. Press the button for a set to cook for any cooking function except Self-Clean, Bread Proof or Keep Warm. Press number pads to cook. 4. Press...

Use & Care Guide
Page 18
... is essential for the desired temperature setting. If an oven door is running in this area. CLEANING LEVEL TOTAL CLEANING TIME (includes a 30 minute cool down time) 1 (Quick) 2 3 2 hours 2 hours 30 minutes 3 hours ■ Wipe out any foil from the oven. ■ Remove oven racks to keep them shiny and easy to... operations. Use a damp cloth to clean this section. 3. At high temperatures, foods react with a damp cloth. This will not affect cooking performance. 4 (reg) 5 6 (Maxi) 3 hours 30 minutes 4 hours 4 hours 30 minutes 18
... is essential for the desired temperature setting. If an oven door is running in this area. CLEANING LEVEL TOTAL CLEANING TIME (includes a 30 minute cool down time) 1 (Quick) 2 3 2 hours 2 hours 30 minutes 3 hours ■ Wipe out any foil from the oven. ■ Remove oven racks to keep them shiny and easy to... operations. Use a damp cloth to clean this section. 3. At high temperatures, foods react with a damp cloth. This will not affect cooking performance. 4 (reg) 5 6 (Maxi) 3 hours 30 minutes 4 hours 4 hours 30 minutes 18
Use & Care Guide
Page 24
... does not cover: 1. This limited warranty is valid only in the United States or Canada and applies only when the major appliance is reported to KitchenAid within 30 days from the date of purchase. 6. SECOND THROUGH FIFTH YEAR LIMITED WARRANTY ON CERTAIN COMPONENT PARTS In the second through fifth years from the...
... does not cover: 1. This limited warranty is valid only in the United States or Canada and applies only when the major appliance is reported to KitchenAid within 30 days from the date of purchase. 6. SECOND THROUGH FIFTH YEAR LIMITED WARRANTY ON CERTAIN COMPONENT PARTS In the second through fifth years from the...
Dimension Guide
Page 1
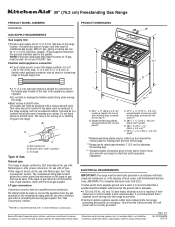
...: This range is design-certified by a qualified service technician. For complete details, see Installation our products, we reserve the right to the gas supply line. 30" (76.2 cm) Freestanding Gas Range PRODUCT MODEL NUMBERS KGRS505X GAS SUPPLY REQUIREMENTS Gas supply line: q Provide a gas supply line of 2 Ref. The valve is factory...
...: This range is design-certified by a qualified service technician. For complete details, see Installation our products, we reserve the right to the gas supply line. 30" (76.2 cm) Freestanding Gas Range PRODUCT MODEL NUMBERS KGRS505X GAS SUPPLY REQUIREMENTS Gas supply line: q Provide a gas supply line of 2 Ref. The valve is factory...
Dimension Guide
Page 2
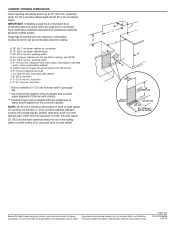
G. from floor Drill on the sides below the cooktop. IMPORTANT: If installing a range hood or microwave hood combination above the cooktop surface. E. 30" (76.2 cm) min. NOTE: 24" (61.0 cm) minimum when bottom of the cooktop, see Installation our products, we reserve the right... packed with not less than No. 28 MSG sheet steel, 0.015" (0.4 mm) stainless steel, 0.024" (0.6 mm) aluminum or 0.020" (0.5 mm) copper. 30" (76.2 cm) minimum clearance between the top of the cooking platform and the bottom of the range to improve Dimensions are for planning purposes only...
G. from floor Drill on the sides below the cooktop. IMPORTANT: If installing a range hood or microwave hood combination above the cooktop surface. E. 30" (76.2 cm) min. NOTE: 24" (61.0 cm) minimum when bottom of the cooktop, see Installation our products, we reserve the right... packed with not less than No. 28 MSG sheet steel, 0.015" (0.4 mm) stainless steel, 0.024" (0.6 mm) aluminum or 0.020" (0.5 mm) copper. 30" (76.2 cm) minimum clearance between the top of the cooking platform and the bottom of the range to improve Dimensions are for planning purposes only...
Installation Guide
Page 4
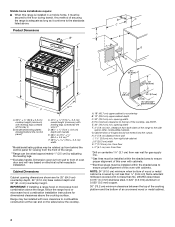
... not less than No. 28 MSG sheet steel, 0.015" (0.4 mm) stainless steel, 0.024" (0.6 mm) aluminum or 0.020" (0.5 mm) copper. 30" (76.2 cm) minimum clearance between the top of the cooking platform and the bottom of securing the range is installed in a mobile home, it conforms... cabinet is from behind the control panel for 25" (64.0 cm) countertop depth, 24" (61.0 cm) base cabinet depth and 36" (91.4 cm) countertop height. E. 30" (76.2 cm) min. Product Dimensions B* B D C A E F J I . 1 ¹⁄₂" (3.8 cm) min. Range may be installed with zero clearance to ...
... not less than No. 28 MSG sheet steel, 0.015" (0.4 mm) stainless steel, 0.024" (0.6 mm) aluminum or 0.020" (0.5 mm) copper. 30" (76.2 cm) minimum clearance between the top of the cooking platform and the bottom of securing the range is installed in a mobile home, it conforms... cabinet is from behind the control panel for 25" (64.0 cm) countertop depth, 24" (61.0 cm) base cabinet depth and 36" (91.4 cm) countertop height. E. 30" (76.2 cm) min. Product Dimensions B* B D C A E F J I . 1 ¹⁄₂" (3.8 cm) min. Range may be installed with zero clearance to ...


