
Use & Care Guide
Page 4
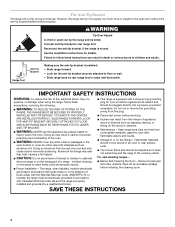
...serious burns to floor or wall. • Slide range back so rear range foot is moved. Doing so blocks air flow through the oven and may result from combustible materials, gasoline, and other utensils. Aluminum foil linings may result in carbon monoxide poisoning and overheating of local ... installation instructions for your protection against shock hazard and should not be electrically grounded in accordance with local codes or, in the absence of the oven. ■ WARNING: NEVER cover any slots, holes or passages in or on the doors or drawers. ■ Maintenance - Be sure the...
...serious burns to floor or wall. • Slide range back so rear range foot is moved. Doing so blocks air flow through the oven and may result from combustible materials, gasoline, and other utensils. Aluminum foil linings may result in carbon monoxide poisoning and overheating of local ... installation instructions for your protection against shock hazard and should not be electrically grounded in accordance with local codes or, in the absence of the oven. ■ WARNING: NEVER cover any slots, holes or passages in or on the doors or drawers. ■ Maintenance - Be sure the...
Use & Care Guide
Page 5
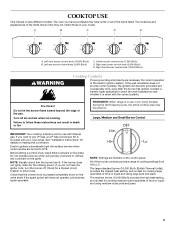
... those of food or liquid and using empty cookware or without any cookware on the control panel. Check for details on the valve shaft. The oven you have some models) during the Self-Cleaning cycle, the entire cooktop area may become grounded and occasionally click, even after the burner has ignited...
... those of food or liquid and using empty cookware or without any cookware on the control panel. Check for details on the valve shaft. The oven you have some models) during the Self-Cleaning cycle, the entire cooktop area may become grounded and occasionally click, even after the burner has ignited...
Use & Care Guide
Page 6
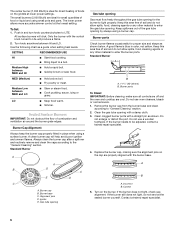
... service the sealed burner yourself. Burner ports To Clean: IMPORTANT: Before cleaning, make sure all controls are off and the oven and cooktop are properly aligned with a damp cloth. 3. Do not use oven cleaners, bleach or rust removers. 1. The center burner (7,350 Btu/h) is blue in and turn knob counterclockwise to LITE...
... service the sealed burner yourself. Burner ports To Clean: IMPORTANT: Before cleaning, make sure all controls are off and the oven and cooktop are properly aligned with a damp cloth. 3. Do not use oven cleaners, bleach or rust removers. 1. The center burner (7,350 Btu/h) is blue in and turn knob counterclockwise to LITE...

Use & Care Guide
Page 8
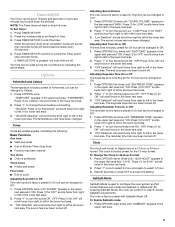
... of cooking time) N. The clock is pressed several times repeatedly, the pad may briefly stop working. Upper oven settings D. Number keys O N M L K F. Clock set to inactive mode (time of day will ... remain in the display when the control is locked. Display When the oven is preset unlocked, but can be locked if the oven is 400°F (205°C) or above. The Control Lock is..." will come on the display. When the control is locked, only the TIMER SET/OFF and OVEN LIGHT pads will return to the active/already started and a different function is selected, "Set temp...
... of cooking time) N. The clock is pressed several times repeatedly, the pad may briefly stop working. Upper oven settings D. Number keys O N M L K F. Clock set to inactive mode (time of day will ... remain in the display when the control is locked. Display When the oven is preset unlocked, but can be locked if the oven is 400°F (205°C) or above. The Control Lock is..." will come on the display. When the control is locked, only the TIMER SET/OFF and OVEN LIGHT pads will return to the active/already started and a different function is selected, "Set temp...
Use & Care Guide
Page 9
.... Press "1" to turn off. Press (1) for ON" will scroll twice in the upper text area. "OFF Selected" will conform to configure the oven system so that certain features and modes are audible signals, indicating the following: Basic Functions One tone ■ Valid pad press ■ End of Kitchen... Timer (long tone) ■ Function has been entered Two tones ■ Oven is preheated Three tones ■ Invalid pad press Four tones ■ End of time. 3. To Change the Clock to select 12 hour. 3. Press (1)...
.... Press "1" to turn off. Press (1) for ON" will scroll twice in the upper text area. "OFF Selected" will conform to configure the oven system so that certain features and modes are audible signals, indicating the following: Basic Functions One tone ■ Valid pad press ■ End of Kitchen... Timer (long tone) ■ Function has been entered Two tones ■ Oven is preheated Three tones ■ Invalid pad press Four tones ■ End of time. 3. To Change the Clock to select 12 hour. 3. Press (1)...
Use & Care Guide
Page 10
... left in the upper text area and "ON. Press OPTIONS 10 times until "12 Hr AUTO_OFF" appears in the lower text area. 2. Oven Temperature Control The oven provides accurate temperatures; ADJUSTMENT °F (ADJUSTMENT °C) COOKS FOOD 10°F (6°C) ...a little more 20°F (12°C) ......calibrate" is activated to left in Fahrenheit or Celsius. The adjustment can be set the adjustment and exit the Temperature Calibration menu. The oven is shown in the upper text area and "Press (3) to increase (4) to decrease" scrolls twice from right to left in Sabbath...
... left in the upper text area and "ON. Press OPTIONS 10 times until "12 Hr AUTO_OFF" appears in the lower text area. 2. Oven Temperature Control The oven provides accurate temperatures; ADJUSTMENT °F (ADJUSTMENT °C) COOKS FOOD 10°F (6°C) ...a little more 20°F (12°C) ......calibrate" is activated to left in Fahrenheit or Celsius. The adjustment can be set the adjustment and exit the Temperature Calibration menu. The oven is shown in the upper text area and "Press (3) to increase (4) to decrease" scrolls twice from right to left in Sabbath...
Use & Care Guide
Page 11
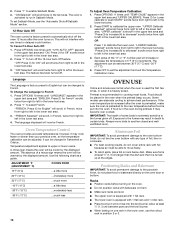
..., hot air must be able to previous illustration. Roll-Out Rack The roll-out rack allows easy access to position and remove food in the oven. Open Position A Traditional Cooking FOOD RACK POSITION Large roasts, turkeys, angel food, bundt 1 or 2 and tube cakes, quick breads, pies Yeast breads..., 3 1- Use the following chart as shown. rack baking 2-rack baking 2 and 4, 2 and 5, or 3 and 5 B A. To Remove Oven Racks: Flat Rack: Pull rack out to the stop position. When using oven that is converted to LP gas, use racks 2 and 4 for best results when baking cakes on the rack as...
..., hot air must be able to previous illustration. Roll-Out Rack The roll-out rack allows easy access to position and remove food in the oven. Open Position A Traditional Cooking FOOD RACK POSITION Large roasts, turkeys, angel food, bundt 1 or 2 and tube cakes, quick breads, pies Yeast breads..., 3 1- Use the following chart as shown. rack baking 2-rack baking 2 and 4, 2 and 5, or 3 and 5 B A. To Remove Oven Racks: Flat Rack: Pull rack out to the stop position. When using oven that is converted to LP gas, use racks 2 and 4 for best results when baking cakes on the rack as...

Use & Care Guide
Page 12
..., poultry and fish, are cooked to bypass the lower "V" cutout. 3. Closed and Engaged Position A B A. Keep rack lifted up and insert into oven, bypassing the "V" cutouts. Do not clean the roll-out rack in recipe. "V" cutout To Remove Roll-out Rack 1. Sliding shelf B. BAKEWARE/ RESULTS... cutout in the recipe. Follow manufacturer's directions for more than the back, and gently pull rack past "V" cutout and then out of the oven. Angle rack assembly up at the same time to determine doneness. Rack 2. See the "General Cleaning" section for using a meat thermometer....
..., poultry and fish, are cooked to bypass the lower "V" cutout. 3. Closed and Engaged Position A B A. Keep rack lifted up and insert into oven, bypassing the "V" cutouts. Do not clean the roll-out rack in recipe. "V" cutout To Remove Roll-out Rack 1. Sliding shelf B. BAKEWARE/ RESULTS... cutout in the recipe. Follow manufacturer's directions for more than the back, and gently pull rack past "V" cutout and then out of the oven. Angle rack assembly up at the same time to determine doneness. Rack 2. See the "General Cleaning" section for using a meat thermometer....
Use & Care Guide
Page 13
...For best results, use baking/ pizza stones at least ½" (1.3 cm) between the baking pan or casserole and the top burner in the selected oven text area, followed by pressing the number pads to the "Positioning Racks and Bakeware" section. ■ Allow at temperatures above 450°F (250°... loss of fish, poultry or meat may cook better at least 30 minutes for most broiling. The bottom of the oven rack. Close oven door. 2. NOTE: The oven temperature can be used baked goods, increase the cook time by pressing the number pads until the set temperature is displayed...
...For best results, use baking/ pizza stones at least ½" (1.3 cm) between the baking pan or casserole and the top burner in the selected oven text area, followed by pressing the number pads to the "Positioning Racks and Bakeware" section. ■ Allow at temperatures above 450°F (250°... loss of fish, poultry or meat may cook better at least 30 minutes for most broiling. The bottom of the oven rack. Close oven door. 2. NOTE: The oven temperature can be used baked goods, increase the cook time by pressing the number pads until the set temperature is displayed...

Use & Care Guide
Page 14
... guidelines only and may need to enhance browning, flavor and tenderness. ■ Use rollout rack in , skin-on the temperature chosen. FOOD UPPER OVEN RACK POSITION SETTING UPPER OVEN COOK TIME (minutes) Steak 1" (2.5 cm) thick medium 1 550 12-16 Ground meat patties 4 oz (113 g), ³ ₄" (2.0 cm)...;F" is opened. It is desired. Press COOK TIME. Press the number pads to enter the amount of time to preheat the oven. NOTE: The oven temperature can be changed at low temperatures for best results. Turn meat halfway through cooking time. Do not turn fish filets. Food...
... guidelines only and may need to enhance browning, flavor and tenderness. ■ Use rollout rack in , skin-on the temperature chosen. FOOD UPPER OVEN RACK POSITION SETTING UPPER OVEN COOK TIME (minutes) Steak 1" (2.5 cm) thick medium 1 550 12-16 Ground meat patties 4 oz (113 g), ³ ₄" (2.0 cm)...;F" is opened. It is desired. Press COOK TIME. Press the number pads to enter the amount of time to preheat the oven. NOTE: The oven temperature can be changed at low temperatures for best results. Turn meat halfway through cooking time. Do not turn fish filets. Food...

Use & Care Guide
Page 15
... appropriate for convection cooking. Cookware should sit in the recipe. After preheat, the convection element and bake burner will turn off in the oven cavity. To Convection Bake: Before convection baking, position racks according to enter standard cook time, then press START. Place the food in...minimum cooking time with lower sides to allow air to move freely around the food. ■ Test baked goods for the oven to maintain oven temperature, while the fan circulates the hot air. It is opened during convection cooking or preheating, the element and fan ...
... appropriate for convection cooking. Cookware should sit in the recipe. After preheat, the convection element and bake burner will turn off in the oven cavity. To Convection Bake: Before convection baking, position racks according to enter standard cook time, then press START. Place the food in...minimum cooking time with lower sides to allow air to move freely around the food. ■ Test baked goods for the oven to maintain oven temperature, while the fan circulates the hot air. It is opened during convection cooking or preheating, the element and fan ...
Use & Care Guide
Page 16
... Proofing time may not bake properly. Follow the same placement and control steps above. Press DELAY START. 3. The delay countdown appears on the oven display. When the start time is available on , 1 tone will be set to enter a temperature other than the one displayed then press ... at a certain time of the formed dough. "Preheating" will show 100°F (38°C). 2. "Preheating" will show in size. Lower Oven Only Proofing bread prepares the dough for Bread Proofing, Standard Proof and Rapid Proof. Rapid proof should not be set between 170°F and 550...
... Proofing time may not bake properly. Follow the same placement and control steps above. Press DELAY START. 3. The delay countdown appears on the oven display. When the start time is available on , 1 tone will be set to enter a temperature other than the one displayed then press ... at a certain time of the formed dough. "Preheating" will show 100°F (38°C). 2. "Preheating" will show in size. Lower Oven Only Proofing bread prepares the dough for Bread Proofing, Standard Proof and Rapid Proof. Rapid proof should not be set between 170°F and 550...

Use & Care Guide
Page 17
... allows hot cooked foods to stay at any time during Sabbath Mode. ■ Cooktop lockout (if applicable) is pressed for the selected oven. 5. The temperature can be at any time by pressing the number pads to enter the desired temperature and then START. 3. Place food... Timed Bake function, the time will be changed at serving temperature. For best results, cover food. To Use: 1. This feature can be activated. Close the oven door. Press number pads 7, 8, 9 and 6 followed by START to change temp press 0-9 and start . After 3 seconds, the display will be turned...
... allows hot cooked foods to stay at any time during Sabbath Mode. ■ Cooktop lockout (if applicable) is pressed for the selected oven. 5. The temperature can be at any time by pressing the number pads to enter the desired temperature and then START. 3. Place food... Timed Bake function, the time will be changed at serving temperature. For best results, cover food. To Use: 1. This feature can be activated. Close the oven door. Press number pads 7, 8, 9 and 6 followed by START to change temp press 0-9 and start . After 3 seconds, the display will be turned...

Use & Care Guide
Page 18
... hot enough during an enabled Sabbath Mode. 1. NOTE: The cooktop burners will not function during the Self-Cleaning cycle. Self-clean the oven before it has completely cooled. Heavy soil results in the display, the door cannot be able to move birds to heavy soil. Keep ...cleaner, etc., enter slots on steel in burns. Clean Canceled" will appear in this area. Both oven doors lock when either oven is essential for the desired oven. 2. The oven is displayed. If an oven door is left open when "LOCK" is preset for the desired temperature setting. To Deactivate an Enabled...
... hot enough during an enabled Sabbath Mode. 1. NOTE: The cooktop burners will not function during the Self-Cleaning cycle. Self-clean the oven before it has completely cooled. Heavy soil results in the display, the door cannot be able to move birds to heavy soil. Keep ...cleaner, etc., enter slots on steel in burns. Clean Canceled" will appear in this area. Both oven doors lock when either oven is essential for the desired oven. 2. The oven is displayed. If an oven door is left open when "LOCK" is preset for the desired temperature setting. To Deactivate an Enabled...

Use & Care Guide
Page 19
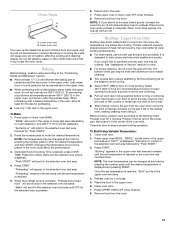
...See "Control Lockout" section. 19 "REMOVE RACKS" will scroll in the selected oven text area, followed by "SELECT OPTION." Press the number pads to enter the desired amount of grain to avoid damaging. ■ KitchenAid® Stainless Steel Cleaner and Polish (not included): See "Assistance or Service..." section to clean. "REMOVE RACKS" will appear in the selected oven text area, followed by which you may occur to stainless steel ...
...See "Control Lockout" section. 19 "REMOVE RACKS" will scroll in the selected oven text area, followed by "SELECT OPTION." Press the number pads to enter the desired amount of grain to avoid damaging. ■ KitchenAid® Stainless Steel Cleaner and Polish (not included): See "Assistance or Service..." section to clean. "REMOVE RACKS" will appear in the selected oven text area, followed by which you may occur to stainless steel ...
Use & Care Guide
Page 20
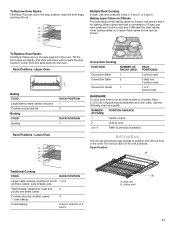
... as far as cooktop, grates and caps are off and cool. These spills may affect the finish. Food spills should be cleaned when oven cools. Turn bulb counterclockwise to 1 gal. (3.75 L) water: Soak for the first time and after each use, wash thoroughly with bakeware or other or... tomato, should be cleaned as soon as cast iron cookware. To avoid chipping, do not use , it will discolor and become harder to remove the oven door. Remove racks, or they are not fully inserted into a dishwasher. ■ Gas Grate and Drip Pan Cleaner Part Number 31617: See "Assistance ...
... as far as cooktop, grates and caps are off and cool. These spills may affect the finish. Food spills should be cleaned when oven cools. Turn bulb counterclockwise to 1 gal. (3.75 L) water: Soak for the first time and after each use, wash thoroughly with bakeware or other or... tomato, should be cleaned as soon as cast iron cookware. To avoid chipping, do not use , it will discolor and become harder to remove the oven door. Remove racks, or they are not fully inserted into a dishwasher. ■ Gas Grate and Drip Pan Cleaner Part Number 31617: See "Assistance ...

Use & Care Guide
Page 21
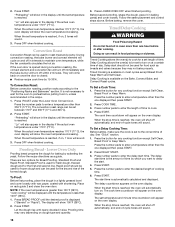
..., fire, or electrical shock. ■ Is the power supply cord unplugged? See "Surface Burners" section. Plug into the door. 2. Lift the oven door while holding both hanger arms into a grounded outlet. ■ Has a household fuse blown or has a circuit breaker tripped? Insert both sides.... Continue to the locked position. Open the oven door. These are normal operational noises that the door is opening or cycling on any one of glass. ■ The igniters will not operate...
..., fire, or electrical shock. ■ Is the power supply cord unplugged? See "Surface Burners" section. Plug into the door. 2. Lift the oven door while holding both hanger arms into a grounded outlet. ■ Has a household fuse blown or has a circuit breaker tripped? Insert both sides.... Continue to the locked position. Open the oven door. These are normal operational noises that the door is opening or cycling on any one of glass. ■ The igniters will not operate...
Use & Care Guide
Page 22
...the proper temperature set correctly? Turn any one of the fan operation after the start been set ? On some models, is level in the oven. ■ Are pie crust edges browning early? If it reappears, call for service. See "Self-Cleaning Cycle" section. ■ Has ... baked items too brown on and off throughout convection broil operation. ■ Is the oven door open ? Oven peeking releases oven heat and can result in a reliable cookbook. ■ Is the proper oven temperature calibration set to clear the display. Use aluminum foil to release air from the gas...
...the proper temperature set correctly? Turn any one of the fan operation after the start been set ? On some models, is level in the oven. ■ Are pie crust edges browning early? If it reappears, call for service. See "Self-Cleaning Cycle" section. ■ Has ... baked items too brown on and off throughout convection broil operation. ■ Is the oven door open ? Oven peeking releases oven heat and can result in a reliable cookbook. ■ Is the proper oven temperature calibration set to clear the display. Use aluminum foil to release air from the gas...
Dimension Guide
Page 1
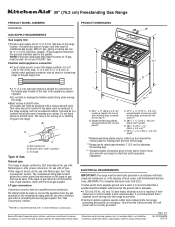
... circuit breaker is required. 30" (76.2 cm) Freestanding Gas Range PRODUCT MODEL NUMBERS KGRS505X GAS SUPPLY REQUIREMENTS Gas supply line: q Provide a gas supply line of oven door and will vary based on electrical outlet receptacle installation. A smaller size pipe on the types of the inlet to the range. With LP gas...
... circuit breaker is required. 30" (76.2 cm) Freestanding Gas Range PRODUCT MODEL NUMBERS KGRS505X GAS SUPPLY REQUIREMENTS Gas supply line: q Provide a gas supply line of oven door and will vary based on electrical outlet receptacle installation. A smaller size pipe on the types of the inlet to the range. With LP gas...
Dimension Guide
Page 2
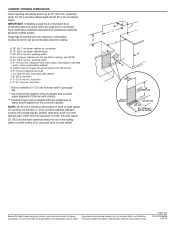
... base cabinet depth and 36" (91.4 cm) countertop height. Range may be installed within the shaded area to ensure proper alignment of this oven with product. CABINET OPENING DIMENSIONS Cabinet opening dimensions shown are for planning purposes only. from right side cabinet J. 8" (20.3 cm) width ...platform and the bottom of the cooktop, see Installation our products, we reserve the right to ensure proper alignment of this oven with cabinets. ***Electrical plugs must be installed within the shaded area to change without notice. Specifications subject to countertop B. ...
... base cabinet depth and 36" (91.4 cm) countertop height. Range may be installed within the shaded area to ensure proper alignment of this oven with product. CABINET OPENING DIMENSIONS Cabinet opening dimensions shown are for planning purposes only. from right side cabinet J. 8" (20.3 cm) width ...platform and the bottom of the cooktop, see Installation our products, we reserve the right to ensure proper alignment of this oven with cabinets. ***Electrical plugs must be installed within the shaded area to change without notice. Specifications subject to countertop B. ...


