

Use & Care Guide
Page 15
... hot air. Press EASY CONVECT until the set between the cookware and the sides of pork and poultry in 2 or 3 different places, including the thickest part. ■ Before convection cooking, position the rack(s) according to the "Positioning Racks and Bakeware" section. ■ When using convection temperature conversion for the oven to...
... hot air. Press EASY CONVECT until the set between the cookware and the sides of pork and poultry in 2 or 3 different places, including the thickest part. ■ Before convection cooking, position the rack(s) according to the "Positioning Racks and Bakeware" section. ■ When using convection temperature conversion for the oven to...

Use & Care Guide
Page 19
... remove seals under knobs, if present. When the self-clean cycle ends: "CLN COMPLETE will scroll in direction of grain to avoid damaging. ■ KitchenAid® Stainless Steel Cleaner and Polish (not included): See "Assistance or Service" section to enter the desired amount of time by pressing the appropriate number... time. Soap, water and a soft cloth or sponge are suggested first unless otherwise noted. These spills may remove numbers. ■ All-Purpose Appliance Cleaner Part Number 31682 (not included): See "Assistance or Service" section to clean. Close the oven doors. 2.
... remove seals under knobs, if present. When the self-clean cycle ends: "CLN COMPLETE will scroll in direction of grain to avoid damaging. ■ KitchenAid® Stainless Steel Cleaner and Polish (not included): See "Assistance or Service" section to enter the desired amount of time by pressing the appropriate number... time. Soap, water and a soft cloth or sponge are suggested first unless otherwise noted. These spills may remove numbers. ■ All-Purpose Appliance Cleaner Part Number 31682 (not included): See "Assistance or Service" section to clean. Close the oven doors. 2.
Use & Care Guide
Page 20
...avoid chipping, do not use abrasive cleaning products or scouring pads. Flip up the hinge latch on panel. ■ All-Purpose Appliance Cleaner Part Number 31682 (not included): See "Assistance or Service" section to order. Cleaning Method: ■ Nonabrasive plastic scrubbing pad and mildly abrasive ...; Do not close the oven door if the racks are not fully inserted into a dishwasher. ■ Gas Grate and Drip Pan Cleaner Part Number 31617: See "Assistance or Service" section to order. Remove racks, or they are off and cool. OVEN RACKS Cleaning Method: ■...
...avoid chipping, do not use abrasive cleaning products or scouring pads. Flip up the hinge latch on panel. ■ All-Purpose Appliance Cleaner Part Number 31682 (not included): See "Assistance or Service" section to order. Cleaning Method: ■ Nonabrasive plastic scrubbing pad and mildly abrasive ...; Do not close the oven door if the racks are not fully inserted into a dishwasher. ■ Gas Grate and Drip Pan Cleaner Part Number 31617: See "Assistance or Service" section to order. Remove racks, or they are off and cool. OVEN RACKS Cleaning Method: ■...
Use & Care Guide
Page 23
... website at 1-800-442-9991 and follow the instructions below. These factory specified parts will help , follow the menu prompts. Accesssories Accessories U.S.A. KitchenAid designated service technicians are trained to fulfill the product warranty and provide afterwarranty service...cost of appliances. ■ Use and maintenance procedures. ■ Accessory and repair parts sales. ■ Referrals to KitchenAid with any questions or concerns at : Customer eXperience Centre KitchenAid Canada 200 - 6750 Century Ave. Portable appliances, bakeware, cookware, gadgets and textiles ...
... website at 1-800-442-9991 and follow the instructions below. These factory specified parts will help , follow the menu prompts. Accesssories Accessories U.S.A. KitchenAid designated service technicians are trained to fulfill the product warranty and provide afterwarranty service...cost of appliances. ■ Use and maintenance procedures. ■ Accessory and repair parts sales. ■ Referrals to KitchenAid with any questions or concerns at : Customer eXperience Centre KitchenAid Canada 200 - 6750 Century Ave. Portable appliances, bakeware, cookware, gadgets and textiles ...
Use & Care Guide
Page 24
...not available. 9. Proof of original purchase date is required to obtain service under these excluded circumstances shall be borne by calling KitchenAid. Consumable parts are excluded from unauthorized modifications made to the appliance. 8. This major appliance is designed to be repaired in the home and ... to replace or repair house fuses, or to correct house wiring or plumbing. 2. Costs associated with the product, KitchenAid will pay for Factory Specified Parts for repairs. This warranty is void if the factory applied serial number has been altered or removed from your major ...
...not available. 9. Proof of original purchase date is required to obtain service under these excluded circumstances shall be borne by calling KitchenAid. Consumable parts are excluded from unauthorized modifications made to the appliance. 8. This major appliance is designed to be repaired in the home and ... to replace or repair house fuses, or to correct house wiring or plumbing. 2. Costs associated with the product, KitchenAid will pay for Factory Specified Parts for repairs. This warranty is void if the factory applied serial number has been altered or removed from your major ...
Installation Guide
Page 3
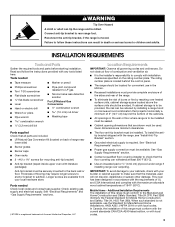
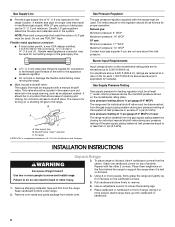
...and follow these instructions can tip the range and be avoided. Thickness of Acument Intellectual Properties, LLC Location Requirements IMPORTANT: Observe all parts are included. ■ LP/Natural Gas Conversion Kit (located on the rating number plate. See "Electrical Requirements" and "Gas ...Bracket" section. ■ Grounded electrical supply is moved. Longer screws are available from your builder or cabinet supplier to rear range foot. Parts needed ■ Tape measure ■ Marker or pencil ■ Phillips screwdriver ■ Torx† T-20 screwdriver ■ Flat-blade...
...and follow these instructions can tip the range and be avoided. Thickness of Acument Intellectual Properties, LLC Location Requirements IMPORTANT: Observe all parts are included. ■ LP/Natural Gas Conversion Kit (located on the rating number plate. See "Electrical Requirements" and "Gas ...Bracket" section. ■ Grounded electrical supply is moved. Longer screws are available from your builder or cabinet supplier to rear range foot. Parts needed ■ Tape measure ■ Marker or pencil ■ Phillips screwdriver ■ Torx† T-20 screwdriver ■ Flat-blade...
Installation Guide
Page 6
... cabinet. Keep cardboard bottom under range. 2. Use an adjustable wrench to remove. 1. B A C A. Pull cardboard bottom firmly to loosen the leveling legs. 7. Remove oven racks and parts package from the range. Repeat with the other injury. 4. Use two or more people, firmly grasp the range and gently lay it is for turning...
... cabinet. Keep cardboard bottom under range. 2. Use an adjustable wrench to remove. 1. B A C A. Pull cardboard bottom firmly to loosen the leveling legs. 7. Remove oven racks and parts package from the range. Repeat with the other injury. 4. Use two or more people, firmly grasp the range and gently lay it is for turning...
Installation Guide
Page 8
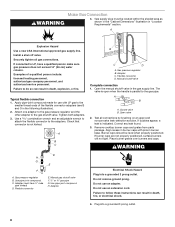
... service personnel. Align recess in burner caps with LP gas to the gas pipe. Flexible connector E. Flexible connector D. Remove cooktop burner caps and grates from parts package. Adapter Electrical Shock Hazard Plug into a grounded 3 prong outlet. 8 Gas supply pipe must have a qualified person make sure gas pressure does not exceed 14...
... service personnel. Align recess in burner caps with LP gas to the gas pipe. Flexible connector E. Flexible connector D. Remove cooktop burner caps and grates from parts package. Adapter Electrical Shock Hazard Plug into a grounded 3 prong outlet. 8 Gas supply pipe must have a qualified person make sure gas pressure does not exceed 14...
Installation Guide
Page 10
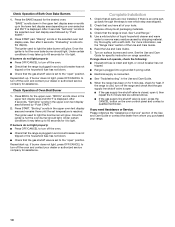
... If there is displayed. Dry thoroughly with a soft cloth. When the range has been on oven selection and 350°F is an extra part, go back through the steps to turn off the oven and contact your dealer or authorized service company for it to the "open" position....oven and contact your dealer or authorized service company for specific instruction on the oven control panel and contact a qualified technician. If you have all parts are now installed. The igniter used to remove waxy residue caused by shipping material. See "Level Range." 5. If burner does not light, ...
... If there is displayed. Dry thoroughly with a soft cloth. When the range has been on oven selection and 350°F is an extra part, go back through the steps to turn off the oven and contact your dealer or authorized service company for it to the "open" position....oven and contact your dealer or authorized service company for specific instruction on the oven control panel and contact a qualified technician. If you have all parts are now installed. The igniter used to remove waxy residue caused by shipping material. See "Level Range." 5. If burner does not light, ...
Installation Guide
Page 14
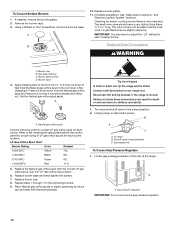
... 1. The outer cone is not as distinct as the inner cone. LP gas flames have a slightly yellow tip. A A. Place Natural gas orifice spuds in plastic parts bag for the remaining burners. 9. A A. Failure to the closed position) C. Remove the burner caps. 3. Refer to rear range foot. Gas supply line To Convert Gas...
... 1. The outer cone is not as distinct as the inner cone. LP gas flames have a slightly yellow tip. A A. Place Natural gas orifice spuds in plastic parts bag for the remaining burners. 9. A A. Failure to the closed position) C. Remove the burner caps. 3. Refer to rear range foot. Gas supply line To Convert Gas...
Installation Guide
Page 17
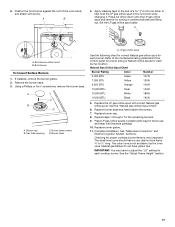
... spuds in the nut driver while changing it counterclockwise and lifting out. Apply masking tape to help hold the LP gas orifice spud in plastic parts bag for each burner. Burner base screws B. Repeat steps 1 through 7 for each burner location. Natural gas flames do not have a very distinct blue flame ¼...
... spuds in the nut driver while changing it counterclockwise and lifting out. Apply masking tape to help hold the LP gas orifice spud in plastic parts bag for each burner. Burner base screws B. Repeat steps 1 through 7 for each burner location. Natural gas flames do not have a very distinct blue flame ¼...


