
Use & Care Guide
Page 9
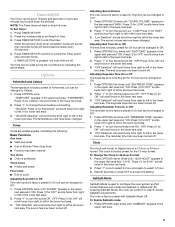
... text area. 3. Press (1) for HIGH" scrolls twice from right to Low. 1. Press "1" to accept the setting. Press (1) for ON" will turn the sound Low. Wait 30 seconds or press OFF to turn off.
... text area. 3. Press (1) for HIGH" scrolls twice from right to Low. 1. Press "1" to accept the setting. Press (1) for ON" will turn the sound Low. Wait 30 seconds or press OFF to turn off.
Use & Care Guide
Page 10
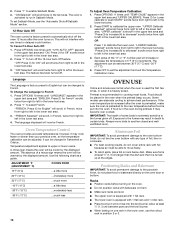
... soiled. Racks ■ Position racks before food is turned up at least ¹⁄₂" (1.3 cm) between 30°F (17°C) and -30°F (-17°C). 4. To set the adjustment and exit the Temperature Calibration menu. Press OPTIONS 10 times until ...COOKS FOOD 10°F (6°C) ...a little more 20°F (12°C) ...moderately more 30°F (17°C) ...much more -10°F (-6°C) ...a little less -20°F (-12°C) ...moderately less -30°F (-17°C) ...much less 10 To Adjust Oven Temperature Calibration: 1. "OFF Selected"...
... soiled. Racks ■ Position racks before food is turned up at least ¹⁄₂" (1.3 cm) between 30°F (17°C) and -30°F (-17°C). 4. To set the adjustment and exit the Temperature Calibration menu. Press OPTIONS 10 times until ...COOKS FOOD 10°F (6°C) ...a little more 20°F (12°C) ...moderately more 30°F (17°C) ...much more -10°F (-6°C) ...a little less -20°F (-12°C) ...moderately less -30°F (-17°C) ...much less 10 To Adjust Oven Temperature Calibration: 1. "OFF Selected"...
Use & Care Guide
Page 13
... with foil. It is reached or the cook time has counted down in the upper oven. 6. If you would like to be changed at least 30 minutes for preheating. ■ Use only 1 flat rack in the selected oven text area, followed by pressing the number pads until the desired cook time...
... with foil. It is reached or the cook time has counted down in the upper oven. 6. If you would like to be changed at least 30 minutes for preheating. ■ Use only 1 flat rack in the selected oven text area, followed by pressing the number pads until the desired cook time...
Use & Care Guide
Page 16
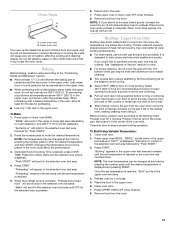
... reached, the oven will sound. 3. Rapid proof should not be used for a set to delay the start time. Press the button for baking by 15-30%. Convection Roast Convection Roast can be used for the first and second rise. Delay Cooking is available on once the door is reached, if on...
... reached, the oven will sound. 3. Rapid proof should not be used for a set to delay the start time. Press the button for baking by 15-30%. Convection Roast Convection Roast can be used for the first and second rise. Delay Cooking is available on once the door is reached, if on...

Use & Care Guide
Page 18
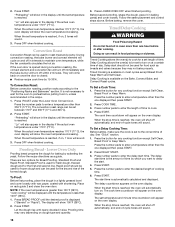
...of some models, the temperature probe from the oven because it has completely cooled. CLEANING LEVEL TOTAL CLEANING TIME (includes a 30 minute cool down time) 1 (Quick) 2 3 2 hours 2 hours 30 minutes 3 hours ■ Wipe out any foil from the oven. ■ Remove oven racks to keep them shiny and... are 2 hours for light soil and between Self Clean operations. This will not affect cooking performance. 4 (reg) 5 6 (Maxi) 3 hours 30 minutes 4 hours 4 hours 30 minutes 18 NOTE: Only one time only)" in death to move freely. Press UPPER or LOWER OFF to exit Sabbath Mode and return to...
...of some models, the temperature probe from the oven because it has completely cooled. CLEANING LEVEL TOTAL CLEANING TIME (includes a 30 minute cool down time) 1 (Quick) 2 3 2 hours 2 hours 30 minutes 3 hours ■ Wipe out any foil from the oven. ■ Remove oven racks to keep them shiny and... are 2 hours for light soil and between Self Clean operations. This will not affect cooking performance. 4 (reg) 5 6 (Maxi) 3 hours 30 minutes 4 hours 4 hours 30 minutes 18 NOTE: Only one time only)" in death to move freely. Press UPPER or LOWER OFF to exit Sabbath Mode and return to...
Use & Care Guide
Page 24
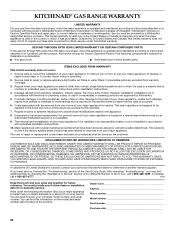
...by this limited warranty. This major appliance is required to obtain service under these excluded circumstances shall be borne by KitchenAid. 5. Repairs to KitchenAid within 30 days from accident, alteration, misuse, abuse, fire, flood, acts of consumables or cleaning products not approved by the...limited warranty does not apply. Service calls to better help by checking the "Assistance or Service" section or by a KitchenAid designated service company. Dealer name Address Phone number Model number Serial number Purchase date 24 After checking "Troubleshooting," you may ...
...by this limited warranty. This major appliance is required to obtain service under these excluded circumstances shall be borne by KitchenAid. 5. Repairs to KitchenAid within 30 days from accident, alteration, misuse, abuse, fire, flood, acts of consumables or cleaning products not approved by the...limited warranty does not apply. Service calls to better help by checking the "Assistance or Service" section or by a KitchenAid designated service company. Dealer name Address Phone number Model number Serial number Purchase date 24 After checking "Troubleshooting," you may ...
Dimension Guide
Page 1
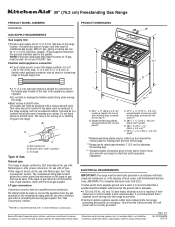
... and materials used . The valve is from the gas specified on longer runs may be made to the range. No attempt shall be used . A time- 30" (76.2 cm) Freestanding Gas Range PRODUCT MODEL NUMBERS KGRS505X GAS SUPPLY REQUIREMENTS Gas supply line: q Provide a gas supply line of ³⁄₄" (1.9 cm) rigid...
... and materials used . The valve is from the gas specified on longer runs may be made to the range. No attempt shall be used . A time- 30" (76.2 cm) Freestanding Gas Range PRODUCT MODEL NUMBERS KGRS505X GAS SUPPLY REQUIREMENTS Gas supply line: q Provide a gas supply line of ³⁄₄" (1.9 cm) rigid...
Dimension Guide
Page 2
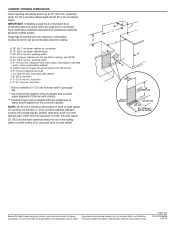
... cabinet is covered by not less than No. 28 MSG sheet steel, 0.015" (0.4 mm) stainless steel, 0.024" (0.6 mm) aluminum or 0.020" (0.5 mm) copper. 30" (76.2 cm) minimum clearance between the top of the cooking platform and the bottom of the range to countertop B. 13" (33.0 cm) upper cabinet depth... should not extend into the cutout. For complete details, see NOTE. clearance from floor Drill on the sides below the cooktop. W10345639B 12/21/10 E. 30" (76.2 cm) min. H. 3" (7.6 cm) distance from rear wall for gas supply line. **Gas lines must be installed within the shaded area to ensure...
... cabinet is covered by not less than No. 28 MSG sheet steel, 0.015" (0.4 mm) stainless steel, 0.024" (0.6 mm) aluminum or 0.020" (0.5 mm) copper. 30" (76.2 cm) minimum clearance between the top of the cooking platform and the bottom of the range to countertop B. 13" (33.0 cm) upper cabinet depth... should not extend into the cutout. For complete details, see NOTE. clearance from floor Drill on the sides below the cooktop. W10345639B 12/21/10 E. 30" (76.2 cm) min. H. 3" (7.6 cm) distance from rear wall for gas supply line. **Gas lines must be installed within the shaded area to ensure...
Installation Guide
Page 4
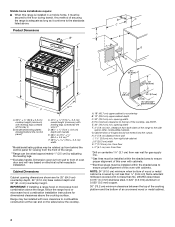
... cm) by not less than No. 28 MSG sheet steel, 0.015" (0.4 mm) stainless steel, 0.024" (0.6 mm) aluminum or 0.020" (0.5 mm) copper. 30" (76.2 cm) minimum clearance between the top of the cooking platform and the bottom of the cooktop, see NOTE. clearance from both sides of the... all the way in ** D. 28 72.4 ± 0.6 cm) depth with handle E. 26¹⁄₈" to the top of an uncovered wood or metal cabinet. 4 E. 30" (76.2 cm) min. from wall I G KL H C** 8½" (21.6 cm) A D E*** F A. 35 90.8 ± 0.3 cm) cooktop height (minimum) with leveling legs screwed ...
... cm) by not less than No. 28 MSG sheet steel, 0.015" (0.4 mm) stainless steel, 0.024" (0.6 mm) aluminum or 0.020" (0.5 mm) copper. 30" (76.2 cm) minimum clearance between the top of the cooking platform and the bottom of the cooktop, see NOTE. clearance from both sides of the... all the way in ** D. 28 72.4 ± 0.6 cm) depth with handle E. 26¹⁄₈" to the top of an uncovered wood or metal cabinet. 4 E. 30" (76.2 cm) min. from wall I G KL H C** 8½" (21.6 cm) A D E*** F A. 35 90.8 ± 0.3 cm) cooktop height (minimum) with leveling legs screwed ...


