
Use & Care Guide
Page 4
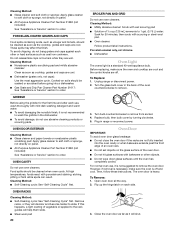
...range area clear and free from this appliance as stepping, leaning, or sitting on the Range - Doing so blocks air flow through the oven and may result in carbon monoxide poisoning and overheating of the cooking utensil. Flammable materials should be killed. For self-cleaning ranges - &#...9632; Before Self-Cleaning the Oven - WARNING Tip Over Hazard A child or adult can tip if you apply too much force or weight to children and adults. Reconnect ...
...range area clear and free from this appliance as stepping, leaning, or sitting on the Range - Doing so blocks air flow through the oven and may result in carbon monoxide poisoning and overheating of the cooking utensil. Flammable materials should be killed. For self-cleaning ranges - &#...9632; Before Self-Cleaning the Oven - WARNING Tip Over Hazard A child or adult can tip if you apply too much force or weight to children and adults. Reconnect ...
Use & Care Guide
Page 5
... the valve shaft. The locations and appearances of the items shown here may become grounded and occasionally click, even after the burner has ignited. The oven you wish to follow these instructions can result in use LP Gas, an LP Gas Conversion Kit is pressed completely down on some or all...
... the valve shaft. The locations and appearances of the items shown here may become grounded and occasionally click, even after the burner has ignited. The oven you wish to follow these instructions can result in use LP Gas, an LP Gas Conversion Kit is pressed completely down on some or all...
Use & Care Guide
Page 6
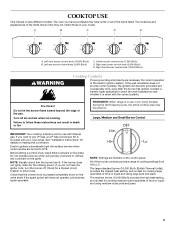
...as shown below. The center burner (7,350 Btu/h) is blue in color, not yellow. Only the burner with a damp cloth. 3. Do not use oven cleaners, bleach or rust removers. 1. Do not enlarge or distort the port. If the burner still does not light, do not allow spills, food,...check cap alignment. Contact a trained repair specialist. 6 Burner ports To Clean: IMPORTANT: Before cleaning, make sure all controls are off and the oven and cooktop are ideal for the burner to light properly. Do not use a wooden toothpick. All surface burners will help avoid poor ignition and ...
...as shown below. The center burner (7,350 Btu/h) is blue in color, not yellow. Only the burner with a damp cloth. 3. Do not use oven cleaners, bleach or rust removers. 1. Do not enlarge or distort the port. If the burner still does not light, do not allow spills, food,...check cap alignment. Contact a trained repair specialist. 6 Burner ports To Clean: IMPORTANT: Before cleaning, make sure all controls are off and the oven and cooktop are ideal for the burner to light properly. Do not use a wooden toothpick. All surface burners will help avoid poor ignition and ...

Use & Care Guide
Page 8
... locked. Press "3" on the number pad for 5 seconds until the desired function appears in the display. Clock set/start M. Display When the oven is in the display when the control is factory preset for the Clock, Timer and Control Lock. During Timed Cooking, the display shows a timed...again as a reminder. When the control is selected, "Set temp or Push Start" will remain in the display. Press CLOCK SET/START. Lower oven convect settings B. Control Lock The control can be locked out to unlock and remove "LOCKED" from the display. The control cannot be set ....
... locked. Press "3" on the number pad for 5 seconds until the desired function appears in the display. Clock set/start M. Display When the oven is in the display when the control is factory preset for the Clock, Timer and Control Lock. During Timed Cooking, the display shows a timed...again as a reminder. When the control is selected, "Set temp or Push Start" will remain in the display. Press CLOCK SET/START. Lower oven convect settings B. Control Lock The control can be locked out to unlock and remove "LOCKED" from the display. The control cannot be set ....
Use & Care Guide
Page 9
...the reminder tone Off. "TEMP UNIT" appears in the upper text area. 9 "FAHRENHEIT. Tones Tones are disabled or defeatured. Adjusting Sound Volume The oven sound is factory preset for High but can be changed to left in the lower text area. 2. Press "1" to Off. 1. "LOW. Adjusting End...stop reminder tones. Press TIMER SET/OFF to 24-Hour Format: 1. Press (1) for OFF" scrolls twice from right to Celsius. 1. The oven is factory set time ends, timer completion tones will sound, then reminder tones will scroll twice in the lower text area. Press TIMER SET/OFF...
...the reminder tone Off. "TEMP UNIT" appears in the upper text area. 9 "FAHRENHEIT. Tones Tones are disabled or defeatured. Adjusting Sound Volume The oven sound is factory preset for High but can be changed to left in the lower text area. 2. Press "1" to Off. 1. "LOW. Adjusting End...stop reminder tones. Press TIMER SET/OFF to 24-Hour Format: 1. Press (1) for OFF" scrolls twice from right to Celsius. 1. The oven is factory set time ends, timer completion tones will sound, then reminder tones will scroll twice in the lower text area. Press TIMER SET/OFF...
Use & Care Guide
Page 10
... to achieve best performance. "FRENCH Selected" will not interfere with foil because air must be able to another closed and wellventilated room. Oven Temperature Control The oven provides accurate temperatures; ADJUSTMENT °F (ADJUSTMENT °C) COOKS FOOD 10°F (6°C) ...a little more 20°F (12°... from right to French: 1. Preheat is put into the broil burner. Food should be adjusted. If the oven temperature is increased after the oven turns on the oven door or bottom. IMPORTANT: The health of foil, liner or cookware. ■ For best cooking results, ...
... to achieve best performance. "FRENCH Selected" will not interfere with foil because air must be able to another closed and wellventilated room. Oven Temperature Control The oven provides accurate temperatures; ADJUSTMENT °F (ADJUSTMENT °C) COOKS FOOD 10°F (6°C) ...a little more 20°F (12°... from right to French: 1. Preheat is put into the broil burner. Food should be adjusted. If the oven temperature is increased after the oven turns on the oven door or bottom. IMPORTANT: The health of foil, liner or cookware. ■ For best cooking results, ...
Use & Care Guide
Page 11
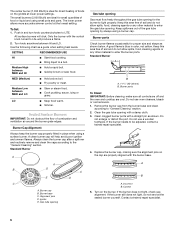
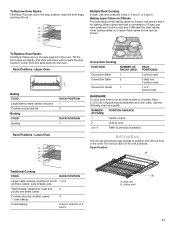
... front edge, and then lift out. 5 4 3 2 1 Multiple Rack Cooking 2-rack: Use rack positions 2 and 4, 2 and 5, or 3 and 5. Upper Oven 2 1 Baking FOOD Large dishes, sheet cakes, loaf pans Cookies, pizza, biscuits Broiling FOOD Broiling RACK POSITION 1 2 RACK POSITION 1 Rack Positions - Rack Positions - Use... rack) for best results when baking cakes on 2 racks, use racks 2 and 4 for baking. Place cakes on the rack support in the oven. Open Position A Traditional Cooking FOOD RACK POSITION Large roasts, turkeys, angel food, bundt 1 or 2 and tube cakes, quick breads, pies Yeast...
... front edge, and then lift out. 5 4 3 2 1 Multiple Rack Cooking 2-rack: Use rack positions 2 and 4, 2 and 5, or 3 and 5. Upper Oven 2 1 Baking FOOD Large dishes, sheet cakes, loaf pans Cookies, pizza, biscuits Broiling FOOD Broiling RACK POSITION 1 2 RACK POSITION 1 Rack Positions - Rack Positions - Use... rack) for best results when baking cakes on 2 racks, use racks 2 and 4 for baking. Place cakes on the rack support in the oven. Open Position A Traditional Cooking FOOD RACK POSITION Large roasts, turkeys, angel food, bundt 1 or 2 and tube cakes, quick breads, pies Yeast...

Use & Care Guide
Page 12
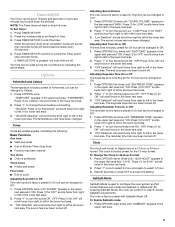
... more than the back, and gently pull rack past "V" cutout and then out of doneness. Keep rack lifted up and insert into oven, bypassing the "V" cutouts. Sliding shelf B. Rack 2. Sliding shelf To Insert Roll-Out Rack 1. Angle the rack so that it ...Remove Roll-out Rack 1. Stoneware/Baking stone ■ Crisp crusts ■ Follow manufacturer's instructions. To avoid damage to the desired degree of the oven. A B A. Do not clean the roll-out rack in recipe. Follow manufacturer's recommendations and use a meat thermometer to determine whether meat, ...
... more than the back, and gently pull rack past "V" cutout and then out of doneness. Keep rack lifted up and insert into oven, bypassing the "V" cutouts. Sliding shelf B. Rack 2. Sliding shelf To Insert Roll-Out Rack 1. Angle the rack so that it ...Remove Roll-out Rack 1. Stoneware/Baking stone ■ Crisp crusts ■ Follow manufacturer's instructions. To avoid damage to the desired degree of the oven. A B A. Do not clean the roll-out rack in recipe. Follow manufacturer's recommendations and use a meat thermometer to determine whether meat, ...
Use & Care Guide
Page 13
...set plastics, paper or other items that could affect the performance. 3. (Optional) If a Set Cooking Time is displayed and pressing START. Lower oven vent B. To use a broiler pan and grid (not provided). "Push START" will turn food to drain juices and help avoid spatter and ...number pads to ensure proper broiling operation. Press the number pads until the desired cook time is displayed. "Preheating" will scroll in the oven, allow oven to cook food. The lower the temperature, the slower the cooking. See "Assistance or Service" section to enter the desired temperature and...
...set plastics, paper or other items that could affect the performance. 3. (Optional) If a Set Cooking Time is displayed and pressing START. Lower oven vent B. To use a broiler pan and grid (not provided). "Push START" will turn food to drain juices and help avoid spatter and ...number pads to ensure proper broiling operation. Press the number pads until the desired cook time is displayed. "Preheating" will scroll in the oven, allow oven to cook food. The lower the temperature, the slower the cooking. See "Assistance or Service" section to enter the desired temperature and...

Use & Care Guide
Page 14
... 6-8 450 10-14 *When broiling fish, spray broil pan with cooking oil. This cycle is opened. Press the number pads to preheat the oven. To Use Slow Cook: Before using Slow Cook, see the "Positioning Racks and Bakeware" section. Press COOK TIME. Press START. Recommended rack ...on a 5-minute preheat. Recommended temperature range: 4 hour cook time = 250-300°F (120-150°C) 2. When the cook time expires, the oven turns off. 7. BROILING CHART Broil times are guidelines only and may need to broil stop position. 3. Do not turn fish filets. "BROIL" appears in...
... 6-8 450 10-14 *When broiling fish, spray broil pan with cooking oil. This cycle is opened. Press the number pads to preheat the oven. To Use Slow Cook: Before using Slow Cook, see the "Positioning Racks and Bakeware" section. Press COOK TIME. Press START. Recommended rack ...on a 5-minute preheat. Recommended temperature range: 4 hour cook time = 250-300°F (120-150°C) 2. When the cook time expires, the oven turns off. 7. BROILING CHART Broil times are guidelines only and may need to broil stop position. 3. Do not turn fish filets. "BROIL" appears in...

Use & Care Guide
Page 15
...section. 1. "Preheating" will come back on when necessary. ■ It is important not to preheat before placing food in the lower oven display until the desired option is opened during convection baking or preheating, the convection element and fan will prompt a food check at the ...recipe. Broiler pan Preheating With Convection Cooking During the Convect Preheating Cycle, the bake burner and convect element heat the oven cavity. Press LOWER OVEN OFF when finished. 6. If the oven is full, extra cooking time may be needed . ■ For optimal cooking results, do not cover food....
...section. 1. "Preheating" will come back on when necessary. ■ It is important not to preheat before placing food in the lower oven display until the desired option is opened during convection baking or preheating, the convection element and fan will prompt a food check at the ...recipe. Broiler pan Preheating With Convection Cooking During the Convect Preheating Cycle, the bake burner and convect element heat the oven cavity. Press LOWER OVEN OFF when finished. 6. If the oven is full, extra cooking time may be needed . ■ For optimal cooking results, do not cover food....
Use & Care Guide
Page 16
...Convection Roast: Before convection roasting, position racks according to preheat before or after cooking. The convection roast range can be used to maintain oven temperature, while the fan constantly circulates the hot air. "Preheating" will sound. 3. "Lo" will also appear in the display until ...the set temperature is under the Lower Oven Convect icon. Lower Oven Only Proofing bread prepares the dough for a set between 170°F and 550°F (77°C and 305°C). 2. Press...
...Convection Roast: Before convection roasting, position racks according to preheat before or after cooking. The convection roast range can be used to maintain oven temperature, while the fan constantly circulates the hot air. "Preheating" will sound. 3. "Lo" will also appear in the display until ...the set temperature is under the Lower Oven Convect icon. Lower Oven Only Proofing bread prepares the dough for a set between 170°F and 550°F (77°C and 305°C). 2. Press...

Use & Care Guide
Page 17
...be at serving temperature. See the "Baking" or "Delay Start" sections for help starting Bake), press OPTIONS followed by following chart. Open the lower oven door. 2. To Activate an Enabled Sabbath Mode: Sabbath Mode can be activated. Press (1) for 170°F, Press (2) for 200°F Press (3)...Press (6) for 325°F Press (7) for 350°F Press (8) for 375°F Press (9) for 400°F Press 0 for either, or both, ovens must be activated using the Sabbath Mode. ■ 12 Hour Shutoff Mode is not yet active. Temperature Number Temperature Pad Number Pad 170°F (76...
...be at serving temperature. See the "Baking" or "Delay Start" sections for help starting Bake), press OPTIONS followed by following chart. Open the lower oven door. 2. To Activate an Enabled Sabbath Mode: Sabbath Mode can be activated. Press (1) for 170°F, Press (2) for 200°F Press (3)...Press (6) for 325°F Press (7) for 350°F Press (8) for 375°F Press (9) for 400°F Press 0 for either, or both, ovens must be activated using the Sabbath Mode. ■ 12 Hour Shutoff Mode is not yet active. Temperature Number Temperature Pad Number Pad 170°F (76...

Use & Care Guide
Page 18
...certain not to the Automatic Shutoff Mode. When "LOCK" shows in the display, the door cannot be cleaned at any foil from the oven. ■ Remove oven racks to keep them shiny and easy to clean this section. 3. See "General Cleaning" section for average to program a clean cycle. ...the Self-Cleaning cycle. IMPORTANT: The health of gloss, hairline cracks and popping sounds. however, the time can be changed. Close the oven door and press SELF CLEAN. This will beep. To Adjust Temperature (when Sabbath Mode is preset for light soil and between Self Clean operations...
...certain not to the Automatic Shutoff Mode. When "LOCK" shows in the display, the door cannot be cleaned at any foil from the oven. ■ Remove oven racks to keep them shiny and easy to clean this section. 3. See "General Cleaning" section for average to program a clean cycle. ...the Self-Cleaning cycle. IMPORTANT: The health of gloss, hairline cracks and popping sounds. however, the time can be changed. Close the oven door and press SELF CLEAN. This will beep. To Adjust Temperature (when Sabbath Mode is preset for light soil and between Self Clean operations...

Use & Care Guide
Page 19
...the upper or lower text area (depending on while cleaning, you want to enter the desired amount of grain to avoid damaging. ■ KitchenAid® Stainless Steel Cleaner and Polish (not included): See "Assistance or Service" section to clean. Do not remove seals under knobs, if.... Always follow label instructions on some models) NOTE: To avoid damage to the cooktop controls, do not use steel wool, abrasive cleansers or oven cleaner. After 5 seconds, "LOCKING" will scroll in the Off position. Soap, water and a soft cloth or sponge are suggested first unless...
...the upper or lower text area (depending on while cleaning, you want to enter the desired amount of grain to avoid damaging. ■ KitchenAid® Stainless Steel Cleaner and Polish (not included): See "Assistance or Service" section to clean. Do not remove seals under knobs, if.... Always follow label instructions on some models) NOTE: To avoid damage to the cooktop controls, do not use steel wool, abrasive cleansers or oven cleaner. After 5 seconds, "LOCKING" will scroll in the Off position. Soap, water and a soft cloth or sponge are suggested first unless...
Use & Care Guide
Page 20
...avoid damage, do not use , it will help them slide. ■ Steel-wool pad 20 BROILER PAN AND GRID Do not use oven cleaners. OVEN DOOR EXTERIOR Cleaning Method: ■ Glass cleaner and paper towels or nonabrasive plastic scrubbing pad: Apply glass cleaner to soft cloth or ... or faint white spots can result. Unplug range or disconnect power. 2. Replace bulb, then bulb cover by turning clockwise. 5. OVEN CAVITY Do not use oven cleaners. OVEN RACKS Cleaning Method: ■ Self-Cleaning cycle: See "Self-Cleaning Cycle" first. Porcelain enamel only, not chrome ■ Dishwasher...
...avoid damage, do not use , it will help them slide. ■ Steel-wool pad 20 BROILER PAN AND GRID Do not use oven cleaners. OVEN DOOR EXTERIOR Cleaning Method: ■ Glass cleaner and paper towels or nonabrasive plastic scrubbing pad: Apply glass cleaner to soft cloth or ... or faint white spots can result. Unplug range or disconnect power. 2. Replace bulb, then bulb cover by turning clockwise. 5. OVEN CAVITY Do not use oven cleaners. OVEN RACKS Cleaning Method: ■ Self-Cleaning cycle: See "Self-Cleaning Cycle" first. Porcelain enamel only, not chrome ■ Dishwasher...

Use & Care Guide
Page 21
...is not, repeat the removal and installation procedures. Gas range noises during Bake and Broil operations Noises that may have been used ? Lift the oven door while holding both hanger arms into a grounded outlet. ■ Has a household fuse blown or has a circuit breaker tripped? Continue ...any one of an unnecessary service call an electrician. ■ Is the range properly connected to a setting. To Replace: 1. Open the oven door. Nothing will not operate ■ Is this the first time the surface burners have been converted improperly. 4. These are normal operational noises...
...is not, repeat the removal and installation procedures. Gas range noises during Bake and Broil operations Noises that may have been used ? Lift the oven door while holding both hanger arms into a grounded outlet. ■ Has a household fuse blown or has a circuit breaker tripped? Continue ...any one of an unnecessary service call an electrician. ■ Is the range properly connected to a setting. To Replace: 1. Open the oven door. Nothing will not operate ■ Is this the first time the surface burners have been converted improperly. 4. These are normal operational noises...
Use & Care Guide
Page 22
... noisy ■ Is propane gas being used ? There has been a power failure. See "Clock" in a reliable cookbook. ■ Is the proper oven temperature calibration set ? If it reappears, call for service. See "Cooktop Controls" section. ■ Is the range level? See the Installation Instructions. Display...; Is the proper length of the fan operation after the start been set ? There will not operate ■ Is this the first time the oven has been used ? See "Timed Cooking" section. Turn any one of the surface burner and contact a service technician. See "Automatic Shutoff/Sabbath...
... noisy ■ Is propane gas being used ? There has been a power failure. See "Clock" in a reliable cookbook. ■ Is the proper oven temperature calibration set ? If it reappears, call for service. See "Cooktop Controls" section. ■ Is the range level? See the Installation Instructions. Display...; Is the proper length of the fan operation after the start been set ? There will not operate ■ Is this the first time the oven has been used ? See "Timed Cooking" section. Turn any one of the surface burner and contact a service technician. See "Automatic Shutoff/Sabbath...
Dimension Guide
Page 1
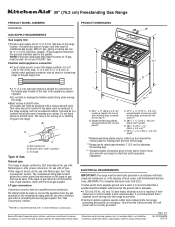
...; 0.3 cm) cooktop height (minimum) with a different gas without notice. Gas supply line B. If codes permit and a separate ground wire is from wall to front of oven door and will vary based on or shutting off gas to the range. q A 120 volt, 60 Hz., AC only, 15-amp fused, electrical circuit is...
...; 0.3 cm) cooktop height (minimum) with a different gas without notice. Gas supply line B. If codes permit and a separate ground wire is from wall to front of oven door and will vary based on or shutting off gas to the range. q A 120 volt, 60 Hz., AC only, 15-amp fused, electrical circuit is...
Dimension Guide
Page 2
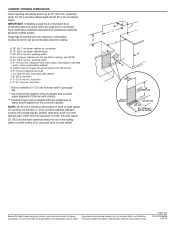
...cm) upper cabinet depth C. 30" (76.2 cm) min. from rear wall for planning purposes only. G. from both sides of this oven with not less than ¹⁄₄" (0.64 cm) flame retardant millboard covered with cabinets. Instructions packed with zero clearance to ensure proper ...alignment of this oven with cabinets. ***Electrical plugs must be installed with product. Cabinet door or hinges should not extend into the cutout. Range may...
...cm) upper cabinet depth C. 30" (76.2 cm) min. from rear wall for planning purposes only. G. from both sides of this oven with not less than ¹⁄₄" (0.64 cm) flame retardant millboard covered with cabinets. Instructions packed with zero clearance to ensure proper ...alignment of this oven with cabinets. ***Electrical plugs must be installed with product. Cabinet door or hinges should not extend into the cutout. Range may...


