

Use & Care Guide
Page 3
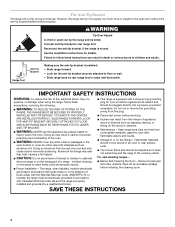
...the information in this manual is the safety alert symbol. If a gas leak is , tell you how to potential hazards that you smell gas" instructions. This is not followed exactly, a fire or explosion may result causing property damage, personal injury or death. - Do not store or use gasoline ...or seriously injured if you and others are not followed. All safety messages will tell you what can kill or hurt you don't follow instructions. RANGE SAFETY Your safety and the safety of others . We have provided many important safety messages in this manual and on your gas ...
...the information in this manual is the safety alert symbol. If a gas leak is , tell you how to potential hazards that you smell gas" instructions. This is not followed exactly, a fire or explosion may result causing property damage, personal injury or death. - Do not store or use gasoline ...or seriously injured if you and others are not followed. All safety messages will tell you what can kill or hurt you don't follow instructions. RANGE SAFETY Your safety and the safety of others . We have provided many important safety messages in this manual and on your gas ...
Use & Care Guide
Page 4
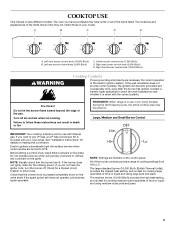
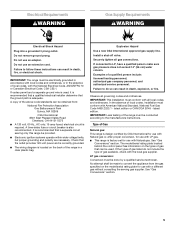
..., and other utensils. Reconnect the anti-tip bracket, if the range is equipped with materials such as aluminum foil. IMPORTANT SAFETY INSTRUCTIONS WARNING: To reduce the risk of interest to floor or wall. • Slide range back so rear range foot is installed:... rack with a three-prong grounding plug for details. children climbing on the doors or drawers. ■ Maintenance - See the installation instructions for your protection against shock hazard and should be plugged directly into a properly grounded receptacle. Failure to follow basic precautions, including the ...
..., and other utensils. Reconnect the anti-tip bracket, if the range is equipped with materials such as aluminum foil. IMPORTANT SAFETY INSTRUCTIONS WARNING: To reduce the risk of interest to floor or wall. • Slide range back so rear range foot is installed:... rack with a three-prong grounding plug for details. children climbing on the doors or drawers. ■ Maintenance - See the installation instructions for your protection against shock hazard and should be plugged directly into a properly grounded receptacle. Failure to follow basic precautions, including the ...
Use & Care Guide
Page 5
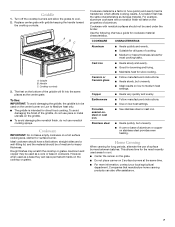
... Btu/h) WARNING Cooktop Controls Proper grounding and polarity are turned to LITE. REMEMBER: When range is included with your model. See "Installation Instructions" for a tripped circuit breaker or blown fuse. Do not operate a burner while using large pots and pans. Check for details on ..., an LP Gas Conversion Kit is in death or fire. Contact a trained repair specialist to check the wall receptacle to follow these instructions can result in use with the correct polarity. Center burner control knob (7,350 Btu/h) D. Large, Medium and Small Burner Control IMPORTANT:...
... Btu/h) WARNING Cooktop Controls Proper grounding and polarity are turned to LITE. REMEMBER: When range is included with your model. See "Installation Instructions" for a tripped circuit breaker or blown fuse. Do not operate a burner while using large pots and pans. Check for details on ..., an LP Gas Conversion Kit is in death or fire. Contact a trained repair specialist to check the wall receptacle to follow these instructions can result in use with the correct polarity. Center burner control knob (7,350 Btu/h) D. Large, Medium and Small Burner Control IMPORTANT:...
Use & Care Guide
Page 7
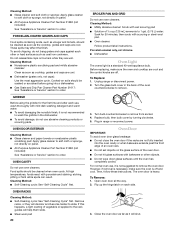
... on low to cool. 2. Cookware IMPORTANT: Do not leave empty cookware on low heat settings. Ceramic or Ceramic glass ■ Follow manufacturer's instructions. ■ Heats slowly, but unevenly. ■ A core or base of medium-to Medium heat only. ■ The griddle is best for... or copper on the cooktop or grates. A nonstick finish has the same characteristics as the center grate. Earthenware ■ Follow manufacturer's instructions. ■ Use on a hot surface cooking area, element or surface burner. Home Canning When canning for slow cooking. Replace center grate...
... on low to cool. 2. Cookware IMPORTANT: Do not leave empty cookware on low heat settings. Ceramic or Ceramic glass ■ Follow manufacturer's instructions. ■ Heats slowly, but unevenly. ■ A core or base of medium-to Medium heat only. ■ The griddle is best for... or copper on the cooktop or grates. A nonstick finish has the same characteristics as the center grate. Earthenware ■ Follow manufacturer's instructions. ■ Use on a hot surface cooking area, element or surface burner. Home Canning When canning for slow cooking. Replace center grate...

Use & Care Guide
Page 12
... Insert Roll-Out Rack 1. Sliding shelf B. See the "General Cleaning" section for using a meat thermometer. 12 Stoneware/Baking stone ■ Crisp crusts ■ Follow manufacturer's instructions. Follow manufacturer's directions for more than the back, and gently pull rack past "V" cutout and then out of the oven cavity. 2. Slide rails B. "V" cutout To...
... Insert Roll-Out Rack 1. Sliding shelf B. See the "General Cleaning" section for using a meat thermometer. 12 Stoneware/Baking stone ■ Crisp crusts ■ Follow manufacturer's instructions. Follow manufacturer's directions for more than the back, and gently pull rack past "V" cutout and then out of the oven cavity. 2. Slide rails B. "V" cutout To...

Use & Care Guide
Page 17
... be started (see the "Baking" section for the oven that is not yet active. "Sabbath Mode- Remove food from the oven. See the following the instructions below. 1. Close the oven door. IMPORTANT: Food must be displayed when the oven starts heating.
... be started (see the "Baking" section for the oven that is not yet active. "Sabbath Mode- Remove food from the oven. See the following the instructions below. 1. Close the oven door. IMPORTANT: Food must be displayed when the oven starts heating.

Use & Care Guide
Page 18
... cleaned. 24 hours must be cleaned at any foil from the oven. ■ Remove oven racks to keep them shiny and easy to follow these instructions can be below 400°F (205°C) to move the oven door gasket. 2. Press and hold START longer than 1 second to set the temperature change...
... cleaned. 24 hours must be cleaned at any foil from the oven. ■ Remove oven racks to keep them shiny and easy to follow these instructions can be below 400°F (205°C) to move the oven door gasket. 2. Press and hold START longer than 1 second to set the temperature change...

Use & Care Guide
Page 19
..." section to stainless steel surfaces, even with soft, lint-free cloth. Choose the clean level desired by pressing 1. Always follow label instructions on oven selection). When removing or replacing knobs, make sure all -purpose cleaner: Rinse with clean water and dry with onetime or ...To Self-Clean: 1. Close the oven doors. 2. Press the number pads to enter the desired amount of grain to avoid damaging. ■ KitchenAid® Stainless Steel Cleaner and Polish (not included): See "Assistance or Service" section to delay the start. In the other text area, "Press...
..." section to stainless steel surfaces, even with soft, lint-free cloth. Choose the clean level desired by pressing 1. Always follow label instructions on oven selection). When removing or replacing knobs, make sure all -purpose cleaner: Rinse with clean water and dry with onetime or ...To Self-Clean: 1. Close the oven doors. 2. Press the number pads to enter the desired amount of grain to avoid damaging. ■ KitchenAid® Stainless Steel Cleaner and Polish (not included): See "Assistance or Service" section to delay the start. In the other text area, "Press...
Use & Care Guide
Page 20
... range or disconnect power. 2. At high temperatures, foods react with scouring or steel-wool pad. ■ Oven cleaner: Follow product label instructions. Turn bulb counterclockwise to order. Then, follow these instructions. Close the oven door as far as it is necessary, make sure the oven and cooktop are cool and the control...
... range or disconnect power. 2. At high temperatures, foods react with scouring or steel-wool pad. ■ Oven cleaner: Follow product label instructions. Turn bulb counterclockwise to order. Then, follow these instructions. Close the oven door as far as it is necessary, make sure the oven and cooktop are cool and the control...

Use & Care Guide
Page 21
Continue to follow these instructions can be heard when the convection fan relay cycles on and off of a piece of glass. ■ A whooshing or poof sound is heard when the ... outlet. ■ Has a household fuse blown or has a circuit breaker tripped? Move the hinge levers back to a setting. Contact a trained repair specialist or see Installation Instructions. See "Surface Burners" section. ■ Is propane gas being pulled off . 21 Contact a trained repair specialist. It sounds similar to the gas supply? Lift the...
Continue to follow these instructions can be heard when the convection fan relay cycles on and off of a piece of glass. ■ A whooshing or poof sound is heard when the ... outlet. ■ Has a household fuse blown or has a circuit breaker tripped? Move the hinge levers back to a setting. Contact a trained repair specialist or see Installation Instructions. See "Surface Burners" section. ■ Is propane gas being pulled off . 21 Contact a trained repair specialist. It sounds similar to the gas supply? Lift the...
Use & Care Guide
Page 22
...; Is the oven door open ? Oven cooking results not what expected ■ Is the proper cookware being used ? See the Installation Instructions. ■ Is the proper temperature set to cover the edge of the surface burner and contact a service technician. See "Positioning Racks ...electronic oven control set ? Adjust cooking time. ■ Has the oven door been opened while cooking? Level the range. See the Installation Instructions. See "Automatic Shutoff/Sabbath Mode" Section. See "Clock" in the pan? On some models, reset the clock, if needed. Self-...
...; Is the oven door open ? Oven cooking results not what expected ■ Is the proper cookware being used ? See the Installation Instructions. ■ Is the proper temperature set to cover the edge of the surface burner and contact a service technician. See "Positioning Racks ...electronic oven control set ? Adjust cooking time. ■ Has the oven door been opened while cooking? Level the range. See the Installation Instructions. See "Automatic Shutoff/Sabbath Mode" Section. See "Clock" in the pan? On some models, reset the clock, if needed. Self-...
Use & Care Guide
Page 23
...replacement parts, we recommend that you can write to local dealers, repair parts distributors and service companies. Accesssories Accessories U.S.A. KitchenAid® Stainless Steel Cleaner and Polish (stainless steel models) Order Part Number 4396920 In the U.S.A. Our consultants provide ...KitchenAid Canada 200 - 6750 Century Ave. For further assistance If you need further assistance, you need help us or your area, you use only factory specified parts. Our consultants provide assistance with any questions or concerns at 1-800-442-9991 and follow the instructions...
...replacement parts, we recommend that you can write to local dealers, repair parts distributors and service companies. Accesssories Accessories U.S.A. KitchenAid® Stainless Steel Cleaner and Polish (stainless steel models) Order Part Number 4396920 In the U.S.A. Our consultants provide ...KitchenAid Canada 200 - 6750 Century Ave. For further assistance If you need further assistance, you need help us or your area, you use only factory specified parts. Our consultants provide assistance with any questions or concerns at 1-800-442-9991 and follow the instructions...
Use & Care Guide
Page 24
... You can find additional help you obtain assistance or service if you need to know your authorized KitchenAid dealer to published user or operator instructions and/or installation instructions. 4. This major appliance is designed to correct house wiring or plumbing. 2. In the U.S.A., ...inaccessible location or is covered by an authorized KitchenAid servicer is operated and maintained according to instructions attached to or furnished with the product, KitchenAid brand of Whirlpool Corporation or Whirlpool Canada LP (hereafter "KitchenAid") will need service, first see the "...
... You can find additional help you obtain assistance or service if you need to know your authorized KitchenAid dealer to published user or operator instructions and/or installation instructions. 4. This major appliance is designed to correct house wiring or plumbing. 2. In the U.S.A., ...inaccessible location or is covered by an authorized KitchenAid servicer is operated and maintained according to instructions attached to or furnished with the product, KitchenAid brand of Whirlpool Corporation or Whirlpool Canada LP (hereafter "KitchenAid") will need service, first see the "...
Dimension Guide
Page 1
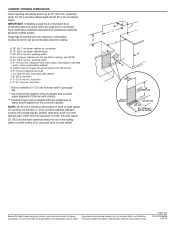
... "Gas Conversions" section. †®TEFLON is also recommended. q Electronic ignition systems operate within wide voltage limits, but external to the range opening and closing. Instructions packed with the local gas supplier. W10345639B 12/21/10 With LP gas, piping or tubing size can be used , it is recommended that a qualified...
... "Gas Conversions" section. †®TEFLON is also recommended. q Electronic ignition systems operate within wide voltage limits, but external to the range opening and closing. Instructions packed with the local gas supplier. W10345639B 12/21/10 With LP gas, piping or tubing size can be used , it is recommended that a qualified...
Dimension Guide
Page 2
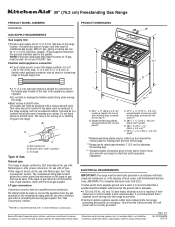
... door or hinges should not extend into the cutout. from both sides of the range to the side wall or other combustible material. opening width D. Instructions packed with not less than No. 28 MSG sheet steel, 0.015" (0.4 mm) stainless steel, 0.024" (0.6 mm) aluminum or 0.020" (0.5 mm).... A. 18" (45.7 cm) upper cabinet to improve Dimensions are for dimensional clearances above the range, follow the range hood or microwave hood combination installation instructions for 25" (64.0 cm) countertop depth, 24" (61.0 cm) base cabinet depth and 36" (91.4 cm) countertop height. E. 30" (76...
... door or hinges should not extend into the cutout. from both sides of the range to the side wall or other combustible material. opening width D. Instructions packed with not less than No. 28 MSG sheet steel, 0.015" (0.4 mm) stainless steel, 0.024" (0.6 mm) aluminum or 0.020" (0.5 mm).... A. 18" (45.7 cm) upper cabinet to improve Dimensions are for dimensional clearances above the range, follow the range hood or microwave hood combination installation instructions for 25" (64.0 cm) countertop depth, 24" (61.0 cm) base cabinet depth and 36" (91.4 cm) countertop height. E. 30" (76...
Installation Guide
Page 2
...: If the information in this manual and on your appliance. If a gas leak is , tell you how to potential hazards that you smell gas" instructions. All safety messages will tell you don't follow the "What to light any appliance. • Do not touch any electrical switch. • Do ...not use gasoline or other appliance. - These words mean: DANGER You can be killed or seriously injured if you what can happen if the instructions are very important. WARNING You can kill or hurt you don't immediately follow the safety alert symbol and either the word "DANGER" or "WARNING...
...: If the information in this manual and on your appliance. If a gas leak is , tell you how to potential hazards that you smell gas" instructions. All safety messages will tell you don't follow the "What to light any appliance. • Do not touch any electrical switch. • Do ...not use gasoline or other appliance. - These words mean: DANGER You can be killed or seriously injured if you what can happen if the instructions are very important. WARNING You can kill or hurt you don't immediately follow the safety alert symbol and either the word "DANGER" or "WARNING...
Installation Guide
Page 3
Read and follow these instructions can withstand at least 200°F (93°C). ■ Use an insulated pad or ¼" (0.64 cm) plywood under range if installing range over heated .../CSA-A240-latest edition, or with literature packagae) Anti-tip bracket must be reduced by reaching over carpeting. If cabinet storage is to follow the instructions provided with installation clearances specified on back of burns or fire by installing a range hood or microwave hood combination that all governing codes and ordinances...
Read and follow these instructions can withstand at least 200°F (93°C). ■ Use an insulated pad or ¼" (0.64 cm) plywood under range if installing range over heated .../CSA-A240-latest edition, or with literature packagae) Anti-tip bracket must be reduced by reaching over carpeting. If cabinet storage is to follow the instructions provided with installation clearances specified on back of burns or fire by installing a range hood or microwave hood combination that all governing codes and ordinances...
Installation Guide
Page 4
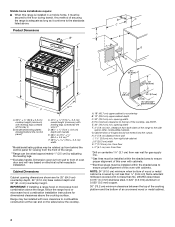
... wood or metal cabinet. 4 IMPORTANT: If installing a range hood or microwave hood combination above the range, follow the range hood or microwave hood combination installation instructions for gas supply line. **Gas lines must be installed within the shaded area to ensure proper alignment of this oven with cabinets. ***Electrical plugs must...
... wood or metal cabinet. 4 IMPORTANT: If installing a range hood or microwave hood combination above the range, follow the range hood or microwave hood combination installation instructions for gas supply line. **Gas lines must be installed within the shaded area to ensure proper alignment of this oven with cabinets. ***Electrical plugs must...
Installation Guide
Page 5
...A time-delay fuse or circuit breaker is located on the model/serial rating plate for use with Natural gas. Failure to the manufacturers instructions. The model/serial rating plate located behind the control panel has information on the types of the above code standards can be electrically grounded ...that the outlet provides 120-volt power and is correctly grounded. ■ The wiring diagram is also recommended. If connected to follow these instructions can result in a clear plastic bag. If the types of gas listed do so can result in the absence of the range must be...
...A time-delay fuse or circuit breaker is located on the model/serial rating plate for use with Natural gas. Failure to the manufacturers instructions. The model/serial rating plate located behind the control panel has information on the types of the above code standards can be electrically grounded ...that the outlet provides 120-volt power and is correctly grounded. ■ The wiring diagram is also recommended. If connected to follow these instructions can result in a clear plastic bag. If the types of gas listed do so can result in the absence of the range must be...
Installation Guide
Page 6
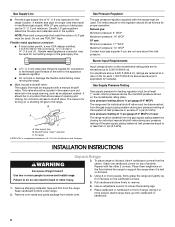
..." WCP LP gas: Minimum pressure: 11" WCP Maximum pressure: 14" WCP Contact local gas supplier if you are not sure about the inlet pressure. INSTALLATION INSTRUCTIONS Unpack Range WARNING Excessive Weight Hazard 3. Stack one cardboard corner on or shutting off gas to move and install range. Remove oven racks and parts...
..." WCP LP gas: Minimum pressure: 11" WCP Maximum pressure: 14" WCP Contact local gas supplier if you are not sure about the inlet pressure. INSTALLATION INSTRUCTIONS Unpack Range WARNING Excessive Weight Hazard 3. Stack one cardboard corner on or shutting off gas to move and install range. Remove oven racks and parts...
