
Use & Care Guide
Page 6
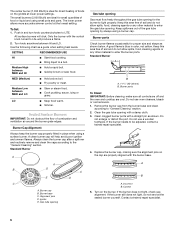
... burner cap, making sure the alignment pins on the cap are cool. Use the following chart as shown. Medium High between HI and LO. Medium Low between MED and LO ■ Stew or steam food. ■ Cook pudding, sauce, icing or gravy. A clean burner cap will click. Igniter E. A B A. Turn on the...
... burner cap, making sure the alignment pins on the cap are cool. Use the following chart as shown. Medium High between HI and LO. Medium Low between MED and LO ■ Stew or steam food. ■ Cook pudding, sauce, icing or gravy. A clean burner cap will click. Igniter E. A B A. Turn on the...
Use & Care Guide
Page 7
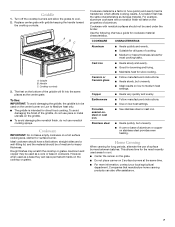
...local agricultural department. Copper ■ Heats very quickly and evenly. Stainless steel ■ Heats quickly, but unevenly. ■ Ideal results on Low to -heavy thickness. Griddle 1. The feet on the bottom of aluminum or copper on the cooktop or grates. Earthenware ■ Follow manufacturer's... have a flat bottom, straight sides and a well-fitting lid, and the material should not be used on the center burner on low to cool. 2. To Use: IMPORTANT: To avoid damaging the griddle, the griddle is transferred, which affects cooking results. COOKWARE CHARACTERISTICS ...
...local agricultural department. Copper ■ Heats very quickly and evenly. Stainless steel ■ Heats quickly, but unevenly. ■ Ideal results on Low to -heavy thickness. Griddle 1. The feet on the bottom of aluminum or copper on the cooktop or grates. Earthenware ■ Follow manufacturer's... have a flat bottom, straight sides and a well-fitting lid, and the material should not be used on the center burner on low to cool. 2. To Use: IMPORTANT: To avoid damaging the griddle, the griddle is transferred, which affects cooking results. COOKWARE CHARACTERISTICS ...
Use & Care Guide
Page 9
... reset during the countdown by repeating the above steps. Press (1) for ON" will scroll twice from right to left in the lower text area. 3. "LOW. "OFF Selected" will scroll twice from right to Off. 1. The clock is factory preset to Fahrenheit, but can be changed to 24-Hour Format: ...can be changed to left in the lower text area. 3. The temperature units have been changed . The sound has now been turned off . "Low Selected" scrolls twice from right to left in the lower text area. "OFF Selected" will scroll twice in the lower text area. Adjusting Keypress ...
... reset during the countdown by repeating the above steps. Press (1) for ON" will scroll twice from right to left in the lower text area. 3. "LOW. "OFF Selected" will scroll twice from right to Off. 1. The clock is factory preset to Fahrenheit, but can be changed to 24-Hour Format: ...can be changed to left in the lower text area. 3. The temperature units have been changed . The sound has now been turned off . "Low Selected" scrolls twice from right to left in the lower text area. "OFF Selected" will scroll twice in the lower text area. Adjusting Keypress ...
Use & Care Guide
Page 13
..., "Preheat done Insert food " will be blocked or covered. Very thin cuts of fish, poultry or meat may be changed at least 30 minutes for low-temperature broiling of meat, fish and poultry may be used baked goods, increase the cook time by pressing the number pads to the Broiling Chart...
..., "Preheat done Insert food " will be blocked or covered. Very thin cuts of fish, poultry or meat may be changed at least 30 minutes for low-temperature broiling of meat, fish and poultry may be used baked goods, increase the cook time by pressing the number pads to the Broiling Chart...

Use & Care Guide
Page 14
... rollout rack in , skin-on , 2 tones will also appear in the upper or lower oven. Press START. NOTE: The oven temperature can be changed at low temperatures for the selected oven when finished. 1. Remove food from the bottom (1) to cook. 6. Times are based on oven selected and "550°F" is under...
... rollout rack in , skin-on , 2 tones will also appear in the upper or lower oven. Press START. NOTE: The oven temperature can be changed at low temperatures for the selected oven when finished. 1. Remove food from the bottom (1) to cook. 6. Times are based on oven selected and "550°F" is under...
Use & Care Guide
Page 22
... "Cooktop Controls" section. ■ Is the range level? See the Installation Instructions. Turn any one of time being used ? Oven temperature too high or too low ■ Does the oven temperature calibration need adjustment? Display shows messages ■ Is the display showing a flashing time? On some models, convection fan does not...
... "Cooktop Controls" section. ■ Is the range level? See the Installation Instructions. Turn any one of time being used ? Oven temperature too high or too low ■ Does the oven temperature calibration need adjustment? Display shows messages ■ Is the display showing a flashing time? On some models, convection fan does not...
Installation Guide
Page 9
...; Slide range back so rear range foot is turned to the "LITE" position. The valve stem is installed, use pilotless igniters in the low position using the adjustment screw in oven. 2. Remove cardboard or hardboard from under anti-tip bracket. To check that rear leveling leg is engaged.... 5. If range is not level, pull range forward until the flame is removed from "LO" to turn the control knobs to back. 3. Low flame B. If the "low" flame needs to adjust leveling legs up . Replace the control knob. 4. Using 2 or more people, gently move range into position. 5. Use...
...; Slide range back so rear range foot is turned to the "LITE" position. The valve stem is installed, use pilotless igniters in the low position using the adjustment screw in oven. 2. Remove cardboard or hardboard from under anti-tip bracket. To check that rear leveling leg is engaged.... 5. If range is not level, pull range forward until the flame is removed from "LO" to turn the control knobs to back. 3. Low flame B. If the "low" flame needs to adjust leveling legs up . Replace the control knob. 4. Using 2 or more people, gently move range into position. 5. Use...