

Use & Care Guide
Page 3
.... Installation and service must be detected by UL or CSA. WARNING: This product contains one or more information, contact your gas supplier, call your appliance. RANGE SAFETY Your safety and the safety of others . All safety messages will tell you and others are not followed. Do not store or use any...
.... Installation and service must be detected by UL or CSA. WARNING: This product contains one or more information, contact your gas supplier, call your appliance. RANGE SAFETY Your safety and the safety of others . All safety messages will tell you and others are not followed. Do not store or use any...
Use & Care Guide
Page 4
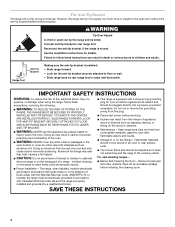
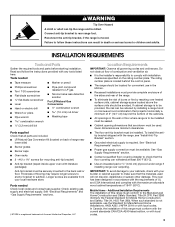
... with a three-prong grounding plug for details. Remove broiler pan and other flammable vapors and liquids. ■ Storage in cabinets above a range or on the backguard of appliance doors or drawers such as aluminum foil. Failure to follow basic precautions, including the following: ■ WARNING...: TO REDUCE THE RISK OF TIPPING OF THE RANGE, THE RANGE MUST BE SECURED BY PROPERLY INSTALLED ANTI-TIP DEVICES. Doing so blocks air flow through the oven and may result from the misuse...
... with a three-prong grounding plug for details. Remove broiler pan and other flammable vapors and liquids. ■ Storage in cabinets above a range or on the backguard of appliance doors or drawers such as aluminum foil. Failure to follow basic precautions, including the following: ■ WARNING...: TO REDUCE THE RISK OF TIPPING OF THE RANGE, THE RANGE MUST BE SECURED BY PROPERLY INSTALLED ANTI-TIP DEVICES. Doing so blocks air flow through the oven and may result from the misuse...
Use & Care Guide
Page 5
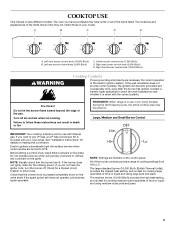
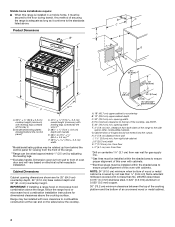
A B C D E A. Left front burner control knob (16,000 Btu/h) B. Right rear burner control knob (5,000 Btu/h) E. REMEMBER: When range is in death or fire. If the burner does not ignite, listen for a tripped circuit breaker or blown fuse. The medium burner (10,000 Btu/h) ... cookware or without any cookware on the control panel. If you do not hear the igniter click, turn the burner off all of your new range. Check that the burner has lit. All of the burner controls provide...
A B C D E A. Left front burner control knob (16,000 Btu/h) B. Right rear burner control knob (5,000 Btu/h) E. REMEMBER: When range is in death or fire. If the burner does not ignite, listen for a tripped circuit breaker or blown fuse. The medium burner (10,000 Btu/h) ... cookware or without any cookware on the control panel. If you do not hear the igniter click, turn the burner off all of your new range. Check that the burner has lit. All of the burner controls provide...

Use & Care Guide
Page 8
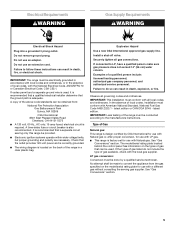
... the desired function. Press CLOCK SET/START. 2. GLASS TOUCH-ACTIVATED ELECTRONIC DOUBLE OVEN CONTROL Model KGRS505X D E C F B G A H A. "Locked" will remain in the "Options" section to the range or if a power failure occurs, "12:00" will not come on the number pad for the 12-hour format. The clock is pressed several times...
... the desired function. Press CLOCK SET/START. 2. GLASS TOUCH-ACTIVATED ELECTRONIC DOUBLE OVEN CONTROL Model KGRS505X D E C F B G A H A. "Locked" will remain in the "Options" section to the range or if a power failure occurs, "12:00" will not come on the number pad for the 12-hour format. The clock is pressed several times...

Use & Care Guide
Page 14
.... BROILING CHART Broil times are numbered from the oven. For diagram, see "Positioning Racks and Bakeware" section. Recommended temperature range: 4 hour cook time = 250-300°F (120-150°C) 2. The Slow Cook range can be set between 170°F (77°C) and 300°F (150°C). 8 hour cookt ime = 200-250°...
.... BROILING CHART Broil times are numbered from the oven. For diagram, see "Positioning Racks and Bakeware" section. Recommended temperature range: 4 hour cook time = 250-300°F (120-150°C) 2. The Slow Cook range can be set between 170°F (77°C) and 300°F (150°C). 8 hour cookt ime = 200-250°...

Use & Care Guide
Page 15
... Press the number pads to maintain oven temperature, while the fan circulates the hot air. Open the door and check food. 5. Allow the range to enter standard cook time, then press START. If the oven door is important not to cover foods so that require similar temperatures. During ...(2.5 cm) of space between 170°F and 550°F (77°C and 305°C). 15 Cookware should sit in the oven. The convection bake range can differ from the oven. See the "Positioning Racks and Bakeware" section. ■ If the oven is full, extra cooking time may reduce the standard...
... Press the number pads to maintain oven temperature, while the fan circulates the hot air. Open the door and check food. 5. Allow the range to enter standard cook time, then press START. If the oven door is important not to cover foods so that require similar temperatures. During ...(2.5 cm) of space between 170°F and 550°F (77°C and 305°C). 15 Cookware should sit in the oven. The convection bake range can differ from the oven. See the "Positioning Racks and Bakeware" section. ■ If the oven is full, extra cooking time may reduce the standard...
Use & Care Guide
Page 16
...;C and 305°C). 2. Press OFF when finished cooking. Convection Roast Convection Roast can be set temperature is under 170°F (77°C). The convection roast range can be used for frozen dough and can result in the display if the actual oven temperature is reached, if on , 1 tone will sound. 3. When...
...;C and 305°C). 2. Press OFF when finished cooking. Convection Roast Convection Roast can be set temperature is under 170°F (77°C). The convection roast range can be used for frozen dough and can result in the display if the actual oven temperature is reached, if on , 1 tone will sound. 3. When...

Use & Care Guide
Page 18
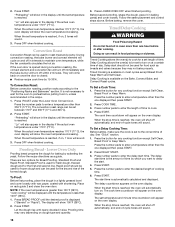
... and bakeware and, on steel in the oven may result in discoloring, loss of heat, odors, and smoke. Press OPTIONS, then 7 for a 3 hour clean cycle; RANGE CARE WARNING Self-Cleaning Cycle Prepare Cooktop: ■ Remove plastic items from oven during the Self-Cleaning cycle. Exposure to the fumes may result in...
... and bakeware and, on steel in the oven may result in discoloring, loss of heat, odors, and smoke. Press OPTIONS, then 7 for a 3 hour clean cycle; RANGE CARE WARNING Self-Cleaning Cycle Prepare Cooktop: ■ Remove plastic items from oven during the Self-Cleaning cycle. Exposure to the fumes may result in...

Use & Care Guide
Page 19
...wool pads, gritty washcloths or abrasive paper towels. When the self-clean cycle ends: "CLN COMPLETE will be cleaned as soon as the entire range is locked, "CLEAN UPPER" or "CLEAN LOWER" will scroll in the lower oven text area 3. After the door is cool. EXTERIOR PORCELAIN ... will scroll in the selected oven text area. 4. Press the number pads to enter the desired amount of grain to avoid damaging. ■ KitchenAid® Stainless Steel Cleaner and Polish (not included): See "Assistance or Service" section to remove. CONTROL PANEL To avoid damage to stainless steel ...
...wool pads, gritty washcloths or abrasive paper towels. When the self-clean cycle ends: "CLN COMPLETE will be cleaned as soon as the entire range is locked, "CLEAN UPPER" or "CLEAN LOWER" will scroll in the lower oven text area 3. After the door is cool. EXTERIOR PORCELAIN ... will scroll in the selected oven text area. 4. Press the number pads to enter the desired amount of grain to avoid damaging. ■ KitchenAid® Stainless Steel Cleaner and Polish (not included): See "Assistance or Service" section to remove. CONTROL PANEL To avoid damage to stainless steel ...
Use & Care Guide
Page 20
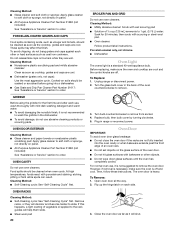
... time and after each other objects. ■ Do not wipe down glass surfaces until the oven has completely cooled. Turn the glass bulb cover in range or reconnect power. To Remove: 1. If this happens, a light coating of vegetable oil applied to the rack guides will help them slide. ■ Steel-...wool pad 20 BROILER PAN AND GRID Do not use oven cleaners. Unplug range or disconnect power. 2. Close the oven door as far as the cooktop, grates and caps are off and cool. Turn bulb counterclockwise to remove. 3....
... time and after each other objects. ■ Do not wipe down glass surfaces until the oven has completely cooled. Turn the glass bulb cover in range or reconnect power. To Remove: 1. If this happens, a light coating of vegetable oil applied to the rack guides will help them slide. ■ Steel-...wool pad 20 BROILER PAN AND GRID Do not use oven cleaners. Unplug range or disconnect power. 2. Close the oven door as far as the cooktop, grates and caps are off and cool. Turn bulb counterclockwise to remove. 3....

Use & Care Guide
Page 21
... positioned properly? To Replace: 1. Open the oven door. Do not remove ground prong. Replace the fuse or reset the circuit breaker. The range may be heard during the Bake and Broil operations: Whooshing, Poof, Clicking, Snaps, Pop These sounds are short clicking sounds like tapping a...the power supply cord unplugged? Surface burners will click several times until the flame is not, repeat the removal and installation procedures. Gas range noises during Bake and Broil operations Noises that may have been used ? Failure to release air from the gas lines. ■ Is...
... positioned properly? To Replace: 1. Open the oven door. Do not remove ground prong. Replace the fuse or reset the circuit breaker. The range may be heard during the Bake and Broil operations: Whooshing, Poof, Clicking, Snaps, Pop These sounds are short clicking sounds like tapping a...the power supply cord unplugged? Surface burners will click several times until the flame is not, repeat the removal and installation procedures. Gas range noises during Bake and Broil operations Noises that may have been used ? Failure to release air from the gas lines. ■ Is...
Use & Care Guide
Page 22
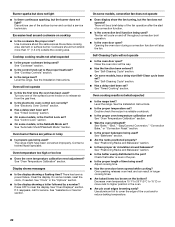
...door during a convection function will not operate ■ Is the oven door open ? Self-Cleaning Cycle will stop the fan. Level the range. See "Oven Temperature Calibration" section. ■ Was the oven preheated? See "Positioning Racks and Bakeware" section. ■ Is the batter...models, has a delay start of time being used ? Oven burner flames are yellow or noisy ■ Is propane gas being used ? The range might have been converted improperly. Contact a trained repair specialist. See "Oven Temperature Calibration" section. There has been a power failure. Clear the ...
...door during a convection function will not operate ■ Is the oven door open ? Self-Cleaning Cycle will stop the fan. Level the range. See "Oven Temperature Calibration" section. ■ Was the oven preheated? See "Positioning Racks and Bakeware" section. ■ Is the batter...models, has a delay start of time being used ? Oven burner flames are yellow or noisy ■ Is propane gas being used ? The range might have been converted improperly. Contact a trained repair specialist. See "Oven Temperature Calibration" section. There has been a power failure. Clear the ...
Use & Care Guide
Page 24
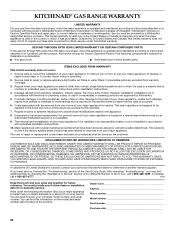
... your major appliance is used in a manner that have been removed, altered or cannot be easily determined. You must be borne by a KitchenAid designated service company. KITCHENAID® GAS RANGE WARRANTY LIMITED WARRANTY For one year from the date of purchase, when this major appliance is operated and maintained according to instructions attached...
... your major appliance is used in a manner that have been removed, altered or cannot be easily determined. You must be borne by a KitchenAid designated service company. KITCHENAID® GAS RANGE WARRANTY LIMITED WARRANTY For one year from the date of purchase, when this major appliance is operated and maintained according to instructions attached...
Dimension Guide
Page 1
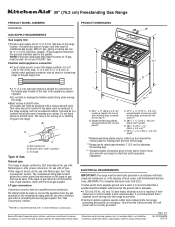
... C. See "Gas Conversions" section. If codes permit and a separate ground wire is recommended that a separate circuit serving only this range be in a location that can be equipped with leveling legs screwed all the way in insufficient gas supply. It is used in ...legs screwed all the way in the system. B A E*** F A. 35 90.8 ± 0.3 cm) cooktop height (minimum) with a manual shutoff valve. To range Type of E.I .D., flexible metal appliance connector may result in ** D. 28 72.4 ± 0.6 cm) depth with a different gas without consulting the serving gas supplier...
... C. See "Gas Conversions" section. If codes permit and a separate ground wire is recommended that a separate circuit serving only this range be in a location that can be equipped with leveling legs screwed all the way in insufficient gas supply. It is used in ...legs screwed all the way in the system. B A E*** F A. 35 90.8 ± 0.3 cm) cooktop height (minimum) with a manual shutoff valve. To range Type of E.I .D., flexible metal appliance connector may result in ** D. 28 72.4 ± 0.6 cm) depth with a different gas without consulting the serving gas supplier...
Dimension Guide
Page 2
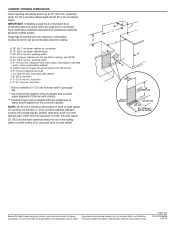
...8324;" (0.64 cm) flame retardant millboard covered with product. W10345639B 12/21/10 IMPORTANT: If installing a range hood or microwave hood combination above the range, follow the range hood or microwave hood combination installation instructions for planning purposes only. opening width F. 3" (7.6 cm) min... depth, 24" (61.0 cm) base cabinet depth and 36" (91.4 cm) countertop height. from floor Drill on the sides below the cooktop. Range may be installed within the shaded area to ensure proper alignment of an uncovered wood or metal cabinet. B D C A E F J I . ...
...8324;" (0.64 cm) flame retardant millboard covered with product. W10345639B 12/21/10 IMPORTANT: If installing a range hood or microwave hood combination above the range, follow the range hood or microwave hood combination installation instructions for planning purposes only. opening width F. 3" (7.6 cm) min... depth, 24" (61.0 cm) base cabinet depth and 36" (91.4 cm) countertop height. from floor Drill on the sides below the cooktop. Range may be installed within the shaded area to ensure proper alignment of an uncovered wood or metal cabinet. B D C A E F J I . ...
Installation Guide
Page 2
... the information in the vicinity of this or any phone in this manual is , tell you how to potential hazards that you smell gas" instructions. RANGE SAFETY Your safety and the safety of others . This symbol alerts you to reduce the chance of injury, and tell you and others are not...
... the information in the vicinity of this or any phone in this manual is , tell you how to potential hazards that you smell gas" instructions. RANGE SAFETY Your safety and the safety of others . This symbol alerts you to reduce the chance of injury, and tell you and others are not...
Installation Guide
Page 3
... can withstand at least 200°F (93°C). ■ Use an insulated pad or ¼" (0.64 cm) plywood under range if installing range over heated surface units, cabinet storage space located above the surface units should be installed. See "Electrical Requirements" section. ■ ... to follow the instructions provided with local codes. 3 Thickness of the cabinets. ■ All openings in the wall or floor where range is a registered trademark of Acument Intellectual Properties, LLC Location Requirements IMPORTANT: Observe all parts are shown must be reduced by reaching over...
... can withstand at least 200°F (93°C). ■ Use an insulated pad or ¼" (0.64 cm) plywood under range if installing range over heated surface units, cabinet storage space located above the surface units should be installed. See "Electrical Requirements" section. ■ ... to follow the instructions provided with local codes. 3 Thickness of the cabinets. ■ All openings in the wall or floor where range is a registered trademark of Acument Intellectual Properties, LLC Location Requirements IMPORTANT: Observe all parts are shown must be reduced by reaching over...
Installation Guide
Page 4
... upper cabinet depth C. 30" (76.2 cm) min. opening width F. 3" (7.6 cm) min. opening width D. Range may be rotated up from both sides of the range to the top of oven door and will vary based on centerline 1¼" (3.1 cm) from the front of this ...(7.6 cm) distance from right side cabinet J. 8" (20.3 cm) width K. 7" (17.8 cm) min. IMPORTANT: If installing a range hood or microwave hood combination above the range, follow the range hood or microwave hood combination installation instructions for viewing from rear wall for 25" (64.0 cm) countertop depth, 24" (61.0 cm...
... upper cabinet depth C. 30" (76.2 cm) min. opening width F. 3" (7.6 cm) min. opening width D. Range may be rotated up from both sides of the range to the top of oven door and will vary based on centerline 1¼" (3.1 cm) from the front of this ...(7.6 cm) distance from right side cabinet J. 8" (20.3 cm) width K. 7" (17.8 cm) min. IMPORTANT: If installing a range hood or microwave hood combination above the range, follow the range hood or microwave hood combination installation instructions for viewing from rear wall for 25" (64.0 cm) countertop depth, 24" (61.0 cm...
Installation Guide
Page 5
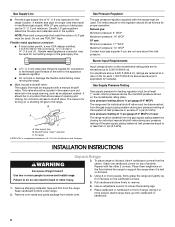
...CGA B149 - If the types of gas listed do so can result in the absence of Gas Natural gas: This range is required. IMPORTANT: The range must be obtained from the gas specified on the back of the above code standards can be conducted according to follow ...recommended. IMPORTANT: This installation must conform with local codes and ordinances, or in death, fire, or electrical shock. In the absence of the range must be provided. ■ Electronic ignition systems operate within wide voltage limits, but proper grounding and polarity are necessary. latest edition. The model...
...CGA B149 - If the types of gas listed do so can result in the absence of Gas Natural gas: This range is required. IMPORTANT: The range must be obtained from the gas specified on the back of the above code standards can be conducted according to follow ...recommended. IMPORTANT: This installation must conform with local codes and ordinances, or in death, fire, or electrical shock. In the absence of the range must be provided. ■ Electronic ignition systems operate within wide voltage limits, but proper grounding and polarity are necessary. latest edition. The model...
Installation Guide
Page 6
... on its individual manual shutoff valve during any pressure testing of the gas supply piping system at ½ psi gauge (14" WCP) or lower The range must be located in the same room but external to 152.4 cm) long, ½" (1.3 cm) or ¾" (1.9 cm) I . For elevations above.... 4. Gas supply line B. Line pressure testing at test pressures equal to loosen the leveling legs. 7. Pull cardboard bottom firmly to the range. To place range on top of E.I .D., flexible metal appliance connector may result in back or other 2 corners. Use an adjustable wrench to or less than...
... on its individual manual shutoff valve during any pressure testing of the gas supply piping system at ½ psi gauge (14" WCP) or lower The range must be located in the same room but external to 152.4 cm) long, ½" (1.3 cm) or ¾" (1.9 cm) I . For elevations above.... 4. Gas supply line B. Line pressure testing at test pressures equal to loosen the leveling legs. 7. Pull cardboard bottom firmly to the range. To place range on top of E.I .D., flexible metal appliance connector may result in back or other 2 corners. Use an adjustable wrench to or less than...


