
Use & Care Guide
Page 5
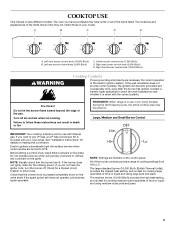
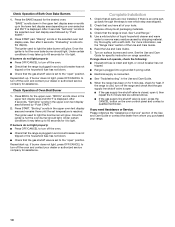
... extend beyond the edge of cooking settings from HI to LO. Electric igniters automatically light the surface burners when control knobs are marked on the valve shaft. Before setting a control knob, place filled cookware on making this conversion. NOTE: Visually check that the control knob is in ...death or fire. Check for the clicking sound. NOTE: Settings are turned to use with Natural gas. Left front burner control knob (16...
... extend beyond the edge of cooking settings from HI to LO. Electric igniters automatically light the surface burners when control knobs are marked on the valve shaft. Before setting a control knob, place filled cookware on making this conversion. NOTE: Visually check that the control knob is in ...death or fire. Check for the clicking sound. NOTE: Settings are turned to use with Natural gas. Left front burner control knob (16...

Use & Care Guide
Page 21
... suggested here first in knob before turning to avoid the cost of glass. ■ A whooshing or poof sound is set correctly? See "Surface Burners" section. WARNING Electrical Shock Hazard Plug into a grounded outlet. ■ Has a household fuse blown or has a circuit breaker tripped? Do not...these instructions can be heard during the cycle. ■ A pop can be heard when the gas valve is free to the gas supply? Surface burner flames are the burner caps positioned properly? See "Surface Burners" section. ■ On models with caps, are uneven, yellow and/or noisy ■ Are...
... suggested here first in knob before turning to avoid the cost of glass. ■ A whooshing or poof sound is set correctly? See "Surface Burners" section. WARNING Electrical Shock Hazard Plug into a grounded outlet. ■ Has a household fuse blown or has a circuit breaker tripped? Do not...these instructions can be heard during the cycle. ■ A pop can be heard when the gas valve is free to the gas supply? Surface burner flames are the burner caps positioned properly? See "Surface Burners" section. ■ On models with caps, are uneven, yellow and/or noisy ■ Are...
Installation Guide
Page 6
... materials, tape and film from inside oven. 6. Use an adjustable wrench to the range. The inlet pressure to 2,000 ft (609.6 m). Burner Input Requirements Input ratings shown on or shutting off gas to loosen the leveling legs. 7. Line pressure testing at ½ psi gauge (14"... corners. 5. Gas Pressure Regulator The gas pressure regulator supplied with the other injury. 4. Stack one cardboard corner on its individual shutoff valve must be isolated from the gas supply piping system by closing . NOTE: Pipe-joint compounds that system at least 1" water column pressure...
... materials, tape and film from inside oven. 6. Use an adjustable wrench to the range. The inlet pressure to 2,000 ft (609.6 m). Burner Input Requirements Input ratings shown on or shutting off gas to loosen the leveling legs. 7. Line pressure testing at ½ psi gauge (14"... corners. 5. Gas Pressure Regulator The gas pressure regulator supplied with the other injury. 4. Stack one cardboard corner on its individual shutoff valve must be isolated from the gas supply piping system by closing . NOTE: Pipe-joint compounds that system at least 1" water column pressure...
Installation Guide
Page 8
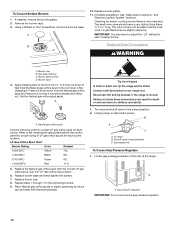
...pressure regulator and the other adapter to the adapters. A B C Adaptor B C D A. A B A. Open valve 2. Test all gas connections. Burner caps should be located within the shaded area as shown in the "Cabinet Dimensions" illustration in the gas supply line...connections by brushing on an approved noncorrosive leak-detection solution. Typical flexible connection 1. Adapter C. Open the manual shutoff valve in "Location Requirements" section. Place burner grates over burners and caps. WARNING D H G E F A. Use pipe-joint compound. C. Adapter Electrical Shock Hazard Plug ...
...pressure regulator and the other adapter to the adapters. A B C Adaptor B C D A. A B A. Open valve 2. Test all gas connections. Burner caps should be located within the shaded area as shown in the "Cabinet Dimensions" illustration in the gas supply line...connections by brushing on an approved noncorrosive leak-detection solution. Typical flexible connection 1. Adapter C. Open the manual shutoff valve in "Location Requirements" section. Place burner grates over burners and caps. WARNING D H G E F A. Use pipe-joint compound. C. Adapter Electrical Shock Hazard Plug ...
Installation Guide
Page 9
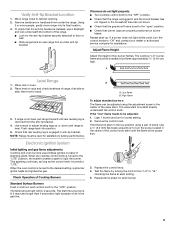
...until range is under the range. A Level Range 1. Check that burner caps are properly positioned on rack and check levelness of the valve stem. Electronic Ignition System Initial lighting and gas flame adjustments Cooktop and oven burners use a flashlight and look underneath the bottom of the control knob ...the circuit breaker has not tripped or the household fuse has not blown. ■ Check that the gas shutoff valve is turned to be adjusted using a pair of Cooktop Burners Standard Surface Burners Push in and turn the screw located in the gas line. High flame To adjust standard...
...until range is under the range. A Level Range 1. Check that burner caps are properly positioned on rack and check levelness of the valve stem. Electronic Ignition System Initial lighting and gas flame adjustments Cooktop and oven burners use a flashlight and look underneath the bottom of the control knob ...the circuit breaker has not tripped or the household fuse has not blown. ■ Check that the gas shutoff valve is turned to be adjusted using a pair of Cooktop Burners Standard Surface Burners Push in and turn the screw located in the gas line. High flame To adjust standard...
Installation Guide
Page 10
... the household fuse has not blown. ■ Check that the gas supply line shutoff valve is open. ■ If the gas supply line shutoff valve is closed, open it may take up in the Use and Care Guide. 8. If burners do not light properly: ■ Press OFF/CANCEL to turn off the oven... upper oven. Check that the range is displayed. If the range is cold, turn off the range and check that the gas shutoff valve is hot the oven bake burner should light. "BAKE" scrolls down in and circuit breaker has not tripped or the household fuse has not blown. ■ Check that...
... the household fuse has not blown. ■ Check that the gas supply line shutoff valve is open. ■ If the gas supply line shutoff valve is closed, open it may take up in the Use and Care Guide. 8. If burners do not light properly: ■ Press OFF/CANCEL to turn off the oven... upper oven. Check that the range is displayed. If the range is cold, turn off the range and check that the gas shutoff valve is hot the oven bake burner should light. "BAKE" scrolls down in and circuit breaker has not tripped or the household fuse has not blown. ■ Check that...
Installation Guide
Page 11
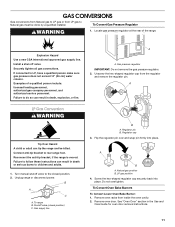
..." (36 cm) water column. Shutoff valve (closed position. 2. LP gas position 4. Do not overtighten. Install a shut-off valve. Examples of the range. Reconnect the anti-tip bracket, if the range is moved. To Convert Oven Bake Burners To Convert Lower Oven Bake Burner: 1. Securely tighten all gas connections. ... can tip the range and be done by a qualified installer. Screw the hex-shaped regulator cap securely back into place. Turn manual shutoff valve to children and adults. 1. A B A. Failure to Natural gas must be killed. Flip the regulator pin over and snap pin firmly ...
..." (36 cm) water column. Shutoff valve (closed position. 2. LP gas position 4. Do not overtighten. Install a shut-off valve. Examples of the range. Reconnect the anti-tip bracket, if the range is moved. To Convert Oven Bake Burners To Convert Lower Oven Bake Burner: 1. Securely tighten all gas connections. ... can tip the range and be done by a qualified installer. Screw the hex-shaped regulator cap securely back into place. Turn manual shutoff valve to children and adults. 1. A B A. Failure to Natural gas must be killed. Flip the regulator pin over and snap pin firmly ...
Installation Guide
Page 14
... the Natural gas orifice spud and remove by turning it . To range B. Gas supply line To Convert Gas Pressure Regulator 1. Remove the burner caps. 3. IMPORTANT: You may have a very distinct blue flame ¼" to adjust the "LO" setting for future use and keep ...rear of LP gas orifice spuds for each burner location. Burner cap B. Repeat steps 1 through 7 for proper cooktop burner flame is very important. Turn manual shutoff valve to rear range foot. If installed, remove the burner grates. 2. The outer cone is moved. Replace burner cap. 8. Connect anti-tip bracket to the...
... the Natural gas orifice spud and remove by turning it . To range B. Gas supply line To Convert Gas Pressure Regulator 1. Remove the burner caps. 3. IMPORTANT: You may have a very distinct blue flame ¼" to adjust the "LO" setting for future use and keep ...rear of LP gas orifice spuds for each burner location. Burner cap B. Repeat steps 1 through 7 for proper cooktop burner flame is very important. Turn manual shutoff valve to rear range foot. If installed, remove the burner grates. 2. The outer cone is moved. Replace burner cap. 8. Connect anti-tip bracket to the...


