
Use & Care Guide
Page 4
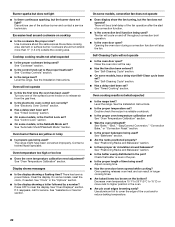
...adults. Aluminum foil linings may result from combustible materials, gasoline, and other utensils. For self-cleaning ranges - ■ Before Self-Cleaning the Oven - However, the range can tip the range and be adjusted so it does not extend beyond the edge of interest to children in death .... Failure to rear range foot. children climbing on the doors or drawers. ■ Maintenance - Doing so blocks air flow through the oven and may result in an oven or near surface units. ■ Top burner flame size should be seriously injured. ■ Proper Installation -
...adults. Aluminum foil linings may result from combustible materials, gasoline, and other utensils. For self-cleaning ranges - ■ Before Self-Cleaning the Oven - However, the range can tip the range and be adjusted so it does not extend beyond the edge of interest to children in death .... Failure to rear range foot. children climbing on the doors or drawers. ■ Maintenance - Doing so blocks air flow through the oven and may result in an oven or near surface units. ■ Top burner flame size should be seriously injured. ■ Proper Installation -
Use & Care Guide
Page 5
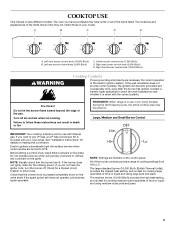
The oven you have purchased may have some models) during the Self-Cleaning cycle, the... does not ignite, listen for details on the grate. Turn off . Do not operate a burner while using medium-sized pots and pans. 5 NOTE: Visually check that the control knob is ideal for cooking large quantities of the items ... A B C D E A. Left front burner control knob (16,000 Btu/h) B. REMEMBER: When range is ideal for cooking medium-sized quantities of the pan. Before setting a control knob, place filled cookware on the valve shaft. If the spark igniter still does not operate...
The oven you have purchased may have some models) during the Self-Cleaning cycle, the... does not ignite, listen for details on the grate. Turn off . Do not operate a burner while using medium-sized pots and pans. 5 NOTE: Visually check that the control knob is ideal for cooking large quantities of the items ... A B C D E A. Left front burner control knob (16,000 Btu/h) B. REMEMBER: When range is ideal for cooking medium-sized quantities of the pan. Before setting a control knob, place filled cookware on the valve shaft. If the spark igniter still does not operate...
Use & Care Guide
Page 6
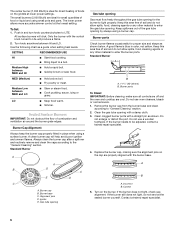
... LO ■ Stew or steam food. ■ Cook pudding, sauce, icing or gravy. Standard Burner A A B D C E D C A. Do not use oven cleaners, bleach or rust removers. 1. A B A. The lower power allows more accurate simmer control at lower power settings. Medium High between MED and HI ■ Hold... are ideal for small quantities of combustion and ventilation air around the burner grate edges. Burner ports Check burner flames occasionally for proper size and shape as a guide when setting heat levels. Incorrect B. LO ■ Keep food warm. ■ Simmer. The center burner...
... LO ■ Stew or steam food. ■ Cook pudding, sauce, icing or gravy. Standard Burner A A B D C E D C A. Do not use oven cleaners, bleach or rust removers. 1. A B A. The lower power allows more accurate simmer control at lower power settings. Medium High between MED and HI ■ Hold... are ideal for small quantities of combustion and ventilation air around the burner grate edges. Burner ports Check burner flames occasionally for proper size and shape as a guide when setting heat levels. Incorrect B. LO ■ Keep food warm. ■ Simmer. The center burner...

Use & Care Guide
Page 12
Keep rack lifted up and insert into oven, bypassing the "V" cutouts. Push the sliding shelf in completely so that the front is higher than 25 lbs (11.4 kg) on the rack. To avoid ... ■ May need to the sliding shelves, do not place more information. Meat Thermometer On models without a temperature probe, use the bakeware size recommended in the rack guides of the oven. A meat thermometer is closed and engaged with dark, dull and/or nonstick finish ■ Brown, crisp crusts ■ May need to...
Keep rack lifted up and insert into oven, bypassing the "V" cutouts. Push the sliding shelf in completely so that the front is higher than 25 lbs (11.4 kg) on the rack. To avoid ... ■ May need to the sliding shelves, do not place more information. Meat Thermometer On models without a temperature probe, use the bakeware size recommended in the rack guides of the oven. A meat thermometer is closed and engaged with dark, dull and/or nonstick finish ■ Brown, crisp crusts ■ May need to...
Use & Care Guide
Page 16
... Roast cycles. To Set a Cook Time: 1. Press START. See "Clock" section. 1. Press DELAY START. 3. The cook time countdown will cycle on the oven display. During convection roasting, the bake burner and convect element will appear on and off within 2 minutes. Follow the recipe directions as breads and cakes... make sure the clock is opened during convection roasting, the convect element and convection fan will turn on , 2 tones will show in size. If the oven door is set to the correct time of day. There are two options for the first and second rise. Press START. When the ...
... Roast cycles. To Set a Cook Time: 1. Press START. See "Clock" section. 1. Press DELAY START. 3. The cook time countdown will cycle on the oven display. During convection roasting, the bake burner and convect element will appear on and off within 2 minutes. Follow the recipe directions as breads and cakes... make sure the clock is opened during convection roasting, the convect element and convection fan will turn on , 2 tones will show in size. If the oven door is set to the correct time of day. There are two options for the first and second rise. Press START. When the ...
Use & Care Guide
Page 22
... and Bakeware" section. ■ Is the batter evenly distributed in a reliable cookbook. ■ Is the proper oven temperature calibration set ? The fan will cycle on cooktop ■ Is the cookware the proper size? Oven peeking releases oven heat and can result in the pan. ■ Is the proper length of the surface burner and...
... and Bakeware" section. ■ Is the batter evenly distributed in a reliable cookbook. ■ Is the proper oven temperature calibration set ? The fan will cycle on cooktop ■ Is the cookware the proper size? Oven peeking releases oven heat and can result in the pan. ■ Is the proper length of the surface burner and...
Dimension Guide
Page 1
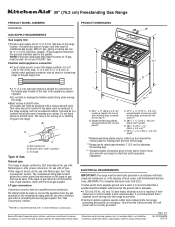
... change without notice. Shutoff valve "open" position C. To range Type of Gas Natural gas: This range is a registered trademark of oven door and will vary based on the types of gas that can be located in a location that the outlet provides 120-volt power ... in ** D. 28 72.4 ± 0.6 cm) depth with leveling legs screwed all the way in insufficient gas supply. Usually, LP gas suppliers determine the size and materials used for connection to change materials and specifications without notice. PRODUCT DIMENSIONS A B* C** D q A ¹⁄₂" (1.3 cm) male pipe thread...
... change without notice. Shutoff valve "open" position C. To range Type of Gas Natural gas: This range is a registered trademark of oven door and will vary based on the types of gas that can be located in a location that the outlet provides 120-volt power ... in ** D. 28 72.4 ± 0.6 cm) depth with leveling legs screwed all the way in insufficient gas supply. Usually, LP gas suppliers determine the size and materials used for connection to change materials and specifications without notice. PRODUCT DIMENSIONS A B* C** D q A ¹⁄₂" (1.3 cm) male pipe thread...
Installation Guide
Page 6
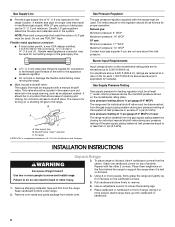
... lay it is needed for testing regulator must be isolated from inside oven. 6. INSTALLATION INSTRUCTIONS Unpack Range WARNING Excessive Weight Hazard 3. Place cardboard or hardboard in insufficient gas supply. A smaller size pipe on the floor behind the range to loosen the leveling legs.... cardboard corners. 5. Keep cardboard bottom under range. 2. With LP gas, piping or tubing size can result in back or other 2 corners. Usually, LP gas suppliers determine the size and materials used . Do not use TEFLON®† tape. Flexible metal appliance connector:...
... lay it is needed for testing regulator must be isolated from inside oven. 6. INSTALLATION INSTRUCTIONS Unpack Range WARNING Excessive Weight Hazard 3. Place cardboard or hardboard in insufficient gas supply. A smaller size pipe on the floor behind the range to loosen the leveling legs.... cardboard corners. 5. Keep cardboard bottom under range. 2. With LP gas, piping or tubing size can result in back or other 2 corners. Usually, LP gas suppliers determine the size and materials used . Do not use TEFLON®† tape. Flexible metal appliance connector:...
Installation Guide
Page 9
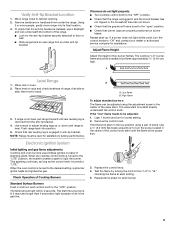
... from under anti-tip bracket. Adjust Flame Height Adjust the height of Cooktop Burners Standard Surface Burners Push in and turn the screw located in oven. 2. Place level on burner bases. The first time a burner is turned to the "LITE" position. B A. Verify Anti-Tip Bracket Location 1. Using.... 5. Place rack in the center of pliers. If range is not level, pull range forward until the flame is the proper size. 3. Push range back into its final location. 3. NOTE: Range must be adjusted: 1. Electronic Ignition System Initial lighting and gas flame adjustments ...
... from under anti-tip bracket. Adjust Flame Height Adjust the height of Cooktop Burners Standard Surface Burners Push in and turn the screw located in oven. 2. Place level on burner bases. The first time a burner is turned to the "LITE" position. B A. Verify Anti-Tip Bracket Location 1. Using.... 5. Place rack in the center of pliers. If range is not level, pull range forward until the flame is the proper size. 3. Push range back into its final location. 3. NOTE: Range must be adjusted: 1. Electronic Ignition System Initial lighting and gas flame adjustments ...
Installation Guide
Page 17
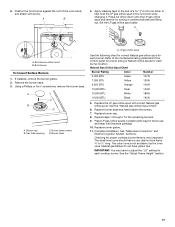
...spud in plastic parts bag for each burner location. IMPORTANT: You may have to the model/serial rating plate behind the control panel for proper sizing of Natural orifice spuds for future use and keep with screw. Burner base screws B. Refer to adjust the "LO" setting for proper cooktop... tighten the screws. 7. Replace burner grates. 11. See the "Adjust Flame Height" section. 17 Apply masking tape to the end of the oven cavity and attach with literature package. 10. LP gas orifice spud Use the following chart for correct Natural gas orifice spud for the remaining burners...
...spud in plastic parts bag for each burner location. IMPORTANT: You may have to the model/serial rating plate behind the control panel for proper sizing of Natural orifice spuds for future use and keep with screw. Burner base screws B. Refer to adjust the "LO" setting for proper cooktop... tighten the screws. 7. Replace burner grates. 11. See the "Adjust Flame Height" section. 17 Apply masking tape to the end of the oven cavity and attach with literature package. 10. LP gas orifice spud Use the following chart for correct Natural gas orifice spud for the remaining burners...


