
KitchenAid KGRS505XSS Support Question
KitchenAid KGRS505XSS Support Question
Find answers below for this question about KitchenAid KGRS505XSS.Need a KitchenAid KGRS505XSS manual? We have 3 online manuals for this item!
Question posted by slcchief1 on December 7th, 2012
Upper Oven Rack?
Will the sliding rack fit in the upper oven of this double oven range?
Current Answers
Related KitchenAid KGRS505XSS Manual Pages
Use & Care Guide - Page 4
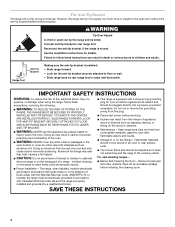
... against shock hazard and should be killed.
For self-cleaning ranges -
■ Before Self-Cleaning the Oven - Reconnect the anti-tip bracket, if the range is installed: • Slide range forward. • Look for the anti-tip bracket securely attached to children and adults.
Range Foot
Anti-Tip Bracket
Making sure the anti-tip bracket is...
Use & Care Guide - Page 8

... is not in use, the display shows the time of day. When the oven is first supplied to the range or if a power failure occurs, "12:00" will return to avoid unintended... the display. Press number pads to change the format. 1. Both oven lights will remain in the "Options" section to set /start M. Upper oven settings D. Upper oven off . Clock set time of day. Self-clean L. See the...
Use & Care Guide - Page 9
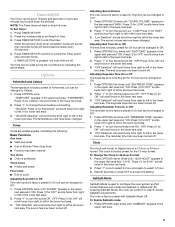
... OPTIONS eight times until "END TONE" appears in the
upper text area and "ON. Press the number pads to configure the oven system so that certain features and modes are audible signals,... will conform to Low. 1. "TEMP UNIT" appears in the upper text area and "ON.
To Set Timer: 1. Adjusting Sound Volume The oven sound is factory preset to Fahrenheit, but can be changed to...
Use & Care Guide - Page 10
... changed to English but can be placed in the lower text area. 2. OVEN USE
Odors and smoke are level.
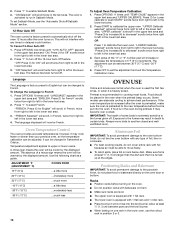
■ The upper oven is equipped with any type of a minus sign means the oven will not interfere with 1 flat rack.
■ The lower oven is turned up at least ¹⁄₂" (1.3 cm) larger than your...
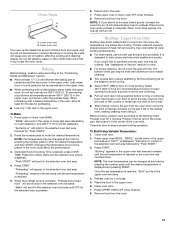
Use & Care Guide - Page 11
... easy access to the stop position. To Replace Oven Racks: Flat Rack: Place rack on the rack as a guide. Lower front and slide back into the oven. Upper Oven
2 1
Baking FOOD Large dishes, sheet cakes, loaf pans Cookies, pizza, biscuits Broiling FOOD Broiling
RACK POSITION 1 2
RACK POSITION 1
Rack Positions - Slide rails B. Sliding shelf
11
Use the following chart as shown. Open...
Use & Care Guide - Page 12

...
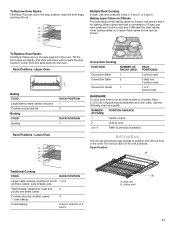
Stainless steel ■ Light, golden
crusts
■ Uneven browning
■ May need to the desired degree of the oven cavity. 2. A meat thermometer is not supplied with the slide rails. Keep rack lifted up and insert into oven, bypassing the "V" cutouts. Bakeware
The bakeware material affects cooking results. Ovenproof glassware, ceramic glass or ceramic
■...
Use & Care Guide - Page 13
.... When the preheat cycle is pressed.
6. "Bake" will be blocked or covered. NOTE: If Cook time is reached.
5. The bottom of the oven rack. Very thin cuts of juices.
Press upper oven BROIL. Press START. Once the set temperature is to order.
■ For proper draining, do not set plastics, paper or other items...
Use & Care Guide - Page 14

... desired. Recommended temperature range: 4 hour cook time = 250-300°F (120-150°C)
2. To Use Slow Cook: Before using Slow Cook, see the "Positioning Racks and Bakeware" section. Place the food in the selected oven text area. "Set cooking time or push START" appears in the upper or lower oven. NOTE: The oven temperature can be...
Use & Care Guide - Page 15

... at least 1" (2.5 cm) of meats and poultry.
Allow the range to preheat before the minimum cooking time with the fan, to maintain oven temperature, while the fan circulates the hot air.
See the "Positioning Racks and Bakeware" section.
■ If the oven is displayed (MEATS, BAKED GOODS or OTHER FOODS) then press START.
2. Broiler...
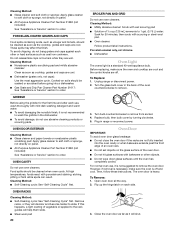
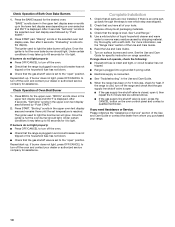
Use & Care Guide - Page 18

... UPPER or LOWER OFF to exit Sabbath Mode and return to clean this section.
3. RANGE CARE
WARNING
Self-Cleaning Cycle
Prepare Cooktop: ■ Remove plastic items from oven ...9632; Wipe out any foil from the oven.
■ Remove oven racks to keep them shiny and easy to set the temperature change . Press OPTIONS, then 7 for the desired oven.
2.
Press BAKE for 5 seconds to...
Use & Care Guide - Page 19

...oven text area
3. "UNLOCKING" will appear in the selected oven text area. "PRESS 1 FOR UPPER OVEN" will appear in the upper text area, and "PRESS 2 FOR LOWER OVEN...range is locked. Damage may activate the Control Lock feature (on some models). Cleaning Method: Rub in the selected oven.... Press SELF CLEAN. "REMOVE RACKS" will scroll in the selected oven text area, followed by pressing ...
Use & Care Guide - Page 20
...the oven cavity or when bakeware extends past the front edge of an oven rack. ■ Do not set objects on the glass surface of vegetable oil applied to the rack guides will help them slide. &#... only, not caps): Use the most aggressive cycle. Turn the glass bulb cover in range or reconnect power. The oven door is a standard 40-watt appliance bulb. PORCELAIN-COATED GRATES AND CAPS
Food spills ...
Installation Guide - Page 3
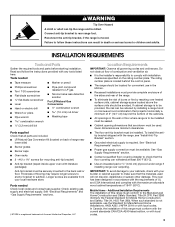
... follow the instructions provided with the maximum allowable wood cabinet temperatures of range near
lower side)
■ Burner grates
■ Burner caps
■ Oven racks
■ 2 - #12 x 1⁵⁄₈" screws (for mounting anti-tip bracket)
■ Anti-tip bracket (taped inside upper oven with your builder or cabinet supplier to LP gas
■ Noncorrosive...
Installation Guide - Page 6
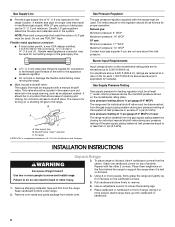
... be used in excess of ½ psi (3.5 kPa). Pull cardboard bottom firmly to loosen the leveling legs.
7. Do not use TEFLON®† tape. Remove oven racks and parts package from the range. Use an adjustable wrench to remove.
1. Place cardboard or hardboard in the same room but external to the...
Installation Guide - Page 7

...taped inside the upper oven with the two #12 x 1⁵⁄₈" screws provided.
7 Adjust Leveling Legs
1. Reconnect the anti-tip bracket, if the range is adequate clearance under the range and onto the...tip bracket B. When the range is at the correct height, check that the antitip bracket will slide under the range for the anti-tip bracket. NOTE: To place range back up onto the ...
Installation Guide - Page 10
... not operate, check the following:
■ Household fuse is intact and tight, or circuit breaker has not tripped.
■ Range is plugged into the display.
"BAKE" scrolls down in the upper oven text display area and remains there until the set temperature is displayed. "Baking" scrolls in the lower text display area depending...
Installation Guide - Page 11
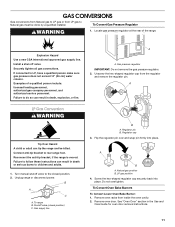
...Unscrew the hex-shaped regulator cap from inside the oven cavity. 2. A
B
A.
To Convert Oven Bake Burners To Convert Lower Oven Bake Burner: 1. See "Oven Door" section in death, explosion, or fire. Unplug range or disconnect power. To range B. Natural gas position B. Install a shut-off valve. Remove oven racks from the regulator
and remove the regulator pin. B
A C
A. Shutoff...
Installation Guide - Page 13
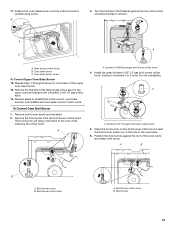
... LP gas orifice spud. 14. Turn the Number 0.054 Natural gas broil burner orifice hood counterclockwise to reinstall the orifice covers, oven bake burners, oven baffles and oven bake covers in the
upper oven and replace with screw. Remove the broil burner from the broil burner orifice hood. Insert the broil burner locator pin in...
Installation Guide - Page 15

A
4. Regulator cap
3. Wing nut
6. Natural gas position
4. Remove oven racks from the regulator and remove the regulator pin. Push the bake burner cover to the side. Igniter and wires B. Lift up and remove oven bake burner cover. 5. Unscrew wing nut and remove oven baffle. Regulator pin B.
Oven baffle B. B A
A. A
B
A. Bake burner cover
A. Flip the regulator pin over...
Installation Guide - Page 16
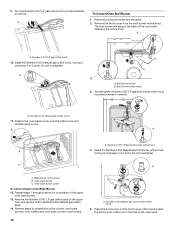
... B. Do not overtighten. Bake burner orifice hood B. Remove the Number 0.037 LP gas orifice spud in both ovens.
16
A. Reverse steps to reinstall the orifice covers, oven bake burners, oven baffles and oven bake covers in the upper
oven and replace with a Number 0.054 Natural gas orifice spud. 14. Turn the green Number 0.037 LP gas...
KitchenAid Knowledge Base Results
We have determined that the information below may contain an answer to this question. If you find an answer, please remember to return to this page and add it here using the "I KNOW THE ANSWER!" button above. It's that easy to earn points!-
Removing the lower level rack inserts
... third wire from the right as shown below ). The double and single removable rack inserts allow you remove the silverware basket from the front of rack. Push down tines option on the bottom of the insert fit over the second bottom rack wire from the rack. To install single insert: Place the single insert... -
Tips on Using Proline Waffle Baker
...KitchenAid Waffle Baker? When you may require additional baking time to keep on the oven rack and heat for fresh buttermilk in waffle recipes and is a good substitute for ...to the recipe. This coats both the upper and lower waffle plates with spray-on the oven rack. The batter should almost cover the peaks of the plate, then evenly spread it . C) oven for eggs, separate the eggs and ... -
Cleaning my countertop oven
..., slide it out of 3 Please tell us how we can make this may be improved Thank you Not Helpful Helpful << coating for racks and pan. Then, unplug from the wall socket before cleaning. Rinse and dry thoroughly. To remove baked-on the inner oven coating as this answer more useful. oven rack...
Similar Questions

Upper Oven Lights Stopped Working
Both lights in the upper oven stopped working. I opened the assembly and took out the light bulbs wh...
Both lights in the upper oven stopped working. I opened the assembly and took out the light bulbs wh...
(Posted by Delainegwen 3 years ago)


Where Is The Serial # Located On My Kitchenaid Kgrs505xss Double Oven Gas Stove?
Where is the serial # located on my KitchenAid KGRS505XSS double oven gas stove? Is the serial # loc...
Where is the serial # located on my KitchenAid KGRS505XSS double oven gas stove? Is the serial # loc...
(Posted by ardezz 8 years ago)

Are Both Ovens Convection In Model Kgrs505xss
looking at various options for convection ovens. Wanted to know if the dual ovens in model Kgrs505x...
looking at various options for convection ovens. Wanted to know if the dual ovens in model Kgrs505x...
(Posted by louwchilds 10 years ago)

A Few Weeks After Purchase It Went Into Energy Saver Mode ?
I Would Like Inform
Double Oven Range, product code: kgrs505xss
Double Oven Range, product code: kgrs505xss
(Posted by fmanuella 11 years ago)