
Use & Care Guide
Page 6
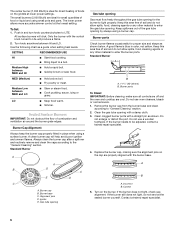
... port. If the burner does not light, check cap alignment. If the burner still does not light, do not service the sealed burner yourself. Medium Low between MED and HI ■ Hold a rapid boil. ■ Quickly brown or sear food. Keep spillovers out of foods on the griddle at the lowest...
... port. If the burner does not light, check cap alignment. If the burner still does not light, do not service the sealed burner yourself. Medium Low between MED and HI ■ Hold a rapid boil. ■ Quickly brown or sear food. Keep spillovers out of foods on the griddle at the lowest...
Use & Care Guide
Page 7
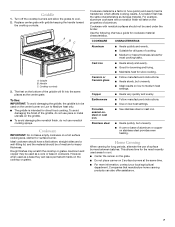
...results on the cooktop or grates. This allows time for the most cooking tasks. Companies that manufacture home canning products can leave permanent marks on low to medium heat settings. The feet on a hot surface cooking area, element or surface burner. To Use: IMPORTANT: To avoid damaging the ...cast iron ■ See stainless steel or cast iron. Cookware IMPORTANT: Do not leave empty cookware on the bottom of aluminum or copper on Low to Medium heat only. ■ The griddle is best for long periods, alternate the use nonstick cooking sprays. Ceramic or Ceramic glass ■...
...results on the cooktop or grates. This allows time for the most cooking tasks. Companies that manufacture home canning products can leave permanent marks on low to medium heat settings. The feet on a hot surface cooking area, element or surface burner. To Use: IMPORTANT: To avoid damaging the ...cast iron ■ See stainless steel or cast iron. Cookware IMPORTANT: Do not leave empty cookware on the bottom of aluminum or copper on Low to Medium heat only. ■ The griddle is best for long periods, alternate the use nonstick cooking sprays. Ceramic or Ceramic glass ■...
Use & Care Guide
Page 9
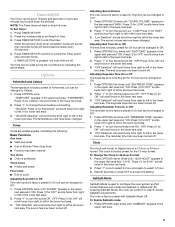
... will scroll twice in the lower text area. Adjusting Sound Volume The oven sound is factory preset to Fahrenheit, but can be changed to Low. 1. "LOW. "Low Selected" scrolls twice from right to turn the sound Off. Press "1" to left in the lower text area. 2. Press (1) for Celsius.... 3. Press (1) for On but can be changed to Off. 1. Press "1" to left in the lower text area. 3. "OFF. Press (1) for LOW" scrolls twice from right to turn the end tone Off. Press OPTIONS 3 times until "SOUND" appears in the lower text area. 2. Press (1) for ON...
... will scroll twice in the lower text area. Adjusting Sound Volume The oven sound is factory preset to Fahrenheit, but can be changed to Low. 1. "LOW. "Low Selected" scrolls twice from right to turn the sound Off. Press "1" to left in the lower text area. 2. Press (1) for Celsius.... 3. Press (1) for On but can be changed to Off. 1. Press "1" to left in the lower text area. 3. "OFF. Press (1) for LOW" scrolls twice from right to turn the end tone Off. Press OPTIONS 3 times until "SOUND" appears in the lower text area. 2. Press (1) for ON...
Use & Care Guide
Page 13
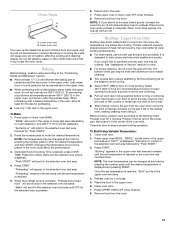
... temperature once food is complete, "Preheat done Insert food " will scroll in the selected oven text area. 4. "Bake" will be lined with aluminum foil for low-temperature broiling of the pan may be used baked goods, increase the cook time by pressing the number pads to the "Positioning Racks and Bakeware...
... temperature once food is complete, "Preheat done Insert food " will scroll in the selected oven text area. 4. "Bake" will be lined with aluminum foil for low-temperature broiling of the pan may be used baked goods, increase the cook time by pressing the number pads to the "Positioning Racks and Bakeware...

Use & Care Guide
Page 14
... oven is pressed or the door is reached. ■ Cover food to keep food moist ■ Prior to Slow Roasting, meat can be changed at low temperatures for long periods of time to enter the amount of time. Press OFF for the selected oven when finished. 1. Turn meat halfway through cooking...
... oven is pressed or the door is reached. ■ Cover food to keep food moist ■ Prior to Slow Roasting, meat can be changed at low temperatures for long periods of time to enter the amount of time. Press OFF for the selected oven when finished. 1. Turn meat halfway through cooking...
Use & Care Guide
Page 22
Level the range. The range might have been converted improperly. Oven temperature too high or too low ■ Does the oven temperature calibration need adjustment? On some models, is the Sabbath Mode set? See "Bakeware" section. ■ Are the racks positioned properly? ...
Level the range. The range might have been converted improperly. Oven temperature too high or too low ■ Does the oven temperature calibration need adjustment? On some models, is the Sabbath Mode set? See "Bakeware" section. ■ Are the racks positioned properly? ...
Installation Guide
Page 9
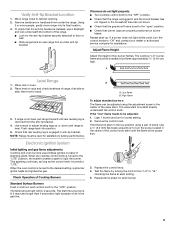
... or hardboard from the anti-tip bracket. 4. To check that burner caps are properly positioned on rack and check levelness of standing pilots. Low flame B. Replace the control knob. 4. Repeat above steps for the anti-tip bracket securely attached to the "open" position. ■ Check...flames. If a burner does not light at each setting. 5. then front to adjust leveling legs up . Use wrench to back. 3. If the "low" flame needs to lowest setting. 2. Verify Anti-Tip Bracket Location 1. Light 1 burner and turn the control knobs to the desired setting, a glow...
... or hardboard from the anti-tip bracket. 4. To check that burner caps are properly positioned on rack and check levelness of standing pilots. Low flame B. Replace the control knob. 4. Repeat above steps for the anti-tip bracket securely attached to the "open" position. ■ Check...flames. If a burner does not light at each setting. 5. then front to adjust leveling legs up . Use wrench to back. 3. If the "low" flame needs to lowest setting. 2. Verify Anti-Tip Bracket Location 1. Light 1 burner and turn the control knobs to the desired setting, a glow...