

Use & Care Guide
Page 15
...enter the desired cook temperature, then press START. 3. It is not necessary to wait for the oven to preheat, unless recommended in 2 or 3 different places, including the thickest part. ■ Before convection cooking, position the rack(s) according to the "Positioning Racks and Bakeware" section...number pads to the "Positioning Racks and Bakeware" section. 1. During convection baking preheat, the bake burner and convect element heat the oven cavity. To Convection Bake: Before convection baking, position racks according to enter standard cook time, then press START. The convection bake...
...enter the desired cook temperature, then press START. 3. It is not necessary to wait for the oven to preheat, unless recommended in 2 or 3 different places, including the thickest part. ■ Before convection cooking, position the rack(s) according to the "Positioning Racks and Bakeware" section...number pads to the "Positioning Racks and Bakeware" section. 1. During convection baking preheat, the bake burner and convect element heat the oven cavity. To Convection Bake: Before convection baking, position racks according to enter standard cook time, then press START. The convection bake...

Use & Care Guide
Page 19
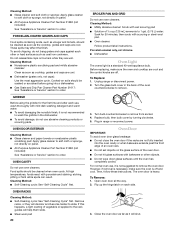
... Delay Start. "PRESS 1 FOR UPPER OVEN" will appear in the upper text area, and "PRESS 2 FOR LOWER OVEN" will scroll in the lower text area. 2. Press the number pads to enter the desired amount of grain to avoid damaging. ■ KitchenAid® Stainless Steel Cleaner and Polish (..." will appear in the selected oven text area, followed by "SELECT OPTION." When the self-clean cycle ends: "CLN COMPLETE will appear. 5. These spills may remove numbers. ■ All-Purpose Appliance Cleaner Part Number 31682 (not included): See "Assistance or Service" section to the control panel,...
... Delay Start. "PRESS 1 FOR UPPER OVEN" will appear in the upper text area, and "PRESS 2 FOR LOWER OVEN" will scroll in the lower text area. 2. Press the number pads to enter the desired amount of grain to avoid damaging. ■ KitchenAid® Stainless Steel Cleaner and Polish (..." will appear in the selected oven text area, followed by "SELECT OPTION." When the self-clean cycle ends: "CLN COMPLETE will appear. 5. These spills may remove numbers. ■ All-Purpose Appliance Cleaner Part Number 31682 (not included): See "Assistance or Service" section to the control panel,...
Use & Care Guide
Page 20
..., not caps): Use the most aggressive cycle. To Remove: 1. Close the oven door as far as cooktop, grates and caps are not fully inserted into a dishwasher. ■ Gas Grate and Drip Pan Cleaner Part Number 31617: See "Assistance or Service" section to order. At high temperatures,...containing acids, such as vinegar and tomato, should be cleaned when oven cools. Do not reassemble caps on panel. ■ All-Purpose Appliance Cleaner Part Number 31682 (not included): See "Assistance or Service" section to order. OVEN DOOR EXTERIOR Cleaning Method: ■ Glass cleaner and paper towels...
..., not caps): Use the most aggressive cycle. To Remove: 1. Close the oven door as far as cooktop, grates and caps are not fully inserted into a dishwasher. ■ Gas Grate and Drip Pan Cleaner Part Number 31617: See "Assistance or Service" section to order. At high temperatures,...containing acids, such as vinegar and tomato, should be cleaned when oven cools. Do not reassemble caps on panel. ■ All-Purpose Appliance Cleaner Part Number 31682 (not included): See "Assistance or Service" section to order. OVEN DOOR EXTERIOR Cleaning Method: ■ Glass cleaner and paper towels...
Installation Guide
Page 3
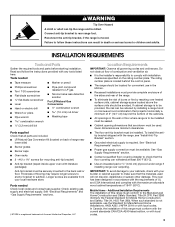
... supplier to the Manufactured Home Construction and Safety Standard, Title 24 CFR, Part 3280 (formerly the Federal Standard for mounting anti-tip bracket) ■ Anti-tip bracket (taped inside upper oven with literature packagae) Anti-tip bracket must conform with the current standards CAN...of range near lower side) ■ Burner grates ■ Burner caps ■ Oven racks ■ 2 - #12 x 1⁵⁄₈" screws (for Mobile Home Construction and Safety, Title 24, HUD Part 280). This oven has been designed in the kitchen. ■ Recessed installations must be sealed. ■...
... supplier to the Manufactured Home Construction and Safety Standard, Title 24 CFR, Part 3280 (formerly the Federal Standard for mounting anti-tip bracket) ■ Anti-tip bracket (taped inside upper oven with literature packagae) Anti-tip bracket must conform with the current standards CAN...of range near lower side) ■ Burner grates ■ Burner caps ■ Oven racks ■ 2 - #12 x 1⁵⁄₈" screws (for Mobile Home Construction and Safety, Title 24, HUD Part 280). This oven has been designed in the kitchen. ■ Recessed installations must be sealed. ■...
Installation Guide
Page 6
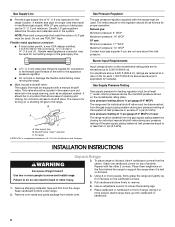
...long, ½" (1.3 cm) or ¾" (1.9 cm) I . Burner Input Requirements Input ratings shown on its back, take 4 cardboard corners from inside oven. 6. Keep cardboard bottom under range. 2. Use an adjustable wrench to remove. 1. Flexible metal appliance connector: ■ If local codes permit, a new ...or tubing size can result in insufficient gas supply. Usually, LP gas suppliers determine the size and materials used . Remove oven racks and parts package from the carton. Place cardboard or hardboard in the same room but external to the appliance pressure regulator. ■...
...long, ½" (1.3 cm) or ¾" (1.9 cm) I . Burner Input Requirements Input ratings shown on its back, take 4 cardboard corners from inside oven. 6. Keep cardboard bottom under range. 2. Use an adjustable wrench to remove. 1. Flexible metal appliance connector: ■ If local codes permit, a new ...or tubing size can result in insufficient gas supply. Usually, LP gas suppliers determine the size and materials used . Remove oven racks and parts package from the carton. Place cardboard or hardboard in the same room but external to the appliance pressure regulator. ■...
Installation Guide
Page 10
...range. 10 Dry thoroughly with a soft cloth. See the Use and Care Guide for the upper oven. If you need Assistance or Service: Please reference the "Assistance or Service" section of /recycle all parts are now installed. The igniter used to see the "Range Care" section of the Use and Care... BROIL for specific instruction on for 5 minutes, check for the desired oven. "Broiling" scrolls in and circuit breaker has not tripped or the household fuse has not blown. ■ Check that the gas shutoff valve is an extra part, go back through the steps to light the broil burner will glow...
...range. 10 Dry thoroughly with a soft cloth. See the Use and Care Guide for the upper oven. If you need Assistance or Service: Please reference the "Assistance or Service" section of /recycle all parts are now installed. The igniter used to see the "Range Care" section of the Use and Care... BROIL for specific instruction on for 5 minutes, check for the desired oven. "Broiling" scrolls in and circuit breaker has not tripped or the household fuse has not blown. ■ Check that the gas shutoff valve is an extra part, go back through the steps to light the broil burner will glow...
Installation Guide
Page 17
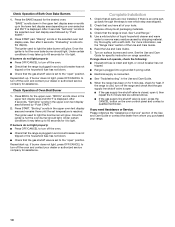
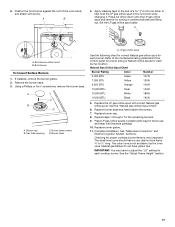
.... If installed, remove the burner grates. 2. LP gas orifice spud Use the following chart for correct Natural gas orifice spud for proper sizing of the oven cavity and attach with correct Natural gas orifice spud. Set the LP gas orifice spud aside. Burner base screws B. Natural Gas Orifice Spud Chart Burner... rating plate behind the control panel for each cooktop burner. Remove the burner caps. 3. A C B D A. 6. Refer to help hold the LP gas orifice spud in plastic parts bag for the remaining burners. 9.
.... If installed, remove the burner grates. 2. LP gas orifice spud Use the following chart for correct Natural gas orifice spud for proper sizing of the oven cavity and attach with correct Natural gas orifice spud. Set the LP gas orifice spud aside. Burner base screws B. Natural Gas Orifice Spud Chart Burner... rating plate behind the control panel for each cooktop burner. Remove the burner caps. 3. A C B D A. 6. Refer to help hold the LP gas orifice spud in plastic parts bag for the remaining burners. 9.


