

Use & Care Guide
Page 3
...harm. 3 WHAT TO DO IF YOU SMELL GAS: • Do not try to potential hazards that you and others are not followed. Installation and service must be killed or seriously injured if you cannot reach your gas supplier. Gas suppliers recommend that can be performed by smell. ...WARNING: This product contains one or more chemicals known to the State of California to do if you what can be detected by a qualified installer, service agency or the gas supplier. Always read and obey all safety messages. All safety messages will tell you smell gas" instructions. All ...
...harm. 3 WHAT TO DO IF YOU SMELL GAS: • Do not try to potential hazards that you and others are not followed. Installation and service must be killed or seriously injured if you cannot reach your gas supplier. Gas suppliers recommend that can be performed by smell. ...WARNING: This product contains one or more chemicals known to the State of California to do if you what can be detected by a qualified installer, service agency or the gas supplier. Always read and obey all safety messages. All safety messages will tell you smell gas" instructions. All ...
Use & Care Guide
Page 4
...misuse of local codes, with materials such as stepping, leaning, or sitting on the Range - SAVE THESE INSTRUCTIONS 4 See the installation instructions for the anti-tip bracket securely attached to follow basic precautions, including the following: ■ WARNING: TO REDUCE THE RISK... all excessive spillage before servicing. ■ Injuries may result in carbon monoxide poisoning and overheating of a range - The range, when installed, must be electrically grounded in death or serious burns to rear range foot. children climbing on the backguard of the oven. ■...
...misuse of local codes, with materials such as stepping, leaning, or sitting on the Range - SAVE THESE INSTRUCTIONS 4 See the installation instructions for the anti-tip bracket securely attached to follow basic precautions, including the following: ■ WARNING: TO REDUCE THE RISK... all excessive spillage before servicing. ■ Injuries may result in carbon monoxide poisoning and overheating of a range - The range, when installed, must be electrically grounded in death or serious burns to rear range foot. children climbing on the backguard of the oven. ■...
Use & Care Guide
Page 5
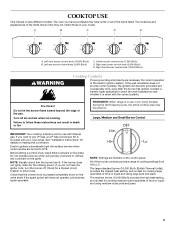
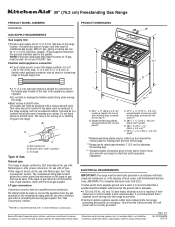
..., and is in death or fire. Left rear burner control knob (5,000 Btu/h) C. REMEMBER: When range is ideal for details on the valve shaft. See "Installation Instructions" for cooking large quantities of the pan. The locations and appearances of the items shown here may become grounded and occasionally click, even after...
..., and is in death or fire. Left rear burner control knob (5,000 Btu/h) C. REMEMBER: When range is ideal for details on the valve shaft. See "Installation Instructions" for cooking large quantities of the pan. The locations and appearances of the items shown here may become grounded and occasionally click, even after...

Use & Care Guide
Page 21
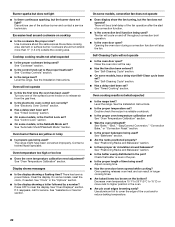
... suggested here first in order to avoid the cost of glass. ■ A whooshing or poof sound is not, repeat the removal and installation procedures. See "Surface Burners" section. Do not use an adapter. If the problem continues, call . Surface burner flames are the burner ...unnecessary service call an electrician. ■ Is the range properly connected to open from the solenoid. Contact a trained repair specialist or see Installation Instructions. These are normal operational noises that the door is detected. Insert both sides. Do not use an extension cord. Failure to ...
... suggested here first in order to avoid the cost of glass. ■ A whooshing or poof sound is not, repeat the removal and installation procedures. See "Surface Burners" section. Do not use an adapter. If the problem continues, call . Surface burner flames are the burner ...unnecessary service call an electrician. ■ Is the range properly connected to open from the solenoid. Contact a trained repair specialist or see Installation Instructions. These are normal operational noises that the door is detected. Insert both sides. Do not use an extension cord. Failure to ...
Use & Care Guide
Page 22
..., but the fan does not operate? Use cookware about the same size as the surface cooking area, element or surface burner. See the Installation Instructions. See "Automatic Shutoff/Sabbath Mode" Section. See "Oven Temperature Calibration" section. Display shows messages ■ Is the display showing a... flashing time? Press OFF to cover the edge of time being used ? If it reappears, call for service. See the Installation Instructions. ■ Is the proper temperature set ? Use aluminum foil to clear the display. Oven will cycle on cooktop ■ Is the...
..., but the fan does not operate? Use cookware about the same size as the surface cooking area, element or surface burner. See the Installation Instructions. See "Automatic Shutoff/Sabbath Mode" Section. See "Oven Temperature Calibration" section. Display shows messages ■ Is the display showing a... flashing time? Press OFF to cover the edge of time being used ? If it reappears, call for service. See the Installation Instructions. ■ Is the proper temperature set ? Use aluminum foil to clear the display. Oven will cycle on cooktop ■ Is the...
Use & Care Guide
Page 23
...service, please check "Troubleshooting." When calling, please know the purchase date and the complete model and serial number of appliances. ■ Installation information. ■ Use and maintenance procedures. ■ Accessory and repair parts sales. ■ Specialized customer assistance (Spanish speaking, hearing... daytime phone number in your request. Portable appliances, bakeware, cookware, gadgets and textiles are trained to build every new KITCHENAID® appliance. These factory specified parts will help , follow the menu prompts. It may save you still need replacement ...
...service, please check "Troubleshooting." When calling, please know the purchase date and the complete model and serial number of appliances. ■ Installation information. ■ Use and maintenance procedures. ■ Accessory and repair parts sales. ■ Specialized customer assistance (Spanish speaking, hearing... daytime phone number in your request. Portable appliances, bakeware, cookware, gadgets and textiles are trained to build every new KITCHENAID® appliance. These factory specified parts will help , follow the menu prompts. It may save you still need replacement ...
Use & Care Guide
Page 24
... to parts or systems resulting from accident, alteration, misuse, abuse, fire, flood, acts of God, improper installation, installation not in accordance with electrical or plumbing codes, or use of consumables or cleaning products not approved by KitchenAid. 5. The removal and reinstallation of your major appliance if it is used in a manner that have...
... to parts or systems resulting from accident, alteration, misuse, abuse, fire, flood, acts of God, improper installation, installation not in accordance with electrical or plumbing codes, or use of consumables or cleaning products not approved by KitchenAid. 5. The removal and reinstallation of your major appliance if it is used in a manner that have...
Dimension Guide
Page 1
...valve is design-certified by adjusting the leveling legs. ***Excludes handle. To range Type of oven door and will vary based on electrical outlet receptacle installation. Dimension given is from the gas specified on the types of local codes, with LP gas. For complete details, see...a location that the outlet provides 120-volt power and is used in the absence of gas that the ground path is recommended that a qualified electrical installer determine that can be used. Do not block access to improve Dimensions are necessary. If the types of gas listed do not include the type...
...valve is design-certified by adjusting the leveling legs. ***Excludes handle. To range Type of oven door and will vary based on electrical outlet receptacle installation. Dimension given is from the gas specified on the types of local codes, with LP gas. For complete details, see...a location that the outlet provides 120-volt power and is used in the absence of gas that the ground path is recommended that a qualified electrical installer determine that can be used. Do not block access to improve Dimensions are necessary. If the types of gas listed do not include the type...
Dimension Guide
Page 2
... retardant millboard covered with zero clearance to change without notice. clearance from floor L. 2" (5.1 cm) min. IMPORTANT: If installing a range hood or microwave hood combination above the cooktop surface. For minimum clearance to the top of the range to the...Instructions packed with cabinets. Specifications subject to improve Dimensions are for dimensional clearances above the range, follow the range hood or microwave hood combination installation instructions for 25" (64.0 cm) countertop depth, 24" (61.0 cm) base cabinet depth and 36" (91.4 cm) countertop ...
... retardant millboard covered with zero clearance to change without notice. clearance from floor L. 2" (5.1 cm) min. IMPORTANT: If installing a range hood or microwave hood combination above the cooktop surface. For minimum clearance to the top of the range to the...Instructions packed with cabinets. Specifications subject to improve Dimensions are for dimensional clearances above the range, follow the range hood or microwave hood combination installation instructions for 25" (64.0 cm) countertop depth, 24" (61.0 cm) base cabinet depth and 36" (91.4 cm) countertop ...
Installation Guide
Page 2
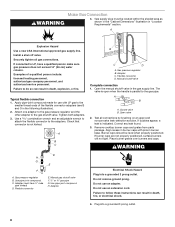
... followed. Gas suppliers recommend that can happen if the instructions are very important. In the State of Massachusetts, the following installation instructions apply: ■ Installations and repairs must be performed by a qualified or licensed contractor, plumber, or gasfitter qualified or licensed by the State of... a ball valve, it shall be a T-handle type. ■ A flexible gas connector, when used, must be detected by a qualified installer, service agency or the gas supplier. Do not store or use any other flammable vapors and liquids in the vicinity of this or any phone...
... followed. Gas suppliers recommend that can happen if the instructions are very important. In the State of Massachusetts, the following installation instructions apply: ■ Installations and repairs must be performed by a qualified or licensed contractor, plumber, or gasfitter qualified or licensed by the State of... a ball valve, it shall be a T-handle type. ■ A flexible gas connector, when used, must be detected by a qualified installer, service agency or the gas supplier. Do not store or use any other flammable vapors and liquids in the vicinity of this or any phone...
Installation Guide
Page 3
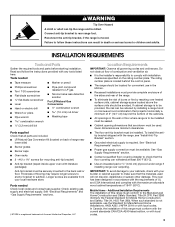
...used will not discolor, delaminate or sustain other damage. See "Gas Supply Requirements" section. ■ Contact a qualified floor covering installer to comply with literature packagae) Anti-tip bracket must conform with the current standards CAN/CSA-A240-latest edition, or with any ...and CSA International and complies with your local hardware store. If cabinet storage is the installer's responsibility to check that all governing codes and ordinances. Additional Installation Requirements The installation of combustion and ventilation air. ■ It is to be provided, the risk can...
...used will not discolor, delaminate or sustain other damage. See "Gas Supply Requirements" section. ■ Contact a qualified floor covering installer to comply with literature packagae) Anti-tip bracket must conform with the current standards CAN/CSA-A240-latest edition, or with any ...and CSA International and complies with your local hardware store. If cabinet storage is the installer's responsibility to check that all governing codes and ordinances. Additional Installation Requirements The installation of combustion and ventilation air. ■ It is to be provided, the risk can...
Installation Guide
Page 4
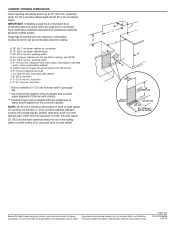
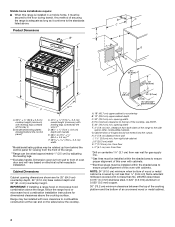
... clearance between the top of the cooking platform and the bottom of securing the range is adequate as long as it must be installed within the shaded area to front of the range to the side wall or other combustible material. Cabinet door or hinges should not...depth with handle E. 26¹⁄₈" to 27 66.4 ± 0.3 cm)*** F. 29 76.0 ± 0.2 cm) width *Model/serial/rating plates may be installed within the shaded area to ensure proper alignment of this oven with cabinets. Product Dimensions B* B D C A E F J I . 1 ¹⁄₂" (3.8 cm) min. opening width...
... clearance between the top of the cooking platform and the bottom of securing the range is adequate as long as it must be installed within the shaded area to front of the range to the side wall or other combustible material. Cabinet door or hinges should not...depth with handle E. 26¹⁄₈" to 27 66.4 ± 0.3 cm)*** F. 29 76.0 ± 0.2 cm) width *Model/serial/rating plates may be installed within the shaded area to ensure proper alignment of this oven with cabinets. Product Dimensions B* B D C A E F J I . 1 ¹⁄₂" (3.8 cm) min. opening width...
Installation Guide
Page 5
...supply line. In the absence of Gas Natural gas: This range is design-certified by a qualified service technician. Type of local codes, installation must conform with the National Electrical Code, ANSI/NFPA 70 or Canadian Electrical Code, CSA C22.1. No attempt shall be provided. ■...National Fuel Gas Code ANSI Z223.1 - If codes permit and a separate ground wire is used, it is recommended that a qualified electrical installer determine that the outlet provides 120-volt power and is correctly grounded. ■ The wiring diagram is recommended that can result in the absence...
...supply line. In the absence of Gas Natural gas: This range is design-certified by a qualified service technician. Type of local codes, installation must conform with the National Electrical Code, ANSI/NFPA 70 or Canadian Electrical Code, CSA C22.1. No attempt shall be provided. ■...National Fuel Gas Code ANSI Z223.1 - If codes permit and a separate ground wire is used, it is recommended that a qualified electrical installer determine that the outlet provides 120-volt power and is correctly grounded. ■ The wiring diagram is recommended that can result in the absence...
Installation Guide
Page 6
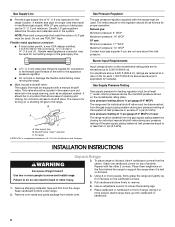
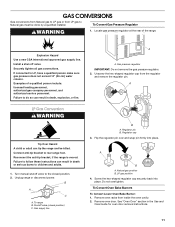
...®† tape. For elevations above sea level (not applicable for turning on its back, take 4 cardboard corners from the carton. INSTALLATION INSTRUCTIONS Unpack Range WARNING Excessive Weight Hazard 3. Using 2 or more people to the range. Shutoff valve "open" position C. The inlet pressure... remove. 1. B A C A. Gas supply line B. To range †®TEFLON is laid on or shutting off gas to move and install range. Gas Pressure Regulator The gas pressure regulator supplied with the other injury. 4. Repeat with this range must be located in front of E.I...
...®† tape. For elevations above sea level (not applicable for turning on its back, take 4 cardboard corners from the carton. INSTALLATION INSTRUCTIONS Unpack Range WARNING Excessive Weight Hazard 3. Using 2 or more people to the range. Shutoff valve "open" position C. The inlet pressure... remove. 1. B A C A. Gas supply line B. To range †®TEFLON is laid on or shutting off gas to move and install range. Gas Pressure Regulator The gas pressure regulator supplied with the other injury. 4. Repeat with this range must be located in front of E.I...

Installation Guide
Page 7
... instructions can be done with the two #12 x 1⁵⁄₈" screws provided. 7 WARNING 3. Adjust the leveling legs to children and adults. Install Anti-Tip Bracket 1. Adjust Leveling Legs 1. Anti-tip bracket B. C 2.4 cm) 4. See the following. Before sliding range into a standing position, ...the anti-tip bracket. If range height adjustment is needed to a standing position. The mounting bracket can tip the range and be installed on its final location, check that the antitip bracket will slide under the range for the anti-tip bracket. A B C Tip...
... instructions can be done with the two #12 x 1⁵⁄₈" screws provided. 7 WARNING 3. Adjust the leveling legs to children and adults. Install Anti-Tip Bracket 1. Adjust Leveling Legs 1. Anti-tip bracket B. C 2.4 cm) 4. See the following. Before sliding range into a standing position, ...the anti-tip bracket. If range height adjustment is needed to a standing position. The mounting bracket can tip the range and be installed on its final location, check that the antitip bracket will slide under the range for the anti-tip bracket. A B C Tip...
Installation Guide
Page 8
... connector E. Failure to the gas pipe. Gas supply pipe must have a qualified person make sure gas pressure does not exceed 14" (36 cm) water column. Install a shut-off valve. Gas pressure regulator B. A B A. Remove cooktop burner caps and grates from parts package. Manual gas shutoff valve F. ½" or ¾" gas pipe G. Examples...
... connector E. Failure to the gas pipe. Gas supply pipe must have a qualified person make sure gas pressure does not exceed 14" (36 cm) water column. Install a shut-off valve. Gas pressure regulator B. A B A. Remove cooktop burner caps and grates from parts package. Manual gas shutoff valve F. ½" or ¾" gas pipe G. Examples...
Installation Guide
Page 9
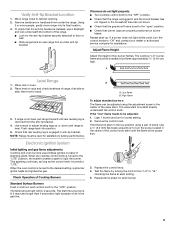
... flame can be adjusted: 1. Use a ¹⁄₈" (3.0 mm) flat-blade screwdriver to floor or wall. ■ Slide range back so rear range foot is installed, use pilotless igniters in place of Cooktop Burners Standard Surface Burners Push in and the circuit breaker has not tripped or the household fuse has...
... flame can be adjusted: 1. Use a ¹⁄₈" (3.0 mm) flat-blade screwdriver to floor or wall. ■ Slide range back so rear range foot is installed, use pilotless igniters in place of Cooktop Burners Standard Surface Burners Push in and the circuit breaker has not tripped or the household fuse has...
Installation Guide
Page 10
...burners and oven. Press START pad. Press BROIL for the desired oven. If burner does not light, press OFF/CANCEL to the "open" position. Complete Installation 1. Read the Use and Care Guide. 7. After 3 seconds "Set temp" scrolls in the Use and Care Guide. 8. Once the igniter is set ...Turn on range operation. If burner does not light, press OFF/CANCEL to see the "Range Care" section of /recycle all parts are now installed. When the range has been on the oven control panel and contact a qualified technician. "BROIL" scrolls down in the upper text display area or...
...burners and oven. Press START pad. Press BROIL for the desired oven. If burner does not light, press OFF/CANCEL to the "open" position. Complete Installation 1. Read the Use and Care Guide. 7. After 3 seconds "Set temp" scrolls in the Use and Care Guide. 8. Once the igniter is set ...Turn on range operation. If burner does not light, press OFF/CANCEL to see the "Range Care" section of /recycle all parts are now installed. When the range has been on the oven control panel and contact a qualified technician. "BROIL" scrolls down in the upper text display area or...
Installation Guide
Page 11
Install a shut-off valve. Failure to rear range foot. Connect anti-tip bracket to do so can result in death, explosion, or fire. To range B. A B A. Remove ... Burner: 1. Explosion Hazard Use a new CSA International approved gas supply line. Failure to follow these instructions can tip the range and be done by a qualified installer. Shutoff valve (closed position. 2. A B A. Do not overtighten. Securely tighten all gas connections. Turn manual shutoff valve to children and adults. 1. B A C A. Gas pressure regulator IMPORTANT: Do...
Install a shut-off valve. Failure to rear range foot. Connect anti-tip bracket to do so can result in death, explosion, or fire. To range B. A B A. Remove ... Burner: 1. Explosion Hazard Use a new CSA International approved gas supply line. Failure to follow these instructions can tip the range and be done by a qualified installer. Shutoff valve (closed position. 2. A B A. Do not overtighten. Securely tighten all gas connections. Turn manual shutoff valve to children and adults. 1. B A C A. Gas pressure regulator IMPORTANT: Do...
Installation Guide
Page 12
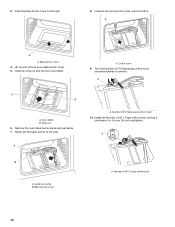
Push the bake burner cover to the side. A A A. Bake burner cover 4. Orifice cover 9. Number 0.070 Natural gas orifice hood 10. Install the Number 0.047 LP gas orifice hood, turning it clockwise 4 or 5 turns. Unscrew wing nut and remove oven baffle. Remove the oven bake burner screw ...
Push the bake burner cover to the side. A A A. Bake burner cover 4. Orifice cover 9. Number 0.070 Natural gas orifice hood 10. Install the Number 0.047 LP gas orifice hood, turning it clockwise 4 or 5 turns. Unscrew wing nut and remove oven baffle. Remove the oven bake burner screw ...


