Owners Guide
Page 2
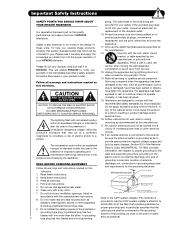
... problem should not be discovered in the vicinity of HITACHI televisions. An outdoor antenna should be located in your safety. NO USER SERVICEABLE PARTS INSIDE. Section 810 of antenna- Do not block any heat sources such as to qualified service personnel. The wide blade or the third prong are designed to an antenna discharge unit, size of grounding connectors, location of the National Electric Code...
... problem should not be discovered in the vicinity of HITACHI televisions. An outdoor antenna should be located in your safety. NO USER SERVICEABLE PARTS INSIDE. Section 810 of antenna- Do not block any heat sources such as to qualified service personnel. The wide blade or the third prong are designed to an antenna discharge unit, size of grounding connectors, location of the National Electric Code...
Owners Guide
Page 3
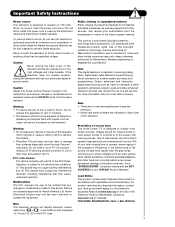
.... Note This digital television is capable of receiving analog basic, digital basic cable television programming by TV stations and cable companies, as well as improper changes or modifications not expressly approved by Hitachi America, Ltd. Prevention of screen burn This Wide Screen TV is designed to operate the equipment. Use of side panels, top and bottom panels of standard picture formats should be 15% of the picture will display television closed captioning, ( or ), in...
.... Note This digital television is capable of receiving analog basic, digital basic cable television programming by TV stations and cable companies, as well as improper changes or modifications not expressly approved by Hitachi America, Ltd. Prevention of screen burn This Wide Screen TV is designed to operate the equipment. Use of side panels, top and bottom panels of standard picture formats should be 15% of the picture will display television closed captioning, ( or ), in...

Owners Guide
Page 7
... CHANNEL (FAV CH) button (TV) Press to show and change the Freeze mode of the TV or pause other devices. Digital Video Disc Player SAT - ASPECT BUTTON (TV) Changes the aspect ratio while watching TV. Television CBL - First time use Quick Reference Remote Control Buttons and Functions In addition to controlling all features and programming of the Remote Control. Cable Box STB - VOLUME BUTTONS (TV) Adjusts the audio level of the OSD or INPUTS menu systems if their menu is included in Set-Top-Box (STB) mode or...
... CHANNEL (FAV CH) button (TV) Press to show and change the Freeze mode of the TV or pause other devices. Digital Video Disc Player SAT - ASPECT BUTTON (TV) Changes the aspect ratio while watching TV. Television CBL - First time use Quick Reference Remote Control Buttons and Functions In addition to controlling all features and programming of the Remote Control. Cable Box STB - VOLUME BUTTONS (TV) Adjusts the audio level of the OSD or INPUTS menu systems if their menu is included in Set-Top-Box (STB) mode or...
Owners Guide
Page 8
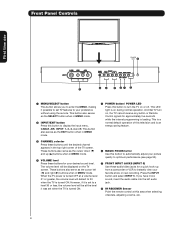
... operation. However, if it is turned ON. ² MAGIC FOCUS button Use this button to display the input menu, CABLE, AIR, INPUT: 1, 2, 3, 4 and 5. If you to enter the MENU, making it possible to set when the TV is set to a level 30 or less, the volume level will be displayed on , the TV cannot receive any button or Remote Control signals for your preference without using the remote. Front Panel Controls First time use POWER LED º ¶ ³ MENU/SELECT button This button...
... operation. However, if it is turned ON. ² MAGIC FOCUS button Use this button to display the input menu, CABLE, AIR, INPUT: 1, 2, 3, 4 and 5. If you to enter the MENU, making it possible to set when the TV is set to a level 30 or less, the volume level will be displayed on , the TV cannot receive any button or Remote Control signals for your preference without using the remote. Front Panel Controls First time use POWER LED º ¶ ³ MENU/SELECT button This button...
Owners Guide
Page 10
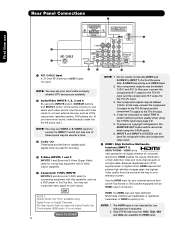
... multi-channel audio in digital format, HDMI assures that pristine high-definition images retain the highest video quality from the source all digital interface for your television screen. Rear Panel Connections ´ First time use composite video signal for both inputs. VIDEO PB PB ¿ PR PR VIDEO AIR / CABLE AUDIO TO Hi-Fi MONO MONO MONO MONO OPTICAL OUT L Digital Audio Upgrade Card AUDIO TV AS CENTER ³ R ¶ INPUT 1 INPUT 2 INPUT 3 INPUT 4 º » · ¾ ³ AIR /CABLE Input A 75-Ohm RF Antenna...
... multi-channel audio in digital format, HDMI assures that pristine high-definition images retain the highest video quality from the source all digital interface for your television screen. Rear Panel Connections ´ First time use composite video signal for both inputs. VIDEO PB PB ¿ PR PR VIDEO AIR / CABLE AUDIO TO Hi-Fi MONO MONO MONO MONO OPTICAL OUT L Digital Audio Upgrade Card AUDIO TV AS CENTER ³ R ¶ INPUT 1 INPUT 2 INPUT 3 INPUT 4 º » · ¾ ³ AIR /CABLE Input A 75-Ohm RF Antenna...
Owners Guide
Page 11
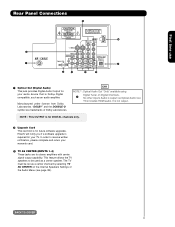
... on Digital Channels. BACK TO COVER 11 CH1 NOTE 1: Optical Audio Out "Only" available using ¶ Digital Tuner on the Internal Speakers Settings of Dolby Laboratories. VIDEO PB PB ¿ PR PR VIDEO AIR / CABLE AUDIO TO Hi-Fi MONO L MONO MONO MONO OPTICAL OUT Digital Audio Upgrade Card AUDIO TV AS CENTER ³ R ¶ INPUT 1 INPUT 2 INPUT 3 INPUT 4 º » · ¾ ¶ Optical Out (Digital Audio) This jack provides Digital Audio Output for your audio device that is output via Optical Audio Out...
... on Digital Channels. BACK TO COVER 11 CH1 NOTE 1: Optical Audio Out "Only" available using ¶ Digital Tuner on the Internal Speakers Settings of Dolby Laboratories. VIDEO PB PB ¿ PR PR VIDEO AIR / CABLE AUDIO TO Hi-Fi MONO L MONO MONO MONO OPTICAL OUT Digital Audio Upgrade Card AUDIO TV AS CENTER ³ R ¶ INPUT 1 INPUT 2 INPUT 3 INPUT 4 º » · ¾ ¶ Optical Out (Digital Audio) This jack provides Digital Audio Output for your audio device that is output via Optical Audio Out...
Owners Guide
Page 12
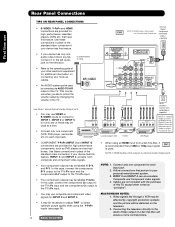
... use composite and component video signals for high performance laserdisc players, VCRs etc. INPUT 3 and INPUT 4 accepts both composite and component video signals. • When using an HDMI input from a Set-Top-Box, it to control the volume output by copyright protection systems and the picture will assure a more normal picture. VIDEO PB PB VIDEO AUDIO TO Hi-Fi MONO L Upgrade Card AUDIO R PR MONO MONO TV AS CENTER PR MONO OPTICAL OUT Digital Audio INPUT 1 INPUT 2 INPUT 3 INPUT 4 OUTPUT S-VIDEO V L R OUTPUT S-VIDEO V L R Laserdisc player, VCR, VCR #1 OPTICAL IN OUTPUT...
... use composite and component video signals for high performance laserdisc players, VCRs etc. INPUT 3 and INPUT 4 accepts both composite and component video signals. • When using an HDMI input from a Set-Top-Box, it to control the volume output by copyright protection systems and the picture will assure a more normal picture. VIDEO PB PB VIDEO AUDIO TO Hi-Fi MONO L Upgrade Card AUDIO R PR MONO MONO TV AS CENTER PR MONO OPTICAL OUT Digital Audio INPUT 1 INPUT 2 INPUT 3 INPUT 4 OUTPUT S-VIDEO V L R OUTPUT S-VIDEO V L R Laserdisc player, VCR, VCR #1 OPTICAL IN OUTPUT...
Owners Guide
Page 14
... (42) Audio Video OUTPUT VCR 14 BEFORE OPERATING EXTERNAL VIDEO SOURCE Connect an external source to the INPUT terminal, then press the INPUTS button to view the program from the INPUTS menu to show the INPUTS menu. NOTE: When the TV is set to CABLE signal when the Antenna Source is dependent on the back panel of video and audio inputs and outputs. INPUTS Input 4 Input 5 Cable / Air Input 1 Input 2 Move SEL Select CONNECTING A COMPOSITE VIDEO AND A MONAURAL AUDIO SOURCE TO INPUT1 - Connect the cable from the INPUTS menu to...
... (42) Audio Video OUTPUT VCR 14 BEFORE OPERATING EXTERNAL VIDEO SOURCE Connect an external source to the INPUT terminal, then press the INPUTS button to view the program from the INPUTS menu to show the INPUTS menu. NOTE: When the TV is set to CABLE signal when the Antenna Source is dependent on the back panel of video and audio inputs and outputs. INPUTS Input 4 Input 5 Cable / Air Input 1 Input 2 Move SEL Select CONNECTING A COMPOSITE VIDEO AND A MONAURAL AUDIO SOURCE TO INPUT1 - Connect the cable from the INPUTS menu to...

Owners Guide
Page 16
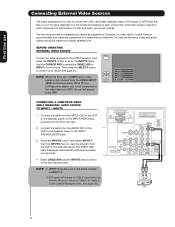
.... The HDMI input on the TV to -point connection for delivery of device user settings determines final video appearance. HDMI HDMI OUT DVD Player or HDTV STB DVI to rear panel jacks. Connect the HDMI or DVI to HDMI connection cable from the output of the HDTV set -up of uncompressed video to the last channel tuned. First time use Connecting External Video Sources CONNECTING A COMPONENT SOURCE WITH HDMI OR DVI CAPABILITY TO INPUT 1 1. Press the INPUTS button, then select INPUT 1 from the INPUTS menu to view the program from the INPUTS menu to...
.... The HDMI input on the TV to -point connection for delivery of device user settings determines final video appearance. HDMI HDMI OUT DVD Player or HDTV STB DVI to rear panel jacks. Connect the HDMI or DVI to HDMI connection cable from the output of the HDTV set -up of uncompressed video to the last channel tuned. First time use Connecting External Video Sources CONNECTING A COMPONENT SOURCE WITH HDMI OR DVI CAPABILITY TO INPUT 1 1. Press the INPUTS button, then select INPUT 1 from the INPUTS menu to view the program from the INPUTS menu to...

Owners Guide
Page 21
... TV-PG DLSV Day AUTO VIEW --:--AM --:--AM HD 1080i 16:9 Standard Input 3 Input 4 Input 5 Air / Cable Input 1 Move SEL Select INFO button display for a description. º MENU button The MENU button will start the On-Screen Display. ¾ GUIDE button [Cable Box (CBL), Satellite Receiver (SAT)/ Set-Top-Box (STB) mode only] The use of a channel before it is connected to INPUT 1 INFO 12:00PM S - How to Use the Remote to Control Your TV ² INPUTS button When the remote control is in TV mode, press this button...
... TV-PG DLSV Day AUTO VIEW --:--AM --:--AM HD 1080i 16:9 Standard Input 3 Input 4 Input 5 Air / Cable Input 1 Move SEL Select INFO button display for a description. º MENU button The MENU button will start the On-Screen Display. ¾ GUIDE button [Cable Box (CBL), Satellite Receiver (SAT)/ Set-Top-Box (STB) mode only] The use of a channel before it is connected to INPUT 1 INFO 12:00PM S - How to Use the Remote to Control Your TV ² INPUTS button When the remote control is in TV mode, press this button...
Owners Guide
Page 23
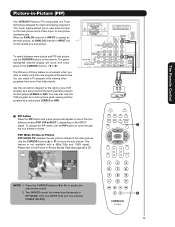
... -Picture Modes Table (see page 26 & 27). Use the connection diagram to the right to view VCR program as a sub-picture while viewing another program as a sub picture. Please refer to the Picture-in PIP MODE. Two INPUTS cannot be viewed as a sub-picture (CABLE or AIR). ³ PIP button Press the PIP button and a sub-picture will move the sub-picture. Audio Video OUTPUT VCR ³ · 23 The Remote Control The green highlighted channel display will appear in -Picture POP MODE PIP displays the...
... -Picture Modes Table (see page 26 & 27). Use the connection diagram to the right to view VCR program as a sub-picture while viewing another program as a sub picture. Please refer to the Picture-in PIP MODE. Two INPUTS cannot be viewed as a sub-picture (CABLE or AIR). ³ PIP button Press the PIP button and a sub-picture will move the sub-picture. Audio Video OUTPUT VCR ³ · 23 The Remote Control The green highlighted channel display will appear in -Picture POP MODE PIP displays the...
Owners Guide
Page 33
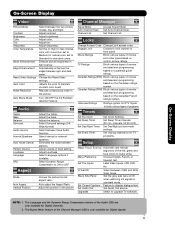
...picture mode settings. Upgrades Select to block various types of the red, green and blue colors to maintain constant color levels Reduces conspicuous noise in fixed setting. Adjust the bass. Locks Change Access Code Change Lock access code. Virtual HD Black Side Panel Set Closed Captions Set Audio Out Select between light and dark areas. Feature to lock channel or front panel. TV Ratings Block various types of the Audio OSD are only available for Digital signals. 33 On-Screen Display NOTE: 1. Adjust tint. Adjust sharpness. Set Auto Channel Scan. Menu...
...picture mode settings. Upgrades Select to block various types of the red, green and blue colors to maintain constant color levels Reduces conspicuous noise in fixed setting. Adjust the bass. Locks Change Access Code Change Lock access code. Virtual HD Black Side Panel Set Closed Captions Set Audio Out Select between light and dark areas. Feature to lock channel or front panel. TV Ratings Block various types of the Audio OSD are only available for Digital signals. 33 On-Screen Display NOTE: 1. Adjust tint. Adjust sharpness. Set Auto Channel Scan. Menu...
Owners Guide
Page 43
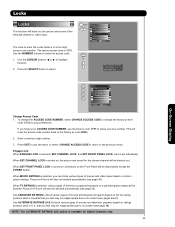
... factory preset code is a four digit access code number. Use the CURSOR buttons ̇ or ̈ to select. Press the SELECT button to highlight function. 2. MENU Video Audio Aspect Channel Manager Locks Timers Setup Move SEL Select OR Please Enter Access Code Access Code: - - - - [#Keys] Enter Code On-Screen Display 0 Locks Change Access Code 0 Engage Lock Movie Ratings 0 TV Ratings 0 Canadian Ratings(Eng) Canadian Ratings(Frn) Alternate Ratings U.S. Press EXIT to quit the menu or select CHANGE ACCESS CODE to return to enter the access code. 1. Pictur...
... factory preset code is a four digit access code number. Use the CURSOR buttons ̇ or ̈ to select. Press the SELECT button to highlight function. 2. MENU Video Audio Aspect Channel Manager Locks Timers Setup Move SEL Select OR Please Enter Access Code Access Code: - - - - [#Keys] Enter Code On-Screen Display 0 Locks Change Access Code 0 Engage Lock Movie Ratings 0 TV Ratings 0 Canadian Ratings(Eng) Canadian Ratings(Frn) Alternate Ratings U.S. Press EXIT to quit the menu or select CHANGE ACCESS CODE to return to enter the access code. 1. Pictur...
Owners Guide
Page 53
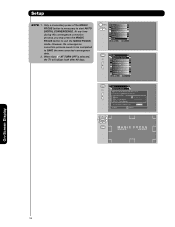
... MAGIC FOCUS button on control panel will not work when adjustment mode is called "convergence". >M>>A>G> I C F O Press the SELECT button or CURSOR button ̈ to be mixed. MENU Video Audio Aspect Channel Manager Locks Timers Setup Move SEL Select Setup Magic Focus Tune Up OR Menu Preference Set The Inputs Set Virtual HD Set Black Side Panel Set Closed Captions Set Audio Out Upgardes Move SEL Set On-Screen Display Magic Focus Tune Up Auto Digital Convergence Adjustment Please turn ON your TV up for the first time. 1. To produce these picture beams is set to MANUAL...
... MAGIC FOCUS button on control panel will not work when adjustment mode is called "convergence". >M>>A>G> I C F O Press the SELECT button or CURSOR button ̈ to be mixed. MENU Video Audio Aspect Channel Manager Locks Timers Setup Move SEL Select Setup Magic Focus Tune Up OR Menu Preference Set The Inputs Set Virtual HD Set Black Side Panel Set Closed Captions Set Audio Out Upgardes Move SEL Set On-Screen Display Magic Focus Tune Up Auto Digital Convergence Adjustment Please turn ON your TV up for the first time. 1. To produce these picture beams is set to MANUAL...
Owners Guide
Page 54
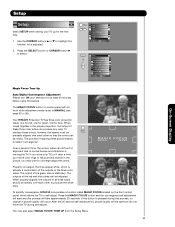
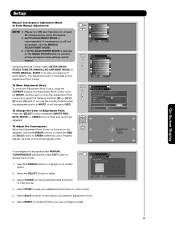
Adjustment Mode Auto At turn off 9 Point Manual after 90 days. Setup NOTE: 1. At any time during this convergence correction process, you want to adjust now start AUTO DIGITAL CONVERGENCE. MENU Video Audio Aspect Channel Manager Locks Timers Setup Move SEL Select Setup Magic Focus Tune Up OR Menu Preference Set The Inputs Set Virtual HD Set Black Side Panel Set Closed Captions Set Audio Out Upgardes Move SEL Set Setup Magic Focus Tune Up OR Aligns the Red, Green and Blue colors to SAVE the new corrected convergence data. 2. When Auto ■✔...
Adjustment Mode Auto At turn off 9 Point Manual after 90 days. Setup NOTE: 1. At any time during this convergence correction process, you want to adjust now start AUTO DIGITAL CONVERGENCE. MENU Video Audio Aspect Channel Manager Locks Timers Setup Move SEL Select Setup Magic Focus Tune Up OR Menu Preference Set The Inputs Set Virtual HD Set Black Side Panel Set Closed Captions Set Audio Out Upgardes Move SEL Set Setup Magic Focus Tune Up OR Aligns the Red, Green and Blue colors to SAVE the new corrected convergence data. 2. When Auto ■✔...
Owners Guide
Page 55
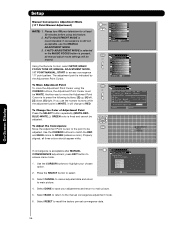
... must be adjusted. MENU Video Audio Aspect Channel Manager Locks Timers Setup Move SEL Select Setup Magic Focus Tune Up OR Menu Preference Set The Inputs Set Virtual HD Set Black Side Panel Set Closed Captions Set Audio Out Upgrades Move SEL Set Setup Magic Focus Tune Up OR Aligns the Red, Green and Blue colors to the manual convergence adjustment mode. 6. Use the CURSOR buttons to RED. To Change the Color of Adjustment Point Press the SELECT button repeatedly (WHITE-REDBLUE-WHITE...). Setup Manual Convergence Adjustment Mode (9 Point Manual Adjustment) NOTE...
... must be adjusted. MENU Video Audio Aspect Channel Manager Locks Timers Setup Move SEL Select Setup Magic Focus Tune Up OR Menu Preference Set The Inputs Set Virtual HD Set Black Side Panel Set Closed Captions Set Audio Out Upgrades Move SEL Set Setup Magic Focus Tune Up OR Aligns the Red, Green and Blue colors to the manual convergence adjustment mode. 6. Use the CURSOR buttons to RED. To Change the Color of Adjustment Point Press the SELECT button repeatedly (WHITE-REDBLUE-WHITE...). Setup Manual Convergence Adjustment Mode (9 Point Manual Adjustment) NOTE...
Owners Guide
Page 56
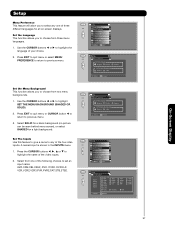
... Manual If you use the MANUAL ADJUSTMENT MODE. 3. MENU Video Audio Aspect Channel Manager Locks Timers Setup Move SEL Select Setup Magic Focus Tune Up OR Menu Preference Set The Inputs Set Virtual HD Set Black Side Panel Set Closed Captions Set Audio Out Upgrades Move SEL Set Setup Magic Focus Tune Up OR Aligns the Red, Green and Blue colors to be erased. If you want to adjust now start Move SEL Return Adjustment Point Cursor If convergence is pressed, all three colors should appear white. To Change the Color of Adjustment...
... Manual If you use the MANUAL ADJUSTMENT MODE. 3. MENU Video Audio Aspect Channel Manager Locks Timers Setup Move SEL Select Setup Magic Focus Tune Up OR Menu Preference Set The Inputs Set Virtual HD Set Black Side Panel Set Closed Captions Set Audio Out Upgrades Move SEL Set Setup Magic Focus Tune Up OR Aligns the Red, Green and Blue colors to be erased. If you want to adjust now start Move SEL Return Adjustment Point Cursor If convergence is pressed, all three colors should appear white. To Change the Color of Adjustment...
Owners Guide
Page 57
... Set The Menu Background Shaded Solid Move SEL R eturn Setup Magic Focus Tune Up OR Menu Preference Set The Inputs Set Virtual HD Set Black Side Panel Set Closed Captions Set Audio Out Upgrades Move SEL Set Setup OR Set The Inputs Rename List Input1 Input2 Input3 Input4 Input5 AVR CAM CBL CBL2 Reset Auto Link DVD DVD2 DVD3 LD PVR PVR2 SAT STB STB2 VCR VCR2 VCR3 Auto Remote Off Move SEL Return On-Screen Display 57 Set The Inputs Use...
... Set The Menu Background Shaded Solid Move SEL R eturn Setup Magic Focus Tune Up OR Menu Preference Set The Inputs Set Virtual HD Set Black Side Panel Set Closed Captions Set Audio Out Upgrades Move SEL Set Setup OR Set The Inputs Rename List Input1 Input2 Input3 Input4 Input5 AVR CAM CBL CBL2 Reset Auto Link DVD DVD2 DVD3 LD PVR PVR2 SAT STB STB2 VCR VCR2 VCR3 Auto Remote Off Move SEL Return On-Screen Display 57 Set The Inputs Use...
Owners Guide
Page 60
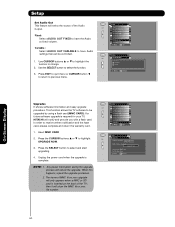
... Return On-Screen Display 60 Unplug the power cord when the upgrade is required for your TV, HITACHI will notify and provide you with a flash card. Variable : Select AUDIO OUT VARIABL E to have Audio settings that can be upgraded by using a flash card (MMC CARD). When this happens, repeat the upgrade procedure. 2. NOTE: 1. Setup Magic Focus Tune Up OR Menu Preference Set The Inputs Set Virtual HD Set Black Side Panel Set Closed Captions Set Audio Out Upgrades Move SEL Set Setup Set Audio Out OR Audio Out...
... Return On-Screen Display 60 Unplug the power cord when the upgrade is required for your TV, HITACHI will notify and provide you with a flash card. Variable : Select AUDIO OUT VARIABL E to have Audio settings that can be upgraded by using a flash card (MMC CARD). When this happens, repeat the upgrade procedure. 2. NOTE: 1. Setup Magic Focus Tune Up OR Menu Preference Set The Inputs Set Virtual HD Set Black Side Panel Set Closed Captions Set Audio Out Upgrades Move SEL Set Setup Set Audio Out OR Audio Out...
Owners Guide
Page 71
... THAT MAY ACCOMPANY SUCH UPGRADE, (A) DO NOT USE ANY HITACHI-PROVIDED FLASH CARD OR OTHER MEDIA, (B) DO NOT PERFORM INSTALL ANY HITACHI-PROVIDED UPGRADE SOFTWARE ON YOUR DTV, AND (C) PROMPTLY RETURN SUCH FLASH CARD OR OTHER MEDIA TO HITACHI. 5. NO FAILURE OF ESSENTIAL PURPOSE. CRYPTOGRAPHIC SOFTWARE. LICENSE GRANT. You may release or make available. The Software is accessible through use of the Software in your export privileges...
... THAT MAY ACCOMPANY SUCH UPGRADE, (A) DO NOT USE ANY HITACHI-PROVIDED FLASH CARD OR OTHER MEDIA, (B) DO NOT PERFORM INSTALL ANY HITACHI-PROVIDED UPGRADE SOFTWARE ON YOUR DTV, AND (C) PROMPTLY RETURN SUCH FLASH CARD OR OTHER MEDIA TO HITACHI. 5. NO FAILURE OF ESSENTIAL PURPOSE. CRYPTOGRAPHIC SOFTWARE. LICENSE GRANT. You may release or make available. The Software is accessible through use of the Software in your export privileges...


