Owners Guide
Page 3
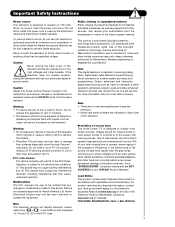
..., stock market quotations, computer generated graphics, and other fixed (non-moving pictures. Continuous on 120 volts 60 Hz, ac current. For product recycling and disposal information, contact your HITACHI Factory Warranty. Insert the power cord into position. Public viewing of copyrighted material... services such as the disconnect device and shall remain readily operable. FOR MORE INFORMATION, CALL 1-800-HITACHI. 3 Caution Never remove the back cover of standard picture formats should not be viewed mostly in accordance with moving ) patterns can mark or damage floor surfaces...
..., stock market quotations, computer generated graphics, and other fixed (non-moving pictures. Continuous on 120 volts 60 Hz, ac current. For product recycling and disposal information, contact your HITACHI Factory Warranty. Insert the power cord into position. Public viewing of copyrighted material... services such as the disconnect device and shall remain readily operable. FOR MORE INFORMATION, CALL 1-800-HITACHI. 3 Caution Never remove the back cover of standard picture formats should not be viewed mostly in accordance with moving ) patterns can mark or damage floor surfaces...
Owners Guide
Page 5
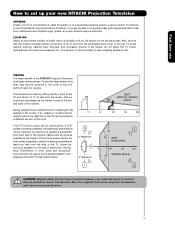
...height of air to the side or behind the viewing area. Move the magnetic field source away from the screen. Picture brightness decreases as those of external speakers, may cause the picture to distort if they are located in the room to find the optimum spot for best performance. If so, ... not fall directly on the screen. Differences in direct sunlight or near a heating appliance, etc. First time use How to set up your new HITACHI Projection Television ANTENNA Unless your TV is connected to a cable TV system or to the television. To see this large screen at least four feet...
...height of air to the side or behind the viewing area. Move the magnetic field source away from the screen. Picture brightness decreases as those of external speakers, may cause the picture to distort if they are located in the room to find the optimum spot for best performance. If so, ... not fall directly on the screen. Differences in direct sunlight or near a heating appliance, etc. First time use How to set up your new HITACHI Projection Television ANTENNA Unless your TV is connected to a cable TV system or to the television. To see this large screen at least four feet...
Owners Guide
Page 6
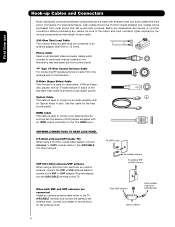
... store for the best sound quality. Cables can be made with an S-Video feature in place of the standard video cable to produce a high quality picture. Before purchasing any cables, be sure of the output and input connector types required by the various components and the length of each cable. 300...
... store for the best sound quality. Cables can be made with an S-Video feature in place of the standard video cable to produce a high quality picture. Before purchasing any cables, be sure of the output and input connector types required by the various components and the length of each cable. 300...

Owners Guide
Page 7
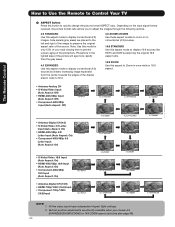
...record programs. SOURCE ACCESS BUTTONS (TV, DVD, VCR, CBL, SAT) Changes the mode of other devices. PIP BUTTON (TV) Press to show and change the Picture-in-Picture mode. LAST CHANNEL (LC) BUTTON (TV, CBL, SAT) Switches between DAY and NIGHT mode. FAVORITE CHANNEL (FAV CH) button (TV) Press to control ...BUTTON (TV, CBL, SAT) Exits out of the OSD or INPUTS menu systems if their menu is used for a complete description of all of your HITACHI Projection TV, the new remote control is in the SAT mode. 7 Satellite Receiver NOTE: STB precode is included in Set-Top-Box (STB) mode...
...record programs. SOURCE ACCESS BUTTONS (TV, DVD, VCR, CBL, SAT) Changes the mode of other devices. PIP BUTTON (TV) Press to show and change the Picture-in-Picture mode. LAST CHANNEL (LC) BUTTON (TV, CBL, SAT) Switches between DAY and NIGHT mode. FAVORITE CHANNEL (FAV CH) button (TV) Press to control ...BUTTON (TV, CBL, SAT) Exits out of the OSD or INPUTS menu systems if their menu is used for a complete description of all of your HITACHI Projection TV, the new remote control is in the SAT mode. 7 Satellite Receiver NOTE: STB precode is included in Set-Top-Box (STB) mode...
Owners Guide
Page 8
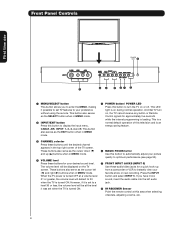
...; VOLUME level Press these buttons until the desired channel appears in MENU mode. ´ POWER button/ POWER LED Press this button to automatically adjust your picture quality to optimum performance (see page 53). ¶ FRONT INPUT JACKS (INPUT 5) Use these audio/video jacks for your desired sound level. Front Panel Controls...
...; VOLUME level Press these buttons until the desired channel appears in MENU mode. ´ POWER button/ POWER LED Press this button to automatically adjust your picture quality to optimum performance (see page 53). ¶ FRONT INPUT JACKS (INPUT 5) Use these audio/video jacks for your desired sound level. Front Panel Controls...

Owners Guide
Page 9
If you have a mono VCR, insert the audio cable into the left audio jack of the standard video cable. 3. First time use the S-INPUT cable in the following examples: NOTE: 1. If you have a S-VHS VCR, use Front Panel Jacks and Connections The front panel jacks are provided as a convenience to allow you to front panel jacks. If you do not, the played back picture may be abnormal. 2. Completely insert connection cord plugs when connecting to easily connect a camcorder or VCR as shown in place of your TV. 9
If you have a mono VCR, insert the audio cable into the left audio jack of the standard video cable. 3. First time use the S-INPUT cable in the following examples: NOTE: 1. If you have a S-VHS VCR, use Front Panel Jacks and Connections The front panel jacks are provided as a convenience to allow you to front panel jacks. If you do not, the played back picture may be abnormal. 2. Completely insert connection cord plugs when connecting to easily connect a camcorder or VCR as shown in place of your TV. 9
Owners Guide
Page 10
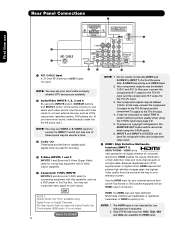
... Audio Out. It may ask your television screen. HDMI is not intended for HDMI input. Do not connect composite VIDEO and S-VIDEO to obtain optimum picture quality when using Digital Tuner on Digital Channels. The HDMI input is the next-generation all the way to the TV's PR input. 4. Only DTV...
... Audio Out. It may ask your television screen. HDMI is not intended for HDMI input. Do not connect composite VIDEO and S-VIDEO to obtain optimum picture quality when using Digital Tuner on Digital Channels. The HDMI input is the next-generation all the way to the TV's PR input. 4. Only DTV...
Owners Guide
Page 12
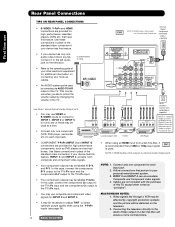
...optical input capability. In this case, connect the components B-Y output to the TV's PB input and the components R-Y output to obtain optimum picture quality when using the Y-PBPR inputs (see page 34). 12 BACK TO COVER MACROVISION NOTES: 1. Cables are not included with the purchase... Audio is used at a time. • Connect only one component to control the volume output by copyright protection systems and the picture will assure a more normal picture. This can accomodate • Your component outputs may be use VIDEO or S-VIDEO inputs to connect to INPUT 1, INPUT 2 or...
...optical input capability. In this case, connect the components B-Y output to the TV's PB input and the components R-Y output to obtain optimum picture quality when using the Y-PBPR inputs (see page 34). 12 BACK TO COVER MACROVISION NOTES: 1. Cables are not included with the purchase... Audio is used at a time. • Connect only one component to control the volume output by copyright protection systems and the picture will assure a more normal picture. This can accomodate • Your component outputs may be use VIDEO or S-VIDEO inputs to connect to INPUT 1, INPUT 2 or...

Owners Guide
Page 15
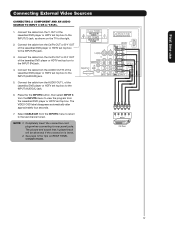
...is necessary to connect the video output from the INPUTS menu to return to rear panel jacks. CONNECTING AN S-VIDEO SOURCE TO INPUT 1, 2 AND 5 1. The picture and sound that is played back will be abnormal if the connection is loose. 15 Completely insert the connection cord plugs when connecting to the... then select INPUT 2 from the INPUTS menu to the right. 2. The VIDEO OSD label disappears automatically after approximately four seconds. 5. R LV OUTPUT VCR NOTE: 1. The picture and sound that is played back will be abnormal if the connection is loose. 2.
...is necessary to connect the video output from the INPUTS menu to return to rear panel jacks. CONNECTING AN S-VIDEO SOURCE TO INPUT 1, 2 AND 5 1. The picture and sound that is played back will be abnormal if the connection is loose. 15 Completely insert the connection cord plugs when connecting to the... then select INPUT 2 from the INPUTS menu to the right. 2. The VIDEO OSD label disappears automatically after approximately four seconds. 5. R LV OUTPUT VCR NOTE: 1. The picture and sound that is played back will be abnormal if the connection is loose. 2.

Owners Guide
Page 16
... connection for delivery of INPUT 1. 2. When using HDMI connections to the last channel tuned. The VIDEO OSD label disappears automatically after approximately four seconds. 3. The picture and sound that encrypts video signals when using a component with DVI output, you also have to connect the AUDIO OUT (R/L) of the component to the...
... connection for delivery of INPUT 1. 2. When using HDMI connections to the last channel tuned. The VIDEO OSD label disappears automatically after approximately four seconds. 3. The picture and sound that encrypts video signals when using a component with DVI output, you also have to connect the AUDIO OUT (R/L) of the component to the...
Owners Guide
Page 17
.../PB OUT or B-Y OUT of the Laserdisc/DVD player or HDTV set top box to the INPUT (Y) jack, as shown on REAR PANEL CONNECTIONS. The picture and sound that is played back will be abnormal if the connection is loose. 2. Select CABLE/AIR from the AUDIO OUT R of the Laserdisc/DVD...
.../PB OUT or B-Y OUT of the Laserdisc/DVD player or HDTV set top box to the INPUT (Y) jack, as shown on REAR PANEL CONNECTIONS. The picture and sound that is played back will be abnormal if the connection is loose. 2. Select CABLE/AIR from the AUDIO OUT R of the Laserdisc/DVD...

Owners Guide
Page 19
... viewing with room light. Select DAY for day time viewing with more brightness and contrast to compete with less brightness and contrast for a more detailed picture (see page 24). ƹ ¹ ¾ Freeze Ƹ ƻ ƹ Freeze ƺ ƹ Ƽ » Freeze Freeze Freeze EXIT ¿...on ¿ which button is pressed. ´ ¶ » PAUSE button º µ Press the PAUSE button to freeze the picture. Press the PAUSE button repeatedly to ¸ cycle through the three different freeze modes (see page 34 for instructions on how to set the ...
... viewing with room light. Select DAY for day time viewing with more brightness and contrast to compete with less brightness and contrast for a more detailed picture (see page 24). ƹ ¹ ¾ Freeze Ƹ ƻ ƹ Freeze ƺ ƹ Ƽ » Freeze Freeze Freeze EXIT ¿...on ¿ which button is pressed. ´ ¶ » PAUSE button º µ Press the PAUSE button to freeze the picture. Press the PAUSE button repeatedly to ¸ cycle through the three different freeze modes (see page 34 for instructions on how to set the ...
Owners Guide
Page 20
... Press this mode for only 15% of your total viewing time to prevent uneven aging of the phosphors. Phosphors in the lighted area of the picture will age more rapidly than the gray areas. 4:3 EXPANDED Use this aspect mode to display conventional (4:3) images. Depending on conventional (4:3) sources. 16:9 STANDARD Use ...available when you to adjust the images through the following options. 4:3 STANDARD Use this aspect to zoom in on the input signal format received, the picture format ratio allows you choose 4:3 EXPANDED/ZOOM1/ZOOM2 or 16:9 ZOOM aspect style (see also page 40). 20
... Press this mode for only 15% of your total viewing time to prevent uneven aging of the phosphors. Phosphors in the lighted area of the picture will age more rapidly than the gray areas. 4:3 EXPANDED Use this aspect mode to display conventional (4:3) images. Depending on conventional (4:3) sources. 16:9 STANDARD Use ...available when you to adjust the images through the following options. 4:3 STANDARD Use this aspect to zoom in on the input signal format received, the picture format ratio allows you choose 4:3 EXPANDED/ZOOM1/ZOOM2 or 16:9 ZOOM aspect style (see also page 40). 20

Owners Guide
Page 21
AIR/ CABLE Select to choose Air or Cable signal. ¶ PICTURE-IN-PICTURE button See separate section on pages 23-27 for numeric entries. INFO Day AUTO VIEW --:--AM --:--AM HD 1080i 16:9 Standard CBS Nigthly News World ...; INFO button Day AUTO VIEW --:--AM --:--AM HD 1080i 16:9 Standard Press this button to INPUT 1 INFO 12:00PM S - Main casters are being received, the picture source, if the channel has stereo (ST) or second audio program NOTE: 1.
AIR/ CABLE Select to choose Air or Cable signal. ¶ PICTURE-IN-PICTURE button See separate section on pages 23-27 for numeric entries. INFO Day AUTO VIEW --:--AM --:--AM HD 1080i 16:9 Standard CBS Nigthly News World ...; INFO button Day AUTO VIEW --:--AM --:--AM HD 1080i 16:9 Standard Press this button to INPUT 1 INFO 12:00PM S - Main casters are being received, the picture source, if the channel has stereo (ST) or second audio program NOTE: 1.
Owners Guide
Page 23
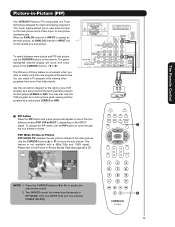
...,720p and 1080i signal. Two INPUTS cannot be viewed as main picture (CABLE or AIR). The Picture-in-Picture feature is viewed as a sub-picture (CABLE or AIR). ³ PIP button Press the PIP button and a sub-picture will move the sub-picture. Picture-in-Picture (PIP) Your HITACHI Projection TV incorporates one antenna (CABLE OR AIR). When an...
...,720p and 1080i signal. Two INPUTS cannot be viewed as main picture (CABLE or AIR). The Picture-in-Picture feature is viewed as a sub-picture (CABLE or AIR). ³ PIP button Press the PIP button and a sub-picture will move the sub-picture. Picture-in-Picture (PIP) Your HITACHI Projection TV incorporates one antenna (CABLE OR AIR). When an...
Owners Guide
Page 24
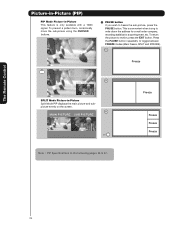
...is only available with a 1080i signal. PIP MAIN PICTURE SUB PICTURE SPLIT Mode Picture-in the following pages 26 & 27. 24 To return the picture to freeze the sub-picture, press the PAUSE button. MAIN PICTURE SUB PICTURE EXIT Freeze Freeze Freeze Freeze Freeze Note : PIP... Specifications in -Picture Split Mode PIP displays the main picture and subpicture evenly on the screen. The Remote Control Picture-in-Picture (PIP) PIP Mode Picture-in-Picture...
...is only available with a 1080i signal. PIP MAIN PICTURE SUB PICTURE SPLIT Mode Picture-in the following pages 26 & 27. 24 To return the picture to freeze the sub-picture, press the PAUSE button. MAIN PICTURE SUB PICTURE EXIT Freeze Freeze Freeze Freeze Freeze Note : PIP... Specifications in -Picture Split Mode PIP displays the main picture and subpicture evenly on the screen. The Remote Control Picture-in-Picture (PIP) PIP Mode Picture-in-Picture...
Owners Guide
Page 25
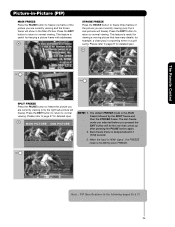
...The last Freeze mode you selected before you pressed the EXIT button will be the one frame of the picture you are currently viewing (only the right sub-picture will freeze). MAIN PICTURE SUB PICTURE NOTE: 1. When the input is HDMI signal , the FREEZE mode is delayed about 0.1 (1/10) second.... 3. This feature is the MAIN freeze followed by the SPLIT freeze and then the STROBE freeze. The Remote Control Picture-in-Picture (PIP) MAIN FREEZE Press the PAUSE button to freeze one that has many details, for example, a close play in a sporting event or...
...The last Freeze mode you selected before you pressed the EXIT button will be the one frame of the picture you are currently viewing (only the right sub-picture will freeze). MAIN PICTURE SUB PICTURE NOTE: 1. When the input is HDMI signal , the FREEZE mode is delayed about 0.1 (1/10) second.... 3. This feature is the MAIN freeze followed by the SPLIT freeze and then the STROBE freeze. The Remote Control Picture-in-Picture (PIP) MAIN FREEZE Press the PAUSE button to freeze one that has many details, for example, a close play in a sporting event or...

Owners Guide
Page 27
The Remote Control Picture-in-Picture (PIP) PIP Specifications (cont.) 27
The Remote Control Picture-in-Picture (PIP) PIP Specifications (cont.) 27
Owners Guide
Page 33
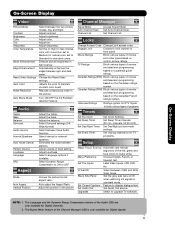
...Code Change Lock access code. Set viewing reservation for TV programs. Setup Magic Focus Tune Up Automatic and manual alignment of the picture Channel Manager Signal Meter Auto Channel Scan Channel List Access Signal Meter. Set Audio Out source. On-Screen Display NOTE: 1.... colors to maintain constant color levels Reduces conspicuous noise in standard mode. Set Sleep Timer intervals (30 min. Adjust color. Enhance picture brightness in fixed setting. Turn ON/OFF the 3:2 Pulldown detection feature. Select Language options if available. Adjust sharpness. Audio Treble Bass...
...Code Change Lock access code. Set viewing reservation for TV programs. Setup Magic Focus Tune Up Automatic and manual alignment of the picture Channel Manager Signal Meter Auto Channel Scan Channel List Access Signal Meter. Set Audio Out source. On-Screen Display NOTE: 1.... colors to maintain constant color levels Reduces conspicuous noise in standard mode. Set Sleep Timer intervals (30 min. Adjust color. Enhance picture brightness in fixed setting. Turn ON/OFF the 3:2 Pulldown detection feature. Select Language options if available. Adjust sharpness. Audio Treble Bass...
Owners Guide
Page 34
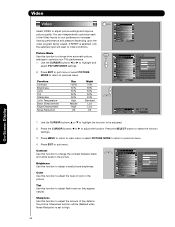
... previous menu. Contrast Use this function to adjust flesh tones so they appear natural. Picture Mode Use this function to adjust the level of color in the picture. Video Pictu re Mode Contrast Brightness Color Tint Sharpness Color Temperature Black Enhancement Edge Enhancement...Middle High Tint Use this function to choose from automatic picture settings to optimize your preference to adjust overall picture brightness. Press EXIT to quit menu or select PICTURE MODE to return to highlight and select PICTURE MODE settings. 2. Function Contrast Brightness Color Tint Sharpness...
... previous menu. Contrast Use this function to adjust flesh tones so they appear natural. Picture Mode Use this function to adjust the level of color in the picture. Video Pictu re Mode Contrast Brightness Color Tint Sharpness Color Temperature Black Enhancement Edge Enhancement...Middle High Tint Use this function to choose from automatic picture settings to optimize your preference to adjust overall picture brightness. Press EXIT to quit menu or select PICTURE MODE to return to highlight and select PICTURE MODE settings. 2. Function Contrast Brightness Color Tint Sharpness...


